| Author |
 Topic Search Topic Search  Topic Options Topic Options
|
Alvin M 
Orange Level

Joined: 24 Jun 2018
Location: PA
Points: 728
|
 Post Options Post Options
") Thanks(0) Thanks(0)
 Quote Quote  Reply Reply
 Posted: 21 Feb 2024 at 10:01am Posted: 21 Feb 2024 at 10:01am |
|
Autolite 405 is the right plug if it had short plugs in it clean the holes
|
 |
|
Sponsored Links
|
|
|
ElementalEarth
Bronze Level


Joined: 05 Oct 2023
Location: Canada
Points: 111
|
Post Options
Thanks(0)
Quote Reply
Posted: 21 Feb 2024 at 10:17am |
 Ok, so assume the reach of the previous plugs was short, doing some research into them. And the new ones have a longer reach. Can I buy a tool like shown above and just clean out the spark plug holes? Please tell me I don't need to pull the head and everything to do this sort of job?
|
|
Alberta Phil
Orange Level

Joined: 13 Sep 2009
Location: Alberta, Canada
Points: 3651
|
Post Options
Thanks(0)
Quote Reply
Posted: 21 Feb 2024 at 11:09am |
The plug you want has a threaded portion about 3/4 in. long. I've modified an old spark plug with the long threaded section by grinding three or four grooves down the threaded length an used it like a tap to clean the carbon buildup out of the threads. Or you could buy a tap as pictured.
No, you shouldn't need to pull the head.
|
|
DrAllis
Orange Level Access
Joined: 12 Sep 2009
Points: 19507
|
Post Options
Thanks(0)
Quote Reply
Posted: 21 Feb 2024 at 12:39pm |
|
But, a 170 cylinder head uses 3/4" LONG spark plugs( not 3/8") of a proper heat range.
|
|
ElementalEarth
Bronze Level
Joined: 05 Oct 2023
Location: Canada
Points: 111
|
Post Options
Thanks(0)
Quote Reply
Posted: 21 Feb 2024 at 2:08pm |
 DrAllis wrote: DrAllis wrote:
But, a 170 cylinder head uses 3/4" LONG spark plugs( not 3/8") of a proper heat range. |
I'm glad you guys caught this, it makes sense now why the new plugs didn't want to thread in. The lower portion of the spark plug well seems caked up with deposits.
I'll have to go and purchase a thread chaser to clean it out as best as I can.
What I don't understand is why would anyone want to put the wrong plugs in an engine?
I'm undoing what looks like years of neglect and abuse, it's pretty sad. We've only been the owners of this tractor for a few years.
Is there any further damage done by running the wrong plugs ?
I laid them side by side to fully understand the significance of what you were telling me, I had no idea you could even run an engine with the wrong plugs!
|
|
Les Kerf
Orange Level
Joined: 08 May 2020
Location: Idaho
Points: 605
|
Post Options
Thanks(0)
Quote Reply
Posted: 21 Feb 2024 at 3:12pm |
ElementalEarth wrote:
Is there any further damage done by running the wrong plugs ? |
Probably not. With the spark gap hidden up inside the spark plug chamber it might make it more difficult to start the engine.
|
|
DrAllis
Orange Level Access
Joined: 12 Sep 2009
Points: 19507
|
Post Options
Thanks(0)
Quote Reply
Posted: 21 Feb 2024 at 3:59pm |
|
R-43-T plugs don't even have a GASKET on them !!! They are a tapered seat sealing type plug !!! which damages the threads in the cylinder head.
|
|
ElementalEarth
Bronze Level
Joined: 05 Oct 2023
Location: Canada
Points: 111
|
Post Options
Thanks(0)
Quote Reply
Posted: 21 Feb 2024 at 4:34pm |
DrAllis wrote:
R-43-T plugs don't even have a GASKET on them !!! They are a tapered seat sealing type plug !!! which damages the threads in the cylinder head. |
Oh dear that sounds not so great Dr. Do you have a tractor penicilin for that? Good god man, 😳 So a thread chaser won't work anymore either?
|
|
steve(ill)
Orange Level Access

Joined: 11 Sep 2009
Location: illinois
Points: 77715
|
Post Options
Thanks(0)
Quote Reply
Posted: 21 Feb 2024 at 5:34pm |
|
yes... your thread chaser or tap should clean up everything... The plugs screwed OUT, so you should be able to get the chaser back in.. OK.
|
|
Like them all, but love the "B"s.
|
|
ElementalEarth
Bronze Level
Joined: 05 Oct 2023
Location: Canada
Points: 111
|
Post Options
Thanks(0)
Quote Reply
Posted: 21 Feb 2024 at 5:43pm |
steve(ill) wrote:
yes... your thread chaser or tap should clean up everything... The plugs screwed OUT, so you should be able to get the chaser back in.. OK. |
Okay, pfew, that's a huge relief. I'll give that a try!
|
|
DrAllis
Orange Level Access
Joined: 12 Sep 2009
Points: 19507
|
Post Options
Thanks(0)
Quote Reply
Posted: 21 Feb 2024 at 5:43pm |
|
A couple of drops of motor oil on spark plug and chaser threads would be a very good idea.
|
|
Les Kerf
Orange Level
Joined: 08 May 2020
Location: Idaho
Points: 605
|
Post Options
Thanks(0)
Quote Reply
Posted: 21 Feb 2024 at 5:47pm |
steve(ill) wrote:
yes... your thread chaser or tap should clean up everything... The plugs screwed OUT, so you should be able to get the chaser back in.. OK. |
Yup. Put some grease on the tap to catch the carbon gunk, don't try to go all the way in with one pass; back it out and clean the tap, then go a little further each time. You will get a feel for it.
|
|
ElementalEarth
Bronze Level
Joined: 05 Oct 2023
Location: Canada
Points: 111
|
Post Options
Thanks(0)
Quote Reply
Posted: 21 Feb 2024 at 9:38pm |
|
Got the chaser, did 2 holes before the kids went to bed, worked awesome. Was able to properly install the new plugs, their gasket flush to the block.
Used vaseline in the chaser slits, worked wonders and turned the carbon into a paste.
Tomorrow I'm doing the other 2 holes. I'm relieved this worked out with ease.
Hopefully this will usher in a new era of easier starting and better combustion.
Thanks everyone for pitching in on the advice! Saved the engine I'm sure of that.
|
|
Lynn Marshall
Orange Level Access

Joined: 13 Sep 2009
Location: Dana, Iowa
Points: 2147
|
Post Options
Thanks(0)
Quote Reply
Posted: 21 Feb 2024 at 11:10pm |
|
You might want to spin the engine over a few times without the plugs in it to blow out any more debris.
|
|
Les Kerf
Orange Level
Joined: 08 May 2020
Location: Idaho
Points: 605
|
Post Options
Thanks(0)
Quote Reply
Posted: 22 Feb 2024 at 9:57am |
DrAllis wrote:
R-43-T plugs don't even have a GASKET on them !!! They are a tapered seat sealing type plug !!! which damages the threads in the cylinder head. |
Good catch! I didn't look at the photo very carefully; apparently the culprit did not care enough to look closely either.
|
|
ElementalEarth
Bronze Level
Joined: 05 Oct 2023
Location: Canada
Points: 111
|
Post Options
Thanks(0)
Quote Reply
Posted: 22 Feb 2024 at 6:09pm |
Well well well, another day another story, I finished cleaning the old crud out left by the engine in the spark plug threads. The thread chaser took care of that super easily. I installed the new plugs, the autolite 405 and turned my new ignition key... She started right away!! Couldn't even believe it. I guess all or most of the starting issues were related to being the wrong plugs in there. Having breathed some exhaust fumes while making a video, she stalled as she ran out of gas, what a treat.. So I put some more fuel in and she started again, first try! It's starting to look better every day to be honest, it still needs work, I'm getting some replacement gauges on Monday and I'll need to wire those up along with some new headlights as half of the bulbs are busted and the wiring is shot as well. There are other things to take care of aswell, need to replace air filter, battery, hydraulic fluid, hydraulic filter, transmission fluid and final drive oil.. and that's literally just the basic stuff, nothing fancy. My air filter assembly is missing the cup that slides over the end, not sure how big of a deal that is. The good news is, she runs and pretty well too! Here's a video https://youtu.be/Md8bba99bYU?si=ISXLghj-g0OYdYtQ
|
|
DrAllis
Orange Level Access
Joined: 12 Sep 2009
Points: 19507
|
Post Options
Thanks(0)
Quote Reply
Posted: 23 Feb 2024 at 6:01am |
|
Like to hear it again cracking the throttle. Sounds like miss-firing to me what I can hear.
|
|
ElementalEarth
Bronze Level
Joined: 05 Oct 2023
Location: Canada
Points: 111
|
Post Options
Thanks(0)
Quote Reply
Posted: 23 Feb 2024 at 9:33am |
DrAllis wrote:
Like to hear it again cracking the throttle. Sounds like miss-firing to me what I can hear. |
You may be right, I had no idea due to my lack of experience, but listening to some videos from other engines, it does sound like it could be misfiring.
There are flames coming out of the exhaust sometimes and the manifold looks "wet" where the carburetor bolts on to it, not sure what to think of that.
How to resolve this issue, just reading a bit on these forums it sounds like it could be carburetor related, timing, or even valves/something more internal.
I have the carburetor set out at 1 turn outward on the idle screw up top of the carb and the lower main jet screw at 2 turns outward, following a zenith carb rebuild video.
No clue about timing or what to even look for. Again, most of this stuff is all new to me, my experience comes from getting old lawnmowers running again, this is somewhat different.
I can make another video yes, with the throttle open all the way.
|
|
Alvin M
Orange Level
Joined: 24 Jun 2018
Location: PA
Points: 728
|
Post Options
Thanks(0)
Quote Reply
Posted: 23 Feb 2024 at 9:38am |
|
Check firing order 1243
|
|
WF owner
Orange Level
Joined: 12 May 2013
Location: Bombay NY
Points: 4388
|
Post Options
Thanks(0)
Quote Reply
Posted: 23 Feb 2024 at 11:31am |
|
Part of the fun (and frustration) of playing with these old tractors is learning things about them. There are a lot of guys on here, with a lot of experience, that fortunately, are willing to share with the rest of us.
|
|
DrAllis
Orange Level Access
Joined: 12 Sep 2009
Points: 19507
|
Post Options
Thanks(0)
Quote Reply
Posted: 23 Feb 2024 at 12:03pm |
|
1 -2- 4- 3 would be a great place to start !!!!
|
|
ElementalEarth
Bronze Level
Joined: 05 Oct 2023
Location: Canada
Points: 111
|
Post Options
Thanks(0)
Quote Reply
Posted: 23 Feb 2024 at 1:08pm |
|
I can confirm, the right firing order is set. I looked at when the distributor rotor passed #1 cylinder when air blew out the spark plug hole and plugged wires in clockwise after that.
Unfortunately I couldnt get her started back up, the battery is pretty weak and needs constant charging, especially because I left it out in the cold with -15°c overnight.
Will try again later or tomorrow. I've had better luck with a warm and charged battery.
Are my carb adjustments set ok? Idle screw is at 1 turn out, main jet screw 2 turns out.
I did notice the exhaust manifold has a gap where it meets the block up top.
I could see sparks escaping from there yesterday.
Edited by ElementalEarth - 23 Feb 2024 at 1:10pm
|
|
WF owner
Orange Level
Joined: 12 May 2013
Location: Bombay NY
Points: 4388
|
Post Options
Thanks(0)
Quote Reply
Posted: 23 Feb 2024 at 4:32pm |
I always start carb adjustments at 1 1/2 turn on each. You are definitely in the ballpark!
A weak battery is very tough on a starter. Starting with a booster/charger is, too. You should get a good battery ASAP.
If you run it very long with a leak between the head and exhaust manifold, it will eventually pit the head. At the very least, you should remove the manifold and try to true it back to as flat as possible and install new manifold gaskets. They need to be retorqued after every heat cycle, until they quit turning.
Edited by WF owner - 23 Feb 2024 at 4:37pm
|
|
ElementalEarth
Bronze Level
Joined: 05 Oct 2023
Location: Canada
Points: 111
|
Post Options
Thanks(0)
Quote Reply
Posted: 23 Feb 2024 at 6:19pm |
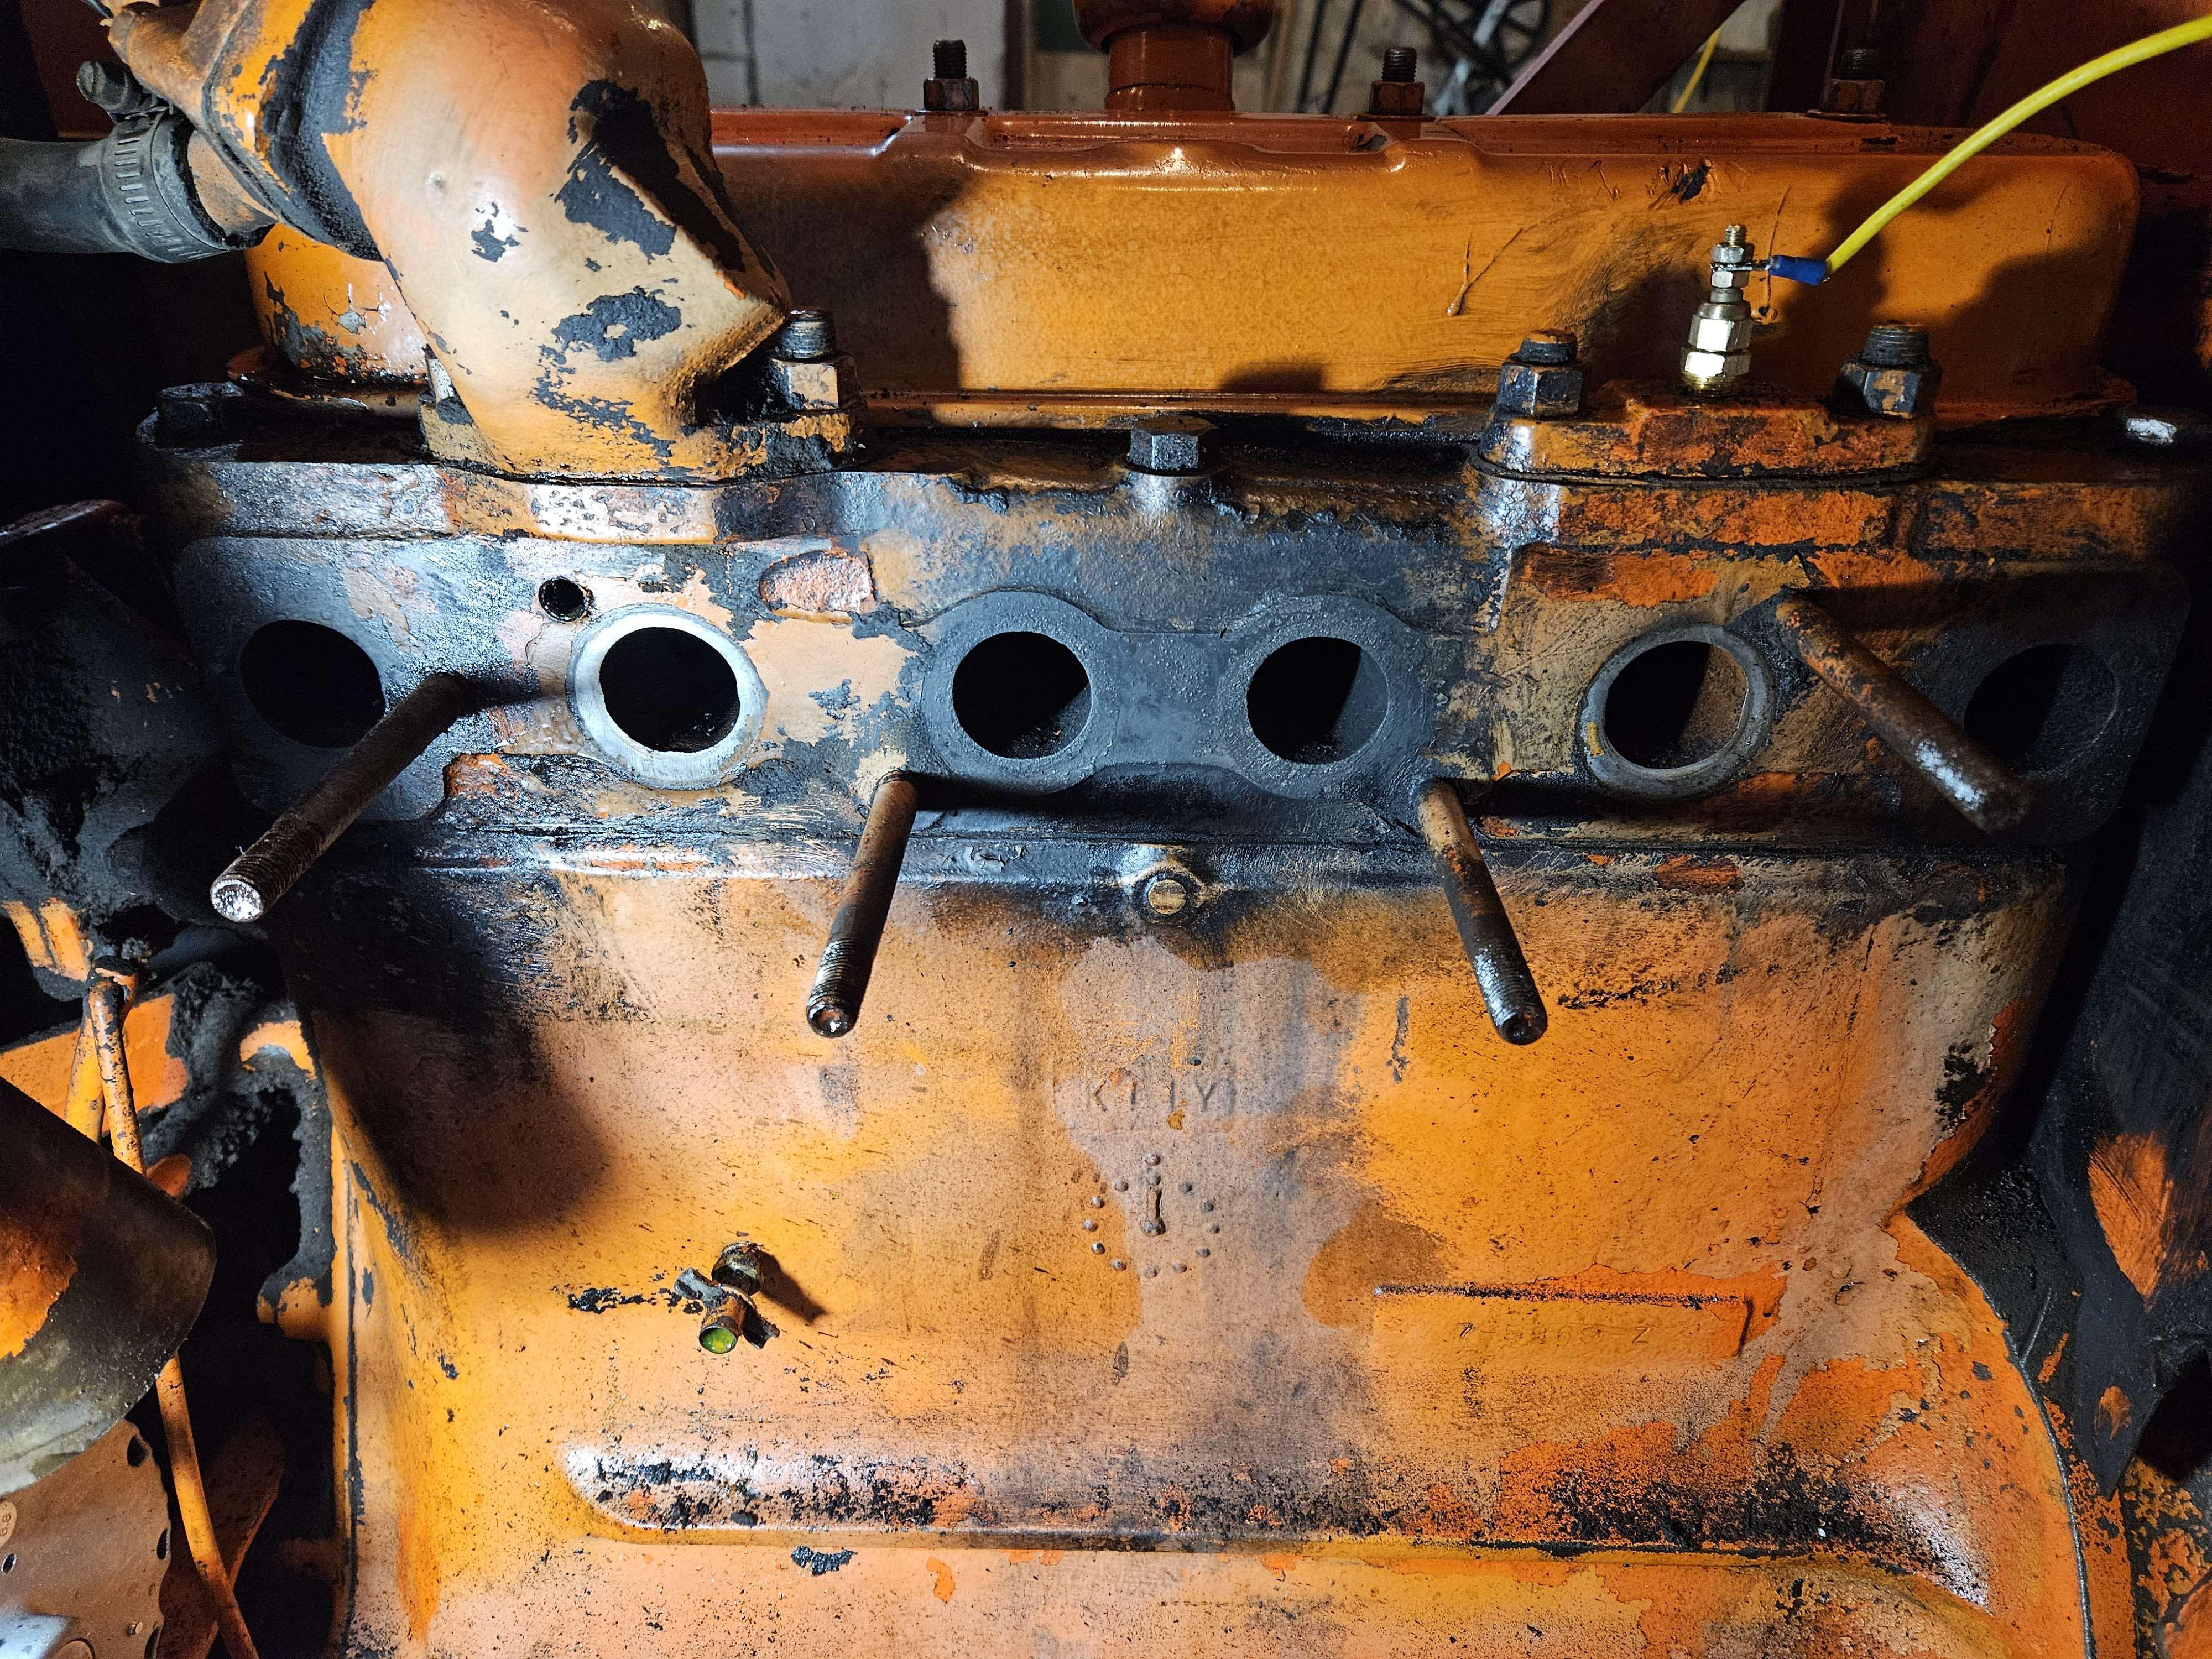
Alright, sounds great, more work! haha The more I am working on it, the more it seems I'm finding wrong with it. Definitely a gap where the manifold meets the block, new gaskets I guess, thanks WF for the tip! You can clearly see the gap in the image below.  I'm also noticing oozing of fluid out of the head gasket I believe, looks like could be coolant because it has a slight green tint to it ? I could be wrong. I guess that means at some point I'll have to replace that aswell.. It seems just very minimal seepage towards the front corner near the radiator and cylinder #1. 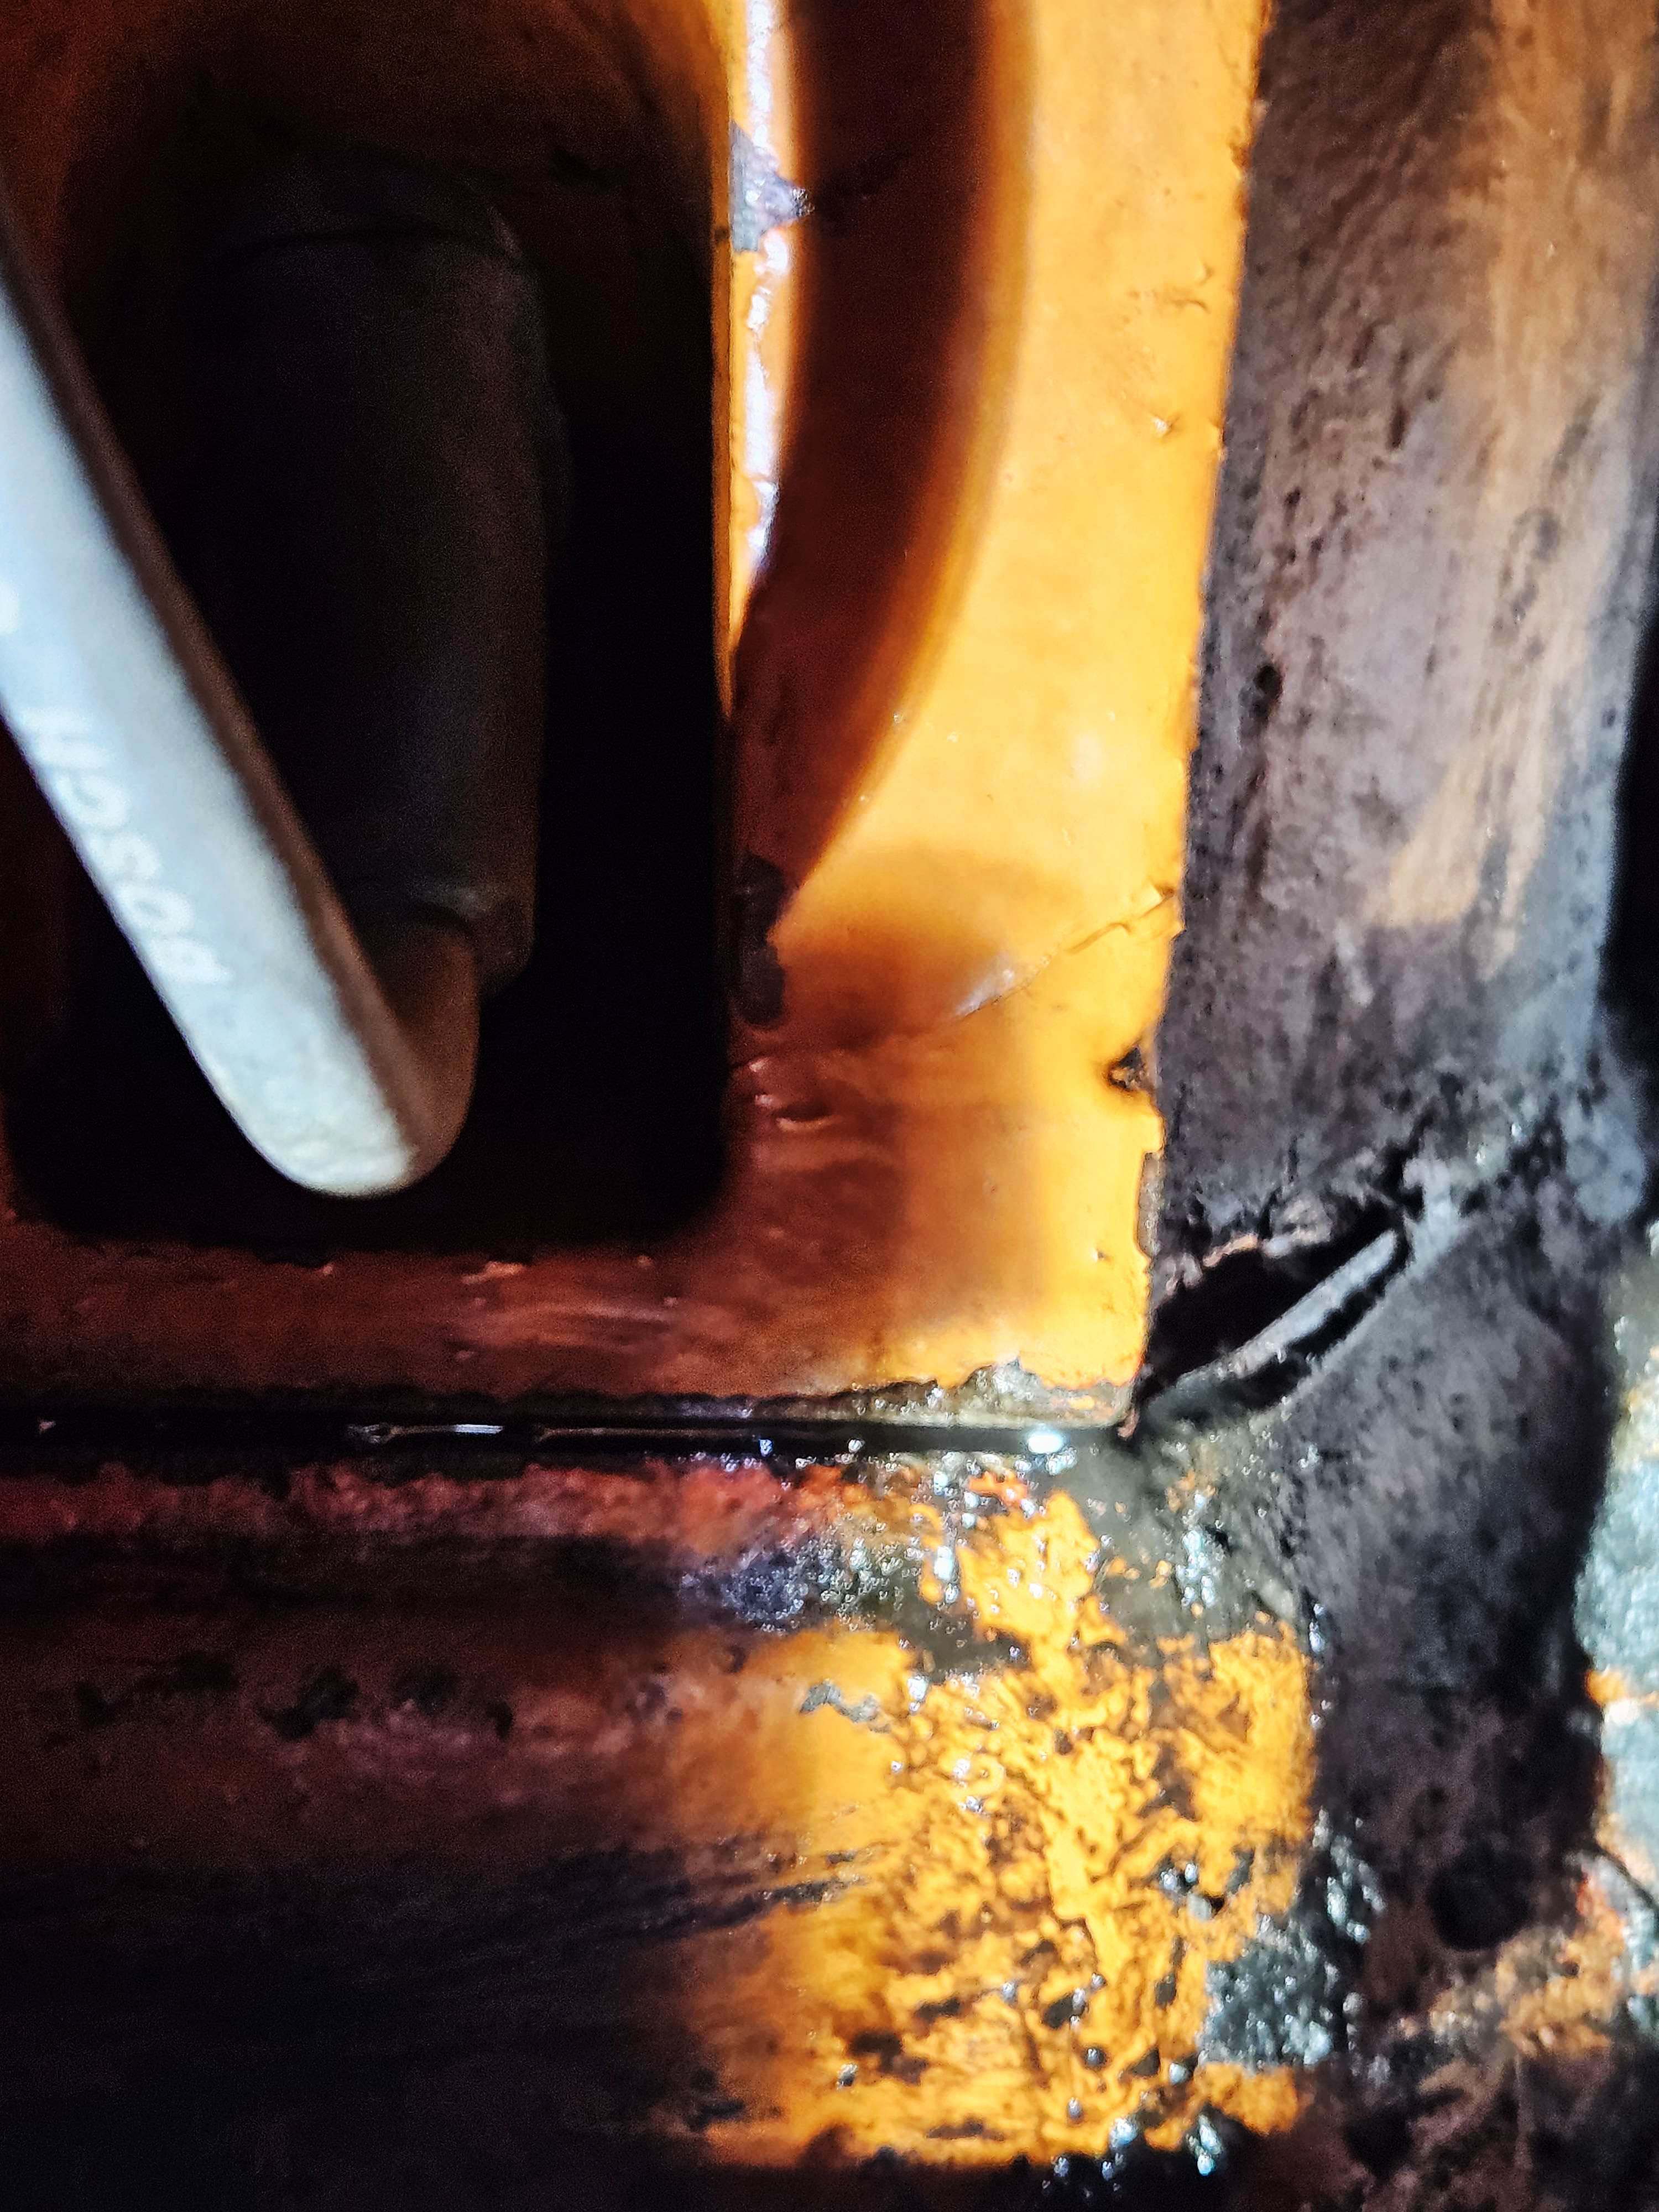
As far as the firing or misfiring for that matter, I was able to get her running again with our truck's battery that has a bit better reliability. I made a video going from low rpm -> high rpm -> low rpm https://www.youtube.com/watch?v=6fiuTr41VO4
Edited by ElementalEarth - 23 Feb 2024 at 6:23pm
|
|
Lynn Marshall
Orange Level Access
Joined: 13 Sep 2009
Location: Dana, Iowa
Points: 2147
|
Post Options
Thanks(0)
Quote Reply
Posted: 23 Feb 2024 at 7:46pm |
|
I don't see any gaskets on the intake or exhaust in that picture. On further looking, I see that those are both exhaust.
Edited by Lynn Marshall - 23 Feb 2024 at 7:48pm
|
|
IBWD MIke
Orange Level
Joined: 08 Apr 2012
Location: Newton Ia.
Points: 3445
|
Post Options
Thanks(0)
Quote Reply
Posted: 24 Feb 2024 at 7:39am |
|
Manifold gaskets will make a huge difference for you, hopefully that's all it needs.
|
|
WF owner
Orange Level
Joined: 12 May 2013
Location: Bombay NY
Points: 4388
|
Post Options
Thanks(0)
Quote Reply
Posted: 24 Feb 2024 at 8:07am |
When/if you replace the gaskets, make sure you search and follow the proper way to install a manifold. There are several good threads (on here) and videos. Google will be a big help here.
Chances are good that you will have to replace one, or more, of the studs. YOU DO NOT WANT TO BREAK THESE STUDS OFF IN THE HEAD!!! At least two (it's been a long time) of the studs thread into the water jacket, so you need to put some sort of sealant on those studs, to avoid leaks.
When you are ready to install the gaskets, they are all individual. You need to use something to hold them in place. I, personally, use a small dab of grease to stick them to the manifold.
When you start tightening, start in the middle (like you would when tightening head bolts). Very lightly snug the nuts and continue gradually working outward. Repeat this several times, tightening slightly and evenly every time. I can't remember the proper torque but be very careful on the ends of the manifold. It is very easy to break the end flanges off.
As I said earlier, keep retorquing the bolts after every run cycle until they don't turn anymore. (This will take several run cycles.)
Good luck!
|
|
ElementalEarth
Bronze Level
Joined: 05 Oct 2023
Location: Canada
Points: 111
|
Post Options
Thanks(0)
Quote Reply
Posted: 24 Feb 2024 at 9:04am |
WF owner wrote:
When/if you replace the gaskets, make sure you search and follow the proper way to install a manifold. There are several good threads (on here) and videos. Google will be a big help here.
Chances are good that you will have to replace one, or more, of the studs. YOU DO NOT WANT TO BREAK THESE STUDS OFF IN THE HEAD!!! At least two (it's been a long time) of the studs thread into the water jacket, so you need to put some sort of sealant on those studs, to avoid leaks.
When you are ready to install the gaskets, they are all individual. You need to use something to hold them in place. I, personally, use a small dab of grease to stick them to the manifold.
When you start tightening, start in the middle (like you would when tightening head bolts). Very lightly snug the nuts and continue gradually working outward. Repeat this several times, tightening slightly and evenly every time. I can't remember the proper torque but be very careful on the ends of the manifold. It is very easy to break the end flanges off.
As I said earlier, keep retorquing the bolts after every run cycle until they don't turn anymore. (This will take several run cycles.)
Good luck! |
Oh dear, seems not the greatest of jobs. I suppose filling those millimeter gaps up with some exhaust caulk won't do right? Probably only temporary at best, I get that.
A little thrown off by what you said about the bolts breaking. May need to do some research first then, those nuts are probably on there so tight and rusted, I do have a small torch to heat them if needed, could maybe apply some sort of liquid wrench to loosen it up a bit. I'll start watching videos and come back with questions here, which I surely will have haha.
I got some gauges and wiring to do for now, I got about a month left to finish the work on the tractor, before the busy growing season starts. Hoping to get as much done on it as I can! Thanks for the help.
|
|
ElementalEarth
Bronze Level
Joined: 05 Oct 2023
Location: Canada
Points: 111
|
Post Options
Thanks(0)
Quote Reply
Posted: 02 Mar 2024 at 10:17am |
Alright, I pulled off the manifold, one stud will need to be replaced. The manifold definitely needs to be cleaned up so it can sit flat again. The engine block looks ok, just needs a bit of cleaning I was hoping using an angle grinder to smooth out the flange of the manifold using blue layout liquid and scraping technique I observed on youtube. What do you folks think about the leaking of coolant from the head gasket? There is no coolant in oil or oil in coolant. Can I get by using a sealer liquid added to the coolant for now? I don't think I will get to replacing the head gasket anymore this winter.
Here's some pics of the manifold and mating surface
|
|
WF owner
Orange Level
Joined: 12 May 2013
Location: Bombay NY
Points: 4388
|
Post Options
Thanks(0)
Quote Reply
Posted: 02 Mar 2024 at 10:36am |
You are going to hear a lot of guys say no to any sort of stop-leak or sealer. Many say it will plug up radiator cores. Personally, I've had good luck with a product recommended by my local auto parts store (I'm in Florida for another couple weeks, so I can't tell you what it is - old man's memory...). Some of the old guys used pepper or ginger with some success. I would pull off the valve cover and check everything for tightness (torque) and see if there is an obvious problem. If nothing, I would start it up and get it up to temperature a couple times and recheck the head torque. If I found nothing, I would try some stop-leak.
Edited by WF owner - 02 Mar 2024 at 10:38am
|
|