Allis Chalmers 170 gas
Printed From: Unofficial Allis
Category: Allis Chalmers
Forum Name: Farm Equipment
Forum Description: everything about Allis-Chalmers farm equipment
URL: https://www.allischalmers.com/forum/forum_posts.asp?TID=197557
Printed Date: 07 May 2024 at 10:40pm
Software Version: Web Wiz Forums 11.10 - http://www.webwizforums.com
Topic: Allis Chalmers 170 gas
Posted By: ElementalEarth
Subject: Allis Chalmers 170 gas
Date Posted: 06 Oct 2023 at 9:29am
|
Hi everyone, first post here. We have an Allis Chalmers 170 gas tractor that we got with the property 5 years ago. We have kept her running despite our lack of knowledge. She has had electrical problems this whole time and it's been a pain to keep her going. It seems the whole electrical wiring is a hack job by one or more individuals over the years. All the gauges are disconnected. She's covered in oil on the engine block. Oozes out cooling liquid from the block and radiator, making her prone to overheating every other time. The front loader piston got bent.. Here's what she looks like and what she sounds like. https://youtube.com/shorts/HUhlOEME8ww" rel="nofollow - https://youtube.com/shorts/HUhlOEME8ww So now my question is, what should we be focusing on first to get repaired? We looked at prices for newer tractors and it's out of our budget, so we decided instead to spend some money on repairs for her, which will be a lot lower than buying a newer used tractor. We do use the tractor for farm work, as we run a marketgarden operation, so it is crucial that we have her operational and well maintained. Up until now we just felt like we didn't know enough about engines to properly work on her, but lot's of research and watching other people work on engines has made us feel like we can probably do some of the work ourselves. So this coming winter we are hoping to get her in the barn and have some repairs started. So again, where do we start ? We feel like the best would be to replace the electrical wiring and get the water tamperature gauge working again and degrease the engine to find the source of the oil leaking and coolant leaking. Here are some of the things that we have observed need attention, some more critical. We felt like reaching out to some of you on here as it seems alot of you have lots more experience with these kinds of machines. Thanks * electrical wiring overhaul * gauges repair and sending units working again * cleaning / degreasing engine and fixing head gasket (maybe this is where the fluids are coming out of) * oil change, fuel filter replacement, hydraulic fluid change * radiator replacement or repair * hoses repair * front loader piston repair or replacement *cleaning rust off and touching up paint * repair brakes * replace lights and wiring * get the blockheater/water heater working for winter snow clearing
|
Replies:
Posted By: DrAllis
Date Posted: 06 Oct 2023 at 9:58am
| Start with the general condition of the engine and answer these questions: #1. When the engine is warmed up, does it smoke blue out the exhaust ?? The video shows nothing, but maybe it wasn't warmed up. Blue exhaust means the engine needs to be overhauled. #2. Does the rear crankshaft seal or oil pan gasket leak ?? Head gaskets aren't a usual issue for coolant leaks, but could be. Water pumps sure are and any hoses or hose clamp connections. Yes, you need to clean things up with the hood off and figure out what and where the leaks are originating from. |
Posted By: ElementalEarth
Date Posted: 08 Dec 2023 at 4:47pm
|
Hey there, it's been a while. I was able to pull the tractor into the barn for the winter and have been able to get a closer look. There is no blue smoke coming out of engine. I did notice where the coolant leak originates. It appears at the middle of the engine block somewhere at the back between the block and the plate between the engine and the fuel tank. If I fidget with the shield plate, the coolant runs quicker. I could not seem to access the method of removal of the plate, so my guess would be, do I drain the fuel tank and remove fuel tank to establish where the leak is at the back of the engine block? |
Posted By: DrAllis
Date Posted: 08 Dec 2023 at 5:31pm
| The coolant leak will be at the rear of the cylinder head. It is an expansive plug that takes a 7/16" wrench to tighten it. You may be able to snug it up but I'll bet you need to replace with new. Part available from AGCO only. Hood and fuel tank likely will need to be removed to gain access to this area. I'd get a new one so you can see what you're dealing with. |
Posted By: ElementalEarth
Date Posted: 14 Dec 2023 at 10:41pm
|
Thanks, that helped alot! I was able to locate the plug and indeed, the rubber had been damaged and so it was oozing a lot of coolant out. I went down to the AGCO store to get this special bolt for $82 CAD.. ouch, that's one expensive bolt. I am not familiar with big machinery repairs, but was shocked. Anyways, couldn't find it online anywhere so went ahead and bought that bolt. The engine block was extremely dirty with half an inch of grease and grime. I tried cleaning lots off but it's a work in progress. I wonder how so much oil got allover the block, my guess is the breather oil cap is clogged and so it just spits it out from above, but I could be wrong, it could be the head gasket ? And do I feel lucky enough to attempt replacement of said gasket? :)  This may be a beginner question, but after looking through an operating manual I cannot seem to locate where to refill the engine oil after draining. Forgive the grime, would this cap be where I fill the oil? The distributor bolts into this assembly it seems.  I'm in Canada, it gets very cold here, so should I get the lowest temp oil possible? The other fluids will probably also need to be changed, new filters. I checked the fuel system while dismantling the tank, it seems like there was some debris in the sediment bowl, but not too bad. I believe my goal will be to change all the fluids, get the engine block cleaned up as best as possible and start replacing all the gauges and wiring according to the schematic. |
Posted By: DrAllis
Date Posted: 15 Dec 2023 at 8:34am
| A new valve cover gasket glued well on both sides is prudent as it leaks. Weatherstrip glue gasket to the valve cover and let cure. Finger rub thin layer of RTV on the dry clean gasket to the cyl head and let cure overnight before starting. Do not over torque the nuts as you'll bend the valve cover. New rubber washers on the studs also. Valve tappets adjust if you can. Make sure oil line to rockers arms is tight and not broken. Remove old cylinder head plug carefully as bolt isn't a hard bolt. Might have to remove bolt and get a grade 8 bolt threaded into the plug to pull it out. Oil fill cap, yes, but you should know that. Have you not been adding any oil with the leaks ?? Probably a head gasket isn't needed. They aren't known for that. |
Posted By: ElementalEarth
Date Posted: 15 Dec 2023 at 5:22pm
|
That's a great list of tips. I think I can definitely replace the valve cover gasket, seems simple enough. I have not had to fill oil as for the most part the tractor had been sitting because it just wouldn't start due to electrical problems. She has seen minimal use, but enough to need it and would be used more if properly maintained. Luckily, the oil level is just below the lower line on the dipstick, but is pretty black so I will definitely change the oil on her. Just wasn't sure where to fill it and which kind of oil to use. I'm also not sure how old the oil and grease was that was covering the entire engine block.. could've been there for decades to be honest. It will be indeed good to replace the gasket and clean the oil breather cap and keep a better eye on any spills/leaks coming out of the block (hopefully not) but it will be better to see the location now that I have degreased the block a lot more. Thanks Dr. Allis. I will get some parts ordered and get to work and updated this post when I can. Some of the terminology I am not familiar with but I can look it up; valve tappets, rocker arm, cylinder head plug? I am scratching my head a bit about where to find these haha. Seems like quite the project, but hey gotta do it sometime and learn.. I suppose these are underneath the valve cover? |
Posted By: Jim.ME
Date Posted: 15 Dec 2023 at 6:32pm
|
If you do not have the Owner/Operator's manual and the Service Manual for it, you should invest in those. I would look on eBay for good used OEM manuals or good reprints. I have a couple reprints of OEM manuals for other tractors from Peaceful Creek Manuals and have been pleased with their quality. The new OEM manuals from AGCO's publications website (agcopubs.com) will be reprints as well. They do also offer downloads if you chose. You can use the online parts books at https://parts.agcocorp.com/" rel="nofollow - https://parts.agcocorp.com/ At the top right of the page, you can change the United States to Canada and change the language if you chose. Click Search by Parts Book and type 170 in the new search box that will open. Check the AGCO Allis box on the left to reduce the list. You will find 170 / 175 Tractor in the list.
|
Posted By: WF owner
Date Posted: 16 Dec 2023 at 7:52am
| Just curious, but where in Canada are you? Canada is a pretty big country. |
Posted By: ElementalEarth
Date Posted: 16 Dec 2023 at 11:13am
Hey there thanks for that. I do have an operator manual from jensen sales. Weirdly enough it doesn't mention anywhere where to add engine oil. It does seem to just be a reproduction of the OEM manual.
I also have a shop manual of the IT brand, but may get an OEM copy as well. |
 Jim.ME wrote:
Posted By: ElementalEarth
Date Posted: 16 Dec 2023 at 11:14am
We are up in Manitoba, close to the big lakes.
|
Posted By: ElementalEarth
Date Posted: 18 Dec 2023 at 10:12am
I have found 2 different gaskets, cork and rubber. Is the one better than the other?
Some of the rubber ones also come with rubber washers for the studs it seems. Does the rubber one need extra sealant as well or is that mostly for the cork versions? When you say weatherstrip adhesive, any particular brand or product you'd recommend? The RTV I have found. I checked and it looks like there's currently a cork one on the tractor, could be one of the culprits of all the goo on the block indeed along with a couple of other factors. Feels like making a bit of progress figuring things out. Thanks for the help, very much beginner level when it comes to bigger engines. I have repaired some smaller engines with great success and I do enjoy tinkering. |
Posted By: DrAllis
Date Posted: 18 Dec 2023 at 3:09pm
| 3-M brand 8001 yellow weather strip glue. Glue gasket to the valve cover FIRST. I always use a cork gasket. You can RTV the rubber gaskets on top if you like. |
Posted By: ElementalEarth
Date Posted: 20 Dec 2023 at 7:09pm
Little update, work has been progressing. I was able to take the valve cover off and clean up the cover, a new gasket is on it's way. Looks like things are looking good in there, I don't see any damage or anything. Someone suggested I reset the valve lash to factory spec before I install the new gasket. Seems logical, more to study up on for me though. :) I also stripped the entire wiring harness out of it. I will attempt rebuilding the damaged wires and maybe salvaging the -still-good- wires, but honestly, it's looking like 50 years worth of splices and connectors. Not sure if those gauges will still be good.. they're looking pretty rough. Is there a way to test those with a multimeter of sorts? Right now nothing was working, except for a jerry rigged ignition key with marine parts and dishwasher switches.    I'm also working on taking the radiator out to clean the fins, they look pretty gunked up. Looks like a birdsnest underneath the radiator too. Not sure what that is about just yet.. Ah well, I did not expect this project would be so extensive. I have 3 months until spring, gotta get her cleaned up, patched up, repaired and running out the doors by then. Definitely worth learning and improving on this beautiful machine. Thanks for following! Merry Christmas folks  |
Posted By: Les Kerf
Date Posted: 20 Dec 2023 at 8:40pm
|
Money spent on a new wiring harness will repay you ten-fold in the long run. Call Steve in New Jersey. |
Posted By: ElementalEarth
Date Posted: 11 Feb 2024 at 10:12am
|
Well, it's been a bit of time, work has progressed on the tractor. Parts have come in, more grease has been degreased! So far I have: *cleaned the radiator, flushed it and refilled with new coolant. * reinstalled coolant cleanout plug at the back top of the block that was leaking previously * removed valve cover, adjusted valve lash and replaced valve cover gasket with cork gasket * changed oil, new oil filter * rebuilt fuel lines with new lines, new fuel filter, cleaned out gas tank and inspected fuel level sender (might still be good, not sure yet until tractor can run) * new alternator 10 si with 3 wires came in, still waiting on internally regulated 12v ignition coil. * got new spark plugs * currently working on the electrical wiring, crimping, soldering, etc. She's almost ready to see if we can start her up again, still waiting on the coil. Cleaned out the air filter, but it's so nasty that might need to be replaced, still need to grab water temperature gauge, potential sending unit, oil pressure gauge, volt gauge to replace ammeter, hydraulic fluid and filter and bits and bobs of electrical parts. The air filter housing does not have a cup to cover the end of it, i take it this is important ? Where do you ground the alternator? any bolt will do ? Do the gauges have a seperate ground wire to the frame or do they just ground to the frame by the bolts that hold them in place ? The old gauges were all metal so I assume they just grounded themselves, some newer gauges seem painted or even plastic. Cheers for stopping in, it's been super cool to work on this beautiful maching and have been eductating and learning alot. Hoping to be able to keep the tractor in better shape for years to come by doing this.
|
Posted By: Steve in NJ
Date Posted: 14 Feb 2024 at 10:12am
|
If you need a new wiring system I build new systems for the AC Tractors. We offer one for the 170/175 Gasser. Visit our website and check it out. I build the systems as the orders come in. Our front wiring kit P/N is 1503-12A. Color coded the same as OEM. Much heavier circuitry than OEM and updated connectors. Steve@B&B bb-customcircuits.com
------------- 39'RC, 43'WC, 48'B, 49'G, 50'WF, 65 Big 10, 67'B-110, 75'716H, 2-620's, & a Motorhead wife |
Posted By: DrAllis
Date Posted: 14 Feb 2024 at 10:54am
| Air cleaner air inlet has no cover on it. |
Posted By: ElementalEarth
Date Posted: 14 Feb 2024 at 8:18pm
|
Well, i got the wiring done, very simple just focused on ignition. It has spark. It turns over, slowly, but no fire yet. I took the hose off to carburetor, nada. Charged battery, turns over a bit quicker but still slow. No fire. I do see some light smoke or vapor coming out of exhaust, so I feel like I'm getting closer. But she doesn't seem to want to start back up. Spark is blue and bright. So I am starting to clean carburetor and have ordered a gasket set, it's not too dirty, but hasn't been cleaned since we are the new owners of the tractor. I'm also suspecting the battery, to be 15 years old, so due for renewal. Fingers crossed she will fire up after cleaning the carb and installing a new battery. Any other tips? Feel free to add, really hoping she fires back up. Have spent a lot of time on it so far. I feel like I'm close though, thanks for reading! |
Posted By: ElementalEarth
Date Posted: 15 Feb 2024 at 6:03pm
|
It was indeed a combination of the battery being weak, and a somewhat dirty carb. Potentially even the choke panel not closing fully. Made some adjustments, cleaned carb, charged battery in a warm room. Got her fired up for the first time today since parking her in the barn early November. Work is not finished yet, still have to hookup gauges and sort out wiring for that and lights. But, it's looking more positive! I have a keyswitch again with proper wiring and ignition. It's a big win to be honest! |
Posted By: ElementalEarth
Date Posted: 20 Feb 2024 at 8:27pm
|
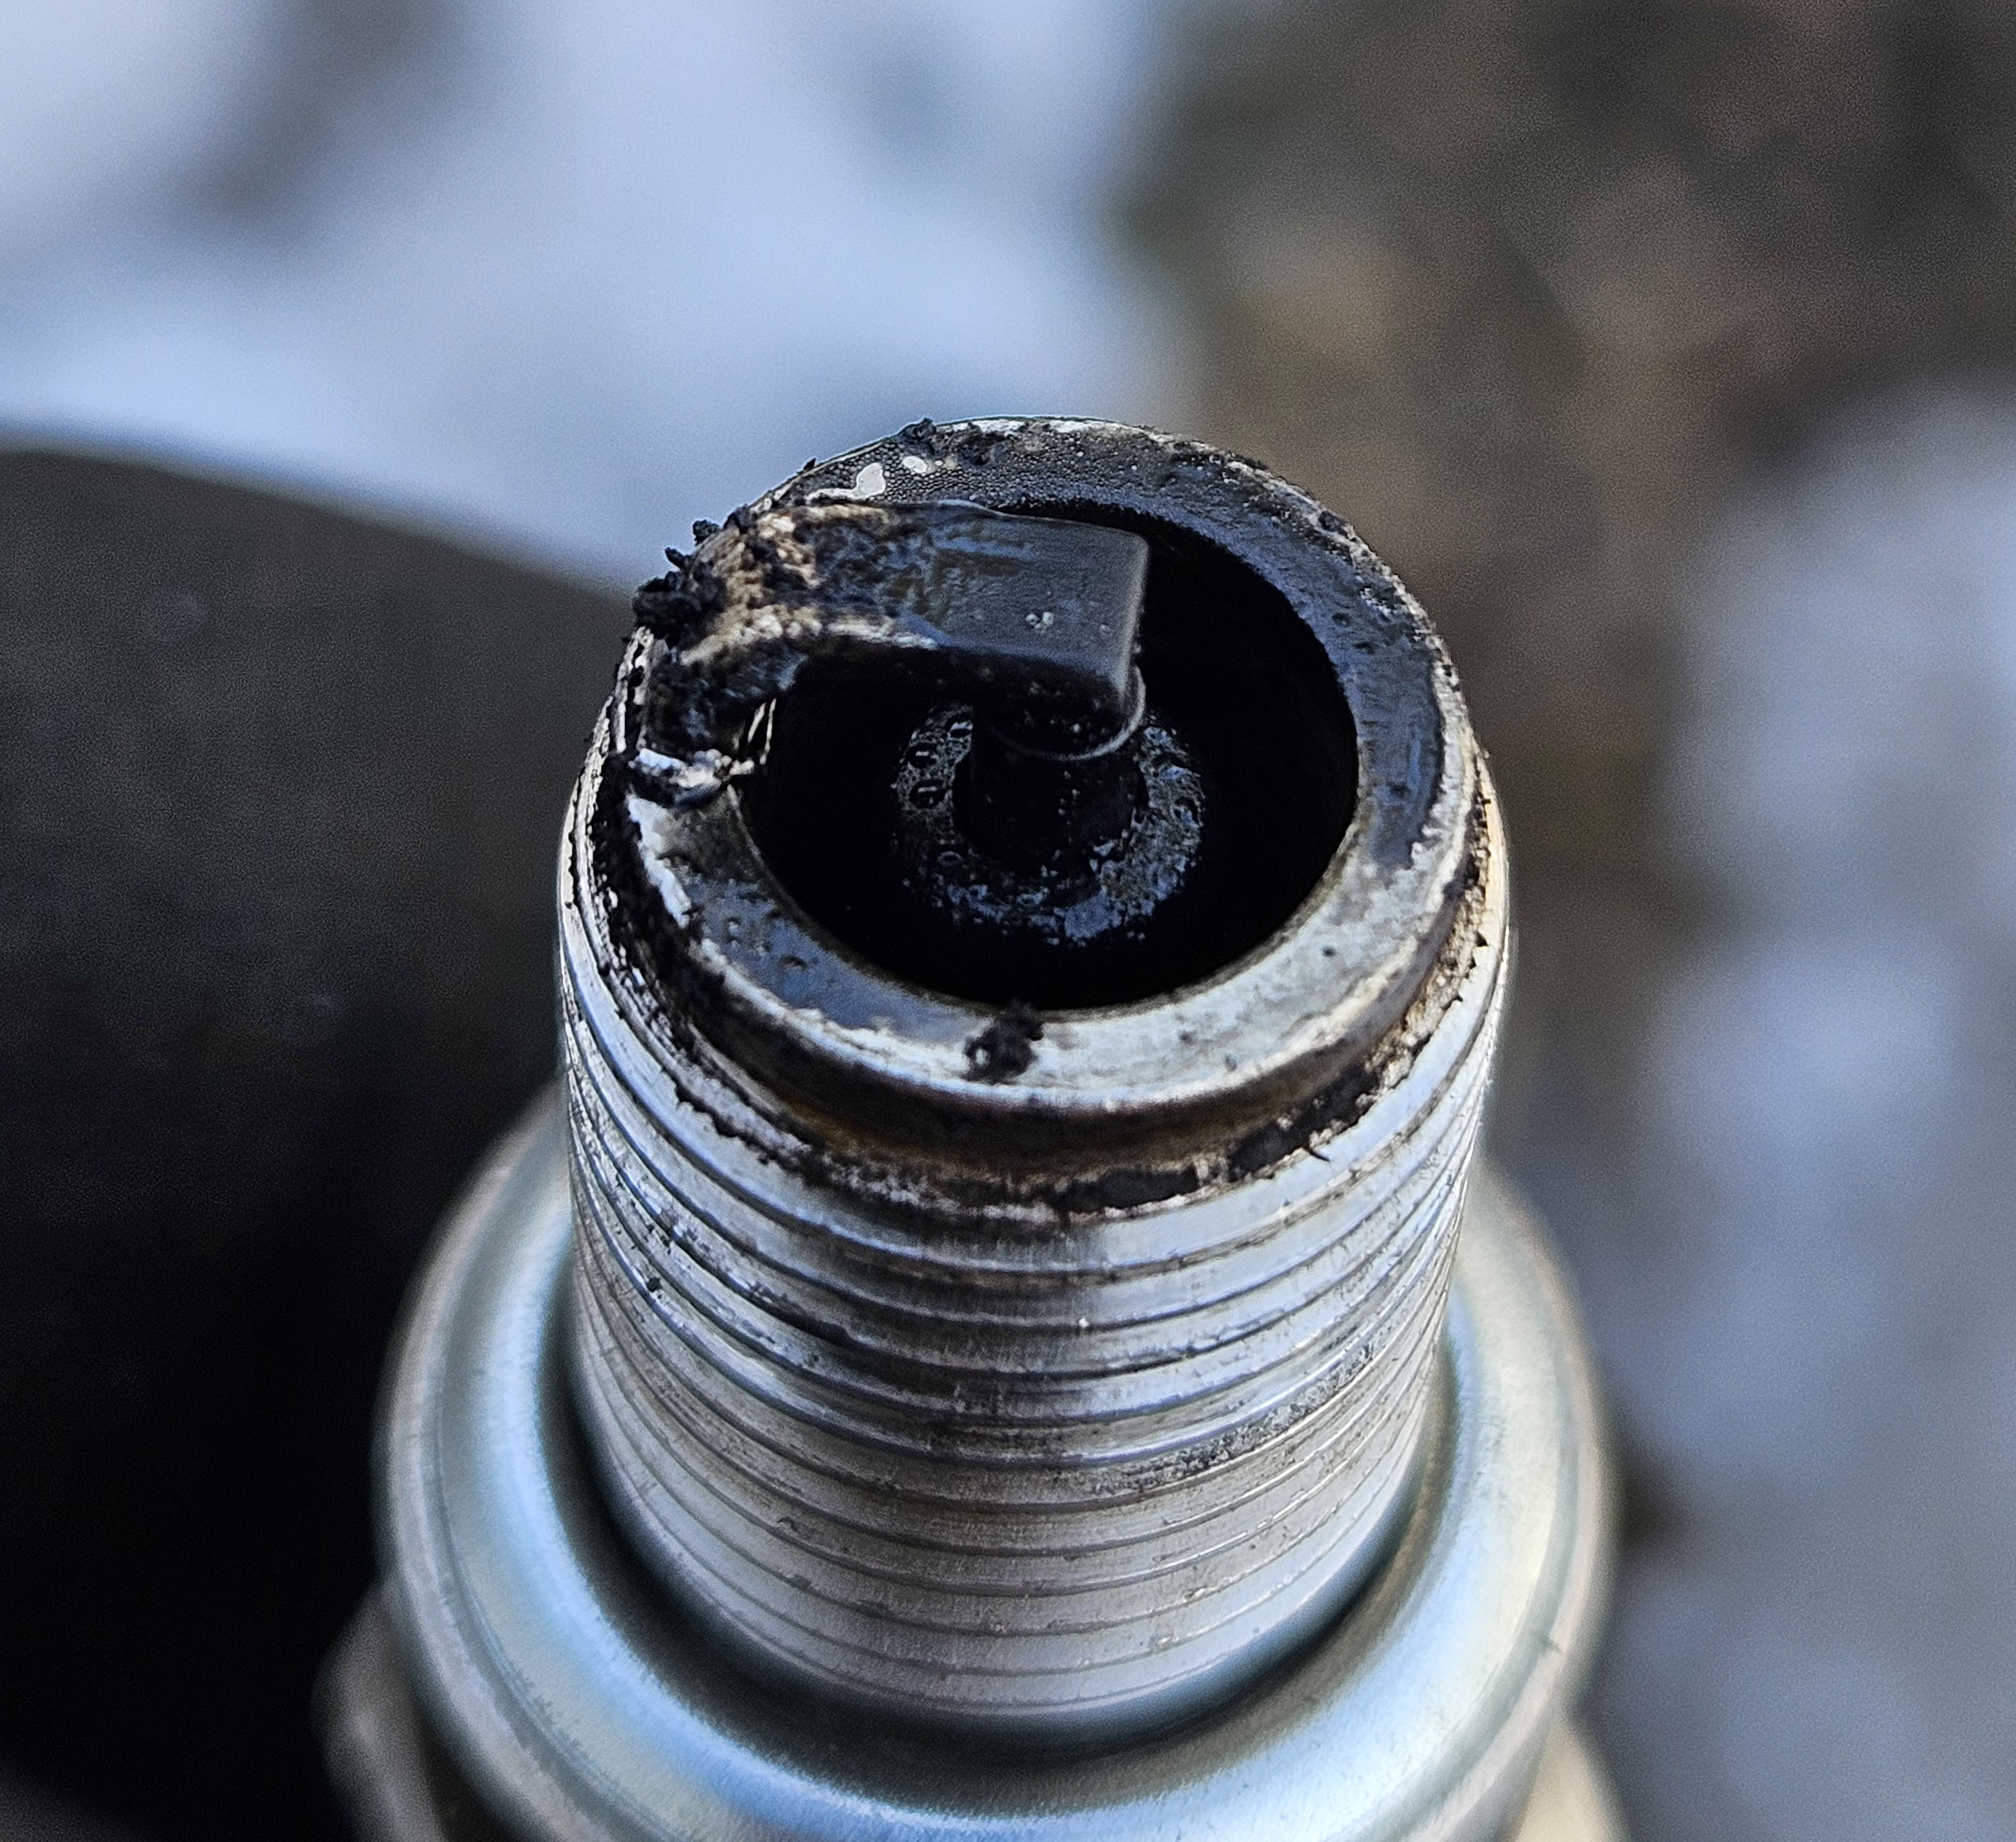
I have been progressing slowly, waiting for some gauges to come in and she's hard to start in the freezing cold barn with a weak battery that's due to be replaced as well. I ran her for a few minutes, then checked the plugs, they were fouled with oil. Could this be because I'm having a hard time starting her, there's no combustion happening, and keeps just cranking without the ability to burn off the oil? Or is there something larger at play here that I'm missing ? The older plugs Acdelco r43ts that I pulled out of her, didn't seem to be right for this tractor, but they weren't fouled with oil, just a bit sooty but not too bad.
 |
Posted By: Les Kerf
Date Posted: 20 Feb 2024 at 10:55pm
That engine needs to be warmed up fully and worked hard, but first, do whatever is needed to ensure a properly functioning air cleaner. Then you will be able to get a better idea as to what you need for spark plugs (heat range, etc.).
|
Posted By: DrAllis
Date Posted: 21 Feb 2024 at 6:30am
| That tractor uses AC Delco R-45 XL or R-45 XLS LONG reach plugs !!!!!!!!!!!!! Gapped at .025" . |
Posted By: SteveM C/IL
Date Posted: 21 Feb 2024 at 6:58am
| A 45 is hotter than a 43. Probably not the reason you're having trouble starting. |
Posted By: ElementalEarth
Date Posted: 21 Feb 2024 at 8:01am
Yep, new air filter and new battery are in the works and on the list already.
|
Posted By: ElementalEarth
Date Posted: 21 Feb 2024 at 8:02am
I got autolites 405's in it right now, would that do it? |
Posted By: ElementalEarth
Date Posted: 21 Feb 2024 at 8:34am
|
The new plugs, the autolite 405, didn't seem to properly fit either. The acdelco I pulled were fit snug and tight, but the autolites, there's a lot more resistance when threading them in, I am worried over tightening and stripping something out on the threads. I can crank them in harder with probably a couple more turns, I'm just concerned I'm damaging the holes if I do.. Not sure why that is, they should be the right ones for this tractor no ? |
Posted By: Les Kerf
Date Posted: 21 Feb 2024 at 9:19am
As Dr. Allis pointed out above, the plugs need to be LONG reach; if short reach plugs were used then the threads are contaminated with carbon deposits and need to be cleaned out with an appropriate tap to prevent further damage.
|
Posted By: ElementalEarth
Date Posted: 21 Feb 2024 at 9:48am
Shoot, are you telling me the Autolites 405 are no good? Honestly I don't know the difference between long and short reach, but I guess I could find some ACdelco R45XLS somewhere online.
I got the autolites from Napa, the guy seemed to believe those would be good. |
Posted By: ElementalEarth
Date Posted: 21 Feb 2024 at 9:59am
Or did you mean because the wrong plugs were used previously in the tractor (acdelcor43ts), they are a shorter reach and now the threads in the engine block are compromised making fitting a proper spark plug Autolite 405 I assume, more difficult and I need to clean the spark plug holes first like you said with a tap ?
Sorry to have to ask all these detailed questions, feeling pretty bummed to be honest about this issue. |
Posted By: Alvin M
Date Posted: 21 Feb 2024 at 10:01am
| Autolite 405 is the right plug if it had short plugs in it clean the holes |
Posted By: ElementalEarth
Date Posted: 21 Feb 2024 at 10:17am
 Ok, so assume the reach of the previous plugs was short, doing some research into them. And the new ones have a longer reach. Can I buy a tool like shown above and just clean out the spark plug holes? Please tell me I don't need to pull the head and everything to do this sort of job? |
Posted By: Alberta Phil
Date Posted: 21 Feb 2024 at 11:09am
|
The plug you want has a threaded portion about 3/4 in. long. I've modified an old spark plug with the long threaded section by grinding three or four grooves down the threaded length an used it like a tap to clean the carbon buildup out of the threads. Or you could buy a tap as pictured. No, you shouldn't need to pull the head.
|
Posted By: DrAllis
Date Posted: 21 Feb 2024 at 12:39pm
| But, a 170 cylinder head uses 3/4" LONG spark plugs( not 3/8") of a proper heat range. |
Posted By: ElementalEarth
Date Posted: 21 Feb 2024 at 2:08pm
I'm glad you guys caught this, it makes sense now why the new plugs didn't want to thread in. The lower portion of the spark plug well seems caked up with deposits. I'll have to go and purchase a thread chaser to clean it out as best as I can. What I don't understand is why would anyone want to put the wrong plugs in an engine? I'm undoing what looks like years of neglect and abuse, it's pretty sad. We've only been the owners of this tractor for a few years. Is there any further damage done by running the wrong plugs ? I laid them side by side to fully understand the significance of what you were telling me, I had no idea you could even run an engine with the wrong plugs!  |
Posted By: Les Kerf
Date Posted: 21 Feb 2024 at 3:12pm
Probably not. With the spark gap hidden up inside the spark plug chamber it might make it more difficult to start the engine.
|
Posted By: DrAllis
Date Posted: 21 Feb 2024 at 3:59pm
| R-43-T plugs don't even have a GASKET on them !!! They are a tapered seat sealing type plug !!! which damages the threads in the cylinder head. |
Posted By: ElementalEarth
Date Posted: 21 Feb 2024 at 4:34pm
Oh dear that sounds not so great Dr. Do you have a tractor penicilin for that? Good god man, 😳 So a thread chaser won't work anymore either? |
Posted By: steve(ill)
Date Posted: 21 Feb 2024 at 5:34pm
|
yes... your thread chaser or tap should clean up everything... The plugs screwed OUT, so you should be able to get the chaser back in.. OK. ------------- Like them all, but love the "B"s. |
Posted By: ElementalEarth
Date Posted: 21 Feb 2024 at 5:43pm
Okay, pfew, that's a huge relief. I'll give that a try! |
Posted By: DrAllis
Date Posted: 21 Feb 2024 at 5:43pm
| A couple of drops of motor oil on spark plug and chaser threads would be a very good idea. |
Posted By: Les Kerf
Date Posted: 21 Feb 2024 at 5:47pm
Yup. Put some grease on the tap to catch the carbon gunk, don't try to go all the way in with one pass; back it out and clean the tap, then go a little further each time. You will get a feel for it.
|
Posted By: ElementalEarth
Date Posted: 21 Feb 2024 at 9:38pm
|
Got the chaser, did 2 holes before the kids went to bed, worked awesome. Was able to properly install the new plugs, their gasket flush to the block. Used vaseline in the chaser slits, worked wonders and turned the carbon into a paste. Tomorrow I'm doing the other 2 holes. I'm relieved this worked out with ease. Hopefully this will usher in a new era of easier starting and better combustion. Thanks everyone for pitching in on the advice! Saved the engine I'm sure of that. |
Posted By: Lynn Marshall
Date Posted: 21 Feb 2024 at 11:10pm
| You might want to spin the engine over a few times without the plugs in it to blow out any more debris. |
Posted By: Les Kerf
Date Posted: 22 Feb 2024 at 9:57am
Good catch! I didn't look at the photo very carefully; apparently the culprit did not care enough to look closely either.
|
Posted By: ElementalEarth
Date Posted: 22 Feb 2024 at 6:09pm
|
Well well well, another day another story, I finished cleaning the old crud out left by the engine in the spark plug threads. The thread chaser took care of that super easily. I installed the new plugs, the autolite 405 and turned my new ignition key... She started right away!! Couldn't even believe it. I guess all or most of the starting issues were related to being the wrong plugs in there. Having breathed some exhaust fumes while making a video, she stalled as she ran out of gas, what a treat.. So I put some more fuel in and she started again, first try! It's starting to look better every day to be honest, it still needs work, I'm getting some replacement gauges on Monday and I'll need to wire those up along with some new headlights as half of the bulbs are busted and the wiring is shot as well. There are other things to take care of aswell, need to replace air filter, battery, hydraulic fluid, hydraulic filter, transmission fluid and final drive oil.. and that's literally just the basic stuff, nothing fancy. My air filter assembly is missing the cup that slides over the end, not sure how big of a deal that is. The good news is, she runs and pretty well too! Here's a video https://youtu.be/Md8bba99bYU?si=ISXLghj-g0OYdYtQ" rel="nofollow - https://youtu.be/Md8bba99bYU?si=ISXLghj-g0OYdYtQ |
Posted By: DrAllis
Date Posted: 23 Feb 2024 at 6:01am
| Like to hear it again cracking the throttle. Sounds like miss-firing to me what I can hear. |
Posted By: ElementalEarth
Date Posted: 23 Feb 2024 at 9:33am
You may be right, I had no idea due to my lack of experience, but listening to some videos from other engines, it does sound like it could be misfiring. There are flames coming out of the exhaust sometimes and the manifold looks "wet" where the carburetor bolts on to it, not sure what to think of that. How to resolve this issue, just reading a bit on these forums it sounds like it could be carburetor related, timing, or even valves/something more internal. I have the carburetor set out at 1 turn outward on the idle screw up top of the carb and the lower main jet screw at 2 turns outward, following a zenith carb rebuild video. No clue about timing or what to even look for. Again, most of this stuff is all new to me, my experience comes from getting old lawnmowers running again, this is somewhat different. I can make another video yes, with the throttle open all the way.
|
Posted By: Alvin M
Date Posted: 23 Feb 2024 at 9:38am
| Check firing order 1243 |
Posted By: WF owner
Date Posted: 23 Feb 2024 at 11:31am
| Part of the fun (and frustration) of playing with these old tractors is learning things about them. There are a lot of guys on here, with a lot of experience, that fortunately, are willing to share with the rest of us. |
Posted By: DrAllis
Date Posted: 23 Feb 2024 at 12:03pm
| 1 -2- 4- 3 would be a great place to start !!!! |
Posted By: ElementalEarth
Date Posted: 23 Feb 2024 at 1:08pm
|
I can confirm, the right firing order is set. I looked at when the distributor rotor passed #1 cylinder when air blew out the spark plug hole and plugged wires in clockwise after that. Unfortunately I couldnt get her started back up, the battery is pretty weak and needs constant charging, especially because I left it out in the cold with -15°c overnight. Will try again later or tomorrow. I've had better luck with a warm and charged battery. Are my carb adjustments set ok? Idle screw is at 1 turn out, main jet screw 2 turns out. I did notice the exhaust manifold has a gap where it meets the block up top. I could see sparks escaping from there yesterday. |
Posted By: WF owner
Date Posted: 23 Feb 2024 at 4:32pm
|
I always start carb adjustments at 1 1/2 turn on each. You are definitely in the ballpark! A weak battery is very tough on a starter. Starting with a booster/charger is, too. You should get a good battery ASAP. If you run it very long with a leak between the head and exhaust manifold, it will eventually pit the head. At the very least, you should remove the manifold and try to true it back to as flat as possible and install new manifold gaskets. They need to be retorqued after every heat cycle, until they quit turning.
|
Posted By: ElementalEarth
Date Posted: 23 Feb 2024 at 6:19pm
|
Alright, sounds great, more work! haha The more I am working on it, the more it seems I'm finding wrong with it. Definitely a gap where the manifold meets the block, new gaskets I guess, thanks WF for the tip! You can clearly see the gap in the image below.  I'm also noticing oozing of fluid out of the head gasket I believe, looks like could be coolant because it has a slight green tint to it ? I could be wrong. I guess that means at some point I'll have to replace that aswell.. It seems just very minimal seepage towards the front corner near the radiator and cylinder #1. 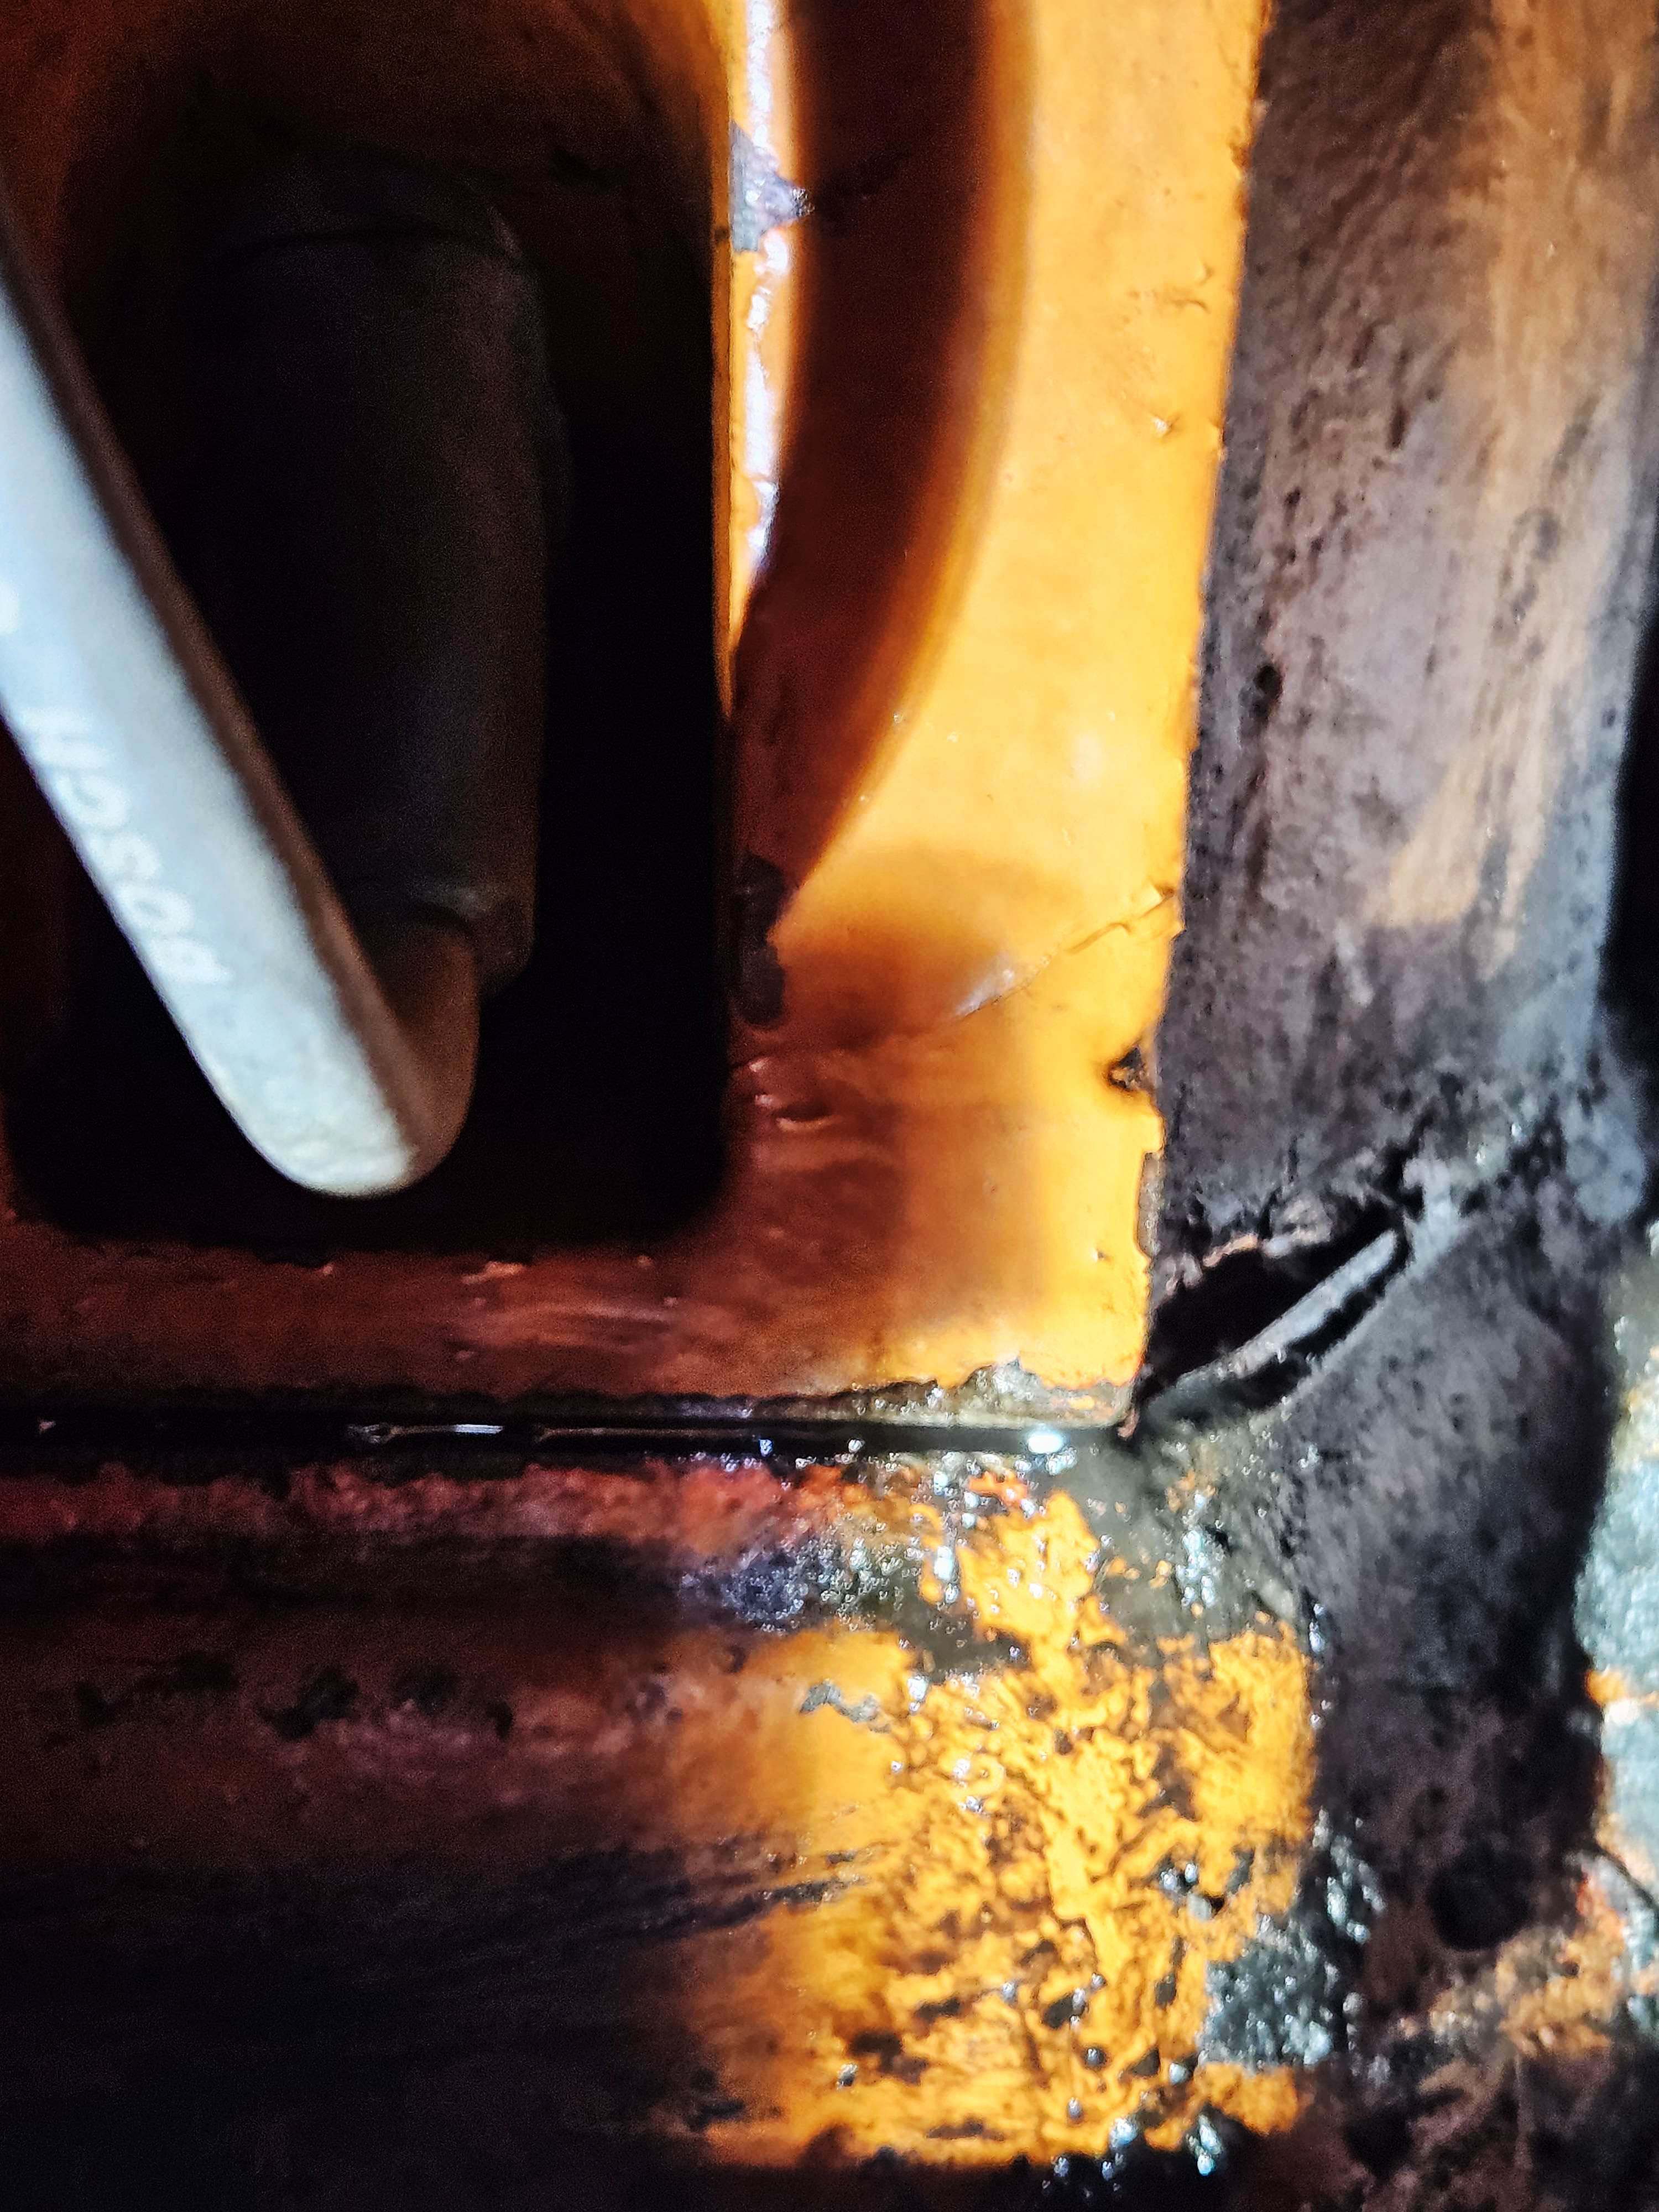 As far as the firing or misfiring for that matter, I was able to get her running again with our truck's battery that has a bit better reliability.
I made a video going from low rpm -> high rpm -> low rpm https://www.youtube.com/watch?v=6fiuTr41VO4" rel="nofollow - https://www.youtube.com/watch?v=6fiuTr41VO4 |
Posted By: Lynn Marshall
Date Posted: 23 Feb 2024 at 7:46pm
| I don't see any gaskets on the intake or exhaust in that picture. On further looking, I see that those are both exhaust. |
Posted By: IBWD MIke
Date Posted: 24 Feb 2024 at 7:39am
|
Manifold gaskets will make a huge difference for you, hopefully that's all it needs. |
Posted By: WF owner
Date Posted: 24 Feb 2024 at 8:07am
|
When/if you replace the gaskets, make sure you search and follow the proper way to install a manifold. There are several good threads (on here) and videos. Google will be a big help here. Chances are good that you will have to replace one, or more, of the studs. YOU DO NOT WANT TO BREAK THESE STUDS OFF IN THE HEAD!!! At least two (it's been a long time) of the studs thread into the water jacket, so you need to put some sort of sealant on those studs, to avoid leaks. When you are ready to install the gaskets, they are all individual. You need to use something to hold them in place. I, personally, use a small dab of grease to stick them to the manifold. When you start tightening, start in the middle (like you would when tightening head bolts). Very lightly snug the nuts and continue gradually working outward. Repeat this several times, tightening slightly and evenly every time. I can't remember the proper torque but be very careful on the ends of the manifold. It is very easy to break the end flanges off. As I said earlier, keep retorquing the bolts after every run cycle until they don't turn anymore. (This will take several run cycles.) Good luck!
|
Posted By: ElementalEarth
Date Posted: 24 Feb 2024 at 9:04am
Oh dear, seems not the greatest of jobs. I suppose filling those millimeter gaps up with some exhaust caulk won't do right? Probably only temporary at best, I get that. A little thrown off by what you said about the bolts breaking. May need to do some research first then, those nuts are probably on there so tight and rusted, I do have a small torch to heat them if needed, could maybe apply some sort of liquid wrench to loosen it up a bit. I'll start watching videos and come back with questions here, which I surely will have haha. I got some gauges and wiring to do for now, I got about a month left to finish the work on the tractor, before the busy growing season starts. Hoping to get as much done on it as I can! Thanks for the help. |
Posted By: ElementalEarth
Date Posted: 02 Mar 2024 at 10:17am
|
Alright, I pulled off the manifold, one stud will need to be replaced. The manifold definitely needs to be cleaned up so it can sit flat again. The engine block looks ok, just needs a bit of cleaning I was hoping using an angle grinder to smooth out the flange of the manifold using blue layout liquid and scraping technique I observed on youtube. What do you folks think about the leaking of coolant from the head gasket? There is no coolant in oil or oil in coolant. Can I get by using a sealer liquid added to the coolant for now? I don't think I will get to replacing the head gasket anymore this winter. Here's some pics of the manifold and mating surface 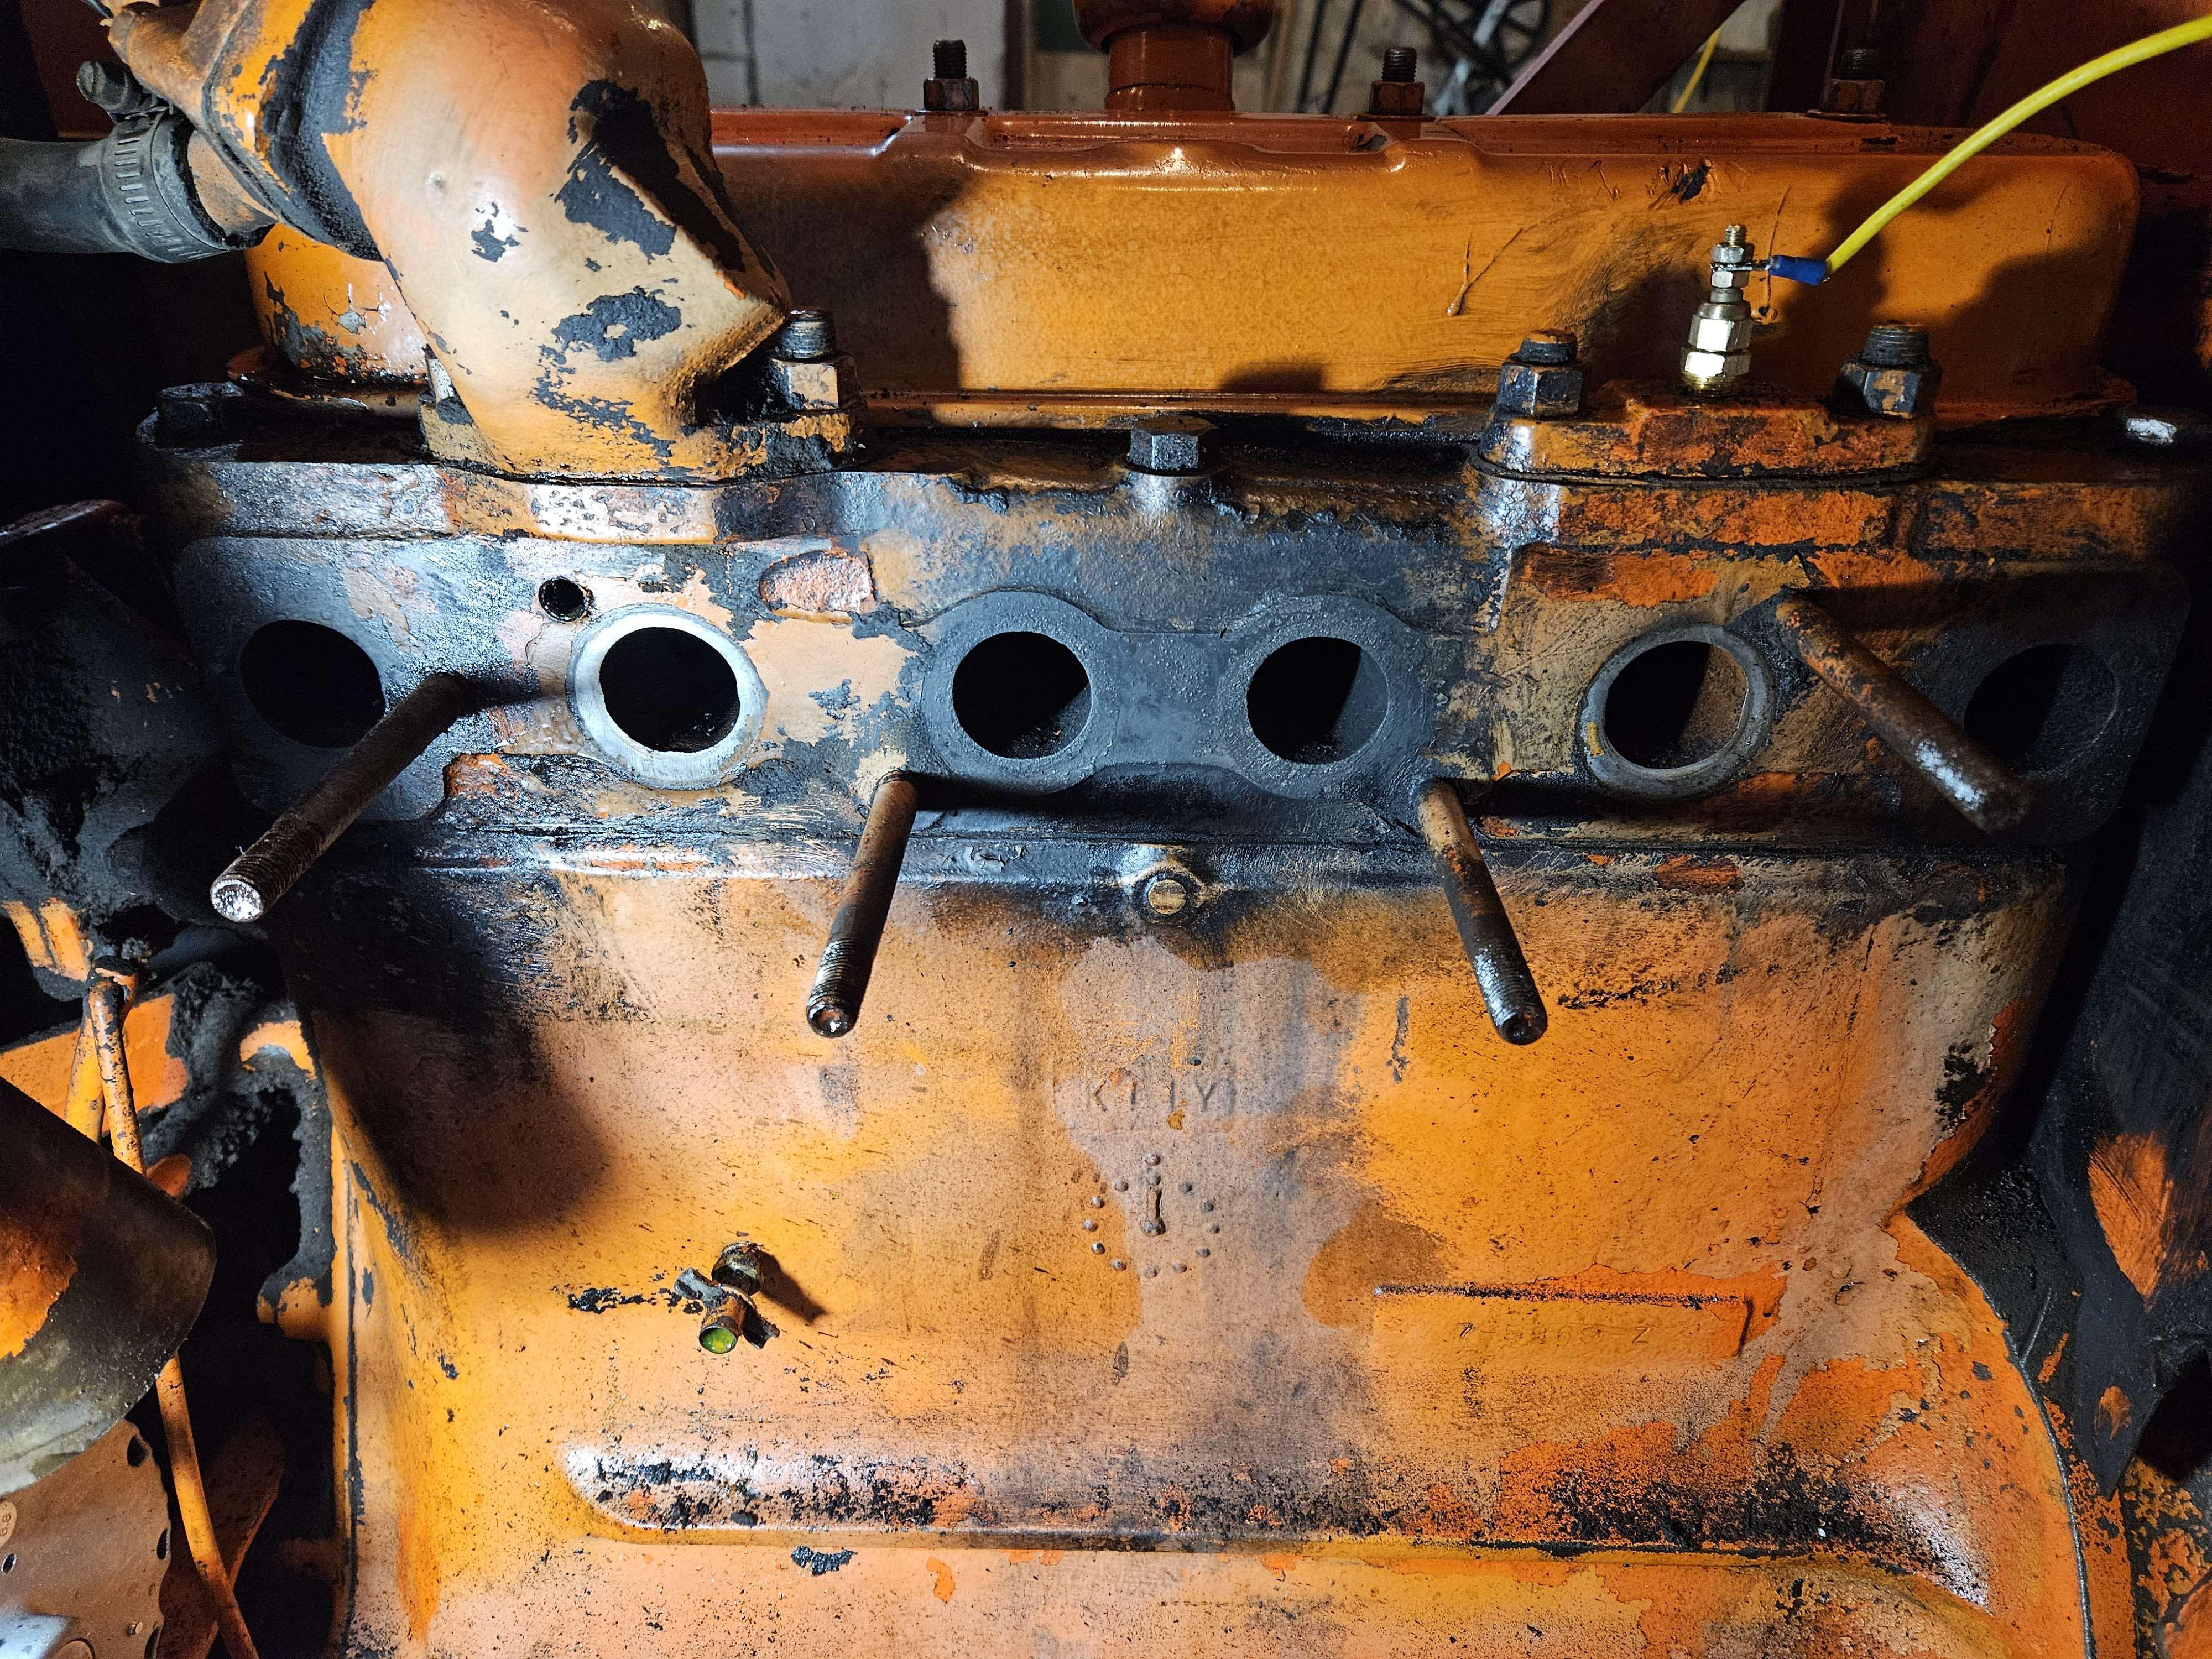  |
Posted By: WF owner
Date Posted: 02 Mar 2024 at 10:36am
|
You are going to hear a lot of guys say no to any sort of stop-leak or sealer. Many say it will plug up radiator cores. Personally, I've had good luck with a product recommended by my local auto parts store (I'm in Florida for another couple weeks, so I can't tell you what it is - old man's memory...). Some of the old guys used pepper or ginger with some success. I would pull off the valve cover and check everything for tightness (torque) and see if there is an obvious problem. If nothing, I would start it up and get it up to temperature a couple times and recheck the head torque. If I found nothing, I would try some stop-leak.
|
Posted By: ElementalEarth
Date Posted: 03 Mar 2024 at 11:38am
That's some good advice and pretty doable. Just pulling the valve cover I can access those bolts or does it involve removal of the rocker assembly aswell ?
|
Posted By: ElementalEarth
Date Posted: 05 Mar 2024 at 7:01pm
|
Alright here's the good, bad and ugly. I ground the manifold down flat, where there used to be a gap, there is now none. Manifold gaskets have arrived, just waiting on a replacement stud and nuts to reassemble.  Before the grinding, big gap, manifold pipes were pretty badly eroded and pitted. 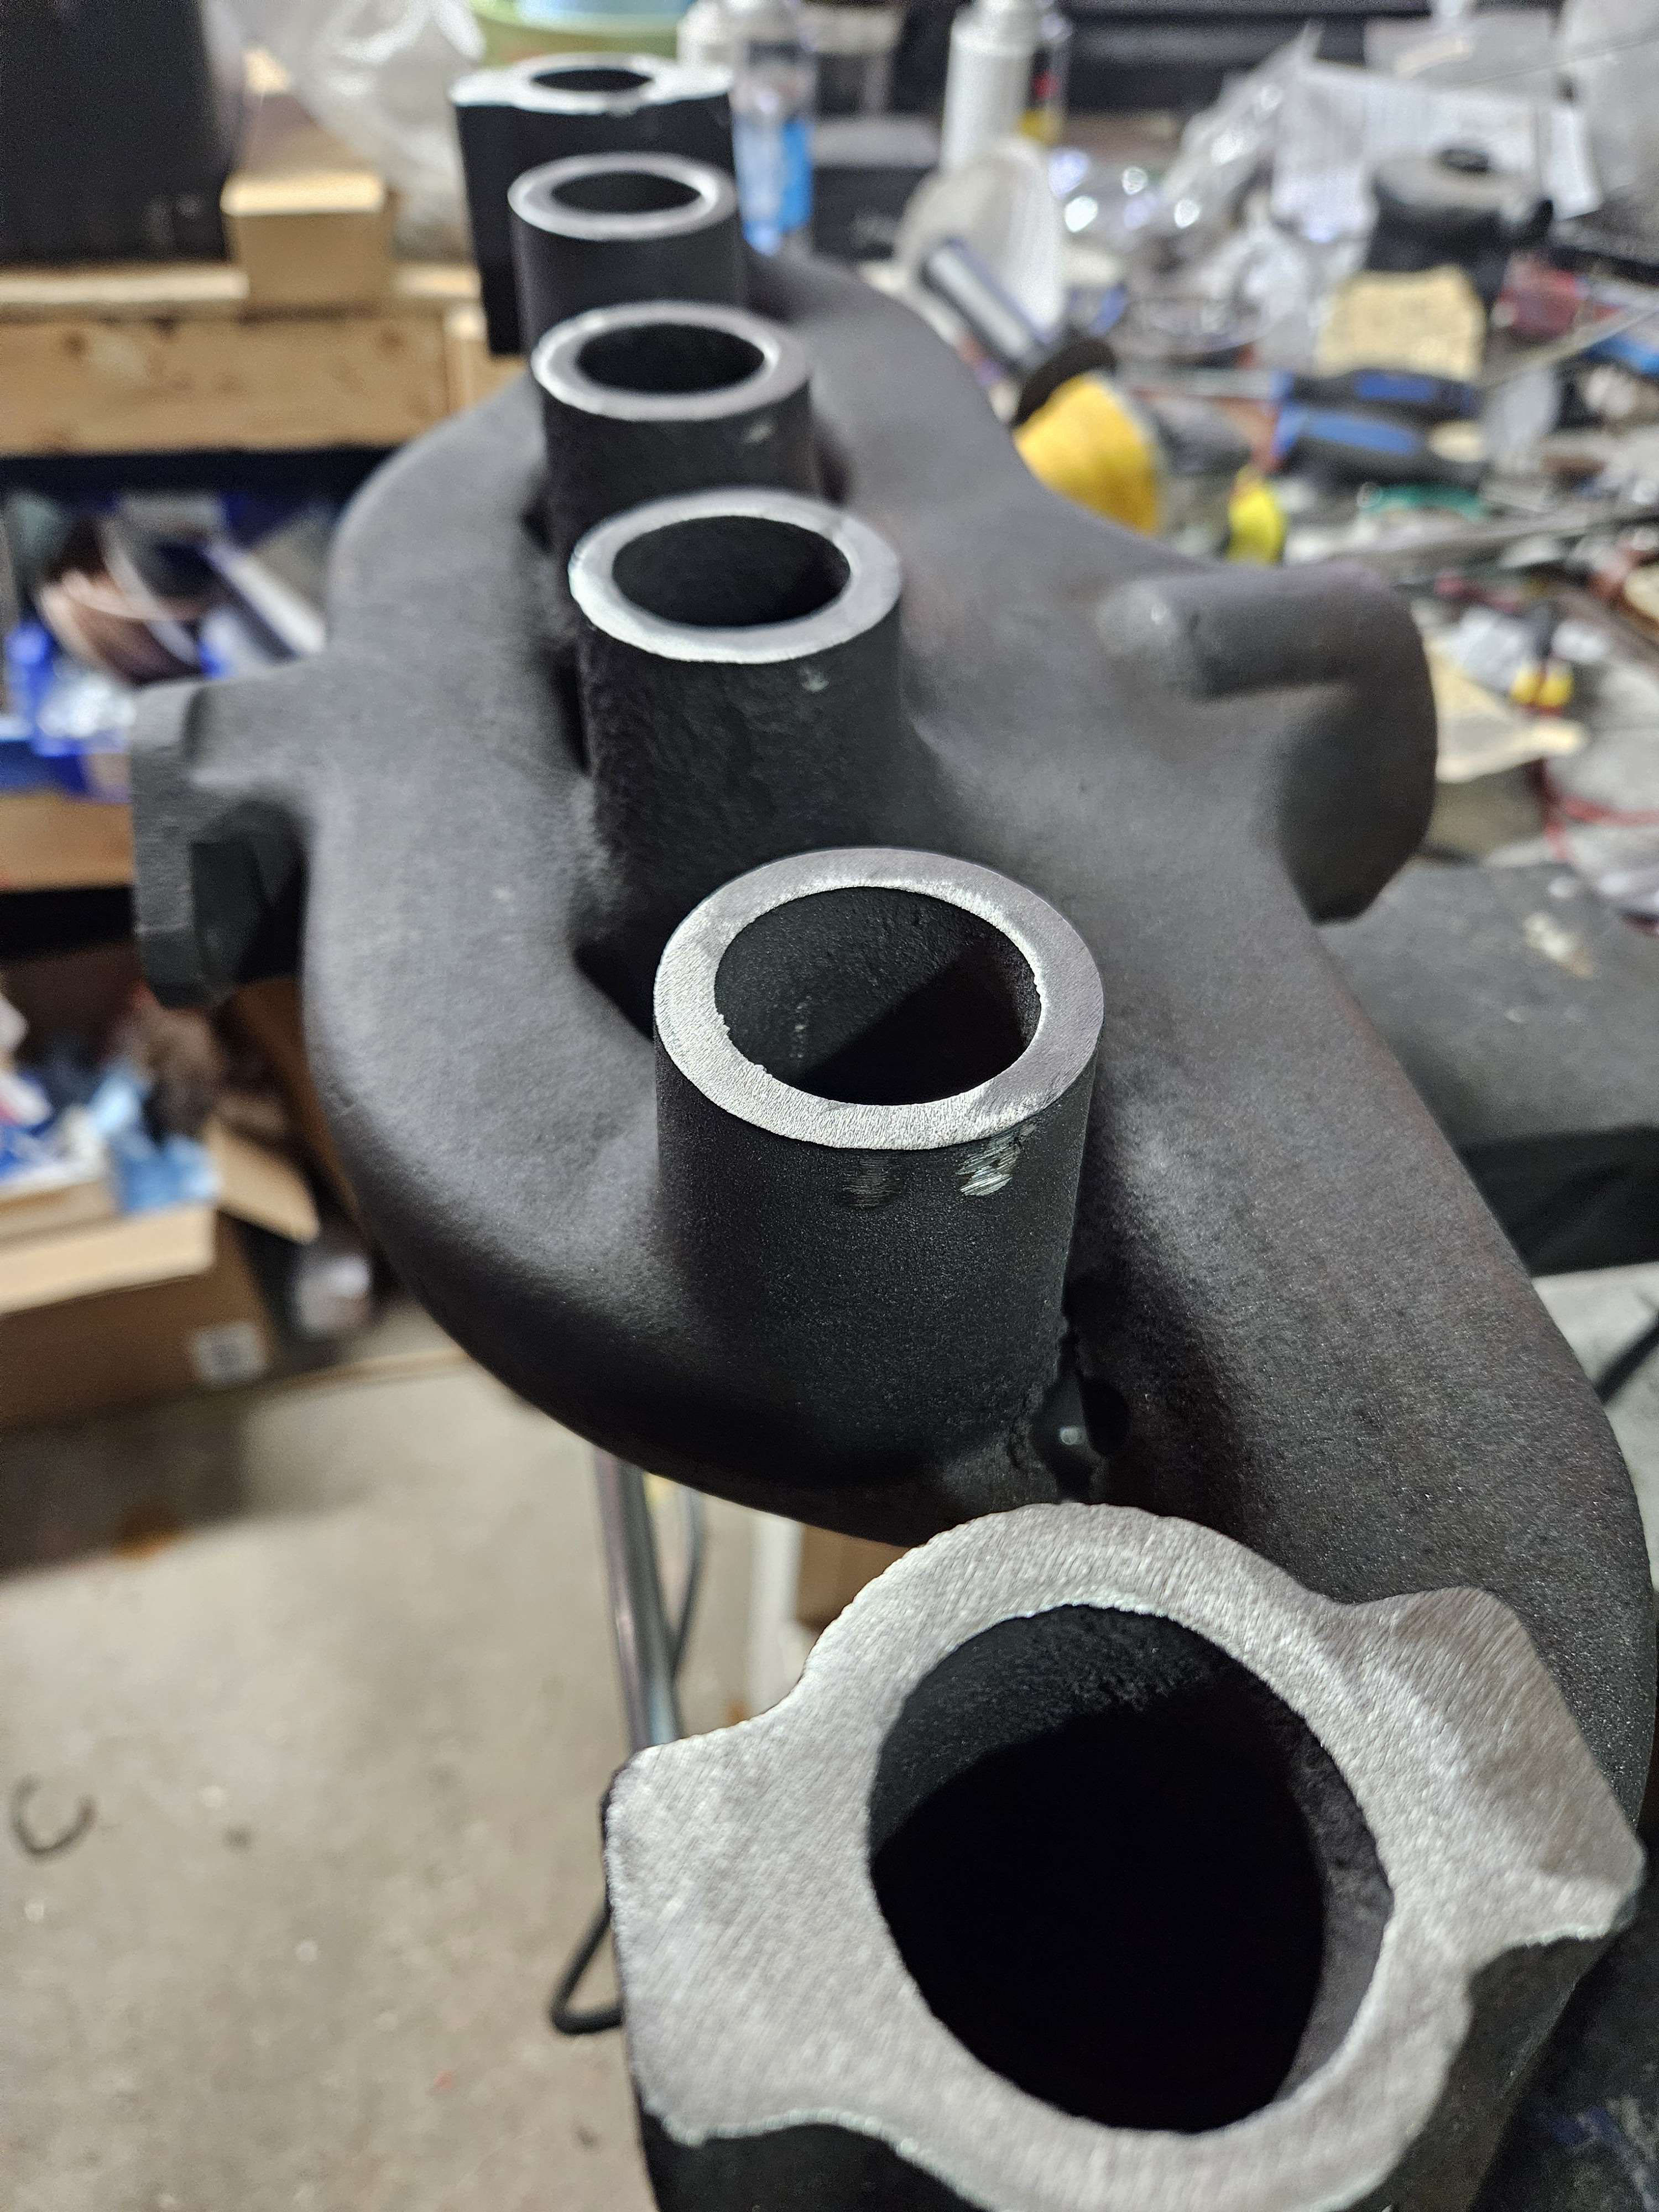 Grinding in progress, took me about 3 hours of spotting the high spots over and over, on top of a pane of glass covered in bearing blue dye for layout spotting. Scraping the high spots down until it was flat again without gaps or low/high spots. 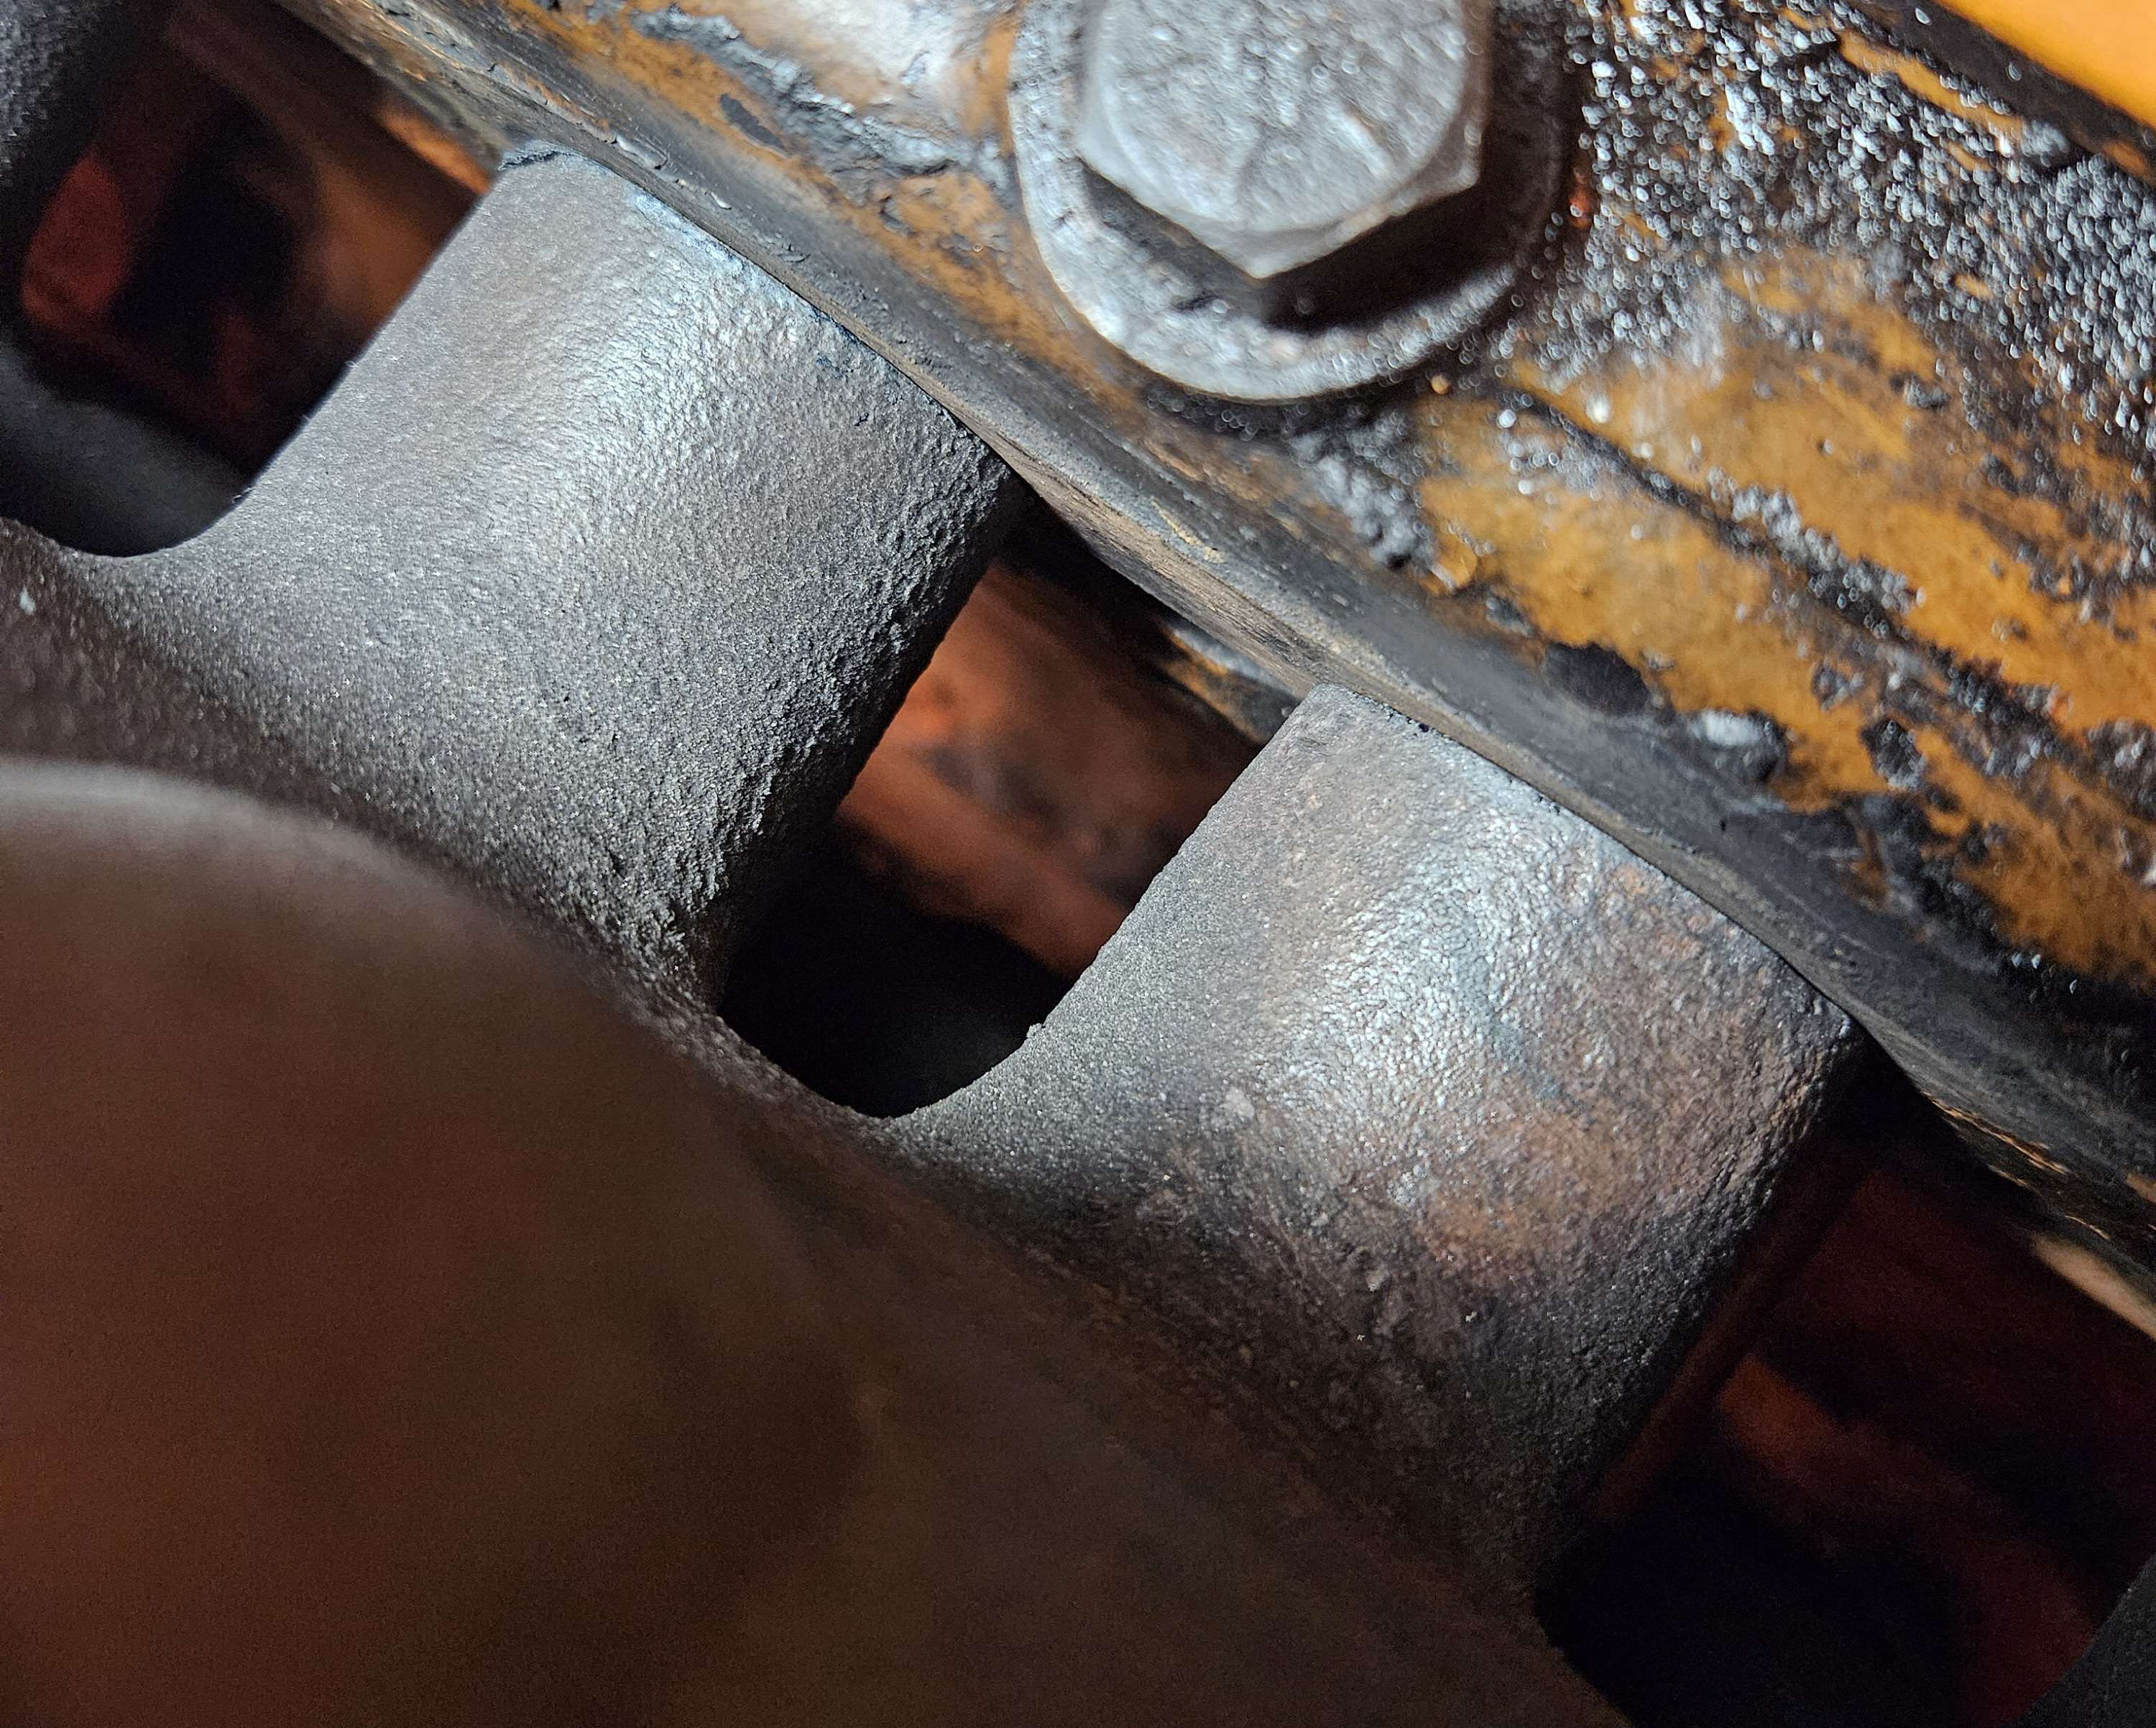 Here's a test fitment I did after 2 hours of grinding, not the final result as I spent more time afterwards perfecting it a bit further, but you can clearly see the huge difference this made in having a better fit. I'm glad this worked out, the forums helped figure things out on what to do, as well as a handy guide on youtube. https://www.youtube.com/watch?v=gxxyhvoMve0&t=2s" rel="nofollow - https://www.youtube.com/watch?v=gxxyhvoMve0&t=2s Now for the other news... my block is seeping coolant, so a forum member above, thanks WF-owner, mentioned tightening the bolts on the head.. So I took the valve cover off and noticed; 1. the bolts are under the rocker arm, tightening them will mean removal of said rocker arm 2. at the surface there is white milky oil. And then the panic set in, but I think I got it figured out why that is.. Something called condensation, not running the engine for very long and the fact that it's -10*c in my barn, from running a search on the internet I can conclude this is a natural occurring phenomenon when an engine is not able to burn off vapours because it didn't get hot enough by running long. I've only run it for 5-10mins tops in a freezing barn. There was even frost on the inside of the valve cover, by the air cleaner cap. I checked the oil dipstick, it looks normal color oil. The only area the milky oil occurred really is by the air cleaner pipe of the valve cover, definitely leading me to believe this is natural condensation happening due to rapid cooling of vapours not fully burned off. Opinions welcome, this is all very new to me, luckily there is so much information online about engines and symptons and all of that. I'm not ruling out a coolant leak, but there is anti-freeze in the coolant, so that should'nt freeze right? And the frost on the valve cover had a clear color, not green, which truely leads me to believe this is condensation only. Anyways here's a picture. PS; how do I remove the rocker arm assembly? for some reason I'm worried springs popping around and valves dropping down in the engine, lol!
 |
Posted By: Les Kerf
Date Posted: 08 Mar 2024 at 8:45pm
I applaud your tenacity and resourcefulness in hand-fitting that manifold!  Most of us would say that it should go to a machine shop but you got'er done! Most of us would say that it should go to a machine shop but you got'er done!On some engines you can use a crowfoot socket adapter so as to not need to remove the rocker shaft. The valves won't fall into the engine or go SPROINGGGG!!! if you do remove the rocker shaft (it just unbolts).
|
Posted By: WF owner
Date Posted: 09 Mar 2024 at 6:39am
|
Before you start it, crack the oil (drain) plug slowly. Keep screwing it out until liquid comes out (catch it in a pan). You will probably get water at first (hopefully not antifreeze). It will give you an idea what and how much contamination there is in the oil. I, personally, remove the rocker arm. It takes minutes and I feel I get a more accurate torque with a regular socket.
Sorry I haven't responded. We are in Florida and I'm not online much. |
Posted By: ElementalEarth
Date Posted: 10 Mar 2024 at 3:59pm
|
Well ran into a bit of a problem.. i was reassembling the rocker arm after tightening the headbolts, i noticed the rocker arm wouldn't sit down flush anymore with the head. I tried moving the pushrods a bit, but couldn't get it to sit down all the way in one spot. I figured the nuts holding the baffle and rocker arm down would tighten down the gap, and indeed they did, but in doing so I stripped the nut on the stud, at the spot where the rocker arm did not sit down properly. I can't back up the nut nor tighten it, it just spins freely in the position it stripped. The rocker arm does look flush now luckily. Any suggestions on how to get that stripped nut off the stud? And why the pushrod was holding up the rocker arm preventing it from sitting flush? The good news is, the head bolts have been tightened to the proper torque specifications and also there was no water found when I cracked the oil drain. Edit; beginner's mistake I suppose, I turned the engine over and realized pressure was relieved on said pushrods holding the rocker arm up. I suppose I needed to alternate tightening bolts down as I slowly turn over the engine and release valves? I could not find the proper procedure in the manual anywhere unfortunately, I don't think I did any major damage, maybe at the worst I stripped the stud a bit.. Am I able to pull out that stud from the top of the engine and replace it ?
|
Posted By: Les Kerf
Date Posted: 10 Mar 2024 at 10:42pm
Is the stripped nut on a stud like the one in this photo? If so, you should be able to put two nuts together on top and jam them tight, then unscrew the stud.
|
Posted By: ElementalEarth
Date Posted: 10 Mar 2024 at 11:01pm
Yep that's right. Seems like a replacement stud i can get from Agco if needed. Hoping it's just the nut thats stripped, we'll have to see I guess. Would I be able to just leave it on there? The other 3 nuts are properly tightened. But I guess that compromises the strength of the assembly ey? I might just order a replacement and swap it when i have time. |
Posted By: Les Kerf
Date Posted: 11 Mar 2024 at 8:10am
|
Is there room to add a nut above the one that is stripped and still fit the valve cover? |
Posted By: ElementalEarth
Date Posted: 11 Mar 2024 at 8:20am
That's what I was thinking as well, I don't know how much clearance the valve cover has underneath the cover, but worth finding out indeed!
|
Posted By: ElementalEarth
Date Posted: 11 Mar 2024 at 4:05pm
|
Got it figured out. I was able to replace the nut with another one and add a couple spacers in between to offset the stripped thread part on the stud. Was able to tighten it down. For some reason a couple of pushrods were sticking out higher than the highest, but I was able to turn the engine and let them settle. I adjusted the valve lash again to 0.015"cold on all valves. Closed it up with the valve cover and on to the next, curious to see if all this trouble was worth it to stop the seeping of coolant. No water found in oil though so that's good right? Still waiting on the stud for the manifold and the nuts, still some electrical wiring to do for the lights. Excited to get it going again, spring is on the horizon, the canadian geese are returning, they know best.
Thanks again for all the time and replies on here. Stay tuned! |
Posted By: ElementalEarth
Date Posted: 18 Mar 2024 at 9:17am
|
Hey all, lots to update, the tractor is running again! https://youtu.be/-VKsxz_Id0E" rel="nofollow - https://youtu.be/-VKsxz_Id0E And much better too I am finding. The manifold got fixed and she sounds much better now without throwing soot and sparks allover the place. I tightened the headbolts and that seems to have slowed or stopped the seeping by #1 cylinder. Will keep an eye on that for sure this upcoming growing season. Oil pressure is around 30psi. I installed a T fitting so I could have the warning light on the dash still.  For some reason my temp gauge stopped working (its new). It does read around 100 when I turn on ignition. My guess is the sending unit is sitting in an air bubble if that's possible, because I had to drain the coolant to do the head bolts tightening, so it's possible that the liquid is just not reaching to the sender, may need to drain the air a bit by cracking the plug open for the sending unit. It was working before as I noticed running the tractor for 5mins, temp got to 160. Swapped out a couple of broken headlights with new LED's, the difference is astounding haha.. I may need to replace all of them just to be on the same kind of light output, right now it just looks funny, but hey, it ain't broke..  Also cleaned up the dash, sprayed it with a rustoleum, rust color, to match the original rust color scheme that was throughout the dash. all new gauges, except for the Tachometer, which is not connected and probably never will as I switched to a newer style alternator with no tach hookup. But that's alright, I might get an aftermarket one at some point..  So what's left to do now.. basically tying up loose ends. Fluids will need to be changed still. One of the pistons on the loader still bent. Will keep a better eye on overall health now that I have more experience and time with her. Also, these forums and the speed of replies of folks on here has been extrordinary helpful with diagnosing and progressing. I know that I may not be able to contribute as much in terms of responding to other posts, as I generally lack experience to be of much help.. But I hope that if someone has a similar problem with their tractor model 170, they might find some information in this lengthy well detailed thread by using the search feature. As far as engine health, she sounds much better, I'm not sure if she is misfiring or not as Dr. Allis mentioned. I did check to see if the distributor was timed to the center mark in the flywheel and indeed it is. However I don't have a timing light or the knowledge to time it to the F25 mark. That might be something for next winter. Overall the rust on the body isn't too bad, but it would be great to just kind of freshen up the paint in the near future, especially since she lives mostly outside under cover of a tarp. Looking forward to the growing season ahead of us and how well she will run. I'm glad I took the time to learn and invest in this great tool. I have not counted the hours, but it's been many many hours in a cold barn. Luckily, it seems this was the best winter in terms of warmth to do this. Many days above freezing helped me progress faster. Thanks for reading ya'll! Busy season starting very soon, so this might be the last update in a while. Let me know what you think, if you made it this far haha. Advice, tips, cheers! Hope you all tractor on.  |
Posted By: JC-WI
Date Posted: 18 Mar 2024 at 10:03am
|
New temp gauge and old sender? May not be the correct ohms between the two... Might find the same for fuel gauge too unless you have the sender that is compatible to the gauge. ------------- He who says there is no evil has already deceived himself The truth is the truth, sugar coated or not. Trawler II says, "Remember that." |
Posted By: WF owner
Date Posted: 18 Mar 2024 at 12:00pm
| As I said earlier, keep checking the manifold nuts for tightness (after each heat cycle) until they don't move anymore. You will be surprised how much more they will tighten after running the tractor. |
Posted By: ElementalEarth
Date Posted: 07 May 2024 at 11:11am
 Well, folks, she's back at work. Did some tilling, pulling up grounding rods, hauling soil, firewood, the list goes on. She's running much better nowadays, thanks to all your advice and help! There is definitely more work needed to get done but in due time. Just wanted to give a little update with gratitude 🙏 |
Posted By: plummerscarin
Date Posted: 07 May 2024 at 11:40am

|