500 Loader Lift and Tilt Seal Replacement
Printed From: Unofficial Allis
Category: Allis Chalmers
Forum Name: Farm Equipment
Forum Description: everything about Allis-Chalmers farm equipment
URL: https://www.allischalmers.com/forum/forum_posts.asp?TID=193219
Printed Date: 24 Mar 2026 at 3:08pm
Software Version: Web Wiz Forums 11.10 - http://www.webwizforums.com
Topic: 500 Loader Lift and Tilt Seal Replacement
Posted By: calico190xt68
Subject: 500 Loader Lift and Tilt Seal Replacement
Date Posted: 01 Feb 2023 at 11:05am
|
Bought new seal kits from A&W to fix all of my cylinders. I have not done this before so I am looking for advice. A&W did send me a picture of a special tool that helps remove the cylinder but I can't envision it's use until I dig into it. It appears I have to make one like they have unless someone has another suggestion? Here is what it looks like. Any help and guidance on the steps to disassemble would be greatly appreciated. 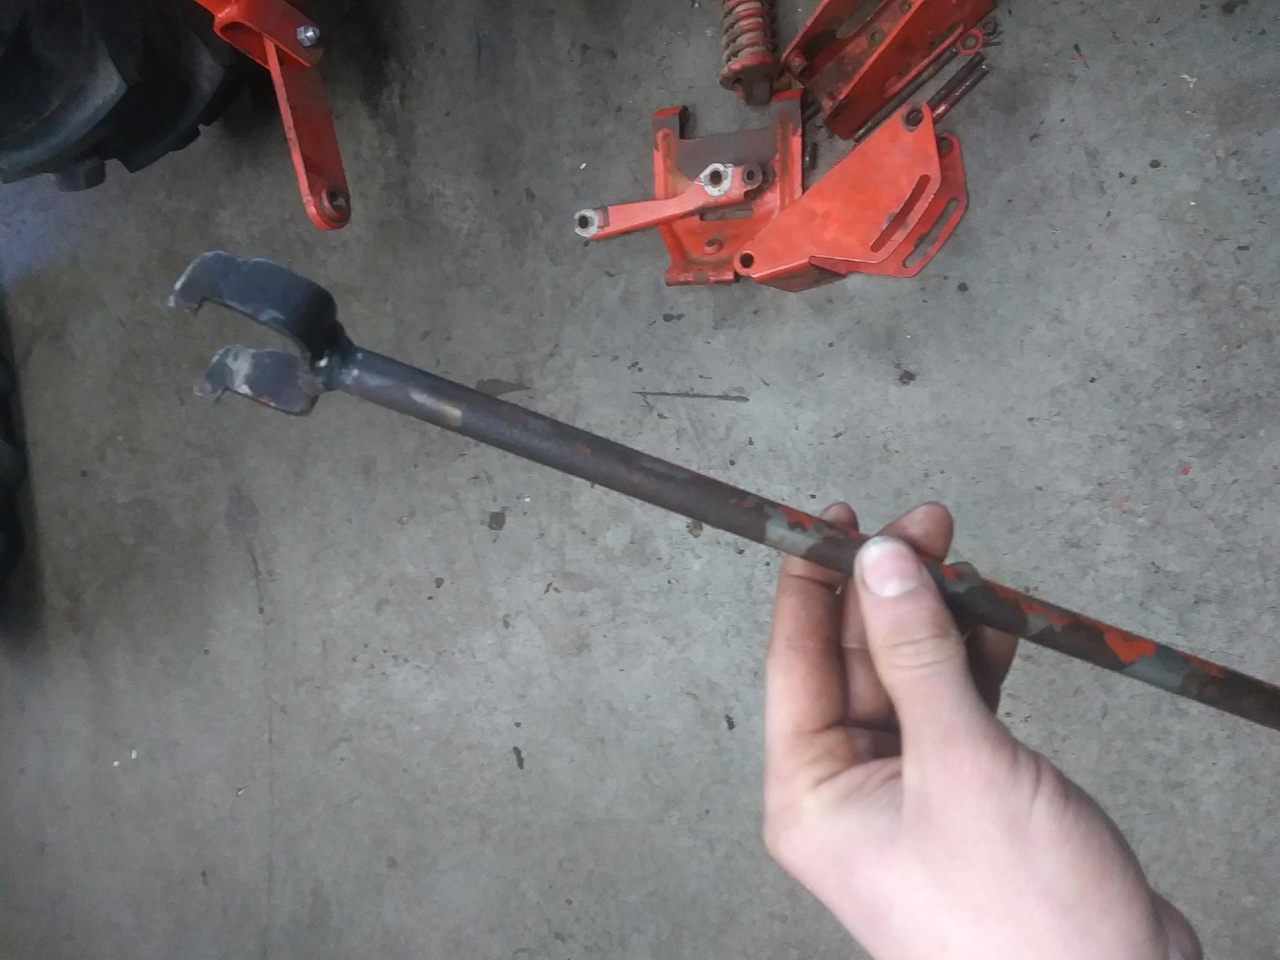 ------------- 80 7010, 80 7020, 68 190XTD, 67 190XTD, 500 Loader, AC 2000 Plow, Member Indiana A-C Partners, Member TAC |
Replies:
Posted By: DSeries4
Date Posted: 01 Feb 2023 at 2:45pm
|
If you have never done it before, just take the cylinders to a local hydraulic shop. They have the tools and experience to do the job properly and will stand behind their work. ------------- '49 G, '54 WD45, '55 CA, '56 WD45D, '57 WD45, '58 D14, '59 D14, '60 D14, '63 D15D, '66 D15II, '66 D21II, '67 D17IV, '67 D17IVD, '67 190XTD, '73 620, '76 185, '77 175, '84 8030, '85 6080 |
Posted By: calico190xt68
Date Posted: 01 Feb 2023 at 3:17pm
|
I understand the value of using a professional and know that is the safe thing to do, but I saw this as an opportunity to learn how to do it. I have had cylinders fail on my equipment and waited days to a week or more to get them rebuilt. I thought since this wasn't an emergency, I could take my time and not be pressed. I do realize not every cylinder is built the same nor the process the same but this would give me start. I also thought these cylinders might be easier to work on since they are older and possibly simpler. So I am not just being cheap in trying to save $200 per cylinder but trying to learn. If the tool to do this becomes a problem, then I may have to punt and go to a professional. ------------- 80 7010, 80 7020, 68 190XTD, 67 190XTD, 500 Loader, AC 2000 Plow, Member Indiana A-C Partners, Member TAC |
Posted By: steve(ill)
Date Posted: 01 Feb 2023 at 6:00pm
|
like you say, its not Rocket Science..... THe big thing is being able to unscrew the head off the cylinder to pull the rod and piston out... then having the right size socket to get the piston off the rod ( depending on cylinder design).... Im not familiar with that cylinder, but look at the HEAD where the rod comes out of the barrel and see how it unscrews. ------------- Like them all, but love the "B"s. |
Posted By: HudCo
Date Posted: 01 Feb 2023 at 9:44pm
| are they the ones that have the lock ring or wire that turns out by turning the cap |
Posted By: MACK
Date Posted: 01 Feb 2023 at 9:46pm
| A hammer and punch can be used in place of special tool. Once started to turn, it should turn easy. Tool could be easily made by welding two pins in a piece of flat metal. MACK |
Posted By: SteveMaskey(MO)
Date Posted: 02 Feb 2023 at 10:03am
 Here is one I made and one I bought. Unscrew
the cap where the shaft comes out and pull rod out. There will be a plug with
Orings and backups then on the end of shaft is the piston with cup seals. Pretty
straight forward just remember where everything goes when you take it apart |
Posted By: calico190xt68
Date Posted: 02 Feb 2023 at 12:29pm
|
Thanks everybody for the additional direction and tool picture. I thought I would tackle one of the tilt cylinders first since they are smaller. My seal kits should be showing up by Friday. I haven't envisioned everything yet so may have some more questions. Once I dig into it, it may be more obvious. ------------- 80 7010, 80 7020, 68 190XTD, 67 190XTD, 500 Loader, AC 2000 Plow, Member Indiana A-C Partners, Member TAC |
Posted By: steve(ill)
Date Posted: 02 Feb 2023 at 12:50pm
|
this guy is rebuilding a cylinder ( not Allis) that has a head similar to yours and shows how to use the tools.... general idea.. https://www.youtube.com/watch?v=L5RMF0fJsqA" rel="nofollow - https://www.youtube.com/watch?v=L5RMF0fJsqA ------------- Like them all, but love the "B"s. |
Posted By: calico190xt68
Date Posted: 02 Feb 2023 at 1:42pm
|
After watching the video, I understand better now how the spanner wrench is used. So big thanks on that! Will it really take that much force to remove the cylinder from the outside casing? Looks like he was fixing a much bigger cylinder so not sure I will encounter the same pressure. If it takes a bunch of pressure like that, I may have to work on my setup. ------------- 80 7010, 80 7020, 68 190XTD, 67 190XTD, 500 Loader, AC 2000 Plow, Member Indiana A-C Partners, Member TAC |
Posted By: MACK
Date Posted: 02 Feb 2023 at 8:37pm
| If you have a snap ring inside, grind burs from snap ring Grove. Don't clamp barrel of cylinder in vice over piston. Most don't pull that hard unless barrel has been mashed or dented. MACK |
Posted By: steve fischer
Date Posted: 02 Feb 2023 at 9:09pm
|
have rebuilt lots of them for the 400 and 500 loaders can do in 15 min if they come apart and i do have the allis tool to do them do not miss up the piston halves they are matched sets also have been using a quad ring for the rod seal ,number 222 ,work better then the oring on rod would not use a hammer and screw driver you will damage the thread inside the tube also i loosen the cap nut before i take cylinder off of loader ,the loader holds it solid to get the end cap lose
|
Posted By: steve(ill)
Date Posted: 02 Feb 2023 at 9:16pm
|
like Steve mentioned, loosen the head while on the tractor... I have done several loader / backhoe cylinders by pulling the rod pin at the end, unscrew the cylinder head, and pulling the rod and head out of the barrel and leave barrel on the tractor, hoses still connected.... take the rod and head to the shop for repairs..
------------- Like them all, but love the "B"s. |
Posted By: steve fischer
Date Posted: 02 Feb 2023 at 9:22pm
| I also leave barrel on loader do not have to take hoses off ,watch the flood have pail ready |
Posted By: calico190xt68
Date Posted: 03 Feb 2023 at 10:02am
I thought leaving the barrel installed on the tractor would avoid the
vice issue so glad to get that confirmed. I have a spanner wrench tool
on order that I think will work. Didn't get it from Allis though so
will see. I don't have the seal kit yet but are you suggesting replacing the orings with a number 222 quad ring? Where do I get that? Never done this so don't know much about the parts options. I was going to do one cylinder at a time so that should avoid getting piston halves mixed up unless the piston half is on the same cylinder? Does it make sense to position the cylinders with the piston all the way extracted when leaving it on the tractor or does it matter? Thanks for the details and sorry for not comprehending everything. ------------- 80 7010, 80 7020, 68 190XTD, 67 190XTD, 500 Loader, AC 2000 Plow, Member Indiana A-C Partners, Member TAC |
 steve fischer wrote:
Posted By: steve(ill)
Date Posted: 03 Feb 2023 at 12:15pm
|
i have not done this Particular cylinder... but MOST of the pistons on the end of the shaft are two halves... You take the NUT off the end of the shaft and pull off both halves of the piston... the seals are sandwiched inbetween the halves.. thats how you get them on.. So there is one half that faces toward the front of the shaft, and one that faces the BIG NUT. Yes... i would help to park with the cylinder extended and the piston up toward the HEAD end.. Then when you pull it out, there is not much oil setting on TOP of the piston.. if the cylinder is pointed DOWN, there will be oil BEHIND the piston after you pull the rod out. look at the above youtube movie at the 9:00 minute mark and you can see the guy pull the piston halves apart to install the new seals.
------------- Like them all, but love the "B"s. |
Posted By: calico190xt68
Date Posted: 03 Feb 2023 at 12:27pm
|
Thanks Steve, that helps me understand. Thanks for the additional advice. ------------- 80 7010, 80 7020, 68 190XTD, 67 190XTD, 500 Loader, AC 2000 Plow, Member Indiana A-C Partners, Member TAC |
Posted By: Gary
Date Posted: 03 Feb 2023 at 1:33pm
|
Here is a Link showing the Seal Kit required to repair one 400 / 500 Series Ram. You will find that most of the Video mentioned and shown earlier is quite different from your Ram. The retaining nut at the top of the cylinder and removed with the Special Tool, is very small - about the size of a pair of 'press in' seals. The upper shaft Bearing has 2 'O' Ringss, a small inner O Ring to seal against the shaft, and a larger outer O Ring to seal the Bearing to the outer cylinder. The remainder of the Seals ( including the Chevron Set) get assembled to the lower end of the Shaft. I strongly recommend you take pictures as you disassemble the old components and lay them out in order as you disassemble them. Gary https://www.ebay.com/itm/225264541591" rel="nofollow - https://www.ebay.com/itm/225264541591 |
Posted By: Michael Crowe
Date Posted: 03 Feb 2023 at 2:40pm
|
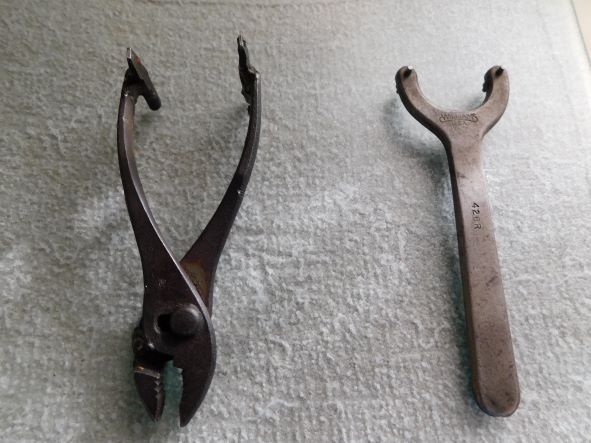
I just replaced the seals on my tilt cylinders yesterday, and plan to do the lift ones tonight. Here is a picture of the tool I used. I bought one like the one pictured on the right in the prior post but it was not big enough. I could have made it work, but found this other one. I worked great. Very easy to do once you get the nut loose. I went ahead and removed the barrel portion of the cylinder so I could clean it out. I plan to keep the tractor for a long time, so I figured it best to clean it out while i was this far into it. 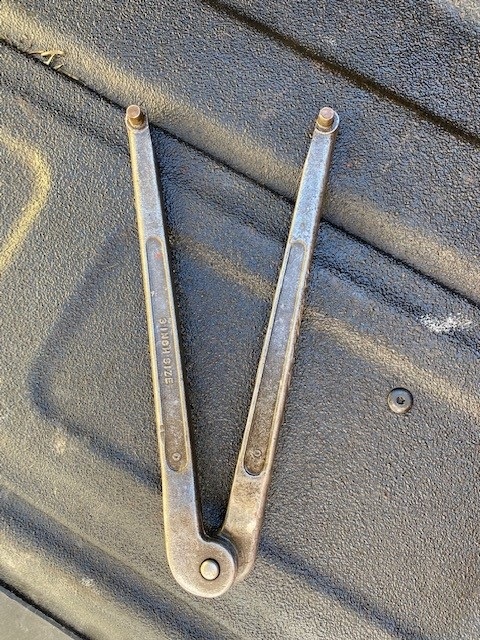 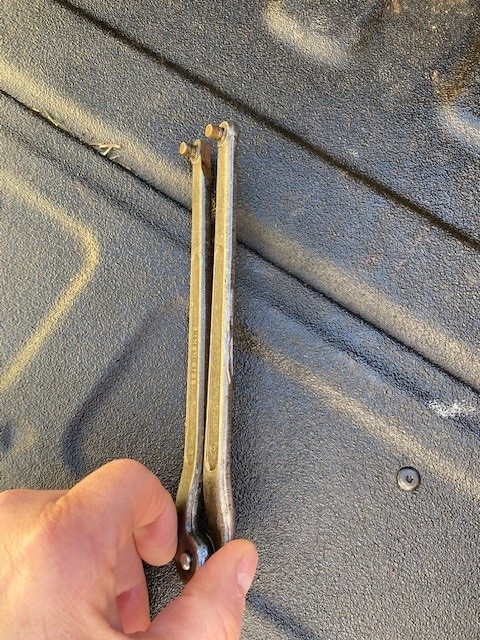 ------------- The 15th Annual Exclusive AC Swap Meet will be held in Boonville, MO, March 6-7, 2026. See the club website for details: http://www.moacclub.com/ |
Posted By: calico190xt68
Date Posted: 03 Feb 2023 at 3:45pm
Thanks for the info. Every response is making it clearer. That kit is the one I bought and from A&W tractor so that picture should be what I am getting. I will definitely take a picture as I disassemble. I may not get to it for another week as I am waiting on everything to arrive. ------------- 80 7010, 80 7020, 68 190XTD, 67 190XTD, 500 Loader, AC 2000 Plow, Member Indiana A-C Partners, Member TAC |
Posted By: calico190xt68
Date Posted: 03 Feb 2023 at 3:47pm
|
Good to know. How did you clean it out? I might do that after I get the barrel nut loose. ------------- 80 7010, 80 7020, 68 190XTD, 67 190XTD, 500 Loader, AC 2000 Plow, Member Indiana A-C Partners, Member TAC |
Posted By: Gary
Date Posted: 03 Feb 2023 at 7:11pm
|
I secured a rag to a Broom Handle with fine wire to wipe the inside. G |
Posted By: steve fischer
Date Posted: 03 Feb 2023 at 8:00pm
|
rod does not have nut on it , you take off the wear ring to get to the halves ,they are in a grove in shaft , next take off seal stack and them second wear ring and halves in second rod grove ,then you can take the other end out to install wiper , outer and inner orings , the inner is the one I use the quad ring and i install the back up to take up space flat side to quad
|
Posted By: calico190xt68
Date Posted: 04 Feb 2023 at 6:31am
|
If there is no nut, how do you separate the two halves? Is that what the tool I pictured first from a&w is for? ------------- 80 7010, 80 7020, 68 190XTD, 67 190XTD, 500 Loader, AC 2000 Plow, Member Indiana A-C Partners, Member TAC |
Posted By: Gary
Date Posted: 04 Feb 2023 at 6:46am
|
The 2 Piston halves are simply held together around the Shaft by the 2 wear strips near each end and the Chevron Seals assembled in the middle. The Bearing (with the 2 O Rings and 'O Ring Back-up) sits in the end of the open cylinder up against a machined recess, and held in place by that small nut. G |
Posted By: calico190xt68
Date Posted: 04 Feb 2023 at 7:28am
|
I haven't dug into it yet but that is not intuitive on how the two halves stay together without coming apart without a nut? Thanks for clarifying that though. I looked at the parts diagram on agco and there is definitely no nut pictured. ------------- 80 7010, 80 7020, 68 190XTD, 67 190XTD, 500 Loader, AC 2000 Plow, Member Indiana A-C Partners, Member TAC |
Posted By: calico190xt68
Date Posted: 04 Feb 2023 at 11:21am
|
Here is a picture of one of the lift cylinders. The others look the same. Those slots don't look right to me though and almost like it is chipped? Do I have a bigger problem? Slot looks a little longer than I expected. I noticed there are some really small slots that look factory made and maybe that is where the spanner wrench goes? Thanks for any insight. 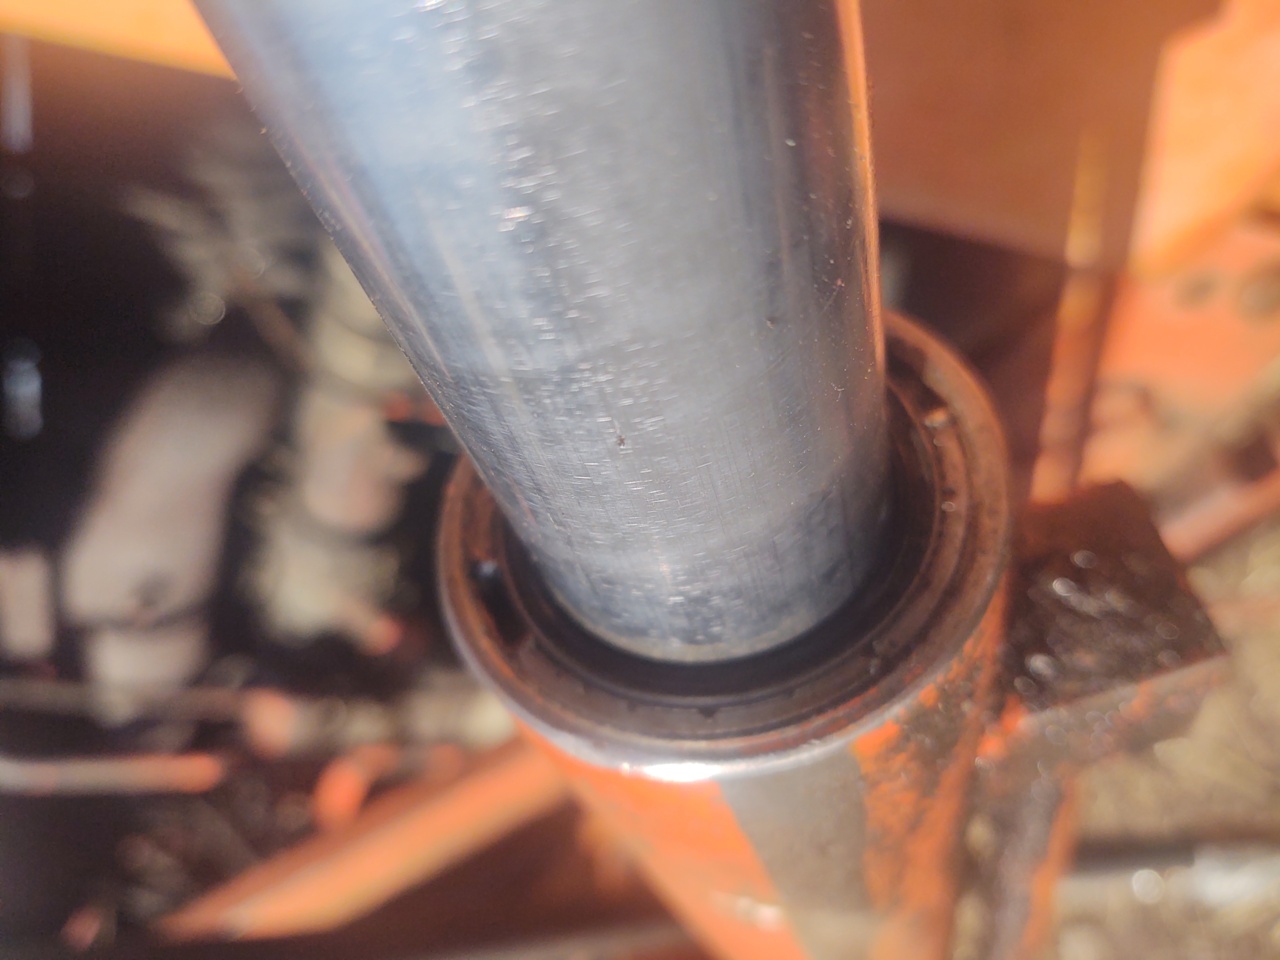 ------------- 80 7010, 80 7020, 68 190XTD, 67 190XTD, 500 Loader, AC 2000 Plow, Member Indiana A-C Partners, Member TAC |
Posted By: calico190xt68
Date Posted: 04 Feb 2023 at 11:34am
|
This is the other lift cylinder. Has the same long slot but looks broke to me. 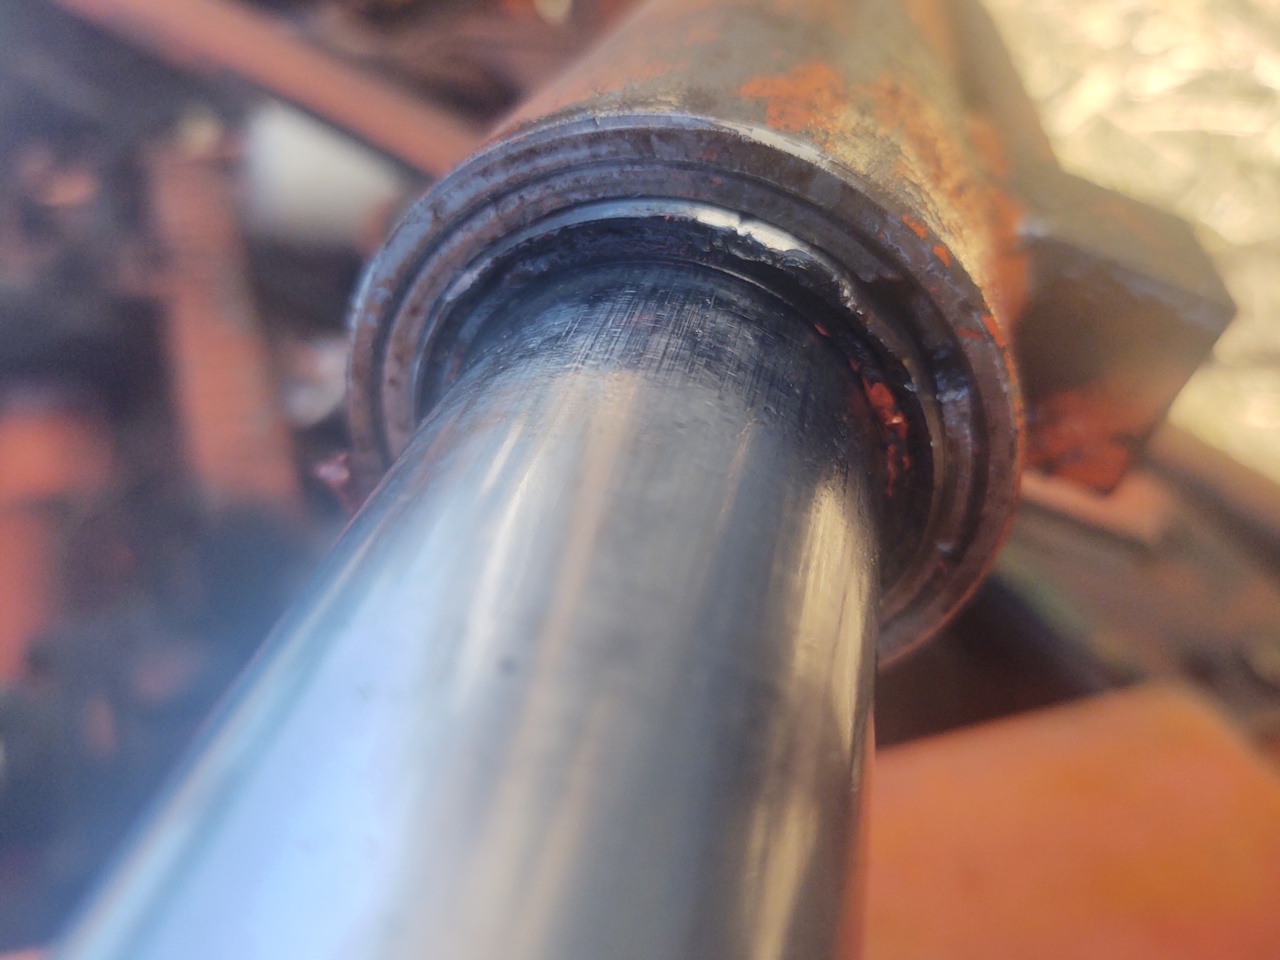 ------------- 80 7010, 80 7020, 68 190XTD, 67 190XTD, 500 Loader, AC 2000 Plow, Member Indiana A-C Partners, Member TAC |
Posted By: Jim.ME
Date Posted: 04 Feb 2023 at 11:35am
| The "ears" on the spanner tool A&W sent you a picture of would appear to closely match the slots in the gland locking ring (nut) in your cylinder picture. They look like they were turned out by being driven with a punch or screwdriver tip at some time in their life. |
Posted By: calico190xt68
Date Posted: 04 Feb 2023 at 2:30pm
|
Thanks and that makes sense. I was afraid they were broke so good to know. I am waiting on my spanner tool. That's why you don't want to use a punch then. ------------- 80 7010, 80 7020, 68 190XTD, 67 190XTD, 500 Loader, AC 2000 Plow, Member Indiana A-C Partners, Member TAC |
Posted By: calico190xt68
Date Posted: 27 Feb 2023 at 8:35am
|
Here is my update on this problem. I did get the lift cylinders rebuilt over the
weekend. I am going to document everything in another post. However, I did end up with a few twists. I decided to stop and get things clarified before I did the tilt cyllinders. I left the bucket up over night and it might have crept down 6 inches in 12 hours so I think that says it is fixed. The first cylinder had a
severe leak. However, I think I am missing a flat rubber
ring in the collar after reinstalling. When I went to do the second cylinder, I found the
flat rubber ring in the collar. It was missing in the first collar. I didn't see a flat rubber ring in my rebuild kit. I also ended up with two extra parts. I
couldn't figure out where they would go. My guess is that this rebuild
kit is for other cylinders too? See the pictures below. I don't
really want to take it apart at this stage but I rather be done with it so I might. My guess is that the Oring will slip around in the groove and eventually have the same situation. First collar. Notice the badly mangled O ring. Maybe because the flat rubber is missing? 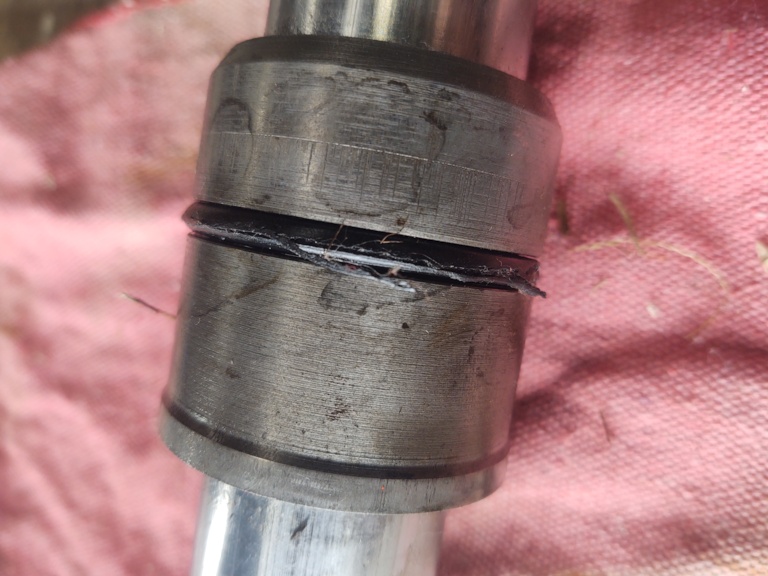 Here is second with flat rubber before i replaced the Oring. 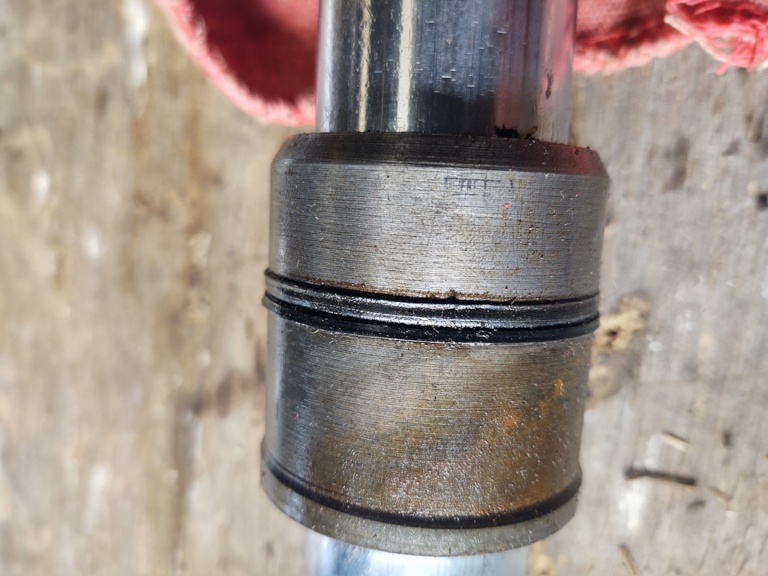 Here are the extra parts. Made me nervous but when I disassembled there was nothing that matched. 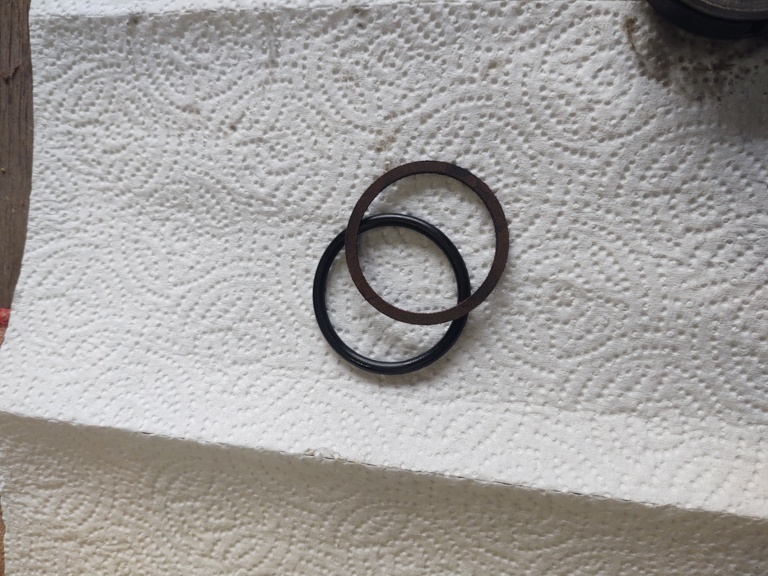 I could never wrap my head around how the bottom rings stay together until I pulled it apart. This is what I started with in case others might not know what it looks like. 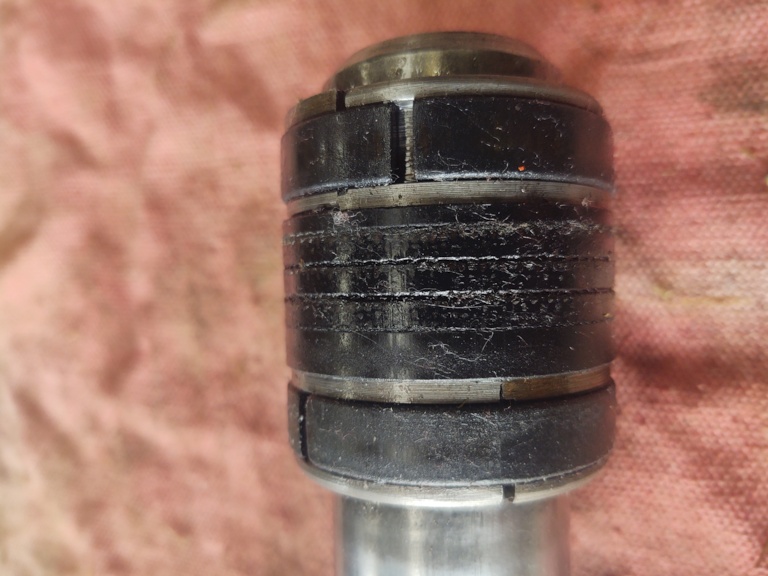 ------------- 80 7010, 80 7020, 68 190XTD, 67 190XTD, 500 Loader, AC 2000 Plow, Member Indiana A-C Partners, Member TAC |
Posted By: calico190xt68
Date Posted: 27 Feb 2023 at 10:16am
|
I called A&W and they said the extra parts are for the inside of the collar. I didn't replace the inside because I didn't see a matching part. They didn't look mangled either. I guess the hard brown washer and the smaller Oring can be used in place of the hard plastic ring I saw. See below picture on what I saw. As well, A&W also said there is only one Oring on the outside of the collar so I shouldn't have to take it apart. Now that this is clarified, I will take the tilt cylinders apart.  ------------- 80 7010, 80 7020, 68 190XTD, 67 190XTD, 500 Loader, AC 2000 Plow, Member Indiana A-C Partners, Member TAC |
Posted By: Gary
Date Posted: 27 Feb 2023 at 10:32am
|
Hi Calico Now that you have a cylinder taken apart, you will see that a lot of advice you were given above does not apply to your 'double acting' cylinder. - no big Head to unscrew - no big nut on the shaft to unscrew - DON'T use a hammer and punch to remove the recessed retaining Nut - use the Tool. As mentioned, could damage internal threads of Cylinder ( or nick Shaft ) - no 'come a-long Winch needed to pull the Shaft Assembly out. - no Snap Ring inside to debur Looking at your pictures, the part you are referring to as the Collar is actually called the Bearing. It doesn't move and is held in place by the internal 'Retaining Nut'. The Outer O Ring seals the Bearing to the Cylinder Wall. The smaller Internal O Ring seals the Bearing to the Piston Rod / Shaft. This is where one of those flat Washers goes. It is referred to as a 'Back-up Washer', and goes in the Bearing inside groove before the O Ring. The Back-up Washer goes next to the O Ring on the side towards the Nut. The Packing Set ( often called Chevron Seals because of their shape ), the 2 wide, flat 'Wear Strips', and the matched 'Bearing Halves - all get assembled to make up the 'Piston'. Hope this helps you to better understand the terminology and assembly for overhauling the Lift and Tilt Cylinders used on 400 Series and 500 Series Loaders. Gary ......................................................... Looks like you were getting your answer while I was posting. Did they tell you the proper location of the Back-up Washer ? FYI I get all my info from an Allis Loader Parts Catalog. G |
Posted By: calico190xt68
Date Posted: 27 Feb 2023 at 2:24pm
|
Thanks Gary for the terminology. Yes, they did tell me about the order of the internal rings had I used them. They said that the inner plastic ring was not standard that I show. It looked hard to remove and since I didn't have a matching part, I left it alone. i wonder if it seals correctly versus the spacer washer and the oring. Should I remove it on my tilt cylinders, if I find it? It was obvious that my outer orings on the bearing were damaged and bad. I am going to document this in detail when I am finally done. However, I tried to use a spanner tool but my nuts were so badly mangled by the last guy using a punch, I had no choice. I thought about cleaning up the nuts and grinding them square but I didn't want to do further damage. A&W said they try to make the slots square so that a spanner tool stays in the groove next time. My grease seal also was completely missing on the first cylinder which also made the spanner tool hard to keep in place. I also think it was a huge advantage to keep the cylinder on the tractor to do the job. As you point out, no vice needed, no big nut to unscrew, no come-along to pull it out. I pulled the first one by hand and it came out fairly easy because it was not sealed well. The second was a different story and I could not pull by my own force. However, I got smart and used the tractor to push the rod out and free the bearing (I called it previously collar) from the cylinder. I removed the top pin from the loader, unscrewed the retaining nut, retracted it back with joystick and then forward with tractor hydraulics and it popped right out. I then pulled by hand the rest of the way. I also didn't realize that once you disconnect the rod part of cylinder from the loader, the other side doesn't work. I thought the other side would continue to work and move the loader up and down. That's why I could use the tractor to remove the rod from the cylinder though. I spent a lot of time looking at parts and trying to make sure I knew what I was doing. Now that I have done it twice, I think I can do it pretty quickly. I am happy to have learned and not screwed up anything learning! ------------- 80 7010, 80 7020, 68 190XTD, 67 190XTD, 500 Loader, AC 2000 Plow, Member Indiana A-C Partners, Member TAC |
Posted By: Gary
Date Posted: 27 Feb 2023 at 8:11pm
|
Calico Look closely at the Link to the picture of a compete Seal Kit that I sent you on Feb. 2. The top row left end, and centre row left end are the 2 Piston Wear Strips. The top row centre would be the 'Back-up flat Washer' for the smaller inner O Ring inside the Bearing ( Re: Collar ) The top row right end would be the 'Wiper Seal', next to the Nut. The centre row centre is the inner O ring and requires the 'Back-up flat Washer. It's purpose is to squeeze the O Ring and force it to seal tighter against the shaft and to the Bearing Groove. I believe whatever is in that inner Bearing Groove needs to be removed. Perhaps try the Bearing on the Shaft with the existing seal and see how snug a fit it is when attempting to move it. It needs to be a rather snug fit and difficult to move along the Shaft. Otherwise it will leak Oil out the end. The centre row right end would be the Bearing Outer O Ring. I would carefully inspect and feel the Inner Surface of the Orange Cylinder to be sure it is smooth with no nicks or other damage. Something has seriously damaged that existing seal in your picture. Gary |
Posted By: calico190xt68
Date Posted: 28 Feb 2023 at 8:50am
Gary, thanks again for the detailed advice. The bearing was tight when I tried to move the bearing down the rod for final assembly. I couldn't move it with my hand. I took a block of wood and hammer and nudged it down the rod. However, that does not mean that the hard plastic piece is correct for the long term. I will attempt to remove the hard plastic on the tilt cylinders (assuming it is there) and use the correct parts. It may not come out easy. It seems to be a hard plastic and not flexible at all. There is no gap in it either. Any ideas or tricks to remove it? Once I start tearing it up, I will have to get it out. How would i feel way down into the cylinder for nicks? Not sure my hand or arm can go very far into it? ------------- 80 7010, 80 7020, 68 190XTD, 67 190XTD, 500 Loader, AC 2000 Plow, Member Indiana A-C Partners, Member TAC |
Posted By: Gary
Date Posted: 28 Feb 2023 at 7:39pm
|
No not way down in the orange cylinder, just the top 2 inches or so, where the 'outer O ring will travel "while you are installing the 'Bearing'. Once you install the top Bearing and it is seated in the recess at the top of the Cylinder, the Nut holds it in place and the outer O Ring will never move. Gary |
Posted By: Alex09(WI)
Date Posted: 12 Mar 2023 at 11:06pm
|
Better late than never I guess, but we just made a step by step video for rebuilding these A-C specific cylinders. Hopefully it will give you more guidance when you reseal the other 2 cylinders. part 1: https://youtu.be/dZ6JCjeOZw8" rel="nofollow - https://youtu.be/dZ6JCjeOZw8 part 2: https://youtu.be/6pcUCdmVLoc" rel="nofollow - https://youtu.be/6pcUCdmVLoc part 3: https://youtu.be/CpNOT1uJu3M" rel="nofollow - https://youtu.be/CpNOT1uJu3M part 4: https://youtu.be/d5vi120ZR6I" rel="nofollow - https://youtu.be/d5vi120ZR6I ------------- www.awtractor.com A&W TRACTOR 920-598-1287 KEEPING ALLIS-CHALMERS IN THE FIELDS THROUGH THE 21ST CENTURY |
Posted By: Dave (NE)
Date Posted: 13 Mar 2023 at 1:07pm
|
Good videos! ------------- Do not argue with an idiot. He will drag you down to his level and beat you with experience. Mark Twain. |
Posted By: WF owner
Date Posted: 13 Mar 2023 at 2:10pm
|
Alex, Great videos!!! How about starting a new thread about rebuilding these cylinders and asking it be moved to "Knowledge Based". Curt
|
Posted By: calico190xt68
Date Posted: 13 Mar 2023 at 6:48pm
|
Yes, I could have used these videos before I tackled my job! However, I have goofed around and not done the tilt cylinders so learned a few tricks from the videos before I do them. I was going to make a video about the repair but yours is a lot better than what I can do. I had a hard time with those last piston halves and kind of pounded them in. I saw no other option at the time. Don't think I did any damage but I was worried about that. I do think removing the piston while on the tractor is still a good idea. Once it is out, you can still remove the cylinder. I did not do a proper inspection on the cylinder as done in the videos since I left them on the tractor though. Nice work and thanks for the videos. It really makes it very clear on how to do the job now. I vote for knowledge base too. It isn't hard if you have a little guidance. ------------- 80 7010, 80 7020, 68 190XTD, 67 190XTD, 500 Loader, AC 2000 Plow, Member Indiana A-C Partners, Member TAC |
Posted By: AC7060IL
Date Posted: 14 Mar 2023 at 7:23am
|
Alex09(WI), your 500 loader cylinder rebuild videos are awesome! Thanks for sharing. Are the big items; rams(cyl rods?), bearings, pistons, & pipe canisters still available? |
Posted By: calico190xt68
Date Posted: 07 Aug 2023 at 2:58pm
|
Another update on this issue. After about 3 weeks the cylinder started leaking again. So, I replaced the seal kit based upon Alex's A & W Tractor videos thinking I did something wrong. After doing it twice, I decided to get some professional advice and it turns out that my rod has a slight bend in it. I noticed that it did not leak when mostly retracted and did not leak when mostly extended but leaked in the middle. Apparently, the cylinder didn't leak after I put the new seal kit in it because it needed to be used to wear the seal by the bend. The consensus is that if I installed it incorrectly, it would have leaked immediately. To replace the rod it was estimated to cost about $500 per cylinder. One was way worse than the other. So, I decided to look around for new ones. I found Majister Hydraulics (that claimed to be made in Europe and not China) bought a 2 inch bore by 36 inch stroke cylinder and it fit perfectly as the lift cylinder. The rod diameter is 1.25 inches versus 1.5 inches on the original cylinder but it seems to have plenty of power on lift. It is way more controlled on up and down now. No leaks either. Best of all I got it for $209 and free shipping. I am probably going to replace the tilt cylinders next. I measured the maximum lift height and it is sitting at about 133 inches so very close to the original cylinder on a 190xt. The only thing I miss is the metal line going to the top cylinder inlet like the original. I had to zip tie the hose to keep it stationary. Ignore the worn out tire, that is getting replaced too. Driving on the road too much has worn it out. Here it is installed: 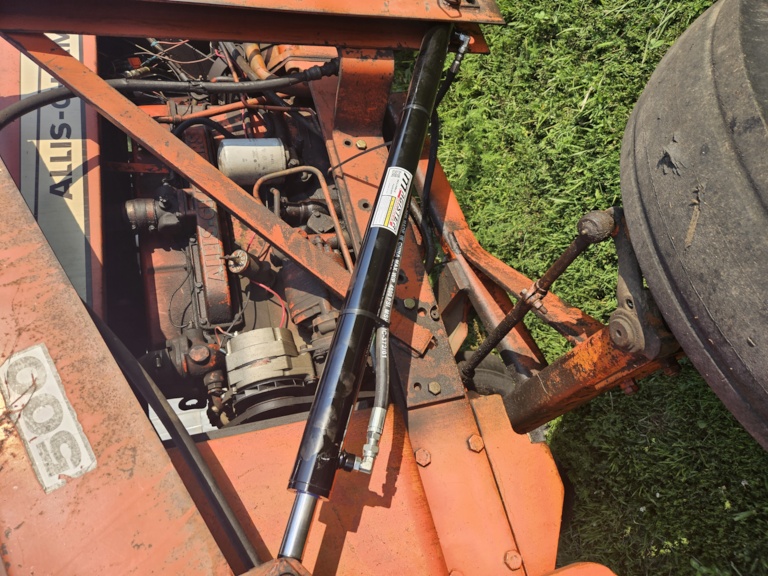 ------------- 80 7010, 80 7020, 68 190XTD, 67 190XTD, 500 Loader, AC 2000 Plow, Member Indiana A-C Partners, Member TAC |
Posted By: Gary
Date Posted: 21 Feb 2025 at 8:09pm
|
So Michael Did you end up replacing 'all' 4 of your repaired / resealed cylinders with those new black ones? I did all 4 cylinders on my 415 about 5 years ago, and so far so good. Gary |
Posted By: calico190xt68
Date Posted: 22 Feb 2025 at 9:58am
|
I did replace all 4 cylinders with the black ones. They work well as replacements so far. The 190xt is down right now for multiple repairs. I overused it as a loader tractor and clutch is going to be replaced. Got a skidsteer to avoid that in the future once fixed. ------------- 80 7010, 80 7020, 68 190XTD, 67 190XTD, 500 Loader, AC 2000 Plow, Member Indiana A-C Partners, Member TAC |