1949 Allis Chalmers WD project
Printed From: Unofficial Allis
Category: Allis Chalmers
Forum Name: Farm Equipment
Forum Description: everything about Allis-Chalmers farm equipment
URL: https://www.allischalmers.com/forum/forum_posts.asp?TID=176306
Printed Date: 17 Mar 2026 at 1:59am
Software Version: Web Wiz Forums 11.10 - http://www.webwizforums.com
Topic: 1949 Allis Chalmers WD project
Posted By: 55allis
Subject: 1949 Allis Chalmers WD project
Date Posted: 27 Nov 2020 at 7:10pm
|
Greetings to all, I got a straight WD, it runs very good, it has pretty good 16.9-28 back tires, and not too many leaks. My most favorite thing about it is it starts on a half a crank. It also has been converted to alternator and negative ground. Might paint it up some time after I get the “bugs” worked out of it. 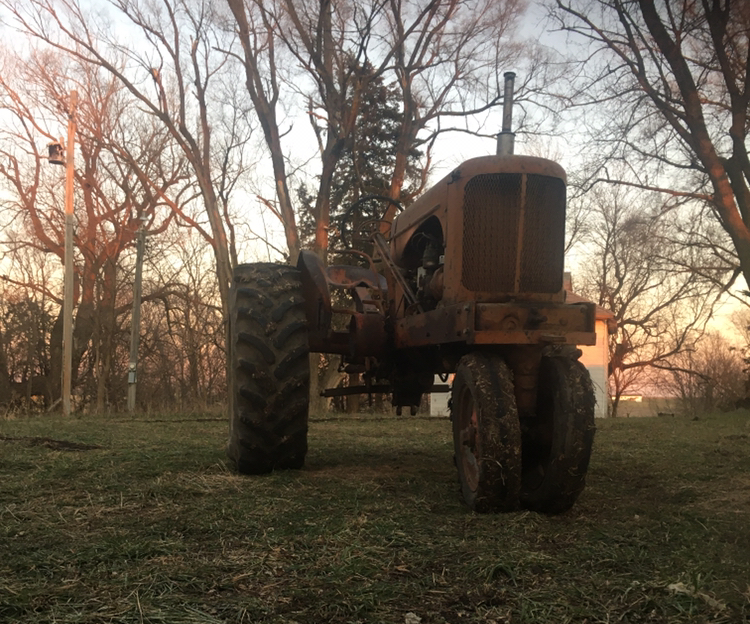
|
Replies:
Posted By: Sugarmaker
Date Posted: 27 Nov 2020 at 8:02pm
|
Congrats on the new tractor! They can still do some work! Have fun with it! Regards, Chris ------------- D17 1958 (NFE), WD45 1954 (NFE), WD 1952 (NFE), WD 1950 (WFE), Allis F-40 forklift, Allis CA, Allis D14, Ford Jubilee, Many IH Cub Cadets, 32 Ford Dump, 65 Comet. |
Posted By: ac hunter
Date Posted: 28 Nov 2020 at 8:06am
| Always glad to hear when someone adopts another Allis. Those WDs are mostly pretty easy to work on. I'm sure you will enjoy it and thanks for sharing the picture. Let us know about what you do to your new project. |
Posted By: jlbintn
Date Posted: 28 Nov 2020 at 9:20am
|
Gratz on the new addition to the family. Not many leaks is just a great reason to justify painting.... at least that's what I tell my wife
 |
Posted By: 55allis
Date Posted: 28 Nov 2020 at 9:41pm
| How far apart do people take these older tractors apart for a restoration? Just out of curiosity. Thinking of a frame down paint job next year when it warms up. |
Posted By: Sugarmaker
Date Posted: 29 Nov 2020 at 7:40am
|
Well to each there own. I do refurb, clean and paint. I dont go to the level of rerstoration. But I have taken the frame rails off each of the tractors that I painted. Also almost all of the other bolt on components too. It is a lot of work and time. I am happy with the end results. Would recommend the best automotive or industrial paint you can get too. my first one has faded some due to using paint without hardners and lower cost paint. Good luck with your tractor! They sure do look sharp with a new paint job! Regards, Chris ------------- D17 1958 (NFE), WD45 1954 (NFE), WD 1952 (NFE), WD 1950 (WFE), Allis F-40 forklift, Allis CA, Allis D14, Ford Jubilee, Many IH Cub Cadets, 32 Ford Dump, 65 Comet. |
Posted By: 55allis
Date Posted: 29 Nov 2020 at 2:22pm
|
Does this look like a good paint and the right paint? https://www.tractorpartsasap.com/allis-chalmers-persian-orange-ii-tractor-paint-108317.html" rel="nofollow - https://www.tractorpartsasap.com/allis-chalmers-persian-orange-ii-tractor-paint-108317.html |
Posted By: 55allis
Date Posted: 27 Dec 2020 at 9:04pm
|
Put new spark plugs (Autolight 295) And a new radiator hose. The old hose fell apart. And got it back together and started it. It started on the second crank with no choke so thought I might have got the spark plugs right. 
|
Posted By: dawntreader74
Date Posted: 27 Dec 2020 at 10:09pm
| good looking wd;; got a 48 an 49 an 50+51 like them all. |
Posted By: 55allis
Date Posted: 03 Jan 2021 at 2:54pm
|
So now with a update. Got ready to drive it on a five mile road trip home and as so as I got to the driveway it started spitting and sputtering so I put it on half choke and it died so started it again and got in the shed so I cleaned out the sentiment bowl and it ran fine. I think I will take the gas tank off and clean it out. 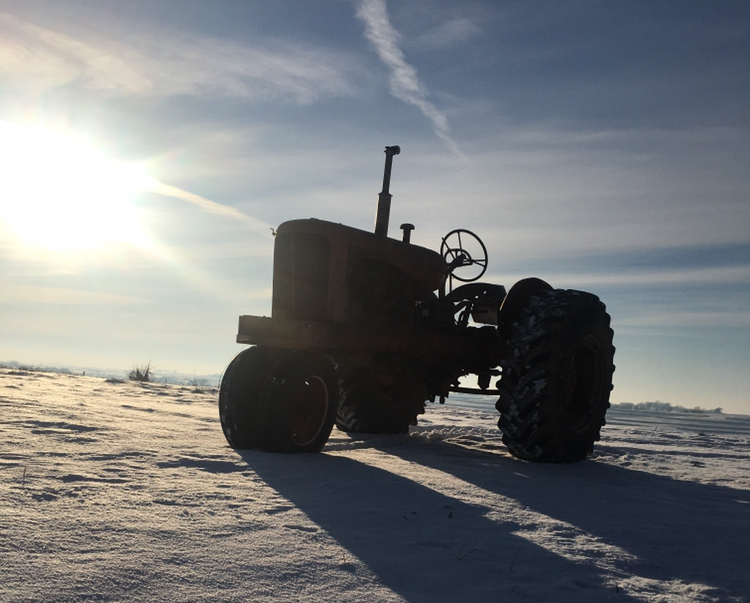
|
Posted By: Brian G. NY
Date Posted: 03 Jan 2021 at 8:24pm
Correct paint is Persion Orange #1.....but a lot of people use the newer color.
|
 55allis wrote:
Posted By: 55allis
Date Posted: 05 Jan 2021 at 6:10pm
That same place has Persian #1 but it’s not in stock. |
Posted By: 55allis
Date Posted: 06 Jan 2021 at 8:47pm
|
I’m thinking that the Tallman’s ag Specialty Paint is the same as Van Sickle paint but not sure. I called Tallmans and they told me to order off of VanSicklepaint.com. It is about $40 for a gallon of Persian #1. |
Posted By: Dakota Dave
Date Posted: 07 Jan 2021 at 12:11am
| The tractors I've painted. I just take the sheet metal parts off easy off scrape and hot pressure wash then paint the alternator starter and distributor cap come off tape it up. Block it up and remove the rims. If you not removing the tires just tape up the rubber. The cast parts I paint over the original paint and sand and prime the sheet metal. Hang it all up with safety wire and you can paint it all in one shot. I dues van sickle restoration paint add the hardener and reducer according to the instructions on the can. My tractor park inside but 20 years after the last paint they still look good. Only bad paint I have is the rear step where I throw the chains. I put no skid on the step. |
Posted By: john(MI)
Date Posted: 07 Jan 2021 at 10:36am
I guess you'll have to change your handle on here too! ------------- D14, D17, 5020, 612H, CASE 446 |
Posted By: 55allis
Date Posted: 07 Jan 2021 at 6:42pm
| Ok now I’m wondering if anyone has put carriage bolts on the hood-to-radiator shell bolts? |
Posted By: Dakota Dave
Date Posted: 08 Jan 2021 at 11:25pm
| Why would you want to its already hard enough to hold a wrench in side to keep a nut from turning. I do use carrage bolts in the top two holes they have a washer and nut to sandwich the light brackets that are then tightened into the weld nuts with a locknut up inside to keep from turning. Gives the tractor a bug eye look but the factory lights are mostly useless when you have a loader on. |
Posted By: plummerscarin
Date Posted: 09 Jan 2021 at 5:41am
| Were they originally a machine bolt with a slotted head for flat screwdriver? |
Posted By: 55allis
Date Posted: 13 Jan 2021 at 11:13pm
Yes I’m thinking that would be true. 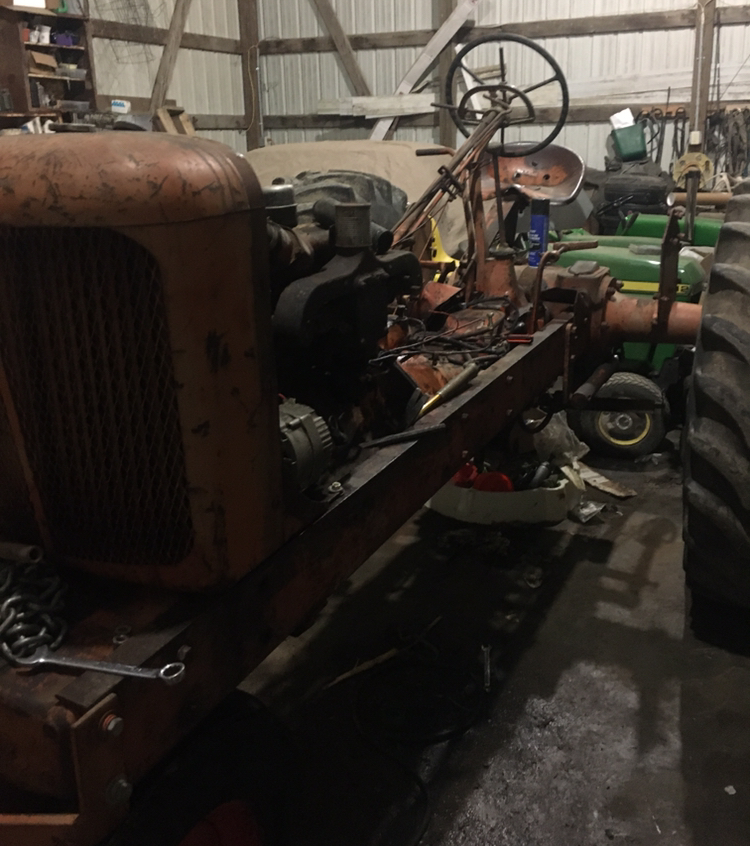
|
Posted By: LaJaMe
Date Posted: 14 Jan 2021 at 8:51pm
| I used round headed screws with alan slots on my 45 |
Posted By: 55allis
Date Posted: 15 Jan 2021 at 7:28pm
Would anyone know what kind of decals it should have? I have a new-old stock kit I found weather it is the right one. 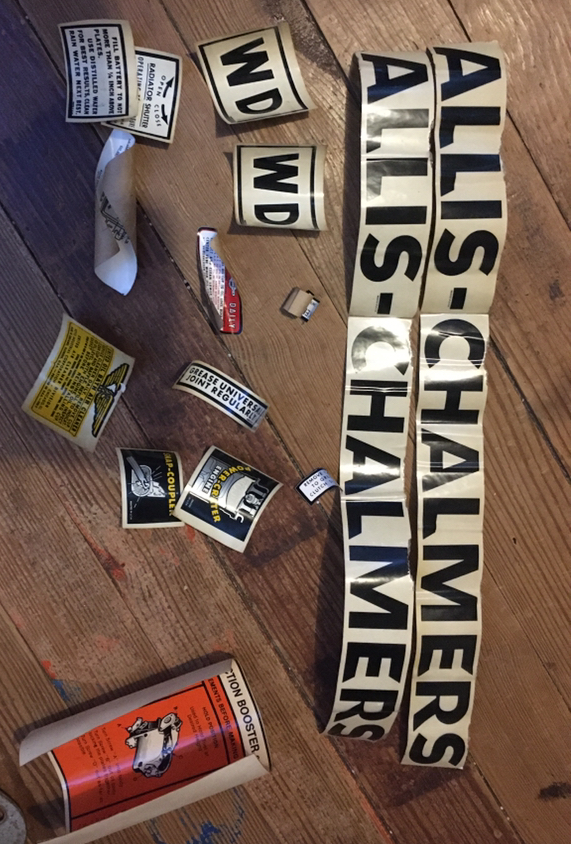
|
Posted By: Sugarmaker
Date Posted: 16 Jan 2021 at 8:23am
|
55, Mine are a little different. lets see if I can find a picture or two. These are from Sandy Lake but sure others have them too. I believe these to be more correct on the name. They have a white outline:  I have seen the ones you have used. I dont think they are correct. But they sure will work if they will stick. The exact location is another questionable thing. I found a original tractor with the decals and used those dimensions to set name decals. Regards, Chris ------------- D17 1958 (NFE), WD45 1954 (NFE), WD 1952 (NFE), WD 1950 (WFE), Allis F-40 forklift, Allis CA, Allis D14, Ford Jubilee, Many IH Cub Cadets, 32 Ford Dump, 65 Comet. |
Posted By: DSeries4
Date Posted: 16 Jan 2021 at 10:14am
These are decals from the 1970s. Not correct for a 50s era tractor, but that is what Allis carried at the time. They should look like what is shown in Sugarmaker's picture. Get a good vinyl set from Maple Hunter.
------------- '49 G, '54 WD45, '55 CA, '56 WD45D, '57 WD45, '58 D14, '59 D14, '60 D14, '63 D15D, '66 D15II, '66 D21II, '67 D17IV, '67 D17IVD, '67 190XTD, '73 620, '76 185, '77 175, '84 8030, '85 6080 |
Posted By: 55allis
Date Posted: 16 Jan 2021 at 2:27pm
Ok. Now it shows three different kinds so it has a cheaper kit , a vinyl kit, and a blue kit. 
|
Posted By: Sugarmaker
Date Posted: 16 Jan 2021 at 9:18pm
|
I dont think you want the blue. I believe those were on some WC or very early WD's. Someone will let you know. Did you try Maple Hunter? They have a good selection. I get mine from Sandy Lake sometimes too. Good luck in your hunt! Regards, Chris ------------- D17 1958 (NFE), WD45 1954 (NFE), WD 1952 (NFE), WD 1950 (WFE), Allis F-40 forklift, Allis CA, Allis D14, Ford Jubilee, Many IH Cub Cadets, 32 Ford Dump, 65 Comet. |
Posted By: 55allis
Date Posted: 16 Jan 2021 at 9:35pm
That picture is a screenshot of maple Hunter Decals. |
Posted By: AC720Man
Date Posted: 17 Jan 2021 at 1:22pm
|
Vinyl cut is what I use from Maple Hunter. They have good decals although I cant tell if that has the white background that Chris has. Spay water on with a water bottle and apply. The water allows movement of the decal to place it. Blot dry and squeegee the bubbles out. ------------- 1968 B-208, 1976 720 (2 of them)Danco brush hog, single bottom plow,52" snow thrower, belly mower,rear tine tiller, rear blade, front blade, 57"sickle bar,1983 917 hydro, 1968 7hp sno-bee, 1968 190XTD |
Posted By: 55allis
Date Posted: 17 Jan 2021 at 1:51pm
|
Here is a link to their website https://www.maplehunterdecalsindiana.com/allis-chalmerswdvinylcut.aspx" rel="nofollow - https://www.maplehunterdecalsindiana.com/allis-chalmerswdvinylcut.aspx |
Posted By: Sugarmaker
Date Posted: 17 Jan 2021 at 2:13pm
|
55, Sorry I missed that. I didnt read down in the add far enough. I have had reall good service from them too. When I messed up my WD45 hood name decals they sent me a new set before I even paid for them! There is a technique to applying the decals too. I would have to go back and look at some pictures because I am old and have CRS! I believe mine were the vinyl decals. I think you want the ones with the white background. Regards, Chris ------------- D17 1958 (NFE), WD45 1954 (NFE), WD 1952 (NFE), WD 1950 (WFE), Allis F-40 forklift, Allis CA, Allis D14, Ford Jubilee, Many IH Cub Cadets, 32 Ford Dump, 65 Comet. |
Posted By: 55allis
Date Posted: 17 Jan 2021 at 3:13pm
I just remembered I have ordered decals from them before for a ji case and haven’t had any problems yet. I just drew a line with a pencil and lined it as much as possible. The picture below is of it.  Sorry for it being a case.
|
Posted By: IBWD MIke
Date Posted: 18 Jan 2021 at 11:03am
I thought having CRS, cold rolled steel was a good thing. I keep a supply around here for repairs that pop up. Or did you mean Can't Remember S***? I'm guessing the later, seam to have plenty of that too!
|
Posted By: 55allis
Date Posted: 19 Jan 2021 at 9:46am
I took the manifold off and broke a stud which luckily it just broke the threads on the end off.  I also got some Persian #1 paint and also Hardener/Catalyst for hardener from Van Syckle. |
Posted By: 55allis
Date Posted: 07 Mar 2021 at 9:41pm
Have it about ready to paint but still haven’t figured out a way to have it on a stand for painting with the tires/rims and frame rails off. 
|
Posted By: plummerscarin
Date Posted: 07 Mar 2021 at 10:04pm
Maybe try drilling and bolting channel iron to the bell housing like I did? The part you miss painting could be touched afterwards and covered by the frame rails anyway.The final drives are on jackstands now. Move them out to the hubs for paint.
|
Posted By: 55allis
Date Posted: 20 Apr 2021 at 2:09pm
|
I finally got a chance to work on it the other day and ended up taking a car stand and putting it under the angle iron that is under the engine on the front. I got both frame rails and the front wheels off. As I was talking to my cousin, we got talking about getting front mud scrapers that they was a rare option from the factory? 
|
Posted By: 55allis
Date Posted: 24 Apr 2021 at 9:20pm
I found the “mud scrapers“ in a local barn. 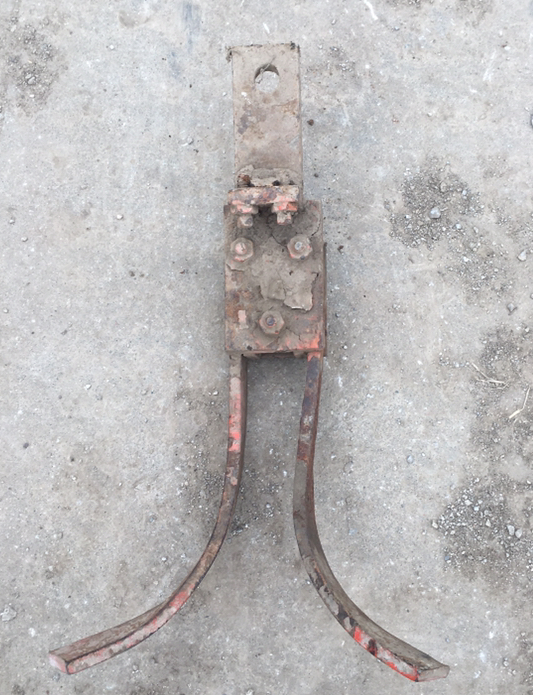
|
Posted By: 55allis
Date Posted: 06 May 2021 at 10:56pm
|
Does anyone have a opinion about self etching primer? I’ve never really have tried it on anything to know if it’s worth the time and money. |
Posted By: AC720Man
Date Posted: 07 May 2021 at 10:39am
|
I use self etching primer on all of mine followed by gray primer. Seals the metal to prevent rust. I have been very pleased with the results. ------------- 1968 B-208, 1976 720 (2 of them)Danco brush hog, single bottom plow,52" snow thrower, belly mower,rear tine tiller, rear blade, front blade, 57"sickle bar,1983 917 hydro, 1968 7hp sno-bee, 1968 190XTD |
Posted By: 55allis
Date Posted: 11 May 2021 at 11:41pm
|
I might than put it on everything I sandblasted. For a update on the tractor, I got the one tire off to get the rim welded on, I also got a picture of it down below. 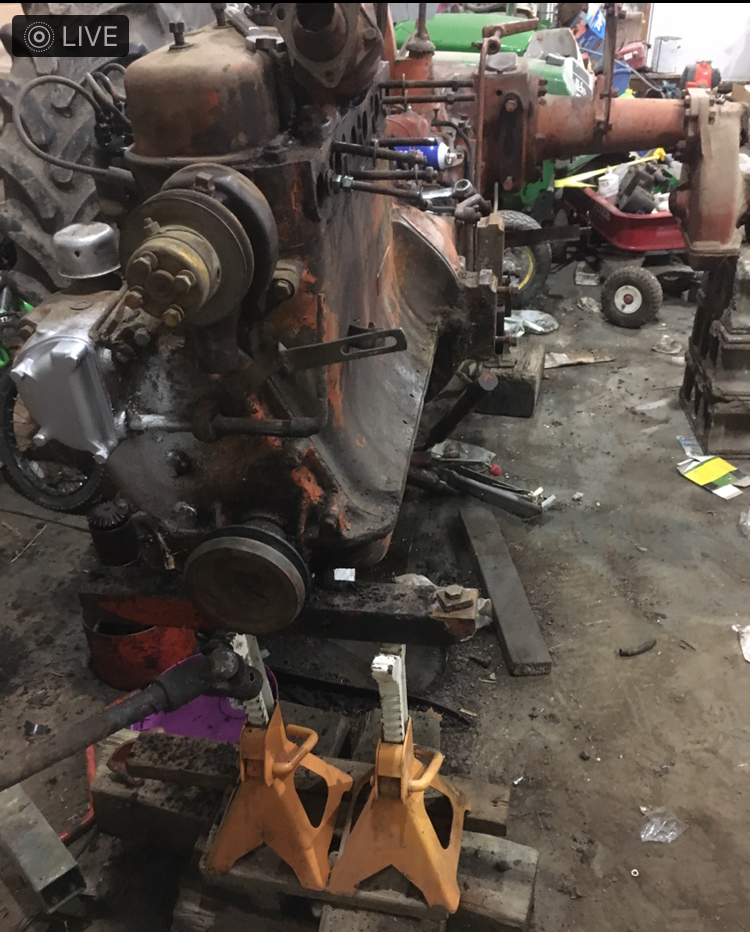
|
Posted By: ac hunter
Date Posted: 12 May 2021 at 7:17am
|
55, Just be very careful when you are working on that tractor with the wheels off / disassembled. I always thought the ones I worked on that way were top heavy and kind of clumsy to handle. Wouldn't want a mishap. Looks like you are making good progress.
|
Posted By: Alberta Phil
Date Posted: 12 May 2021 at 10:06am
|
I'll second AC hunter's comment about safety. I notice you are using concrete blocks to support the tractor. And they are set in the weakest orientation to bear weight. They are a disaster waiting to happen as they can suddenly break with no warning. There have been guys badly injured or killed due to this happening. I would highly recommend that you get some solid wood blocking or heavy duty axle stands to support your tractor!! We want to be able to see the progress on this project continue!
|
Posted By: 55allis
Date Posted: 12 May 2021 at 10:45pm
|
I do have a safety stand under where the drawbar goes. I also taped/painted up the hydraulic hoses to the snap coupler rams 
|
Posted By: Sugarmaker
Date Posted: 13 May 2021 at 7:26am
|
I built a frame for the back of the tractor to support it where the rock shaft attaches. I must say you need to be very careful with these perched on blocks. As others have mentioned wooden blocking is safer and steel members bolted to the tractor frame or structure are safer. We just want you around for a long time!:) Lots of moves to make on your WD. Keep going! Here is a shot of my support system. Frame in back and steel saw horse in front. Any time your lifting any or moving it it can shift and move.  Here is a shot where I was going to do the final painting so the second steel saw horse went under the rear end. the frame came off and I set the rear down on two bolts threaded into the underside. then set this down on the bolts. At this point it could still tip and get out of balance. Use caution!  Regards, Chris
------------- D17 1958 (NFE), WD45 1954 (NFE), WD 1952 (NFE), WD 1950 (WFE), Allis F-40 forklift, Allis CA, Allis D14, Ford Jubilee, Many IH Cub Cadets, 32 Ford Dump, 65 Comet. |
Posted By: 55allis
Date Posted: 18 May 2021 at 2:49pm
I got it mostly primed but now I’m stuck waiting for the humidity to go down. It has been raining about every night just enough to keep the humidity up. 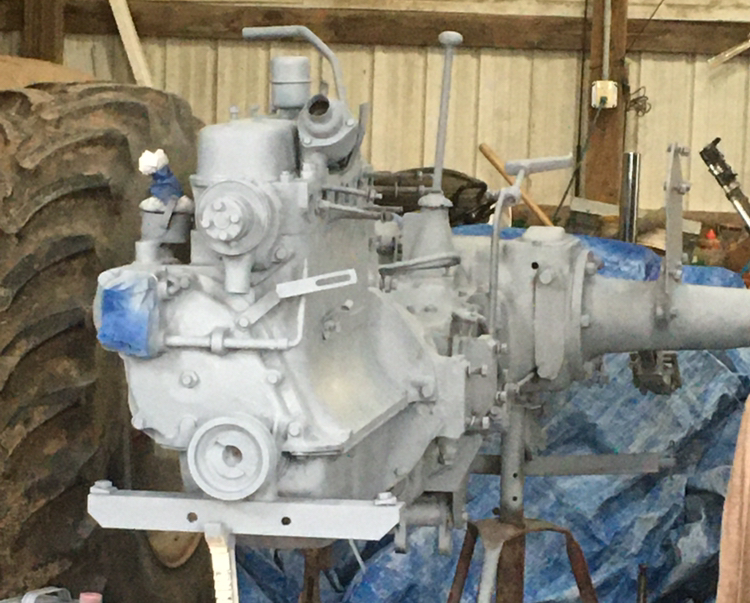
|
Posted By: Sugarmaker
Date Posted: 19 May 2021 at 9:53pm
|
Looking real good! Thanks for the update! Regards, Chris ------------- D17 1958 (NFE), WD45 1954 (NFE), WD 1952 (NFE), WD 1950 (WFE), Allis F-40 forklift, Allis CA, Allis D14, Ford Jubilee, Many IH Cub Cadets, 32 Ford Dump, 65 Comet. |
Posted By: 55allis
Date Posted: 19 May 2021 at 10:11pm
Today I got it painted and I love it!!! 
|
Posted By: ac hunter
Date Posted: 20 May 2021 at 2:37pm
| Looks shiny. Bet you can't wait to get it assembled. Keep up the good work and pictures. |
Posted By: 55allis
Date Posted: 27 May 2021 at 10:29pm
Got a question, where to get oil pressure gauges that are just like the original? I ordered one from tractorpartsASAP.com and it is NOT ANY WHERE CLOSE to the original. 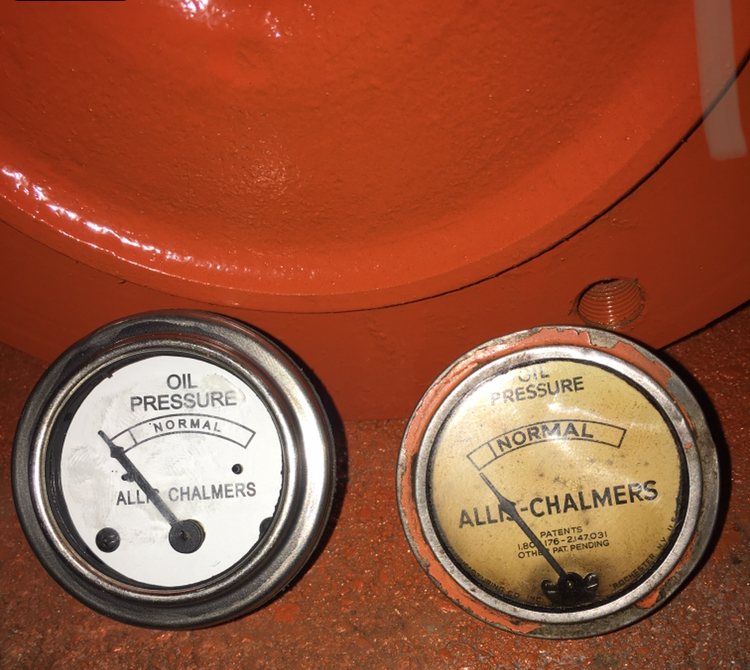 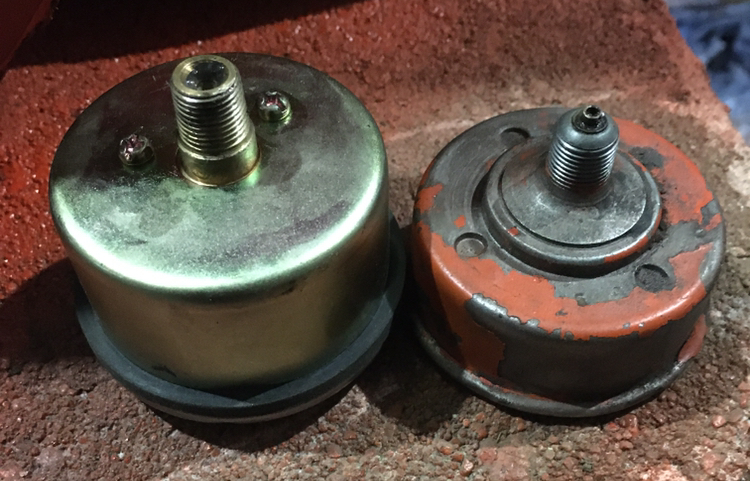
|
Posted By: Sugarmaker
Date Posted: 28 May 2021 at 8:07am
|
Looking good on the paint! Yes your going to like the look! New gauges do leave something to be desired. Not sure there are any better ones?? Maybe some one knows more about these than me. Your doing good on the WD! Regards, Chris ------------- D17 1958 (NFE), WD45 1954 (NFE), WD 1952 (NFE), WD 1950 (WFE), Allis F-40 forklift, Allis CA, Allis D14, Ford Jubilee, Many IH Cub Cadets, 32 Ford Dump, 65 Comet. |
Posted By: garden_guy
Date Posted: 28 May 2021 at 9:23am
|
Looking incredible! I got my new oil gauge from Steiner but didn't take a pic before it was installed. Will try to remember to take a pic. I did get my new temp gauge from AGCO as I felt the aftermarket ones didn't quite look right.
|
Posted By: 55allis
Date Posted: 28 May 2021 at 8:59pm
| I got all brand new knobs and gauges other than that oil pressure gauge they look like original. I will try to get a picture of the tractor later. |
Posted By: 55allis
Date Posted: 28 May 2021 at 10:10pm
 Pictures as I promised. |
Posted By: 55allis
Date Posted: 29 May 2021 at 7:14am
Does anyone know what this spring goes to? It fell off onto the floor when I took the frame rail off. I put a spark plug (only thing I could get my hand on at the time) beside it for sizing.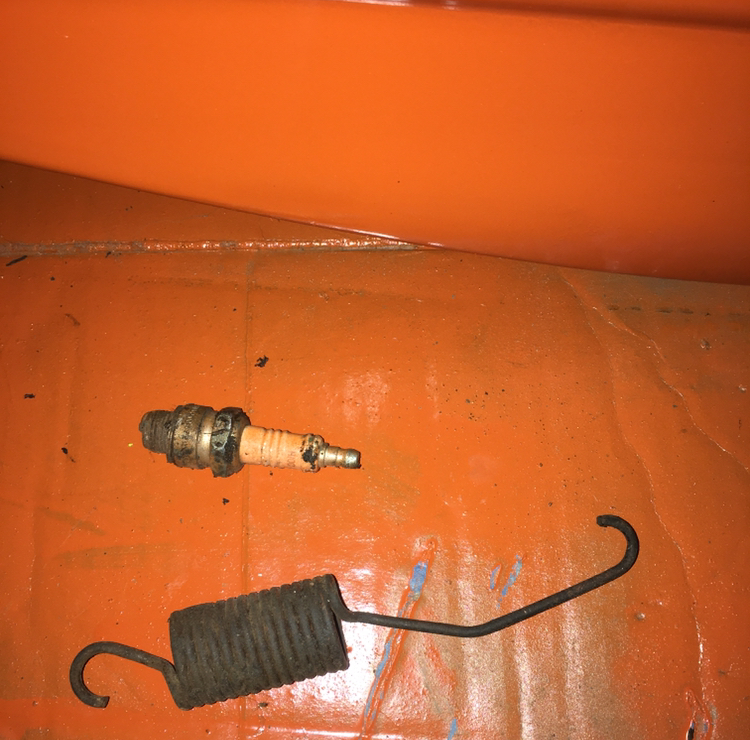
|
Posted By: IBWD MIke
Date Posted: 29 May 2021 at 7:41am
|
Throttle return spring. Not sure 'return' is the exact right term. It makes the throttle stay where set. |
Posted By: ACinSC
Date Posted: 29 May 2021 at 8:27am
| Throttle compensating spring maybe ? |
Posted By: SteveM C/IL
Date Posted: 29 May 2021 at 9:08am
| Not a return....throttle won't stay open without it. After adding D17 gov spring to 45 it needed two of those to stay at high idle. |
Posted By: JTOOL
Date Posted: 29 May 2021 at 12:01pm
| Maybe brake pedal return spring? Mine fell off when I removed the drivers side frame rail to replace the bolster on my WD45. |
Posted By: 55allis
Date Posted: 30 May 2021 at 11:20pm
|
I got both brake return springs on and there is a hook on the throttle linkage so might go to that. Yesterday I picked up two Allis Chalmers 6’ or 7’ snap coupler sickle mowers which looks very sad. I think I will part one out to get one going. 
|
Posted By: ac45dave
Date Posted: 31 May 2021 at 8:03am
  ------------- 54 wd-45gas ; 56 wd-45d N/F w/fact p/s ; 63 d-17 sIII N/F gas ; 60 D14 N/F ; 67 d-17 sIV N/F gas ; 63D15 sII W/F; 39rc#667 ; 2021 massey 4710 fwa ; gravely 2 wheel tractors |
Posted By: AC720Man
Date Posted: 31 May 2021 at 8:32pm
|
Just replaced Dads series II D15 temp gauge with an Agco gauge made in the USA. 3 times the price of the knock offs but it looks just like the original. I have heard the Heritage gauges are pretty close but I have never tried one. Do not waste your money on a knock off, you will be disappointed. Trust me, I know, I ordered one and immediately sent it back at my cost. ------------- 1968 B-208, 1976 720 (2 of them)Danco brush hog, single bottom plow,52" snow thrower, belly mower,rear tine tiller, rear blade, front blade, 57"sickle bar,1983 917 hydro, 1968 7hp sno-bee, 1968 190XTD |
Posted By: 55allis
Date Posted: 05 Jun 2021 at 9:35pm
| Thanks ac45man I figure it out with your pictures. |
Posted By: 55allis
Date Posted: 12 Jun 2021 at 12:21pm
|
I got all the decals out of the bag and well there is some different ones I never seen before. I have got them all numbered to help identify them. The black squared ones I think I know where they go but the rest would be nice to have a reminder.  Down here I have the original picture without the edit. 
|
Posted By: 55allis
Date Posted: 01 Jul 2021 at 10:33pm
|
Well yesterday I started it for the first time in 6 months and after cleaning some connection it started like a good Allis should!! I also took the Final drive pans into my local welding shop and had him put drain plugs on the bottom of the pan.
|
Posted By: Sugarmaker
Date Posted: 02 Jul 2021 at 6:07am
|
Wonderful news! The decal placement is always a issue. I have used pictures and other original tractors for location. Take your time get them as close as you can. They look better when correct too. Regards, Chris ------------- D17 1958 (NFE), WD45 1954 (NFE), WD 1952 (NFE), WD 1950 (WFE), Allis F-40 forklift, Allis CA, Allis D14, Ford Jubilee, Many IH Cub Cadets, 32 Ford Dump, 65 Comet. |
Posted By: 55allis
Date Posted: 05 Jul 2021 at 1:44pm
|
Well here’s the results!! And I love it!! Pulled it out the first time with all new paint. 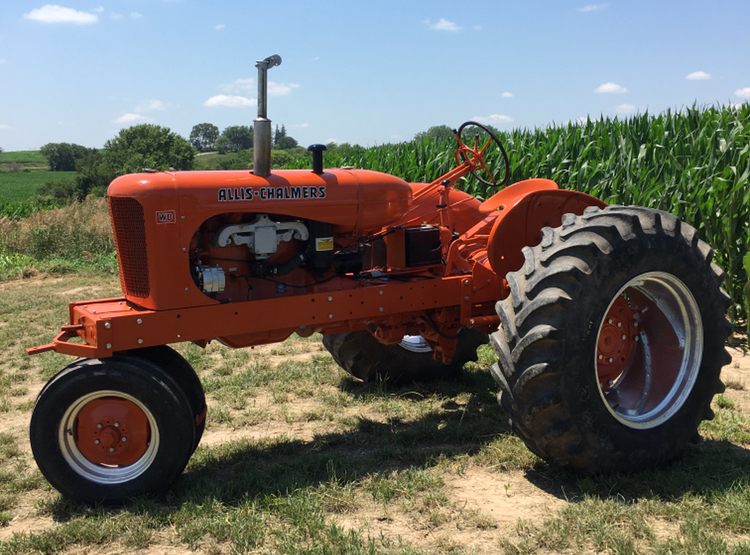
|
Posted By: ac hunter
Date Posted: 05 Jul 2021 at 3:15pm
| Looks great. A nice reward for all your work. Hope you enjoy driving / showing / whatever with it. |
Posted By: Sugarmaker
Date Posted: 06 Jul 2021 at 4:47am
|
55, It looks right at home! Your going to like having it around! Tires make it look ready for some serious work too! Decals look good! Thanks for keeping us up to date! Regards, Chris ------------- D17 1958 (NFE), WD45 1954 (NFE), WD 1952 (NFE), WD 1950 (WFE), Allis F-40 forklift, Allis CA, Allis D14, Ford Jubilee, Many IH Cub Cadets, 32 Ford Dump, 65 Comet. |
Posted By: IBWD MIke
Date Posted: 06 Jul 2021 at 7:27am
|
Good work, looks sharp. |
Posted By: AC720Man
Date Posted: 07 Jul 2021 at 12:20pm
|
Wow, nice job. Really like that serious rubber on the rear. What size tire is that? ------------- 1968 B-208, 1976 720 (2 of them)Danco brush hog, single bottom plow,52" snow thrower, belly mower,rear tine tiller, rear blade, front blade, 57"sickle bar,1983 917 hydro, 1968 7hp sno-bee, 1968 190XTD |
Posted By: 55allis
Date Posted: 07 Jul 2021 at 2:26pm
16.9X28 Firestones |
Posted By: 55allis
Date Posted: 23 Jul 2021 at 6:46pm
Here’s a picture of it before and after.  
|
Posted By: 55allis
Date Posted: 20 Sep 2021 at 8:37pm
Well I found a wide front for it!!
|
Posted By: 55allis
Date Posted: 23 Jan 2022 at 1:10pm
| Earlier I was plowing and the brake rod broke off inside the axle ( it rusted out) so I was wondering if anyone else had that problem? |
Posted By: DrAllis
Date Posted: 23 Jan 2022 at 4:25pm
| Well, you know when things are 70 years old, they might rust out in places. |
Posted By: jvin248
Date Posted: 24 Jan 2022 at 5:58am
|
Probably involves taking the brakes apart (guessing) ... which if that is the case you should watch several youtube videos. You will see where to spray as much 'PB Blaster' as possible to get those lower brake pins loose. I've already started spraying mine for the spring/summer WD project I got in December. Post some pictures and fast help will follow.
|
Posted By: corbinstein
Date Posted: 24 Jan 2022 at 6:27am
| took lots of heat, PB Blaster and a slide hammer to get mine out. |
Posted By: 55allis
Date Posted: 24 Jan 2022 at 11:06pm
|
Hmmm... Sounds like it’s going to be fun job!! Does the axle have to come off though? |
Posted By: Dirt Farmer
Date Posted: 25 Jan 2022 at 12:45am
| No the axle doesnt have to come off to work on the brake shoes, take the top tin covers off, one to the left and a matching one under the seat frame, everything comes out and goes back in through there. There is an inspection hole under the axle to look in and line everything back up as you reassemble, as my Dad would say, have to be patient and hold your mouth just right. Good luck |
Posted By: jvin248
Date Posted: 25 Jan 2022 at 2:41pm
|
. That inspection hole under the brakes seems to be sized perfectly for mice to build nests, I think mine has one too. Most of the youtube videos seem to be knocking fluff out of there too. The mice accelerate any corrosion going on. Peppermint oil extract (if you know anyone making/using aromatherapy may let you borrow a few drops), put in there should keep them out for quite a while. I think the brake rod attaches at the top of the shoes to a small cross-bar. If that's the case you might only need to replace the rod and maybe that top cross-bar. Assuming the pads are still good. And you avoid the lower pin removal project. .
|
Posted By: corbinstein
Date Posted: 26 Jan 2022 at 6:23am
|
some have had to take a blue wrench thru the inspection hole and cut the pin in two. I've had to heat the casting around the ends of the pin and put copious amounts of pb blaster in. I welded a slide puller to the pin (under the tractor) and pulled it that way. Lots of cussing.
|
Posted By: Alberta Phil
Date Posted: 26 Jan 2022 at 10:05am
|
I'm looking forward (not) to doing the brakes on my WD in the spring. The left side pin moves easily with the pin removal tool from DJ's. The right one is in there solid and won't move. I'm soaking it with applications of Kroil over the winter. I don't want to get into it now as it's my main snow plow tractor and brakes aren't used much when plowing snow drifts. |
Posted By: 55allis
Date Posted: 27 Jan 2022 at 9:52pm
|
Now you’re scaring me lol!! At least it’s only one side. I put a wide front on it the other day and here’s a picture of it... 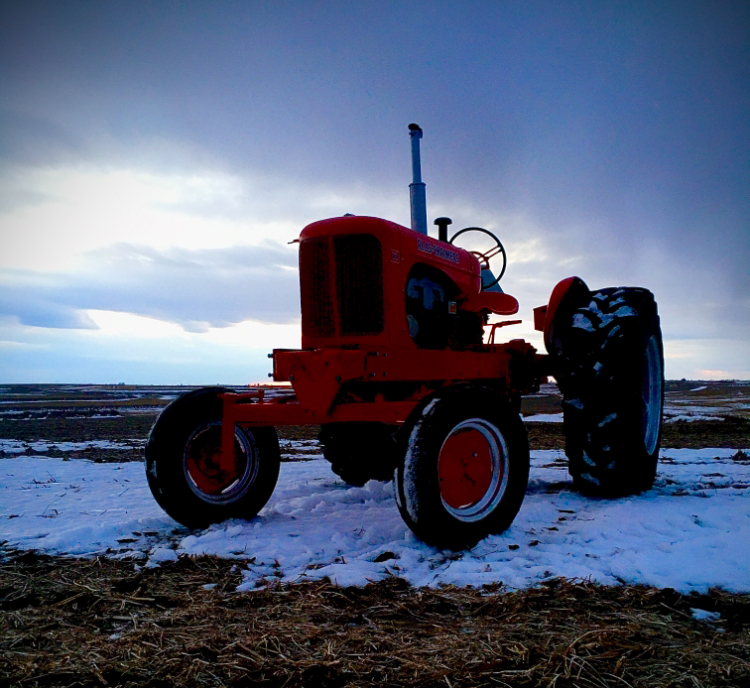
|
Posted By: IBWD MIke
Date Posted: 28 Jan 2022 at 8:51am
| Nice! |
Posted By: 55allis
Date Posted: 23 Oct 2022 at 11:59pm
|
So it’s been running great for so long that I started thinking of it as a dependable tractor, well that was stupid of me… Today I was moving it from our house to our main shop (which is a 2 mile drive on a gravel road) and got there, I shut it of out side of the shop door to open the door (it’s a rolling door) and move a few things and I jump back on the wd to start it and well I was cranking it over the carb bursted in to fiery flams. We got the fire put out before it ruin the rest of the tractor but I think from looking at the out side of that carb is toast!!  I think all the damage done was the carb and the intake hose and a little black around the carb area. So dumb dumb me first thought of mind is kill the fuel only problem is being that close to a gas fire is dumb but heck it keep it from getting any more fuel. I don’t have any pictures yet but will try to. ------------- 1955 AC WD45 diesel with D262 repower, 1949 AC WD, 1963 A-C D17 series 3, several Allis garden tractors 
|
Posted By: 55allis
Date Posted: 24 Oct 2022 at 12:03am
|
I never mentioned that I just put a new needle and seat in the carb because it was sticky where it would sometimes stick open and make a mess and stick shut and kill the tractor… Other than that I can’t figure it out why it did that… ------------- 1955 AC WD45 diesel with D262 repower, 1949 AC WD, 1963 A-C D17 series 3, several Allis garden tractors
|
Posted By: SteveM C/IL
Date Posted: 24 Oct 2022 at 7:48am
| WHAT???? How does a fire break out at the carb? Not possible unless somethings missing. What ignited it? |
Posted By: 55allis
Date Posted: 24 Oct 2022 at 8:53am
It was the carb. I did check the wiring but was all good from what I could see… ------------- 1955 AC WD45 diesel with D262 repower, 1949 AC WD, 1963 A-C D17 series 3, several Allis garden tractors
|
Posted By: DSeries4
Date Posted: 24 Oct 2022 at 9:24am
It does not answer Steve's question. The carb cannot ignite gas. With an incorrectly installed needle and seat, the carb will gush gas like crazy, but something had to make it catch fire. I would be investigating that first. ------------- '49 G, '54 WD45, '55 CA, '56 WD45D, '57 WD45, '58 D14, '59 D14, '60 D14, '63 D15D, '66 D15II, '66 D21II, '67 D17IV, '67 D17IVD, '67 190XTD, '73 620, '76 185, '77 175, '84 8030, '85 6080 |
Posted By: BigGuy1000
Date Posted: 24 Oct 2022 at 6:30pm
|
BUT I had an AC170gas (similar engine) just 3 months ago where the leaking exhaust manifold or gaskets did ignite gas in or around the carb and manifold!!! The intake hose swelled up REAL BIG and came loose, blew off the dirt cup of the air cleaner, smashed the top of one carb float so that float would not stop gas running into carb, gas then ran out of the carb air intake, engine had stopped, gas had to be shut off, all due to ignition problems!!! Had to tow the tractor away.... |
Posted By: 55allis
Date Posted: 24 Oct 2022 at 11:41pm
|
Hmm What big guy 1000 said sounds like a clue… That manifold is pretty rusty, wonder if it blew a peep hole between the two parts, I’m not sure if that’s possible but that sounds like a pretty good clue. 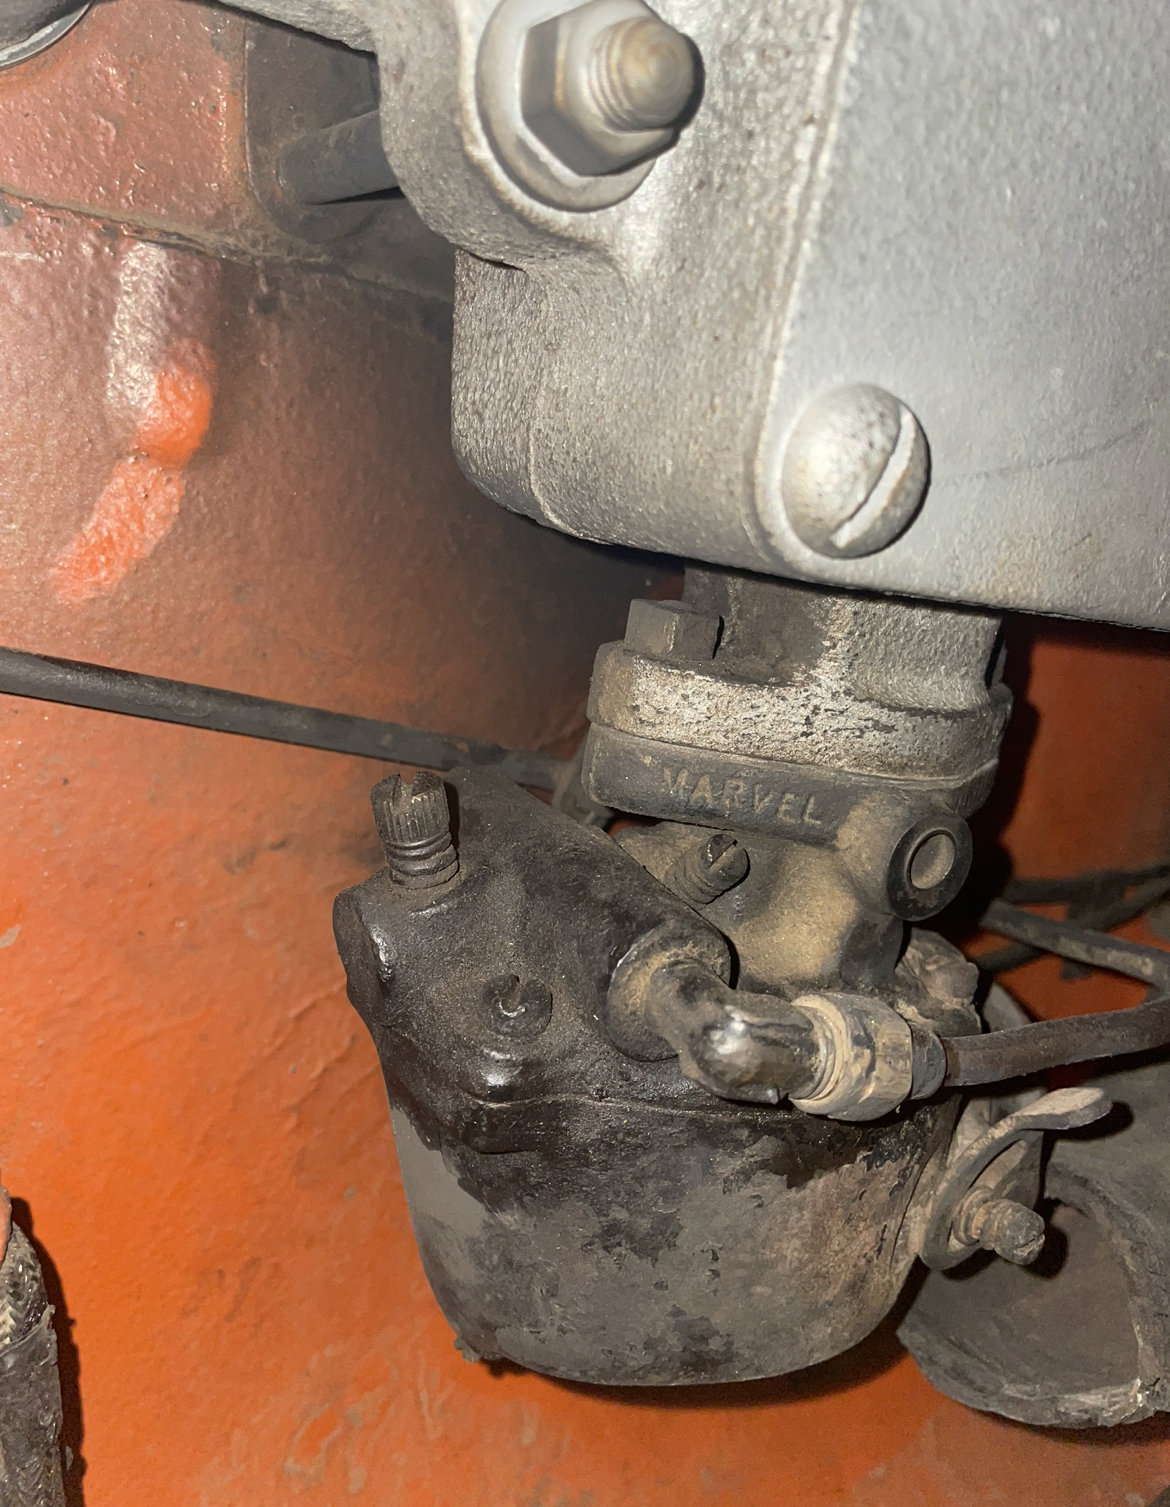  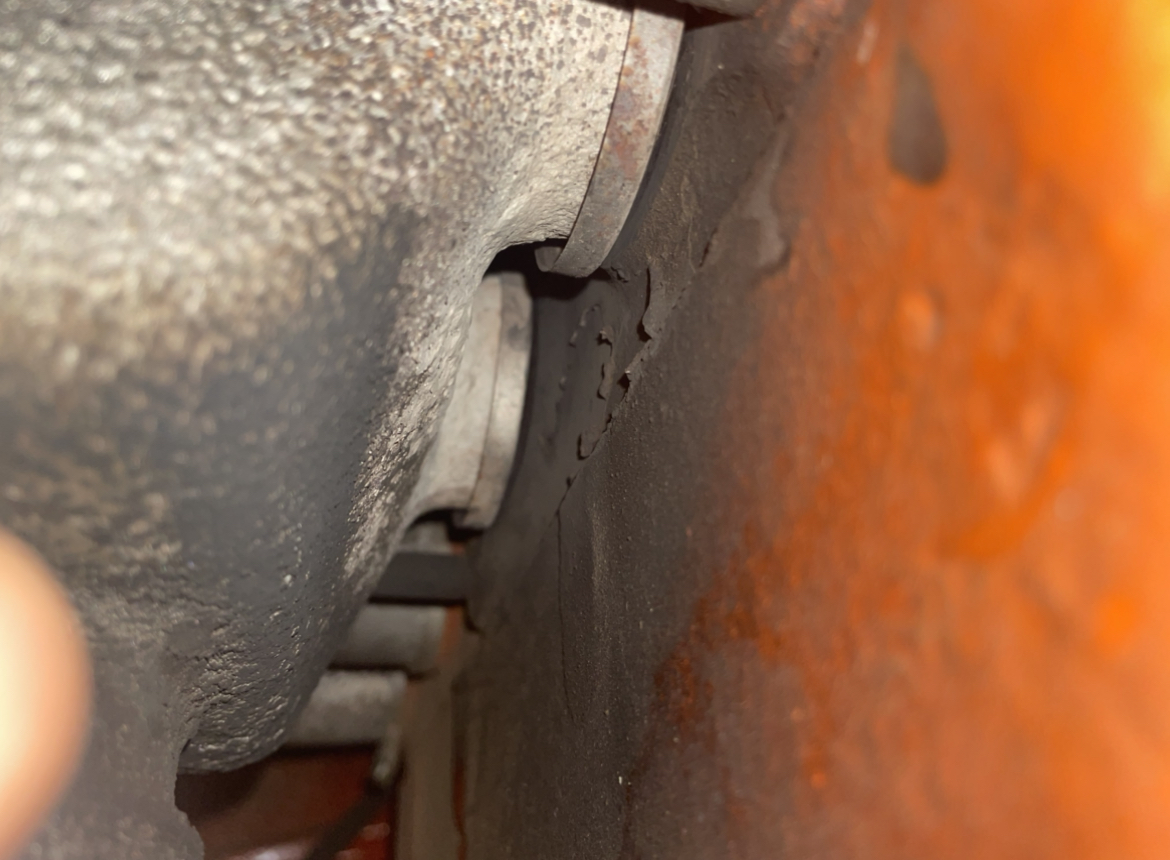 That black was not there before the fire…. ------------- 1955 AC WD45 diesel with D262 repower, 1949 AC WD, 1963 A-C D17 series 3, several Allis garden tractors
|