Pole barn build
Printed From: Unofficial Allis
Category: Other Topics
Forum Name: Shops, Barns, Varmints, and Trucks
Forum Description: anything you want to talk about except politics
URL: https://www.allischalmers.com/forum/forum_posts.asp?TID=166180
Printed Date: 06 Apr 2026 at 4:34am
Software Version: Web Wiz Forums 11.10 - http://www.webwizforums.com
Topic: Pole barn build
Posted By: Levibridge95
Subject: Pole barn build
Date Posted: 27 Nov 2019 at 4:55pm
| I'm building a 18'×18' pole barn/tractor shed and I'm wondering if 4x6 pressure treated would work for the corner post instead of 6x6. Heard 6x6 might be overkill. What are y'all thoughts on it? |
Replies:
Posted By: DanWi
Date Posted: 27 Nov 2019 at 5:12pm
| So many things to consider height of shed, spacing of poles 18 ft you could go to 6 ft centers or 9 ft. Rafter design open sides, open ends, what kind of doors? |
Posted By: Hubert (Ga)engine7
Date Posted: 27 Nov 2019 at 6:45pm
|
Stay with the 6x6 and you won't be second guessing yourself. As DanWi mentioned - lots of factors enter into the equation. ------------- Just an old country boy saved by the grace of God. |
Posted By: Levibridge95
Date Posted: 27 Nov 2019 at 7:19pm
| Ok. It's gonna have 9' wall height. One 16' garage door and metal sides and roof. I'm leaning towards 6x6 just wanted to get others advice. |
Posted By: Sugarmaker
Date Posted: 27 Nov 2019 at 7:28pm
|
Levi, Oh man we need pictures! Maybe will get me interested in building something too! I used all 4 x 6 posts in my sugarhouse build 20 years ago. That was 16 x 24 main room, with 16 x 12 back room, plus loft, and 36 x 10 lean to area. They worked fine. Still standing! Regards, Chris ------------- D17 1958 (NFE), WD45 1954 (NFE), WD 1952 (NFE), WD 1950 (WFE), Allis F-40 forklift, Allis CA, Allis D14, Ford Jubilee, Many IH Cub Cadets, 32 Ford Dump, 65 Comet, 66 F100. |
Posted By: steve(ill)
Date Posted: 27 Nov 2019 at 8:45pm
|
we don't use solid posts.. splice 3 of 2 x 6 together so it ends up 4.5 x 5.5 ........ normally straighter... and you can stagger the top so the rafters set on / inbetween the layers.
------------- Like them all, but love the "B"s. |
Posted By: JohnCO
Date Posted: 28 Nov 2019 at 12:10am
|
If you use Steve's idea,make sure you use treated boards for the in the ground part. Also, about 5 minutes after you set the posts in concrete, you will realize it's not nearly big enough - just sayin... ------------- "If at first you don't succeed, get a bigger hammer" Allis Express participant |
Posted By: DMiller
Date Posted: 28 Nov 2019 at 5:34am
Ain't that the truth!! Ours is 30x48 and should be 60x100 with all the stuff I try to stuff in there!! |
 JohnCO wrote:
Posted By: jaybmiller
Date Posted: 28 Nov 2019 at 6:20am
|
what steve-ill says !! laminated 2by6s with middle one shorter is GREAT !! go 10' high walls ! otherwise YOU have to cut down 10' boards to 9'....also tractor with ROPS will need ROPS lowered to get into shop.... don't ask HOW I KNOW that... extra height makes installing a gaage door opener possible... of course it's too small...on the good side less room to store other people's stuff though ! consider installing a steel I-beam to split tractors ! lam enough 2by6s to make post with 'sides' to trap beam. add separate room for furnace and air compressor.... Jay ------------- 3 D-14s,A-C forklift, B-112 Kubota BX23S lil' TOOT( The Other Orange Tractor) Never burn your bridges, unless you can walk on water |
Posted By: chaskaduo
Date Posted: 28 Nov 2019 at 7:35am
Jay, "other people's stuff". Do you really mean "The Contractor's stuff"?  ------------- 1938 B, 79 Dynamark 11/36 6spd, 95 Weed-Eater 16hp, 2010 Bolens 14hp |
Posted By: ocharry
Date Posted: 28 Nov 2019 at 10:19am
|
that was gona be my comment ,,but John beat me to it......it aint big enough,,,,i would lay it out on the ground just to see how small 18x18 is,,,,,not much room when you are putting stuff in there that takes it up quick ocharry
|
Posted By: Ranse
Date Posted: 28 Nov 2019 at 10:22am
| X2 on the height. Make sure you build it tall enough to have enough headroom for the door you want to install. I'm going to have to buy a low headroom conversion kit before I can finish installing my door, and I probably will never be able to install an auto opener. |
Posted By: Levibridge95
Date Posted: 28 Nov 2019 at 4:13pm
| Could get a side mount opener if you have enough side room. |
Posted By: Levibridge95
Date Posted: 28 Nov 2019 at 4:15pm
| Would love to go bigger but I only have 1 acre which is my parents actually. And I'm putting it where a old shed was at. |
Posted By: jaybmiller
Date Posted: 28 Nov 2019 at 4:50pm
|
since you can't go bigger ( footprint aka L x W) can you go higher ? My shop(40 x 72) has 14' walls then 5/12 pitched trusses. About half has a mezzanine, 10' off of the ground...allows for LOTS of storage and yeah about a 1/4 of it is 'contrator grade' materials..... ------------- 3 D-14s,A-C forklift, B-112 Kubota BX23S lil' TOOT( The Other Orange Tractor) Never burn your bridges, unless you can walk on water |
Posted By: LeonR2013
Date Posted: 28 Nov 2019 at 4:57pm
| Levi, you go with 5X5 yellow pine treated and rough sawn(sic) and you will find that they are almost as big as 6X6. I've used them in my shop and it survived 60 MPH winds Tues. night. Course it's built xxxx for stout. I also poured a pad and shot the plates to the floor, so I could keep the posts out of the soil. Worked for me. Leon |
Posted By: Levibridge95
Date Posted: 28 Nov 2019 at 4:58pm
| Since someone brought it up earlier.i was thinking about it. I will probably do a full 10' wall instead of 9 like I was planning. |
Posted By: Ted J
Date Posted: 28 Nov 2019 at 5:03pm
|
My 36 x 72 is WAY too small. I'm gonna have to add on or build another. Definitely, if you can't go out, go up. AND, 2x6s are cheaper than a 6x6. I staggered all 3 so that there were no seams next to each other. More strength. ------------- "Allis-Express" 19?? WC / 1941 C / 1952 CA / 1956 WD45 / 1957 WD45 / 1958 D-17 |
Posted By: trace
Date Posted: 28 Nov 2019 at 5:08pm
|
go 10' min ht. minimum with low headroom kit for door. that min sidewall ht. that will work. my wd will go in a 7' garage door. 6x6 all posts want it to last. ------------- 1955 WD-45 WIDE FRONT W/ TRIP LOADER |
Posted By: Levibridge95
Date Posted: 28 Nov 2019 at 8:06pm
I definitely agree 2x6 are cheaper. 6x6 pt at lowes and HD are like $35 a piece |
Posted By: Levibridge95
Date Posted: 28 Nov 2019 at 9:02pm
|
Posted By: shameless dude
Date Posted: 28 Nov 2019 at 9:14pm
| my new cook shack is 10x18, it's about already to small... |
Posted By: steve(ill)
Date Posted: 28 Nov 2019 at 9:24pm
Levi, I said I took two 2 x 6 x 12 ft and cut them to 5 and 7 ft ... 6 and 6 ft then used a 5-6-7 to build a post and put them in the ground 3 ft.... I think I actually cut the one 4.5 ft and 7.5 ft .... I think I acutally spliced them 4.5 then 7 f.5 ft, then 6 ft so the taller 2 x 6 part of the post was in the center........ here is a generic drawing, but I show the post with the 7.5 foot on the edge, not center. ------------- Like them all, but love the "B"s. |
Posted By: Levibridge95
Date Posted: 28 Nov 2019 at 9:28pm
|
Posted By: steve(ill)
Date Posted: 28 Nov 2019 at 9:34pm
here is a better drawing, clearer, with the larger 7.5 ft 2 x 6 in the center of the post... This was 15 years ago.. No screws and driver back then.. All 16 penny coated sinkers... no glue. ------------- Like them all, but love the "B"s. |
Posted By: steve(ill)
Date Posted: 28 Nov 2019 at 9:37pm
|
when setting posts, I normally put a brick in the hole and set the post on that... Use a couple 2 x 4 as diagonal braces with stakes in the ground to hold it plumb, then pour concrete around it... that way the bottom of post is covered in concrete and not touching the dirt... good to bring concrete up a couple inches above the ground also , if your not going to pour a floor later
------------- Like them all, but love the "B"s. |
Posted By: Levibridge95
Date Posted: 28 Nov 2019 at 10:36pm
|
Posted By: Dakota Dave
Date Posted: 29 Nov 2019 at 8:30am
| I used 4x4 posts for my tractor shed many years ago. The shed is 12' wide 48' long attached as a lean to on my barn. My brother the builds pole buildings for a living helped me put it up I bought what he told me to. I only have 8' of clearance and my 190 won't fit but a WD45 fits fine. The bottoms of the posts have 1' of 2x6 nailed around a little pea gravle in the bottom set in 5' deep holes back fill with gravel it hasn't moved in 20 years. My tractor shed has a 18" thick class 5 gravel floor just put it in level it out and it packs down almost as hard as concrete. Oil drips just soak in if tractor need more than very minor maintance they get moved to the shop. |
Posted By: Herb(GA)
Date Posted: 29 Nov 2019 at 11:04am
|
Morton laminated three 2" boards staggered with pressure treated in the ground. Herb(GA) |
Posted By: DMiller
Date Posted: 29 Nov 2019 at 11:21am
| Two friends decided on Red Iron buildings, post anchors set in foundations pours, 1/2" bolts are over two feet into the footers in their own column spots. One has two other such buildings, clear span 40' and solid as can get, one is concrete floor the other crushed stone and both over thirty years old. New one should last as well as these. I am considering as to cost where the Red Iron is near to same as Lumber, only insurance can be a bit higher against Diaphragming damage. |
Posted By: BrianC
Date Posted: 29 Nov 2019 at 4:15pm
|
18x18 should fit two smaller tractors side by side. I think you could even have a mower attached on the 3 point. Yeah go high as could be. If at your mothers place check that you won't accidentally burden her with the taxman. |
Posted By: Levibridge95
Date Posted: 30 Nov 2019 at 10:53am
| Update. Dug my holes today and hit rocks bigger then the hole at 2' below ground level. Btw in my area frost level is about 2' according to my township neighbor. 2 methods I could do here: (1) pour concrete directly on top of the stone and build off that or (2) do the original plan with the laminated 2x6 boards and pour concrete in the hole around it. |
Posted By: jaybmiller
Date Posted: 30 Nov 2019 at 11:07am
|
hmm, could you drill 2-3 holes in rock, epoxy rebar in and then pour concrete in sonotube ? gee 2' frost line...nice.. up here it's 4' and posthole diggers are 3'4" !!! ------------- 3 D-14s,A-C forklift, B-112 Kubota BX23S lil' TOOT( The Other Orange Tractor) Never burn your bridges, unless you can walk on water |
Posted By: Levibridge95
Date Posted: 30 Nov 2019 at 12:54pm
|
Posted By: steve(ill)
Date Posted: 30 Nov 2019 at 1:56pm
|
I would thing the concrete poured on top of the rock with the laminated 2 x 6 in it would be fine.. Do 1 or 2 and test... The rocks can be considered part of the footer.
Your going to nail a base board from post to post at the bottom to screw the tin sideing to.. and a couple horizontals on the posts part way up the wall.. That should lock everything together.... might nail a couple diagonals on the inside at 45 degree angles to stiffen it up until the tin is on the walls... or could also leave the diagonals forever.
------------- Like them all, but love the "B"s. |
Posted By: chaskaduo
Date Posted: 30 Nov 2019 at 2:17pm
|
Jay you get all the breaks. ------------- 1938 B, 79 Dynamark 11/36 6spd, 95 Weed-Eater 16hp, 2010 Bolens 14hp |
Posted By: Levibridge95
Date Posted: 30 Nov 2019 at 3:12pm
|
Posted By: DaveKamp
Date Posted: 01 Dec 2019 at 10:56pm
|
The greatest advantage of laminating your posts from 2" lumber, is the fact that you will have better CONSISTENCY, and better uninterrupted strength... or in EngineerSpeak: A more consistent dimension, and more predictable section modulus. Why? Let's say you build a building with 14 solid wood post 12ft long... At least ONE of those posts will have a knot in it. Probably more posts, and probably more than one knot... and eventually, as the post driesand ages, it will distort. When you take three planks, and sandwich them together, ALL the planks will have knots, but they're only going through 2" of the full 6" assembly... because it's LAMINATED, right? Now also, because it's been cut thinner, it will be more flexible on it's narrow dimension. When you make your laminated post, you will SEE the check and bow, and SELECT planks that complement eachother to yield a 'more true' post. ------------- Ten Amendments, Ten Commandments, and one Golden Rule solve most every problem. Citrus hand-cleaner with Pumice does the rest. |
Posted By: Levibridge95
Date Posted: 02 Dec 2019 at 7:32am
| I like the idea of doing laminated post but code says it cant be buried in the concrete anymore. Got confirmation on that. Any anchors I could use to still do a laminated beams on top of the concrete? |
Posted By: jaybmiller
Date Posted: 02 Dec 2019 at 7:47am
|
German Timber framer up here drilled into rocks(6"), epoxied rebars, short sonotube, filled with concrete, wait a day, drill hole, epoxy into hole to secure saddle with rebar. I'd laminate 3- 2by 6's ...glued( PL Premium) and screwed every foot. Be sure to alternate the boards , grain wise ,though... ()( NOT ((( or ))) , looking from end. If you lasersight the sonotubes, no shims necessary and saddles line up ! Jay ------------- 3 D-14s,A-C forklift, B-112 Kubota BX23S lil' TOOT( The Other Orange Tractor) Never burn your bridges, unless you can walk on water |
Posted By: Levibridge95
Date Posted: 02 Dec 2019 at 9:29am
|
Posted By: jaybmiller
Date Posted: 02 Dec 2019 at 9:58am
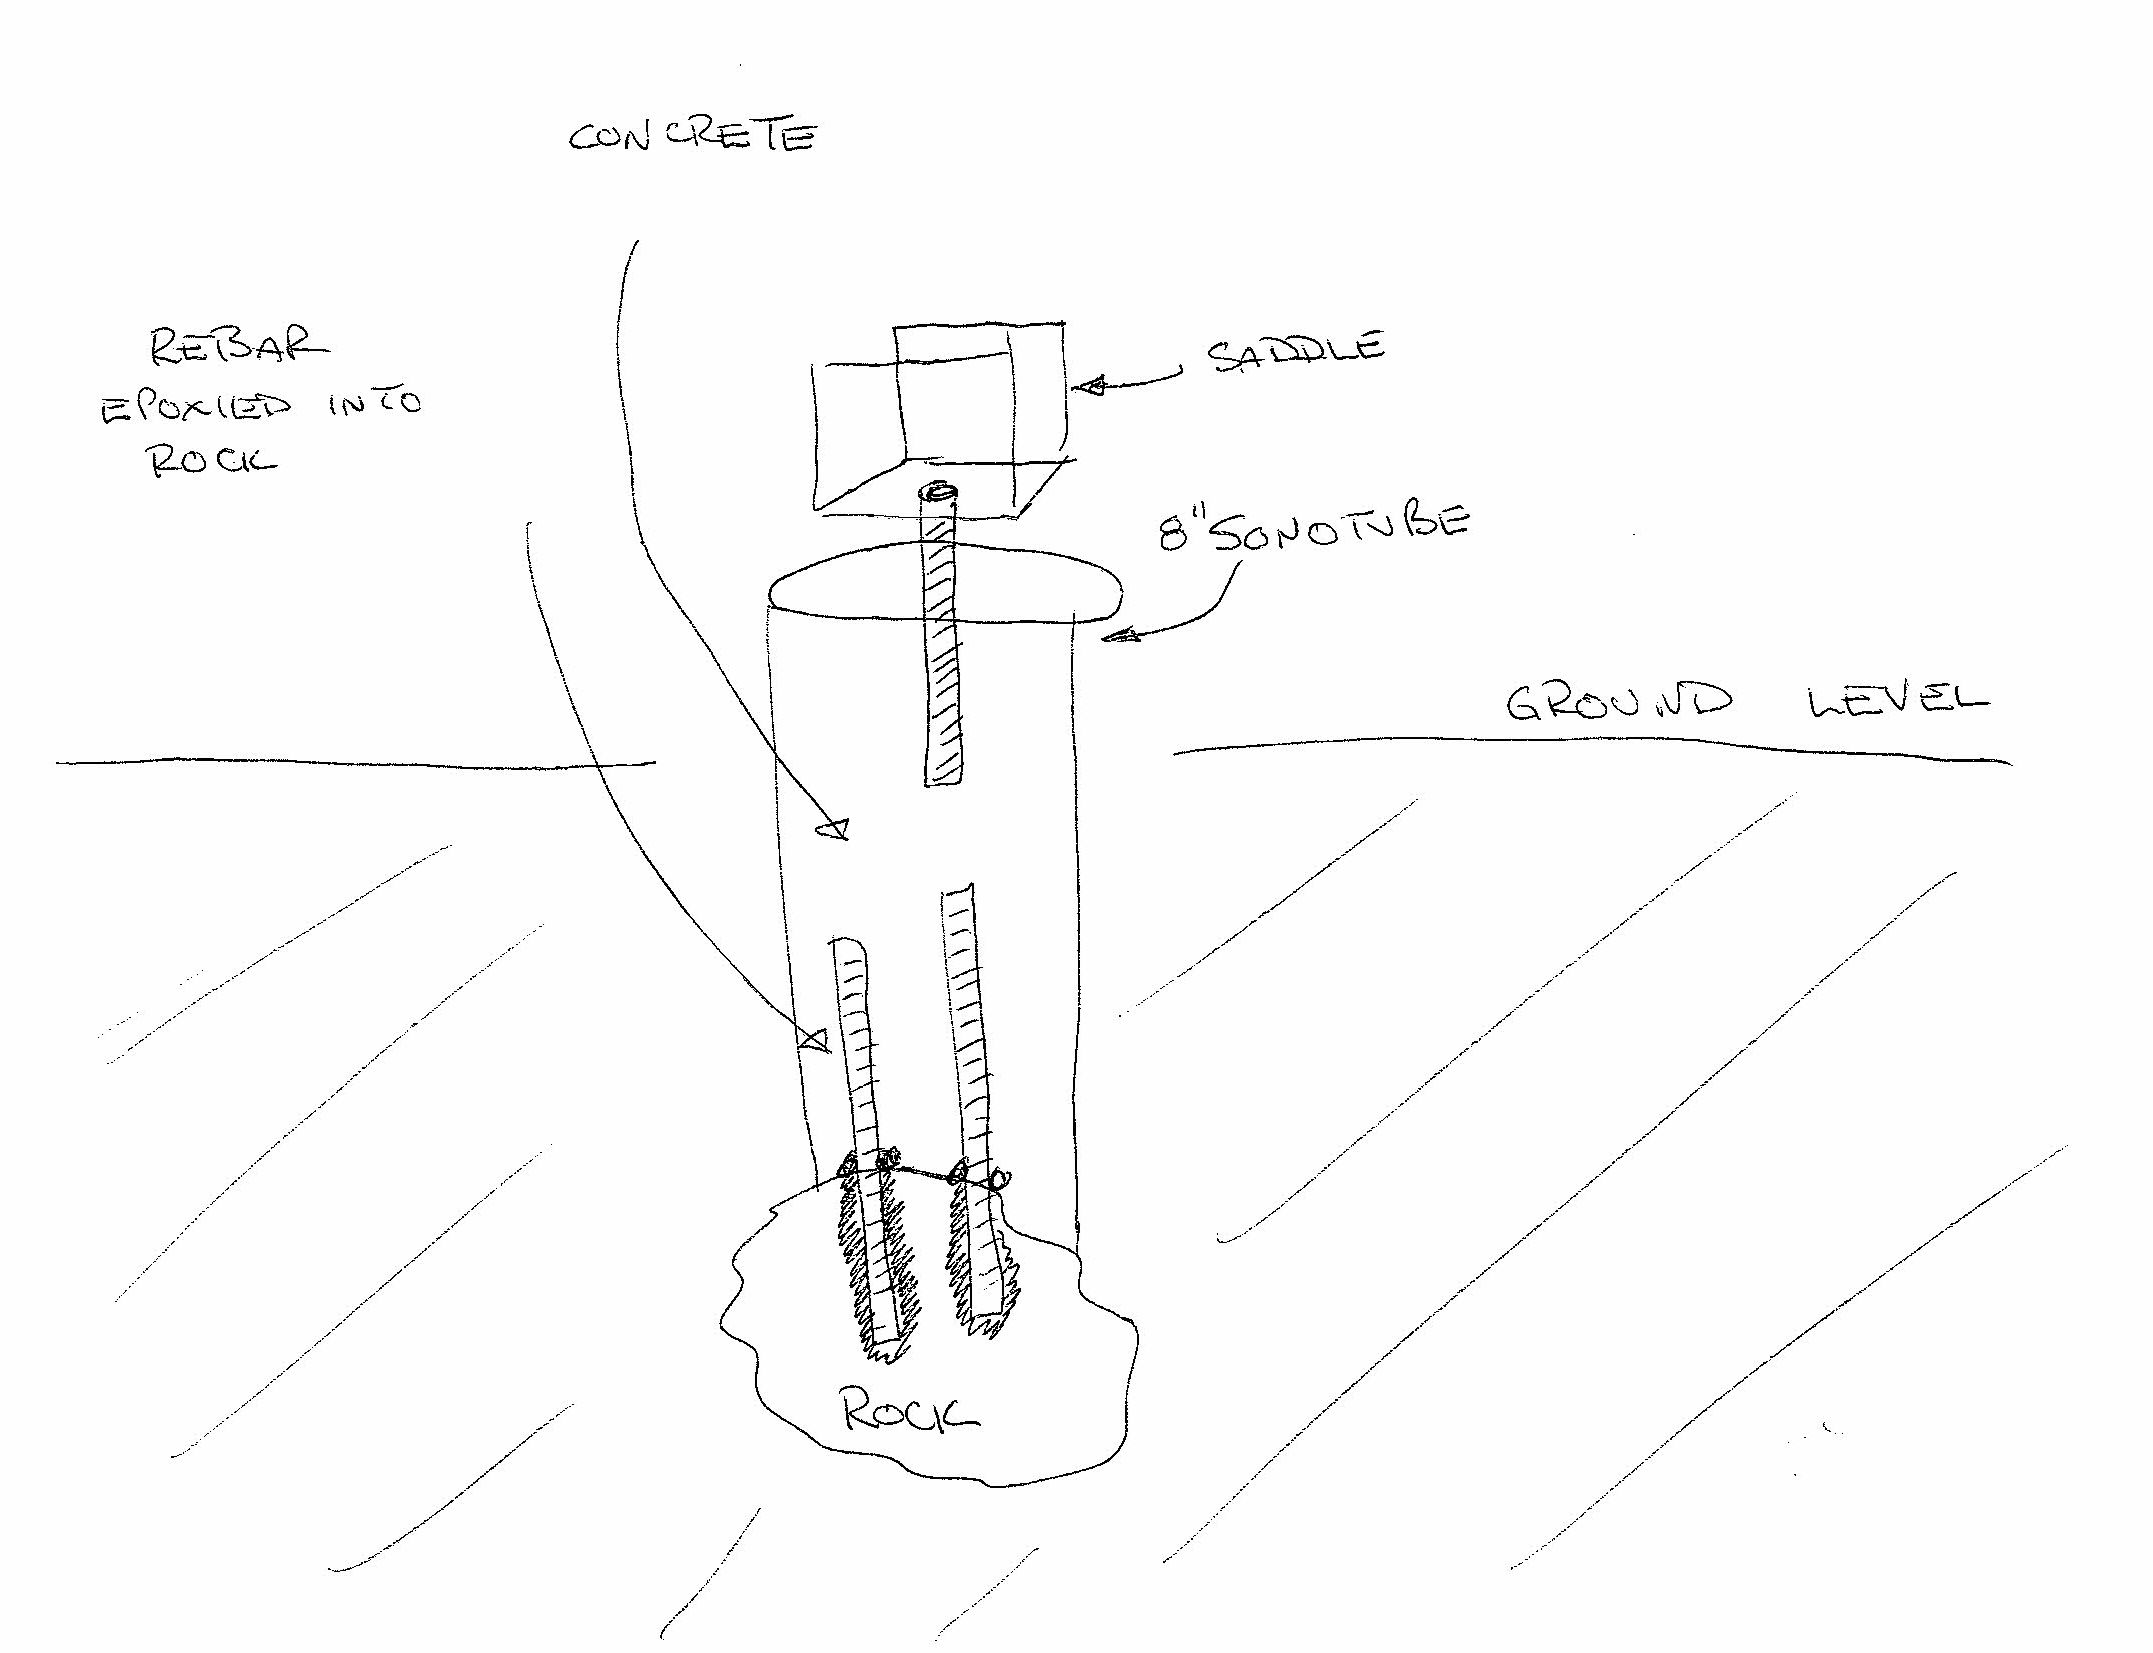 OK, here's a sketch. drill 2 holes into rock, epoxy rebar into it 4" minimum,put down sonotube,backfill,pour concrete into tube.if ,IF, you're real good about sonotubes being 'laser level', push saddle into wet concrete,otherwise wait 1 day ,then layout,drill, epoxy saddles in. You can upside down 'L' shape the rebar, should hold better.8" sonotube for more strength,say 2 bags worth of concrete. more is better... OK, here's a sketch. drill 2 holes into rock, epoxy rebar into it 4" minimum,put down sonotube,backfill,pour concrete into tube.if ,IF, you're real good about sonotubes being 'laser level', push saddle into wet concrete,otherwise wait 1 day ,then layout,drill, epoxy saddles in. You can upside down 'L' shape the rebar, should hold better.8" sonotube for more strength,say 2 bags worth of concrete. more is better...Jay ------------- 3 D-14s,A-C forklift, B-112 Kubota BX23S lil' TOOT( The Other Orange Tractor) Never burn your bridges, unless you can walk on water |
Posted By: Tbone95
Date Posted: 02 Dec 2019 at 10:10am
| Guess this all depends on what exactly is meant by "rock". |
Posted By: Levibridge95
Date Posted: 02 Dec 2019 at 4:29pm
| Won't be able to use concrete to wood base anchors on laminated beams because I would be 1" thin for a 6x6 and .5" to big for a 4x6. Any ideas. |
Posted By: Thad in AR.
Date Posted: 02 Dec 2019 at 4:37pm
Use the 4 by 6 and just use 3 sides. Cut the folded side off. |
Posted By: jaybmiller
Date Posted: 02 Dec 2019 at 5:03pm
|
Laminate a 5/4 PT 'deck board' with the 3 - 2 by 6. A 'deck board' is true 1" so... 1.5+1.5+1+1.5=5.5" same as 6 by 6 glued and screwed, stronger then solid 6by6. Jay ------------- 3 D-14s,A-C forklift, B-112 Kubota BX23S lil' TOOT( The Other Orange Tractor) Never burn your bridges, unless you can walk on water |
Posted By: Levibridge95
Date Posted: 02 Dec 2019 at 6:37pm
| Ok. Thanks to your advice I got the problem figured out so now I can buy the material and get building soon. |
Posted By: Stan IL&TN
Date Posted: 03 Dec 2019 at 9:51am
|
My only suggestion is that you can easily build the trusses on the ground by making a template so that each one is exactly the same. I used several sheets of plywood all attached to each other to make a wood base. Build the first truss on top of the base and when I you are happy with the dimensions of the first truss use some scrap pieces of 2x4's and screw them down onto the base so the truss is outlined. This will make sure as you build the next truss that it is exactly the same size and angle as all the rest. This will be important as you get ready to install the face boards. ------------- 1957 WD45 dad's first AC 1968 one-seventy 1956 F40 Ferguson |
Posted By: Levibridge95
Date Posted: 03 Dec 2019 at 11:05am
I ordered trusses from superior trusses in Ephrata pa for $65 a piece. |
Posted By: jaybmiller
Date Posted: 03 Dec 2019 at 12:17pm
|
Just remember roof trusses are NOT designed to carry weight on the bottom chord !! They're ONLY designed to carry weight on the top chords ( the roof )... Yeah, I can show you why.. a busted truss next door from some 'contractor' who tossed 100s of ##s of 'extra' stuff onto a ceiling supported by the trusses. Jay ------------- 3 D-14s,A-C forklift, B-112 Kubota BX23S lil' TOOT( The Other Orange Tractor) Never burn your bridges, unless you can walk on water |
Posted By: chaskaduo
Date Posted: 03 Dec 2019 at 4:11pm
Them dang contractors, they know it all don't they.  ------------- 1938 B, 79 Dynamark 11/36 6spd, 95 Weed-Eater 16hp, 2010 Bolens 14hp |
Posted By: jaybmiller
Date Posted: 03 Dec 2019 at 4:21pm
|
yeah... HIS diesel 5KW heater for the wife's greenhouse sucked almost 10 Litres of fuel last night ! Somehow THAT is MY fault....sigh.... $14 of diesel..... ------------- 3 D-14s,A-C forklift, B-112 Kubota BX23S lil' TOOT( The Other Orange Tractor) Never burn your bridges, unless you can walk on water |
Posted By: Levibridge95
Date Posted: 03 Dec 2019 at 5:11pm
| I do garage doors and was putting decorative hardware on the front. Because they are purely decorative and not to be used, they're only held in with small screws that will rip out if you pull on them. I told the contractor in plain English "Do not use pull on the handles!! They will rip out." Guess what Mr. Contractor did 10 minutes later? Used the handle to pull down the door. Didnt do Any damage but i gave him an earful. |
Posted By: Levibridge95
Date Posted: 07 Dec 2019 at 1:22pm
| Got my holes dug and lumber ordered. Had to rent a mt52 and was able to power thru the rocks. Now i just have to wait until I can find time to proceed. |
Posted By: chaskaduo
Date Posted: 07 Dec 2019 at 2:40pm
Auger Attachment Bobcat MT52
------------- 1938 B, 79 Dynamark 11/36 6spd, 95 Weed-Eater 16hp, 2010 Bolens 14hp |
Posted By: Levibridge95
Date Posted: 07 Dec 2019 at 2:51pm
|
Posted By: Clay
Date Posted: 08 Dec 2019 at 8:38am
| Make sure you call 811 Dig Safe, before you dig. |
Posted By: Levibridge95
Date Posted: 13 Dec 2019 at 9:57pm
| Holes are dug but it keeps raining on the days that im available to pour. Planning on building my posts tomorrow on the porch out of the rain. So once i get the concrete done I can move along at a good pace. |
Posted By: cabinhollow
Date Posted: 14 Dec 2019 at 7:41am
Here a few years ago, the city utility crew were digging a water line up. They were within 100' of a call be for you dig sign. They hit and cut a gas main. These are the guys, that if you called, would be the ones to mark the lines for you. |
Posted By: TimNearFortWorth
Date Posted: 14 Dec 2019 at 9:22am
|
Years ago on the dairy back east, decision made to have a pole barn built and dealers were brought in for discussions. Money was tight but dad wanted it big enough plus some extra room. Banker advised they would give X amount (yes, back when bankers really got their nose into your business on everything they were loaning on) and banker wanted it smaller than planned, a "citybot" that was raised in town. Spring came and we pulled every piece of equipment out of winter storage, haymow, old wooden buildings and lean-to sheds. Getting all equipment lubed up and checked for use, every piece was parked where the new pole barn was planned and a call was made to the "banker" to come on out. He insisted his plan for a smaller building would work until he was reminded that we also planned an extended downside on one side for 50 heifers, and 10,000 bales of hay. Dad said for years after it was put up, "still not big enough, they never are" . . . . .
|
Posted By: Levibridge95
Date Posted: 14 Dec 2019 at 10:34am
I would need a commercial size warehouse like Amazon and I can guarantee that still wont be big enough!!!!! 😆 |