WD45 - engine coming out
Printed From: Unofficial Allis
Category: Allis Chalmers
Forum Name: Farm Equipment
Forum Description: everything about Allis-Chalmers farm equipment
URL: https://www.allischalmers.com/forum/forum_posts.asp?TID=161842
Printed Date: 01 Apr 2026 at 7:36pm
Software Version: Web Wiz Forums 11.10 - http://www.webwizforums.com
Topic: WD45 - engine coming out
Posted By: sploke
Subject: WD45 - engine coming out
Date Posted: 12 Jun 2019 at 7:32am
|
I have two problems I will be addressing here very shortly with my WD45. The first is a ton of coolant getting into the oil. I'm hoping it is as simple as a bad freeze plug in the head, but I will see once I get it opened up. The second is a massive oil leak at the rear crank seal. The upper section, of course. I dropped the oil pan and replaced the oil pan gaskets, and the leak is still there, running down the face of the engine crankshaft output. It will dump close to a quart an hour while running. My intent is to drain everything, pull the engine and put it on a stand, flip it over and change the seals. The engine was supposedly rebuilt by a friend of the previous owner, but everything else will get at least a good inspection while I'm in there....is there anything else I should keep an eye out for while I have her opened up?
|
Replies:
Posted By: DrAllis
Date Posted: 12 Jun 2019 at 7:36am
| You need to determine exactly what your coolant leak is FIRST !! You may have a cracked BLOCK !!! Remove the oil pan and valve cover and pressurize the cooling system and see where it's coming from FIRST !! before pulling the engine...…………. |
Posted By: sploke
Date Posted: 12 Jun 2019 at 7:48am
|
Good advice. I still have to get the hood off and all that to see what I'm doing, so I will do that before disconnecting everything. What's the best way to pressurize the cooling system, throw together some sort of plug for the radiator cap I can put an air hose on? I'd imagine it should only take a few pounds of pressure for a leak to manifest...
|
Posted By: Don(MO)
Date Posted: 12 Jun 2019 at 8:22am
|
I'd call your parts store and rent a "radiator pressure tester" take your cap along to get the right one to fit your tractor. Don't pressurize over 7 PSI!!! ------------- 3 WD45's with power steering,G,D15 fork lift,D19, W-Speed Patrol, "A" Gleaner with a 330 corn head,"66" combine,roto-baler, and lots of Snap Coupler implements to make them work for their keep. |
Posted By: Sugarmaker
Date Posted: 12 Jun 2019 at 12:39pm
|
sploke, Sure hope you have better luck than me and my current 45. Its been a year since I pulled the engine in mine. Turned into a much larger, more interesting, and more expensive project than I had anticipated! Yes low pressure testing revealed the cracks in my block between the sleeves. Wishing you the best. But your headed in the right direction. I still like them enough to fix them. Regards, Chris ------------- D17 1958 (NFE), WD45 1954 (NFE), WD 1952 (NFE), WD 1950 (WFE), Allis F-40 forklift, Allis CA, Allis D14, Ford Jubilee, Many IH Cub Cadets, 32 Ford Dump, 65 Comet, 66 F100. |
Posted By: sploke
Date Posted: 13 Jun 2019 at 7:38am
Yes, I am surely hoping it doesn't turn into one of those types of projects...I have enough of those already :D
|
 Sugarmaker wrote:
Posted By: sploke
Date Posted: 14 Jun 2019 at 10:27pm
|
Well, not I am kind of stumped. I rented the radiator pressure testing kit, hooked it up, and unfortunately (fortunately?) I did not find a smoking gun for a coolant leak. I pressurized the system up to 7lbs and let it sit for about 15 min. It had dropped to maybe 6.5lbs, and I didn't see any evidence of coolant flowing, either under the valve cover or into the oil sump area. I did notice some wetness/seeping around one of the water pump hoses, but that wouldn't explain coolant getting into the oil. Another thing I noticed when I drained the oil, it did smelly extremely gassy. That might be a separate issue. I'm fairly vigilant about closing the fuel petcock when the tractor is not running, so I'm not sure how any volume of gas would make it into the oil just while the tractor is running. This is what was left in the oil pan when I dropped it...all the oil looked like that. The oil in this tractor has about 10hrs of time on it.  Here's a shot under the valve cover. Everything looked good, other than being coated with the chocolate milk oil.  Here are a few shots of the crank and pistons...the bottom sides of the pistons look remarkably clean to me, I'm wondering if they've been replaced at some point.   Shot of the seepage around the water pump hose  |
Posted By: JoeO(C-MO)
Date Posted: 14 Jun 2019 at 10:34pm
I was told the AC radiators should not exceed 7 lbs pressure by the local dealer at the time. Sometime later I took a D15 radiator into a fairly new radiator shop for clean out and a few days later I was informed that it needed a new core. I always thought it had too much pressure used to clean out. ------------- D10 III, D15 II 3 pt, D15 II SC, 170 Gas w/shuttle, 175 Diesel UI ROPS, 185 w ROPS. AC 653 w/6 way blade, ROPS AC 615 Ind. WD45 running/Parts. |
Posted By: Don(MO)
Date Posted: 14 Jun 2019 at 10:43pm
|
Did you save the oil you removed for the tractor if you did poor some of it in a clear container and let it sit for a day or two and look at and report back. ------------- 3 WD45's with power steering,G,D15 fork lift,D19, W-Speed Patrol, "A" Gleaner with a 330 corn head,"66" combine,roto-baler, and lots of Snap Coupler implements to make them work for their keep. |
Posted By: SteveM C/IL
Date Posted: 14 Jun 2019 at 10:44pm
| I doubt 15 min is enough. Couple hours be more like it. Overnight even better. Antifreeze leaks easier than water alone. Think you will eventually find liner oring dripping. |
Posted By: sploke
Date Posted: 15 Jun 2019 at 5:44am
I do still have the oil, I had dumped out my catch pan prior to draining the tractor so I'll try that and see how it looks. I'm assuming, if there is a significant amount of coolant in the oil, it should separate out to get an idea of how much is in there?
|
Posted By: sploke
Date Posted: 15 Jun 2019 at 5:47am
Ok...now that the pan has been off for a while and everything that's dripping off the bottom end hopefully has, I can clean it up a bit and check again. With everything under there dripping with dirty oil, it would be hard to see yet another slight leak from one of the sleeves. Once everything else has stopped dripping, it should be easier to spot.
|
Posted By: DrAllis
Date Posted: 15 Jun 2019 at 6:06am
| Take a can of brake kleen and spray it down. |
Posted By: Sugarmaker
Date Posted: 15 Jun 2019 at 7:11am
|
Sploke, Yep looks like you have a WD45 opened up. Don would also tell you that you might as well get ready to pull the engine to do the seals and pan gaskets properly. But back to the finding of the leak. Dr recommends spraying with brake cleaner. I would never have thought of that! I like learning stuff from these guys! Your water contamination was not as bad as mine. And I found my leaks easy as I had cracks between each pair of sleeves! My grandsons younger eyes helped too! My guess is that you have a very small leak but still a leak. Now finding it. The pressure tester, and a good light. Maybe a air hose to blow off any drips? And could it be somewhere not visible?? Good luck I will be watching! Regards, Chris ------------- D17 1958 (NFE), WD45 1954 (NFE), WD 1952 (NFE), WD 1950 (WFE), Allis F-40 forklift, Allis CA, Allis D14, Ford Jubilee, Many IH Cub Cadets, 32 Ford Dump, 65 Comet, 66 F100. |
Posted By: DrAllis
Date Posted: 15 Jun 2019 at 7:44am
| The coolant leak at the water pump hose, is probably NOT the hose. It's the water pump seal leaking onto the hose. I'm just sayin...……... |
Posted By: mhankins
Date Posted: 15 Jun 2019 at 8:01am
|
You can also get an ultra violet dye to put in the radiator. Don't know if it will get into the entire system,though with out being able to run the engine and circulate it.
|
Posted By: SteveM C/IL
Date Posted: 15 Jun 2019 at 12:12pm
I agree. Have been there.
|
Posted By: DaveKamp
Date Posted: 18 Jun 2019 at 12:18am
Actually, if you look at the underside edge of the water pump neck, you can see that it's got residue on it that supports the likelyhood of this assertion.... But this doesn't explain the presense of water in the oilpan... and IF he doesn't get any leakage indication with pressure test while pan is off, it's PROBABLY because the block is sealing fine at room temp, but once running, it's got either some loss of seal due to thermal expansion, OR... there's enough of a compression leak through the head gasket, or the head, etc, to 'force' coolant into the oil realm. Double check those cylinder head frost plugs!!!
------------- Ten Amendments, Ten Commandments, and one Golden Rule solve most every problem. Citrus hand-cleaner with Pumice does the rest. |
Posted By: sploke
Date Posted: 18 Jun 2019 at 8:00am
|
I repeated the pressure test..blasted the oil sump/crank area with brake cleaner to clean it up as much as possible and wiped down the bottoms of the sleeves, and cleaned up around the freeze plugs. Pressurized to 7psi and left it for about an hour, again with no visible leakage, weeping or seepage. At this point, I'm thinking it's like DaveKamp says...the leak may be such that it will only manifest under operation at temperature. I got the engine out, so my current plan is basically preventative measures, i.e. start throwing parts at it :D I need to pull the crank to replace the oil seals there, so I figure I might as well pull the head off as well, replace the head gasket and cylinder sleeve o-rings as potential leak sources as well. The freeze plugs in the head appear pristine, but I'll knock on them a little to make sure they are solidly seated. One question - when you order the oil pan gasket set, it comes with the two formed pieces for the sides of the oil pan, and two pairs of straight gaskets, I'm assuming one for above the main seal and one for below. The pairs are two different lengths...which one goes where? Engine out! https://postimages.org/" rel="nofollow">  This is the pulley/coupling on the front of the crank that goes to the hydro pump to power the FEL. It's an...interesting setup. And the pump location made getting the engine out a real freaking pain. https://postimg.cc/py4nx31k" rel="nofollow">  manifold side https://postimages.org/" rel="nofollow">  oil sample...looks awesome, right? https://postimg.cc/6422nhTd" rel="nofollow">  it's been sitting for about 2 days in this picture, and you can see some separation in the bottom inch or so of the container. https://postimg.cc/JDdHsF7r" rel="nofollow">  |
Posted By: Dave(inMA)
Date Posted: 18 Jun 2019 at 8:46am
|
Nasty looking oil. Hope your search for the failure point works out well. ------------- WC, CA, D14, WD45 |
Posted By: DaveKamp
Date Posted: 18 Jun 2019 at 11:08am
|
Aw, man... that hydraulic pump drive concept is nasty. Sheesh...
well, it's apparently the best they could do with what they got... I'm
surprised that the pulley survived all that welding. I dealt with this on the front pump drive for my D17... I thought I had a picture here somewhere... yeah... 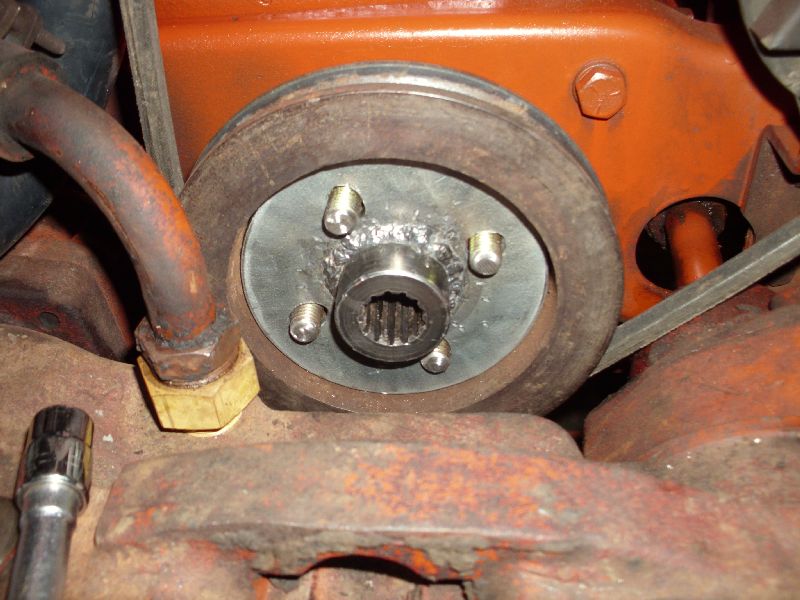 and here's the shaft I made to extend engine PTO out the front bolster: 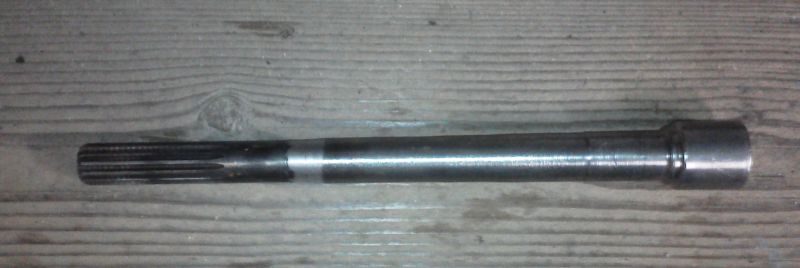 ------------- Ten Amendments, Ten Commandments, and one Golden Rule solve most every problem. Citrus hand-cleaner with Pumice does the rest. |
Posted By: Don(MO)
Date Posted: 18 Jun 2019 at 11:54am
|
This might help you with the oil pan and rear main seal when you get that far. http://www.youtube.com/watch?v=9LWCMvO_Dis&feature=youtu.be" rel="nofollow - http://www.youtube.com/watch?v=9LWCMvO_Dis&feature=youtu.be ------------- 3 WD45's with power steering,G,D15 fork lift,D19, W-Speed Patrol, "A" Gleaner with a 330 corn head,"66" combine,roto-baler, and lots of Snap Coupler implements to make them work for their keep. |
Posted By: sploke
Date Posted: 18 Jun 2019 at 12:05pm
Awesome, thank you!!
|
Posted By: Sugarmaker
Date Posted: 18 Jun 2019 at 6:33pm
|
Your going about it in the right way! One step at a time. Check things out. You will find the leak. I was at this similar position a year ago.  My leak/s were pretty obvious!
Regards, Chris ------------- D17 1958 (NFE), WD45 1954 (NFE), WD 1952 (NFE), WD 1950 (WFE), Allis F-40 forklift, Allis CA, Allis D14, Ford Jubilee, Many IH Cub Cadets, 32 Ford Dump, 65 Comet, 66 F100. |
Posted By: WF owner
Date Posted: 18 Jun 2019 at 8:40pm
| This is just my opinion, but I would rather find the link before installing a bunch of new parts and then finding there is a problem somewhere that the new parts didn't solve. Sometimes lessons are very expensive!!! |
Posted By: sploke
Date Posted: 18 Jun 2019 at 10:32pm
Excellent video and super helpful, but you started to talk about the two different lengths of the flat cork gaskets for the oil pan ends, but never came back to it. What is the application difference between the two different sizes?
|
Posted By: sploke
Date Posted: 18 Jun 2019 at 10:46pm
|
Got the motor mostly torn down tonight. I'm pretty confident I found the source of the leak - there was a significant amount of coolant on both sides of the head gasket between the coolant ports and the pushrods. It looks like it was leaking on one or both sides of the head gasket. I'm rethinking my previous plan of replacing the sleeve o-rings. After doing some more research it looks like I'll need some sort of pulling tool to remove the sleeves. Based on the pressure test, I didn't see any leakage around the sleeves, so I'm thinking it might be better to leave well enough alone. From looking and feeling in the coolant paths and around the outside of the sleeves, I don't feel any corrosion or debris in there, so there may not be a compelling reason to mess with it. Tried to get a pic of the wet coolant areas on the head, block and gasket. I have a lot of cleaning to do before I put those back together. https://postimg.cc/F1MNTm0L" rel="nofollow">  https://postimg.cc/30K6cSrz" rel="nofollow">  https://postimages.org/" rel="nofollow">  https://postimg.cc/S2L3VF4W" rel="nofollow">  Also, I don't know what someone had against the poor crankshaft, but they did a serious number on the front of it for the hydro pump coupling. Several different dimples drilled in and some random weld beads that were sort of ground down. None of the three setscrews in the pulley were tight on the crankshaft, which wasn't helping the cause I'm sure. https://postimg.cc/RW0sfJqQ" rel="nofollow">  |
Posted By: SteveM C/IL
Date Posted: 18 Jun 2019 at 11:10pm
| Pretty sure the coolant mess is just a result of separating head from block. It drained out of the head when opened up. Gasket doesn't show signs of leaking from what I see. |
Posted By: Sugarmaker
Date Posted: 19 Jun 2019 at 7:32am
|
sploke, I probably cant help you at all other than ramble on? The leak, well you got one response that it may not be the head gasket. If not, then you have more work to do to find the problem?? Others can direct you better than me. That crank end sure looks compromised. Are you going to continue to use this to drive a pump? If not maybe it can be repaired to at least get one good original type set screw. Mine did not have any set screw in it and it was holding enough to run the water pump and alternator just by friction. Not sure about the different lengths of gaskets for the front and rear of the pan. I believe I only got one set in my 45 gasket kit. Don't cut the length. Put them inside a soup can to get them round. Get the clips to help hold the gaskets in place for installation too. well worth the $3 each.   You moving right along. Regards, Chris ------------- D17 1958 (NFE), WD45 1954 (NFE), WD 1952 (NFE), WD 1950 (WFE), Allis F-40 forklift, Allis CA, Allis D14, Ford Jubilee, Many IH Cub Cadets, 32 Ford Dump, 65 Comet, 66 F100. |
Posted By: sploke
Date Posted: 19 Jun 2019 at 8:10am
|
Thanks for the replies...if the leak is not likely coming from the head gasket, then I'm bewildered. The block looks to be in good shape, I don't see any cracks in the webs between the cylinder bores. I've done the oil pan once before, but yes this time I will be getting the clips, and also doing it on the engine stand. That should be significantly easier than trying to do it all from the bottom of the engine, which is how I did it last time. The rear main seal, where the major oil leak was, i dunno. The felt seals are in there but don't look like they were sealing very well, so hopefully redoing those will solve that issue. I'll follow the steps in the video Don posted, about making sure the top cap is flat and true and all that to set myself up for a good seal. Sugarmaker, did you pull your engine sleeves? If so, how did you get them out and back in again?
|
Posted By: Don(MO)
Date Posted: 19 Jun 2019 at 12:53pm
|
I'd find a crankshaft that set screw hole will not hold and the end of the shaft might even break off someday and the pulley will make a mess of the rad as it try's to get out of there. ------------- 3 WD45's with power steering,G,D15 fork lift,D19, W-Speed Patrol, "A" Gleaner with a 330 corn head,"66" combine,roto-baler, and lots of Snap Coupler implements to make them work for their keep. |
Posted By: Sugarmaker
Date Posted: 19 Jun 2019 at 1:09pm
|
Sploke, Yes I have a crude puller for the sleeves. A tube larger than the sleeve, to set on the deck, 1/2 inch thick plate that fits in the bottom of the sleeve, 5/8 allthread through the center. Washers and nut on each end. also apply a little oil to the allthread as needed. Putting them in is a lot easier. Almost by hand with twisting down pressure if your good. I am not that good. I needed a couple taps with a piece of hard wood for the last 3/8 inch. That's for the final o-ring assembly. For just checking sleeve protrusion with out the o-rings they come in and out by hand easily. I guess if you needed to you could have the block magnafluxed for cracks. I had mine checked out. Don has seen a lot of these. That crank end has seen better days! Regards, Chris ------------- D17 1958 (NFE), WD45 1954 (NFE), WD 1952 (NFE), WD 1950 (WFE), Allis F-40 forklift, Allis CA, Allis D14, Ford Jubilee, Many IH Cub Cadets, 32 Ford Dump, 65 Comet, 66 F100. |
Posted By: sploke
Date Posted: 19 Jun 2019 at 1:47pm
Thanks for that info. For the pull, did you need to crank on the all-thread until the entire sleeve was clear of the block? Or can you get it halfway or so and then it pulls out freely?
|
Posted By: WF owner
Date Posted: 19 Jun 2019 at 8:17pm
| Some sleeves come out easy. Others you have to really crank on them to get them moving. Usually, after they start, they come easy. After you move them a couple inches, they clear the O rings and come out easily. |
Posted By: sploke
Date Posted: 19 Jun 2019 at 9:16pm
|
That is about what I found. It took me longer to weld up the jig than it did to pull all four liners. Once I got them unseated and up about an inch, I was able to pull them the rest of the way by hand. There is some debris inside the block at the back, furthest from the water pump, so I will clean all that up well before reinstalling. https://postimg.cc/Y4z8C1Mf" rel="nofollow"> 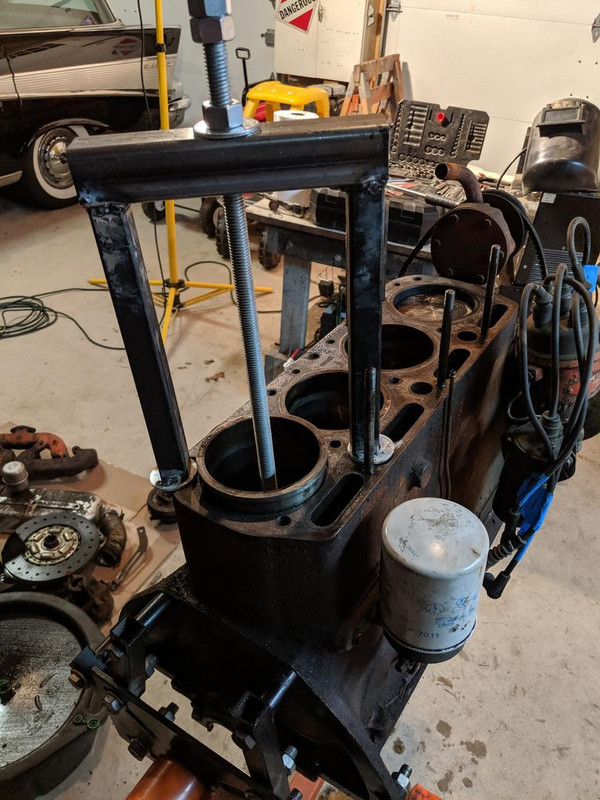 https://postimg.cc/w7x1CLGY" rel="nofollow"> 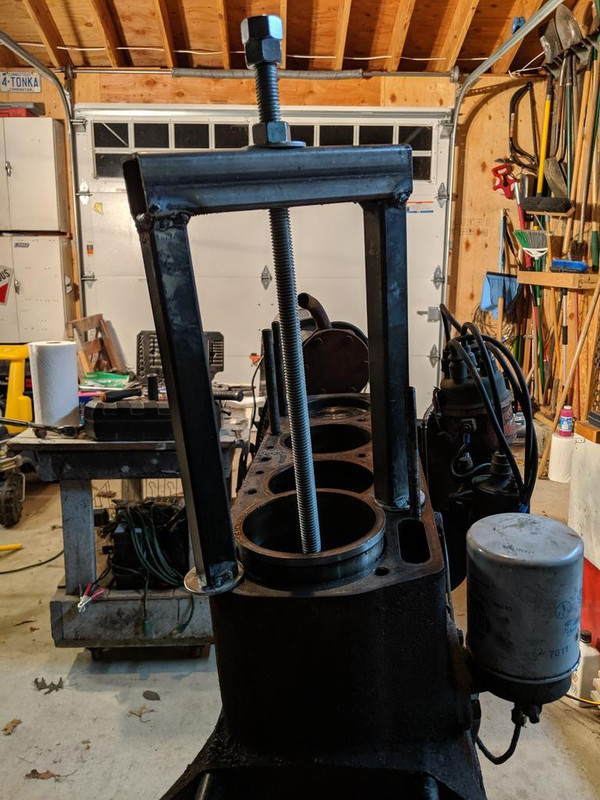 https://postimages.org/" rel="nofollow">  https://postimages.org/" rel="nofollow"> 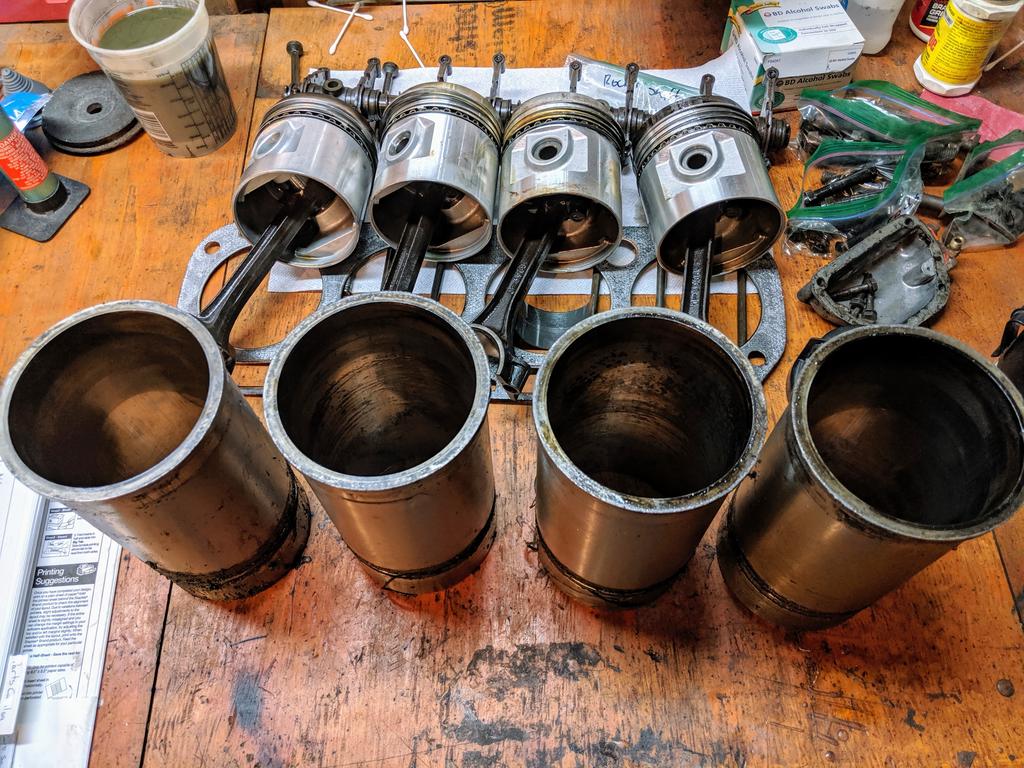 https://postimages.org/" rel="nofollow"> 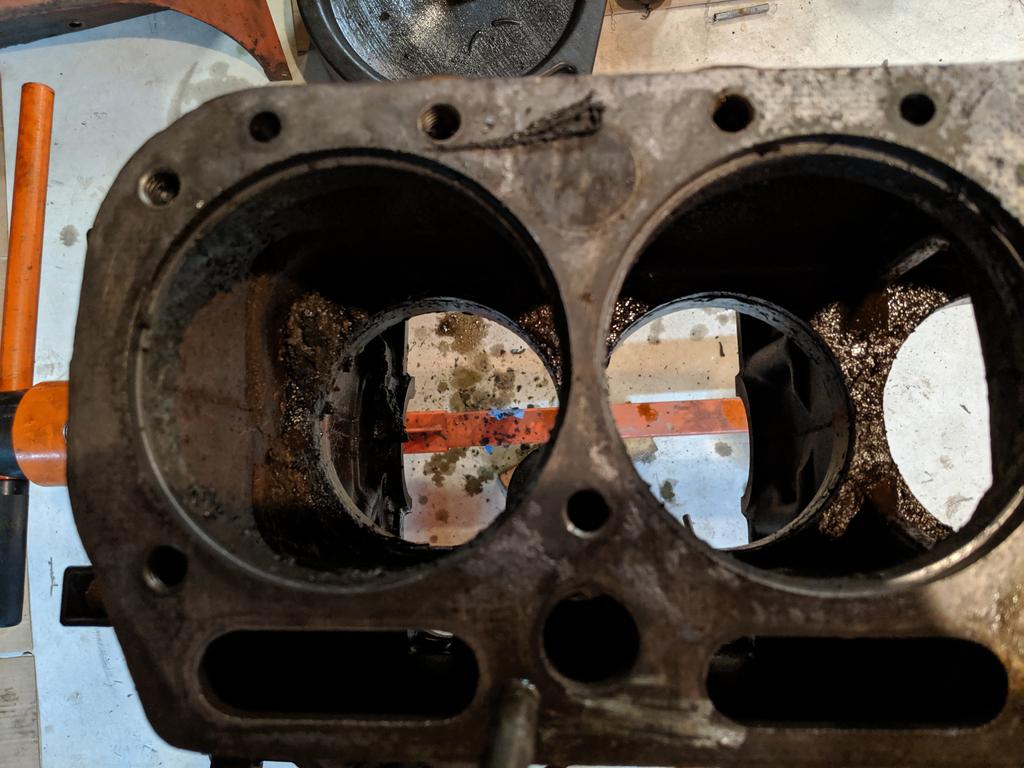 https://postimages.org/" rel="nofollow"> 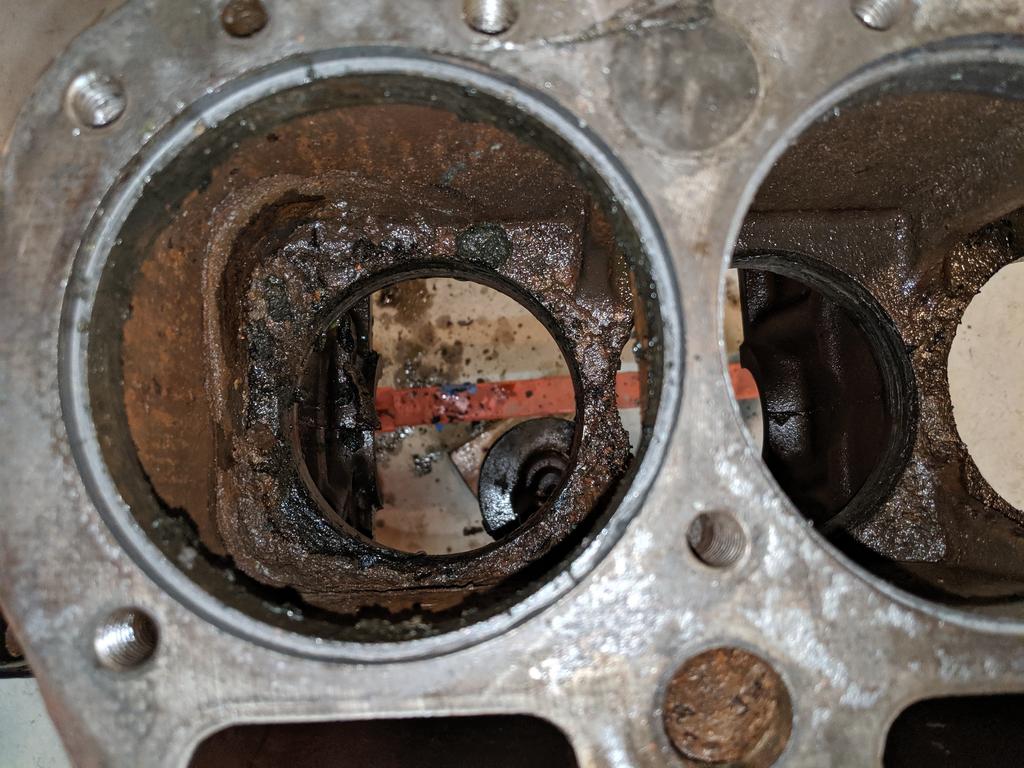 |
Posted By: WF owner
Date Posted: 19 Jun 2019 at 9:30pm
|
Sleeves and pistons look quite new. I would probably hone the sleeves, put in new rings and O-rings and reuse them. I see no cracks between cylinders. Check the bottom end very carefully for cracks (that may be your source of coolant in the oil). 57 Nomad???
|
Posted By: Sugarmaker
Date Posted: 19 Jun 2019 at 9:36pm
|
Sploke, You have good skills and are quick too. The time fabricating the right tool saved you time. Good job! Regards, Chris ------------- D17 1958 (NFE), WD45 1954 (NFE), WD 1952 (NFE), WD 1950 (WFE), Allis F-40 forklift, Allis CA, Allis D14, Ford Jubilee, Many IH Cub Cadets, 32 Ford Dump, 65 Comet, 66 F100. |
Posted By: sploke
Date Posted: 19 Jun 2019 at 9:45pm
'57 four door Bel-Air wagon. My wife and I restored it before we were married. We both like old iron  https://postimages.org/" rel="nofollow">  |
Posted By: WF owner
Date Posted: 19 Jun 2019 at 9:49pm
| NICE !!!!!! |
Posted By: Sugarmaker
Date Posted: 19 Jun 2019 at 9:55pm
|
Very sharp Chevy! Regards, Chris ------------- D17 1958 (NFE), WD45 1954 (NFE), WD 1952 (NFE), WD 1950 (WFE), Allis F-40 forklift, Allis CA, Allis D14, Ford Jubilee, Many IH Cub Cadets, 32 Ford Dump, 65 Comet, 66 F100. |
Posted By: sploke
Date Posted: 22 Jun 2019 at 9:13am
|
Well, got the rest of the block stripped down and ready for cleanup, and started giving things a good inspection. One of the lower spots between the cylinders caught my attention. I'm not sure if this looks like a repair....it certainly seems like it's gotten some attention in the past though. It looks solid...could that possibly be a braze repair of a previous crack? This is from the top, looking down onto the upper surface of the lower web, where the liner o-rings seal.
https://postimg.cc/cvMc1vZp" rel="nofollow">  https://postimages.org/" rel="nofollow"> 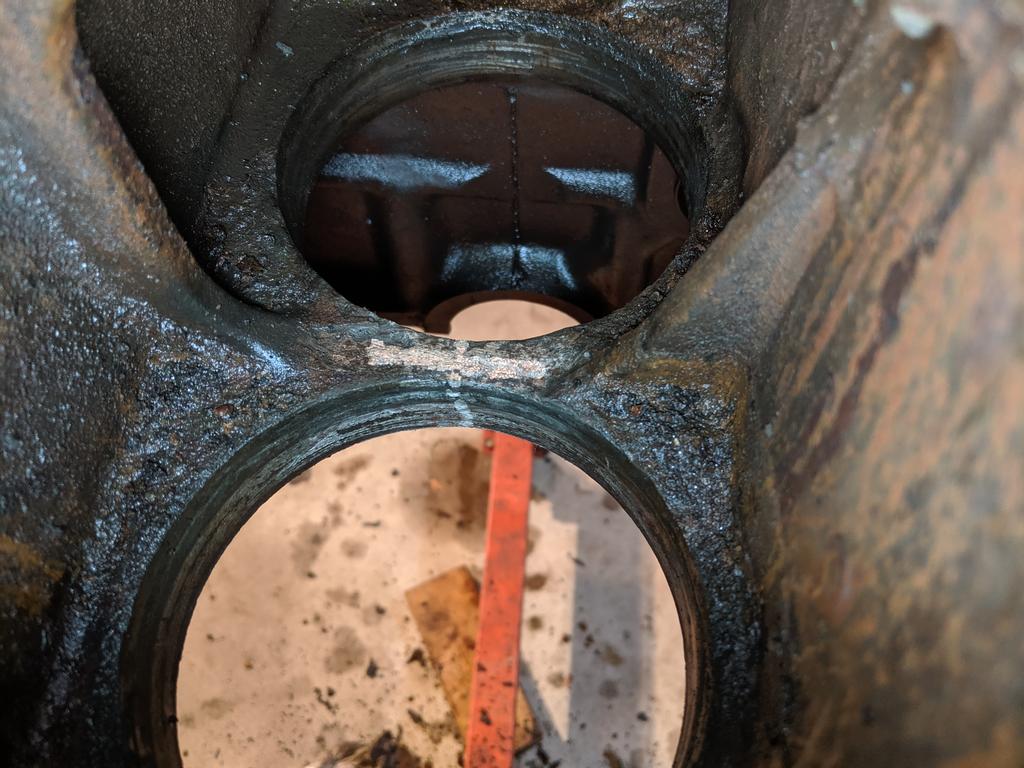 Same area but other side, from the bottom of the block. https://postimages.org/" rel="nofollow"> 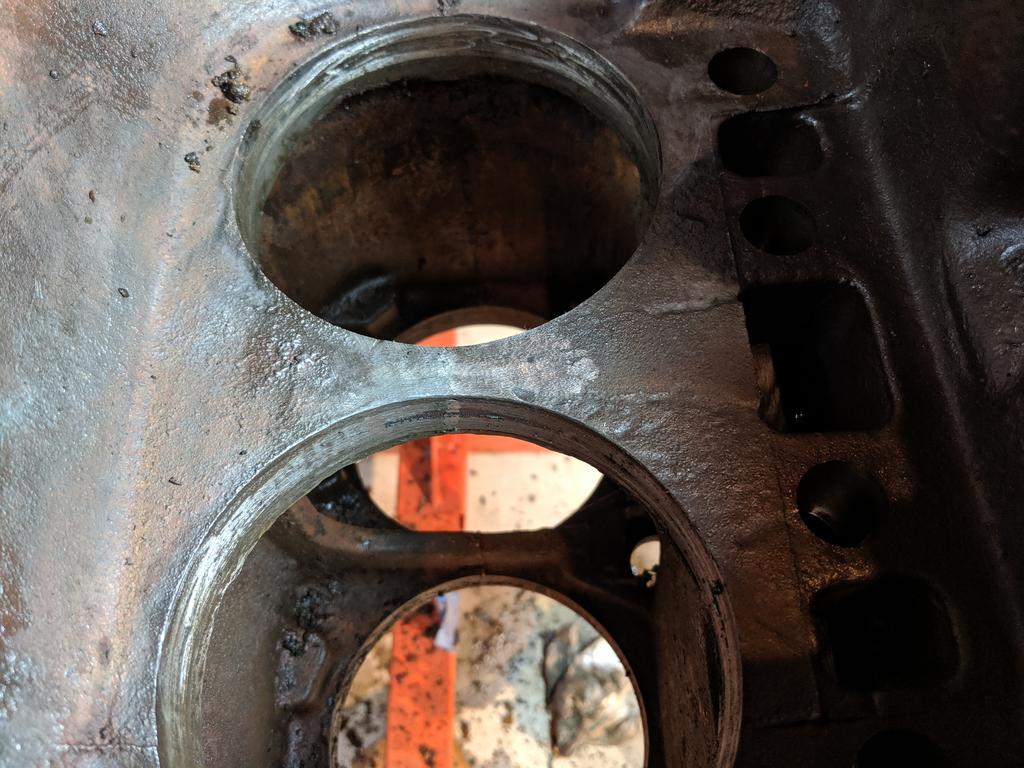 https://postimg.cc/F1LC5sd4" rel="nofollow"> 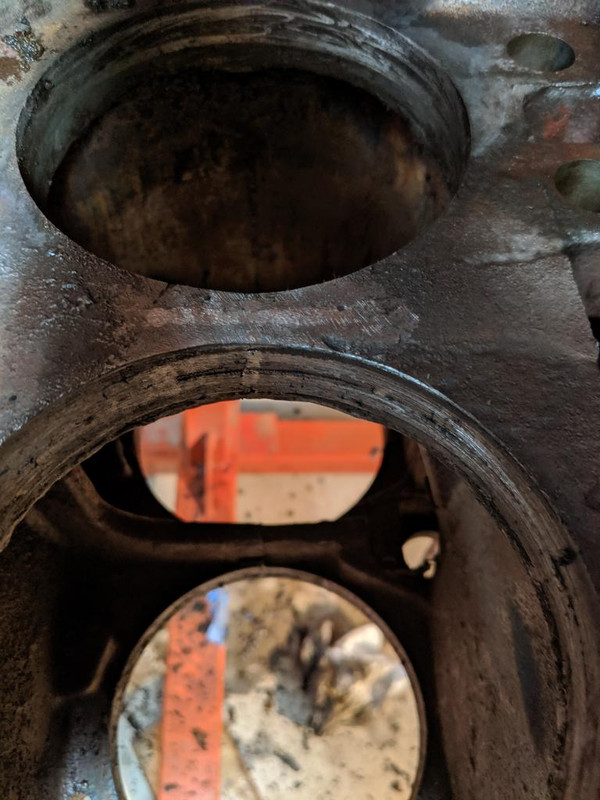 https://postimg.cc/G4QS77BT" rel="nofollow"> 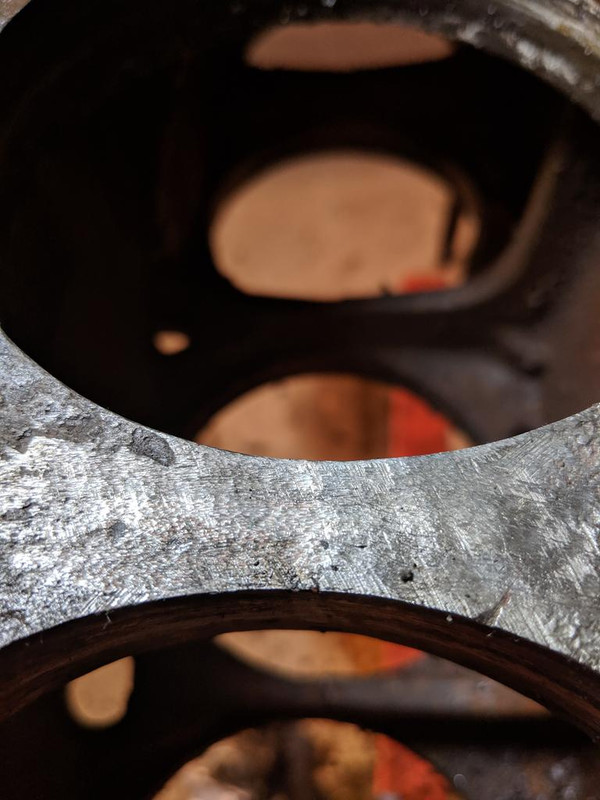 From the inside surface, where the o-rings seal. On a separate note, this surface seems a lot rougher than I would have expected. I was expecting a much more smoothly machined finish where the liner o-rings seal. https://postimg.cc/NyCCYKkg" rel="nofollow"> 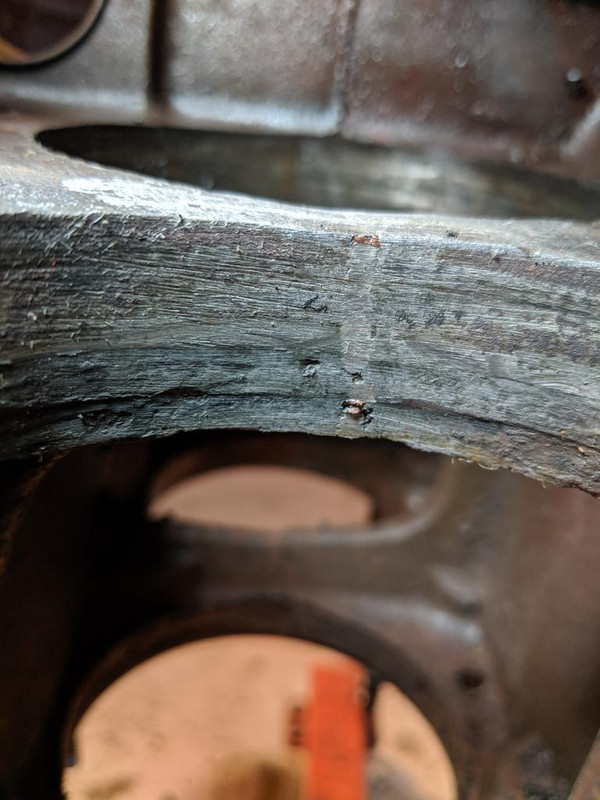 https://postimg.cc/F1Y5f4YW" rel="nofollow"> 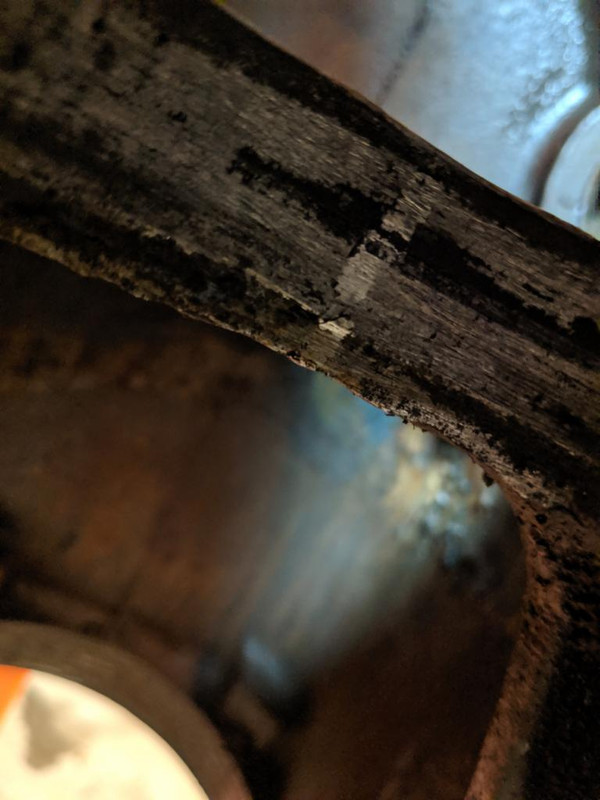 |
Posted By: Don(MO)
Date Posted: 22 Jun 2019 at 10:15am
|
I guess I'll be the bad guy here, the lower bores (where the O-rings fit) need to be bored out and install lower dry sleeves to repair that block right. Before you go on with this block please get it checked for cracks in the lower bores. ------------- 3 WD45's with power steering,G,D15 fork lift,D19, W-Speed Patrol, "A" Gleaner with a 330 corn head,"66" combine,roto-baler, and lots of Snap Coupler implements to make them work for their keep. |
Posted By: SteveM C/IL
Date Posted: 22 Jun 2019 at 10:16am
| They are not that rough. You have a lot of crud to remove to get to the base metal |
Posted By: Sugarmaker
Date Posted: 22 Jun 2019 at 10:32pm
It looks repaired and rough in the area of the o-rings just as you described. But that could be a casting mark???? I will see if I have any pictures of the block I used. May not have taken as good of pictures as you did. Heres about the only one I have. I think my sealing areas were pretty smooth at the o-rings. Regards, Chris ------------- D17 1958 (NFE), WD45 1954 (NFE), WD 1952 (NFE), WD 1950 (WFE), Allis F-40 forklift, Allis CA, Allis D14, Ford Jubilee, Many IH Cub Cadets, 32 Ford Dump, 65 Comet, 66 F100. |
Posted By: sploke
Date Posted: 24 Jun 2019 at 7:16am
| After giving the whole block a good scrub in degreaser, it cleaned up pretty well. Whoever rebuilt this thing last went a little crazy with the permatex...both o-rings on all the sleeves were buried in the stuff, and I think that was causing a lot of the "rough" look on the lower sleeve bores. Live Steve M said, a lot of crud had to come off to expose the base metal, and it looks a lot better now. I'm waiting on parts, but I'm curious to compare the o-rings that were in there to the new ones I get. I'm wondering if the old ones were the wrong size, and the guy tried to make up for it by gluing them in with RTV. Would be a convenient solution to the leakage problem. More to come... |
Posted By: Sugarmaker
Date Posted: 24 Jun 2019 at 7:29am
|
sploke, Yes! There should be permatex police! it does get over used on occasion! Sound slike your block cleaned up good. Those seal areas are going to be critical. I used veggie oil to lube the sleeve o-rings. Regards, Chris ------------- D17 1958 (NFE), WD45 1954 (NFE), WD 1952 (NFE), WD 1950 (WFE), Allis F-40 forklift, Allis CA, Allis D14, Ford Jubilee, Many IH Cub Cadets, 32 Ford Dump, 65 Comet, 66 F100. |
Posted By: SteveM C/IL
Date Posted: 24 Jun 2019 at 9:05am
| When clean,you should be able to set bare liner in block and should turn circles freely. If not,you have more cleaning to do. |
Posted By: sploke
Date Posted: 24 Jun 2019 at 9:28am
good advice, thanks. I will check that soon - right now I have the covers and everything dry-fit and taped off to paint the motor tonight. Once it's apart again I'll be sure to check that.
|
Posted By: frnkeore
Date Posted: 24 Jun 2019 at 12:30pm
|
It looks to me that the block was "pinned", to repair a crack. After pinning, it was ground, to remove the exposed parts of the pins, to try to match the sleeve bore and one side is very rough and could tear the O-ring. You need measure, a good bore, then across that area. I suspect that the measurement will be larger than the other bores and factory specs. ------------- Frank 1959 D17 Series I #24001+, '59 D14 '55 & '59 Ford 850 & 861 Ferguson TO 35 Deluxe, Oliver 70 and 5 more. |
Posted By: CTuckerNWIL
Date Posted: 24 Jun 2019 at 6:26pm
That was my thought too, when I saw the pictures. ------------- http://www.ae-ta.com" rel="nofollow - http://www.ae-ta.com Lena 1935 WC12xxx, Willie 1951 CA6xx Dad bought new, 1954WD45 PS, 1960 D17 NF |
Posted By: sploke
Date Posted: 24 Jun 2019 at 7:41pm
|
Running out of time to get the paint taken care of tonight, but did get the bore measurements. I couldn't find any mention in the service manual of the spec'd bore size, or the clearance between block and liner, so I really have no idea if these measurements are acceptable or not. If anyone has that data I would in interested in seeing it. The repair was done between cylinders 3 and 4. I took measurements on 1 for a baseline, then 3 and 4. These are the places I took measurements: https://postimg.cc/WFyYWtNy" rel="nofollow">  Cyl 1 A - 4.51 B - 4.53 C - 4.52 Cyl 3 A - 4.50 B - 4.55 C - 4.59 Cyl 4 A - 4.54 B - 4.61 C - 4.56 So, the bores for cyl 3 and 4 are slightly larger, but NOT in the area where I expected if the pin repair was ground down too much inside the bores. All that being said, without a tolerance measurement I really have no idea how much variance the sleeve o-rings can be expected to make up. |
Posted By: Sugarmaker
Date Posted: 24 Jun 2019 at 8:33pm
|
Sploke, I think your right on in doing the measuring! But I have a question. You have dimension spread of .090 thousands! That seems way to big, but I must say that I did not measure mine in that area. I would have expected machined dimensions of .010 inch total? I have my junk block but sent my sons mics home. Ok so that is a repair in that one web. Makes sense. Hope you can save this block! Regards, Chris ------------- D17 1958 (NFE), WD45 1954 (NFE), WD 1952 (NFE), WD 1950 (WFE), Allis F-40 forklift, Allis CA, Allis D14, Ford Jubilee, Many IH Cub Cadets, 32 Ford Dump, 65 Comet, 66 F100. |
Posted By: SteveM C/IL
Date Posted: 24 Jun 2019 at 9:32pm
| Just me but I wouldn't chance using a repaired lower web. It's one thing to bore and sleeve it but pinning it would distort the bore wouldn't it? There are good used blocks out there. Wish you had plugged the hoses and put some real pressure on water jacket to see where the leak was. If you use this,I'd advise filling block and head with coolant,plugging radiator hoses with round stock and put pressure on it with pan off....before you ever install it. You can drill and tap one of the plugs and install a fitting to connect air to. Leave it at 15# for 4-5 hrs. Then overnight.If it passes all that you MAY be good to go. |
Posted By: frnkeore
Date Posted: 25 Jun 2019 at 1:47am
|
First check your engine number. W Engines #146608 and above, use a bottom sleeve diameter of 4.459. Engines from #146607 back, use a diameter of 4.467. Verify your sleeve diameter. The above dimensions are from sleeve specs, in my TRW catalog. Your measurements, tell me that you didn't use a inside micrometer to do the measurements? With a inside mic, I would expect a 3rd digit in the measurement. If you don't have one, try to borrow one and measure across the worst part of the repair, that is where it will leak the most. Then, put a O-ring on the sleeve and with a mic, carefully measure that diameter. If that diameter isn't at least .0050 - .010 larger than the largest diameter, in the pinned area, I don't think there is a chance that it will seal, especially on the area, with the roughest surface. I couldn't find the spec for the lower bore, in my service manual but, that would be a great help and something that should be checked when doing a sleeve replacement. ------------- Frank 1959 D17 Series I #24001+, '59 D14 '55 & '59 Ford 850 & 861 Ferguson TO 35 Deluxe, Oliver 70 and 5 more. |
Posted By: Sugarmaker
Date Posted: 25 Jun 2019 at 6:31am
|
sploke, Hows it going? We haven't provided a very good prognosis on your engine project. Your pictures really help bring up some good questions and good point. I for one did not look too hard at that sealing area. I guess I sanded it smooth and did not notice any serious issues. I did not measure it. In fact to be honest I didn't measure anything related to the sleeve area. Just cleaned and set the sleeve protrusion, and made sure the sleeves rotated freely by hand prior to o-rings. Looking forward to your updates on your engine work. I am keeping my fingers crossed on mine! I haven't started it yet and its my first 226 rebuild! Regards, Chris
------------- D17 1958 (NFE), WD45 1954 (NFE), WD 1952 (NFE), WD 1950 (WFE), Allis F-40 forklift, Allis CA, Allis D14, Ford Jubilee, Many IH Cub Cadets, 32 Ford Dump, 65 Comet, 66 F100. |
Posted By: Don(MO)
Date Posted: 25 Jun 2019 at 7:00am
Please re-read this before you put it back together. All that sealer is a warring of trouble the last time it was overhauled. ------------- 3 WD45's with power steering,G,D15 fork lift,D19, W-Speed Patrol, "A" Gleaner with a 330 corn head,"66" combine,roto-baler, and lots of Snap Coupler implements to make them work for their keep. |
Posted By: sploke
Date Posted: 25 Jun 2019 at 7:29am
Do you mean engine s/n or tractor s/n? I don't have the tractor s/n handy but I did confirm it's a 1953 last time I looked at it, so it's definitely an earlier WD45. The engine block s/n is 45-3667-G, for whatever that's worth. I don't have an inside micrometer, I used a standard mic with a bore gauge to get the measurements. I can get better resolution measurements...I was rushing through it last night. I don't have the new o-rings yet, they are scheduled for delivery tomorrow, but I think your suggestion is valid - if I measure the diameter of the sleeve with the o-ring on, and compare that to the bore measurements, I should be able to get a good idea of how much compression I'd be looking at on the o-rings once the sleeves are installed.
|
Posted By: sploke
Date Posted: 25 Jun 2019 at 7:36am
Yeah...I'm beginning to understand that. With the appearance of a repair to the web, the variance in the bore diameter and the sheer volume of sealant found on the sleeves and bores...this is not a new problem. Ugh. I bought this machine not really knowing what I was getting into, and originally noticed the oil leak (which even at that time looked like chocolate milk) when we were loading it on the trailer at pickup. Seller (who reportedly bought the tractor from a mechanic friend who did the previous rebuild) kind of brushed it off as, "oh, it probably just needs an oil change". Looking back, the internal coolant leak had probably already started and has steadily gotten worse in the time I've had it. I probably paid too much for the tractor even without this issue, so now I'm struggling with, am I throwing good money after bad by chasing all these problems? This went from an oil pan gasket replacement, to a rear main seal replacement, to holy crap I really need to replace the whole block and potentially the crank! Budget, meet torpedo
 |
Posted By: sploke
Date Posted: 25 Jun 2019 at 10:39am
| Oof. Local machine shop says budget $800 or so to bore and dry sleeve the lower liner bores in the block. That is pushing deep into the margin of "not worth it to repair". Although the other downside of spending $400-500 to get a used block with who knows what pre-existing problems is not much of a better option. |
Posted By: DrAllis
Date Posted: 25 Jun 2019 at 11:32am
| Well at $400 to $500 for a used block, I'll buy one for $200 and bring it to you. That old block is junk and not worth even trying to fix. Maybe used parts are scarce where you live, but not around here. Those blocks are easily checked with your eyes. Clean it up and if no cracks are visible on the top deck or the bottom, it is probably OK fine. |
Posted By: frnkeore
Date Posted: 25 Jun 2019 at 11:49am
|
Yes, it is the engine # I was referring to. So, I would say the the lower bores were re-bored to the later spec. I would say the re-bore left something to be desired, also and that is why the finish doesn't look like I think a factory finish should. After typing my response last night, I though of a one time, "save this block", one last time fix. You can do it to the pinned cylinders or the whole bottom of the block. Make some dummy plugs (I would use plastic) that extend at least 3/8" above the bore. Then fill the bottom with epoxy, to a depth of at least 1/4" and while the epoxy is still wet, push your sleeves in (with O-rings old or new) and pushing the plugs out. Let it cure 2 days and the re-assemble the engine. The O-rings will help center the sleeves. Epoxy isn't cheap but, should save at least $500, over re-sleeving the lower bores. You might also use some of the stuff that that they fill race blocks with. That said, I wouldn't want to be the guy that try's to pull the sleeves, in 20 - 50 years :( ------------- Frank 1959 D17 Series I #24001+, '59 D14 '55 & '59 Ford 850 & 861 Ferguson TO 35 Deluxe, Oliver 70 and 5 more. |
Posted By: sploke
Date Posted: 25 Jun 2019 at 11:58am
| The other option that came to mind as a last-ditch fix, could I possibly find thicker o-rings to go on the liners that would help make up the difference? |
Posted By: sploke
Date Posted: 25 Jun 2019 at 12:05pm
Those prices were based on a quick ebay search...AC tractors are not at all common around here in New England, as far as antiques go. Everything seems to be either JD or Farmall. Parades or shows will be 90% green or red, with an occasional one-off AC or McCormick thrown in the mix.
|
Posted By: frnkeore
Date Posted: 25 Jun 2019 at 12:18pm
|
O-rings have a tolerance of OD to ID (a finish tolerance, too). So, if you install larger O-rings, you will have to re-machine the groove in the sleeve, to get the fit and with a out of round of .070 and .090, it won't be possible. Also, note that the O-rings are torn on those 2 sleeves. I believe that is a product of the rough finish or, those 2 cyl, possibly have larger o-rings and they tore on installation. ------------- Frank 1959 D17 Series I #24001+, '59 D14 '55 & '59 Ford 850 & 861 Ferguson TO 35 Deluxe, Oliver 70 and 5 more. |
Posted By: Sugarmaker
Date Posted: 25 Jun 2019 at 9:31pm
|
sploke, Not a easy answer here. I had that point in my project. But for some reason I never once considered stopping and selling it or parting it out. My brain says keep going and try to do the best to make it work again. That's why I come here instead of going to a bar or to a shrink. Projects keep me out of trouble and are my mental and physical therapy. Wishing you the best. Regards, Chris
------------- D17 1958 (NFE), WD45 1954 (NFE), WD 1952 (NFE), WD 1950 (WFE), Allis F-40 forklift, Allis CA, Allis D14, Ford Jubilee, Many IH Cub Cadets, 32 Ford Dump, 65 Comet, 66 F100. |
Posted By: sploke
Date Posted: 26 Jun 2019 at 7:26am
| Getting some parts from Steiner tonight, and will make some final measurements on the sleeves w/ o-rings installed and better bore measurements to compare, but I'm not overly optimistic at this point. Starting the search for a semi-local WD45 block I can use as a replacement. |
Posted By: sploke
Date Posted: 26 Jun 2019 at 7:37pm
|
Just for kicks, I dry fit a few of the liners. In the repaired area, I can get a .005" feeler gauge between the liner and the lower bore. Is the block from a D17 engine the same p/n or a direct replacement for the WD45 block? |
Posted By: Don(MO)
Date Posted: 26 Jun 2019 at 7:42pm
------------- 3 WD45's with power steering,G,D15 fork lift,D19, W-Speed Patrol, "A" Gleaner with a 330 corn head,"66" combine,roto-baler, and lots of Snap Coupler implements to make them work for their keep. |
Posted By: SteveM C/IL
Date Posted: 27 Jun 2019 at 11:09pm
| 17 has larger dia mains so you'd need the crank too(but you need one anyway) but they also have a different crank pulley which don't line up with the WD/WD45 water pump. Can't remember if crank nose is longer too or what. Don't think you can use 45 pulley on 17 crank. Bore size? There's some different between them but some one who knows what will have to speak up. |
Posted By: sploke
Date Posted: 28 Jun 2019 at 7:49am
someone on the AC facebook group mentioned a product called Hard-Blok or other engine block fillers, which sounds similar, I'd think I could install the sleeves then pour it through the coolant holes on the top of the deck. You're right, it would be a one-and-done fix, but if the block is otherwise scrap anyway, it might be a stop-gap measure. Anyone ever used this stuff? https://www.summitracing.com/parts/mor-35571" rel="nofollow - https://www.summitracing.com/parts/mor-35571 https://www.summitracing.com/parts/hnh-860212" rel="nofollow - https://www.summitracing.com/parts/hnh-860212 |
Posted By: frnkeore
Date Posted: 28 Jun 2019 at 11:19am
|
I read the reviews and it sounds like it might work but, it also sounds like you have to be prepared and work fast. If it were me, and I couldn't find a replacement block, I would try it and it certainly sounds like it starts out thin enough to pour in from the coolant holes and I think 1 gallon would be plenty. You might want to test and see how much 1 gal water will fill the block, I wouldn't want to fill more than 1" deep but, the head is where most of the cooling is needed. Of course pressure test it to at least 20 or 30 lb, before assembling it. I would also, try to talk to someone that has done it before. I think that there are people on here that have preped puller blocks that way, maybe they can give advice. ------------- Frank 1959 D17 Series I #24001+, '59 D14 '55 & '59 Ford 850 & 861 Ferguson TO 35 Deluxe, Oliver 70 and 5 more. |
Posted By: drak
Date Posted: 04 Jul 2019 at 12:28pm
|
hat a great thread, thank you for sharing, very interesting, as I am about going down this road!!!! good luck with the project and please continue posting your progress take care and good luck john
|
Posted By: sploke
Date Posted: 09 Jul 2019 at 9:58am
| So after doing some more research, I ended up going the block filler route, really for lack of another viable option. I used the Moroso brand filler, since it was the only one I could find that didn't come in a huge package, and still only used half of the container to get about a 3/4" fill. I replaced the liner o-rings, cleaned everything up and installed the liners. I plugged the block drain with a hose to leave a path to keep the drain petcock functional. I then filled the block up to the water pump hole with white vinegar and let it soak for 24hrs, which did a pretty good job of cleaning the inside up. Drained it, rinsed everything very well with fresh water, then filled with rubbing alcohol, drained, and blew out with compressed air until dry inside. I mixed up half a container of the block filler, about to the consistency of pancake batter, filled into the block, and knocked on it for a while with a deadblow mallet to settle everything nicely. It should be dry/hard by tonight so the plan is to dry-assemble everything, paint everything up tonight, then do full reassembly this week and hopefully drop the motor back in this weekend. |
Posted By: frnkeore
Date Posted: 09 Jul 2019 at 12:31pm
|
Great, I'm looking forward to it running again :) ------------- Frank 1959 D17 Series I #24001+, '59 D14 '55 & '59 Ford 850 & 861 Ferguson TO 35 Deluxe, Oliver 70 and 5 more. |
Posted By: SteveM C/IL
Date Posted: 09 Jul 2019 at 10:22pm
| Keep us posted on how well this works. |
Posted By: sploke
Date Posted: 10 Jul 2019 at 8:13am
|
Dry-fit the head, valve cover, oil pan and timing cover to get it primed last night. Shooting the orange tonight. Valve cover is covered because it was painted silver by a previous owner and I kind of liked the look so I'm leaving it. Even in primer it looks pretty good being all one color! I'll still have to do some of the piece parts, not sure how I'm going to handle those. I have some rattle can orange, so I'm thinking I might clean any aluminum pieces and leave them plain, and anything else do orange...that will probably happen as I'm working on final assy. https://postimg.cc/2qtMfLR7" rel="nofollow">  https://postimages.org/" rel="nofollow"> 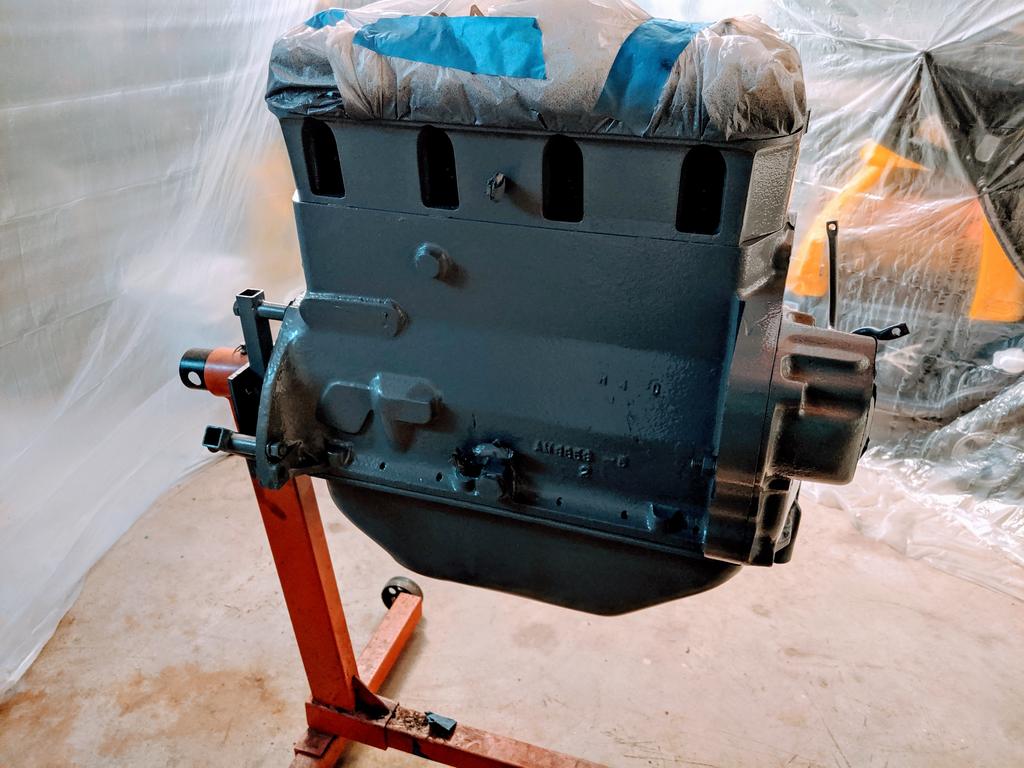 |
Posted By: Sugarmaker
Date Posted: 10 Jul 2019 at 8:28pm
|
sploke, Hope it runs as good as it looks too! Thanks for the pictures and updates on your progress. Coming right along! Regards, Chris ------------- D17 1958 (NFE), WD45 1954 (NFE), WD 1952 (NFE), WD 1950 (WFE), Allis F-40 forklift, Allis CA, Allis D14, Ford Jubilee, Many IH Cub Cadets, 32 Ford Dump, 65 Comet, 66 F100. |
Posted By: sploke
Date Posted: 11 Jul 2019 at 9:02am
|
Well...it's orange! Also got the water pump and t-stat housing cleaned up last night, I'll paint those separately prior to assembly. Also need to decide if I want to paint the carb as well, while it's apart. Internal engine assembly begins tonight! https://postimages.org/" rel="nofollow"> 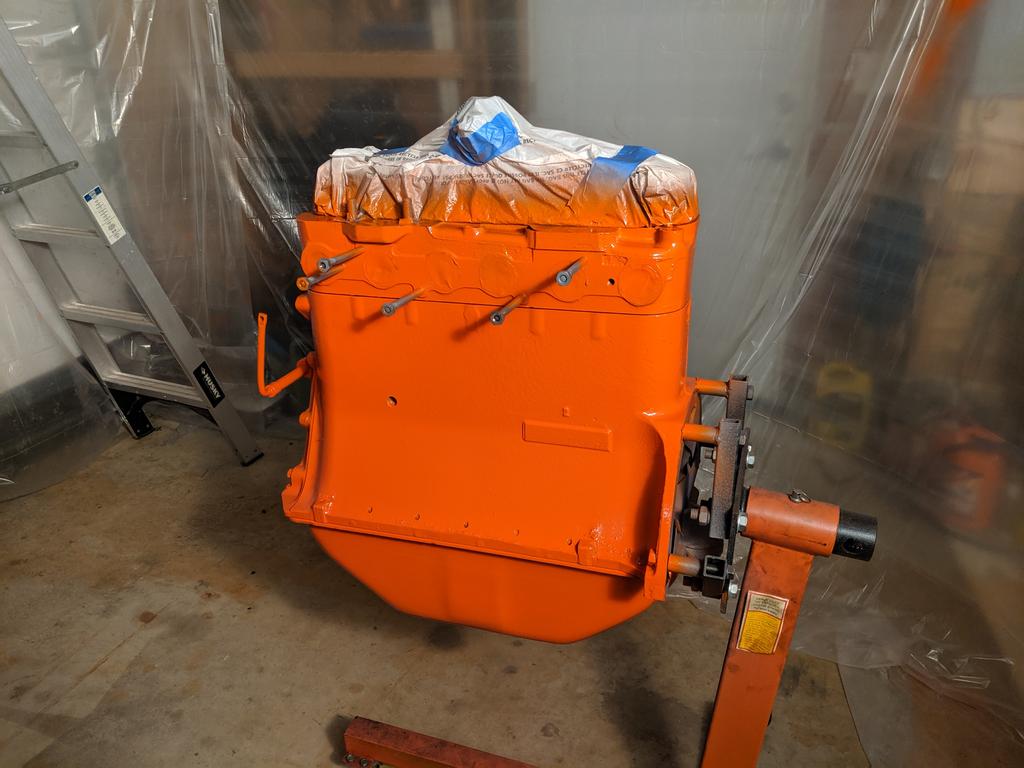 https://postimg.cc/sBXc6QKC" rel="nofollow"> 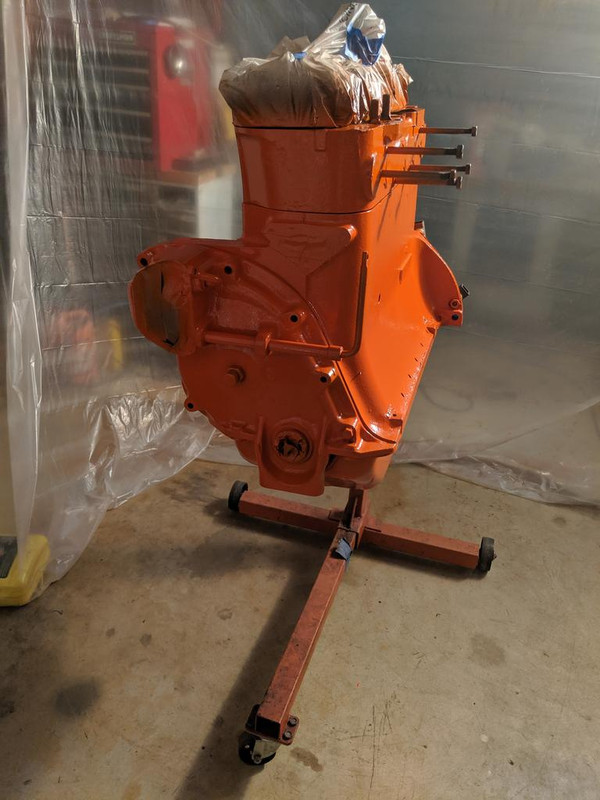 https://postimages.org/" rel="nofollow"> 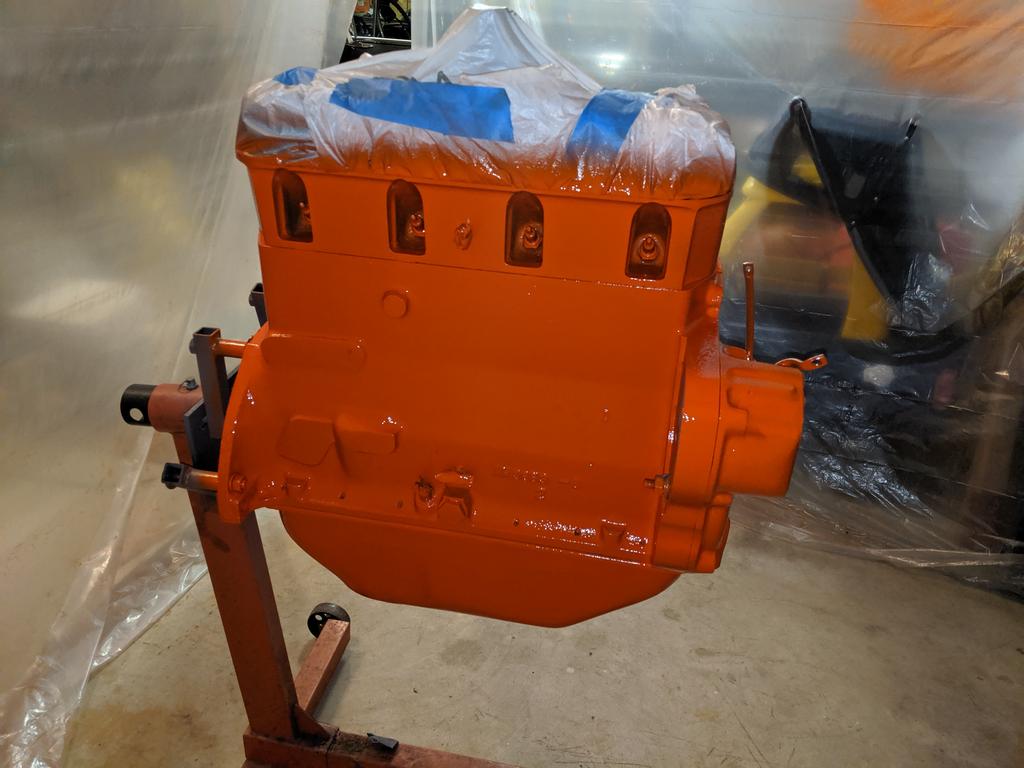 |
Posted By: sploke
Date Posted: 12 Jul 2019 at 7:35am
Well, I had a pretty spectacular "wow, that was dumb" moment last night. Started final assembly last night and my previous time being in a rush is biting me in the butt. When I originally broke down the motor I just pulled everything apart and laid it out on the bench and didn't give it too much thought, knowing I'd give everything a good cleaning prior to reassembly. I pulled the piston rings off pistons 1 and 4 as a representative sample to check out their condition and end gap, and they checked out. Based on the overall general condition of the sleeves and pistons I didn't think much more about it. Well, I started cleaning pistons last night and realized #3 had a broken oil ring, and #2 was missing one of the compression rings altogether! Lesson learned - inspect EVERYTHING upon disassembly if I plan on reusing it. So, now waiting on parts again. 
|
Posted By: frnkeore
Date Posted: 12 Jul 2019 at 1:39pm
Not a bad thing, in the end, you may pick up a couple of horses out of it and save on oil  ------------- Frank 1959 D17 Series I #24001+, '59 D14 '55 & '59 Ford 850 & 861 Ferguson TO 35 Deluxe, Oliver 70 and 5 more. |
Posted By: sploke
Date Posted: 26 Jul 2019 at 8:19am
| Got the engine set back in the tractor last night...no pics because I was so fed up with it by the time I got it in a 10:30 last night I didn't have patience left to deal with it. Still need up button up the new spark plug wires and the muffler clamps, but hopefully get it all bolted in tonight. |
Posted By: sploke
Date Posted: 29 Jul 2019 at 7:00am
| Finally got this thing moved out of my driveway. Oil still pouring from the rear main seal. It's like there isn't even a seal there, practically a steady stream of oil pissing from the crank output at high idle. Extremely frustrated at this point. |
Posted By: Don(MO)
Date Posted: 29 Jul 2019 at 7:16am
|
Sorry to here this. Take a look at my video on main seals and pan gaskets might help. http://www.youtube.com/watch?v=9LWCMvO_Dis&feature=youtu.be" rel="nofollow - http://www.youtube.com/watch?v=9LWCMvO_Dis&feature=youtu.be ------------- 3 WD45's with power steering,G,D15 fork lift,D19, W-Speed Patrol, "A" Gleaner with a 330 corn head,"66" combine,roto-baler, and lots of Snap Coupler implements to make them work for their keep. |
Posted By: sploke
Date Posted: 29 Jul 2019 at 7:50am
| Hi Don, thanks...I watched that previous to doing the repair and referenced it while I was doing the work as well. I'm not sure what I'm missing, but either something isn't right with the motor or I'm royally screwing something up in the process. |
Posted By: Sugarmaker
Date Posted: 29 Jul 2019 at 8:17am
|
Sploke, Can you better describe where you see the oil coming from? Maybe someone can determine the cause. I dont have a answer for you at this time. I would consider pulling the engine again and going through the sealing process again. I dont have a better answer for you. I know there is a reason for your oil leak. Just need to find what it is and correct it. Regards, Chris ------------- D17 1958 (NFE), WD45 1954 (NFE), WD 1952 (NFE), WD 1950 (WFE), Allis F-40 forklift, Allis CA, Allis D14, Ford Jubilee, Many IH Cub Cadets, 32 Ford Dump, 65 Comet, 66 F100. |
Posted By: frnkeore
Date Posted: 29 Jul 2019 at 12:01pm
|
Sploke, Aside from the oil leak, I take it that there is no water in the oil and the block repair is successful? ------------- Frank 1959 D17 Series I #24001+, '59 D14 '55 & '59 Ford 850 & 861 Ferguson TO 35 Deluxe, Oliver 70 and 5 more. |
Posted By: sploke
Date Posted: 29 Jul 2019 at 12:36pm
|
I honestly haven't even gone far enough to check the oil/coolant situation. Once the tractor started, I adjusted the throttle linkage and timing, idled it up to temp, shut it down to torque the head bolts and adjust valve lash. Started it again to move it, saw how much it was still leaking, moved it out of the driveway, and started drinking beer.
|
Posted By: frnkeore
Date Posted: 30 Jul 2019 at 1:18am
A good way to cool off  ------------- Frank 1959 D17 Series I #24001+, '59 D14 '55 & '59 Ford 850 & 861 Ferguson TO 35 Deluxe, Oliver 70 and 5 more. |
Posted By: sploke
Date Posted: 06 Aug 2019 at 7:12am
|
Finally got up the motivation to take another look at this thing last night. I took a video because it was very hard to see what is going on just from pictures. I also captured a sample of the oil leaking out and sucked some up into a syringe to get a good look...I'm not pleased. I left it on the bench overnight to see if I get any water separating out from it, but this was fresh new oil and has about 20 min of engine run time on it. https://postimg.cc/75SnVCD3" rel="nofollow"> 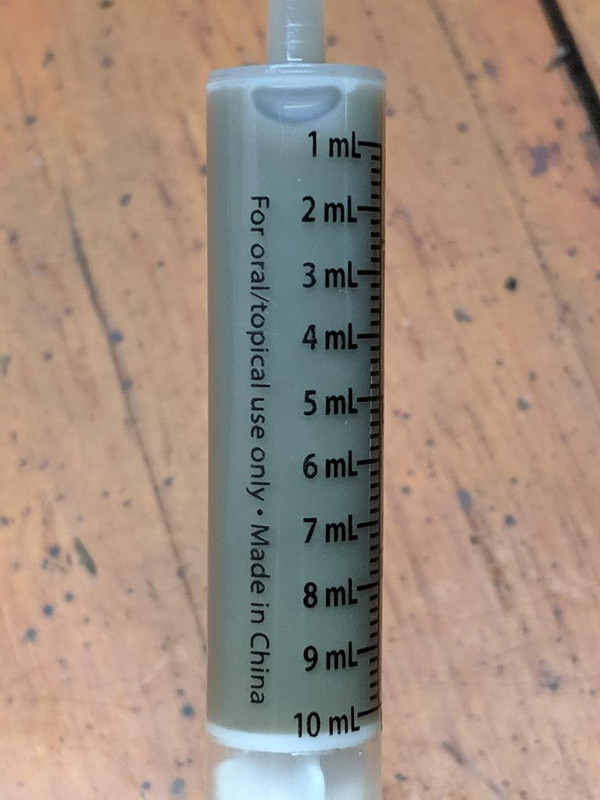 https://www.youtube.com/embed/9Sr7NjhoR9k |
Posted By: chaskaduo
Date Posted: 06 Aug 2019 at 7:39am
|
The video [TUBE]9Sr7NjhoR9k[/TUBE] ------------- 1938 B, 79 Dynamark 11/36 6spd, 95 Weed-Eater 16hp, 2010 Bolens 14hp |
Posted By: sploke
Date Posted: 06 Aug 2019 at 7:40am
| Thank you...i was getting tired of fighting with it haha. How did you get it to embed? |
Posted By: Sugarmaker
Date Posted: 06 Aug 2019 at 7:48am
|
Sploke, Thanks for the update. Not sure what the leak problem is but it sure looks milky, as water mixed with oil. You have done a bunch of work on this and I dont think its going to meet your expectations for a good working engine. Pull it back out and tear into it again. I think you may need that good replacement block to cure some of the ills. I know that's probably not what you wanted to hear. Regards, Chris ------------- D17 1958 (NFE), WD45 1954 (NFE), WD 1952 (NFE), WD 1950 (WFE), Allis F-40 forklift, Allis CA, Allis D14, Ford Jubilee, Many IH Cub Cadets, 32 Ford Dump, 65 Comet, 66 F100. |
Posted By: Don(MO)
Date Posted: 06 Aug 2019 at 9:13am
X2 ------------- 3 WD45's with power steering,G,D15 fork lift,D19, W-Speed Patrol, "A" Gleaner with a 330 corn head,"66" combine,roto-baler, and lots of Snap Coupler implements to make them work for their keep. |
Posted By: Don(MO)
Date Posted: 06 Aug 2019 at 9:19am
|
I'm sorry to see this. Have you pulled the engine's dipstick after it sit's for 1/2 hour or more to see if it's over full and checked the water level to see if it's gone down? I'm with Chris lot of hard work and it's still getting water in the oil. ------------- 3 WD45's with power steering,G,D15 fork lift,D19, W-Speed Patrol, "A" Gleaner with a 330 corn head,"66" combine,roto-baler, and lots of Snap Coupler implements to make them work for their keep. |
Posted By: chaskaduo
Date Posted: 06 Aug 2019 at 9:29am
|
Go to the full reply editor, click the film icon. make sure the youtube selection is in the box. in the location box put the last part of the video Url after the = or embed. select preview to make sure its your video. select ok. only the Url shows while in the editor the first time, it shows after posting from then on. This is on my Win10 Explorer 11, your mileage may vary with a different system. https://www.youtube.com/embed/" rel="nofollow - https://www.youtube.com/embed/ ( 9Sr7NjhoR9k ) HTH ------------- 1938 B, 79 Dynamark 11/36 6spd, 95 Weed-Eater 16hp, 2010 Bolens 14hp |