Restoring a 1940 Allis Chalmers Model B
Printed From: Unofficial Allis
Category: Allis Chalmers
Forum Name: Farm Equipment
Forum Description: everything about Allis-Chalmers farm equipment
URL: https://www.allischalmers.com/forum/forum_posts.asp?TID=148028
Printed Date: 18 Feb 2026 at 7:14pm
Software Version: Web Wiz Forums 11.10 - http://www.webwizforums.com
Topic: Restoring a 1940 Allis Chalmers Model B
Posted By: PickyPotatoPosse
Subject: Restoring a 1940 Allis Chalmers Model B
Date Posted: 28 Feb 2018 at 12:44pm
|
Hello everyone! I recently came into ownership of an Allis Chalmers Model B, Serial #17XXX, which should place it around 1940. It has the sickle mower bar. The last time it ran was about 8 years ago, and as I was not the owner, it was not taken care of. It has spent most of its' life out in a shed, out of the elements. I would like advice on how to get started restoring this beautiful tractor! The current problems, as far as I can tell, are as follow: -Gearbox sludgy(slow/hard to shift into gears) -Hard to rotate crank -Doesn't start(haven't tinkered yet though, I'm sure the carb is pure varnish) -Finish is terrible because of an extra layer of red lead paint -Flat rear tire, tube doesn't hold pressure and the sidewall is cracked I've given it a lot of thought, and I've gotten it down to a few decisions to make right away. Refinishing it can come later: -Do I make it run, then worry about taking it apart and rebuilding the engine, or just dive right in? -How far should I rebuild the engine? New sleeves, cylinders, all the way down to the shims? I've rebuilt a 1982 Honda cb750, and I've worked with modern automotive engines for most of my life, so I at least know how engines work, however I've never tackled anything this old. I have a shed to work in, and it would probably be a good idea to invest in an engine stand. Any advice or opinions you can offer would be greatly appreciated. Thanks! |
Replies:
Posted By: Gerald J.
Date Posted: 28 Feb 2018 at 1:59pm
|
Start with the shop manual: http://geraldj.networkiowa.com/Trees/Allis-Chalmers-G-B-C-CA-Service.pdf" rel="nofollow - http://geraldj.networkiowa.com/Trees/Allis-Chalmers-G-B-C-CA-Service.pdf Gerald J. |
Posted By: CAL(KS)
Date Posted: 28 Feb 2018 at 2:04pm
|
get it running and moving to determine whether it need engine or transmission work. then evaluate what needs to be done and the costs and decide from there.
start with a few squirts of oil in the cylinders to lube them and then work on fuel and spark. ------------- Me -C,U,UC,WC,WD45,190XT,TL-12,145T,HD6G,HD16,HD20 Dad- WD, D17D, D19D, RT100A, 7020, 7080,7580, 2-8550's, 2-S77, HD15 |
Posted By: ACinSC
Date Posted: 28 Feb 2018 at 3:06pm
| I recently bought a D-15 that the seller said was locked up . The starter and the oil pan were both off . My son and I found the motor was loose , so I bought new ignition parts . Put some gas in it and surprisingly it started . I was advised by someone on here to get it running and see what's what . So I agree with CAL , see if you can get it running . |
Posted By: PickyPotatoPosse
Date Posted: 28 Feb 2018 at 3:10pm
| Thanks for the suggestions so far! Somehow that manual managed to evade my searching. I'm reading it now, and I can tell it will be a huge help. I'll pull off the carb this weekend and fix that up, and see if I can get her running in a few weeks. |
Posted By: Hubnut
Date Posted: 28 Feb 2018 at 5:50pm
|
I concur. Get it running. Many times something simple stopped the tractor from working and life gets in the way--it gets forgotten about and sits. This is the most thrilling part of the chase for me. Finding one and getting her running. Restorations are cool, but wrenching is eminently more fun--for me. ------------- 1940 B "Lucy" 1941 B w/ Woods L59 "Flavia" 1942 B w/ finish mower "Dick" 1941 C w/ 3-point "Maggie" 1947 C SFW w/ L306 "Trixie" 1972 314H |
Posted By: drobCA
Date Posted: 28 Feb 2018 at 7:51pm
|
is it hard to crank with the plugs pulled? ------------- 3 Ford 8N's I loan to neighbors, but the '52CA, '41B and little B1 I do not. |
Posted By: CrestonM
Date Posted: 28 Feb 2018 at 7:56pm
x2!
|
 Hubnut wrote:
Posted By: Hubert (Ga)engine7
Date Posted: 28 Feb 2018 at 8:04pm
|
Good advice so far. Drain the engine and transmission oils and check for contamination (water, coolant, sludge, etc.) and change the oil filter before proceeding too far. Once you get it running you can find out what else is needed. And welcome to the Forum, you will find some good advice here. ------------- Just an old country boy saved by the grace of God. |
Posted By: Bill Long
Date Posted: 28 Feb 2018 at 8:49pm
|
First, Congratulations for obtaining my favorite Allis Chalmers Tractor. You will find it is a very basic unit. East to work on with parts readily available. Castings and assemblies can be obtained from sponsors of this forum and even on e-bay. I agree with the others to see if you can get it running then decide how deep you want to go. Frankly, I hope you will go "all the way" and restore my favorite. I would love to join you. Let us know how it goes. Good Luck! Bill Long |
Posted By: BEK
Date Posted: 01 Mar 2018 at 8:32am
|
You chose a good tractor. They are incredibly easy to work on and as stated parts are readily available. Just some quick thoughts on restoring your B: The upside. I like to tinker and my kids helped out with the restoration of our B. Memories and fun times I won't soon forget. The other reward came when it was all fixed up they each learned how to drive on the B. Even learning how to operate a manual transmission. The downside. These little tractors have a finite value. Your restoration can easily exceed two to three times the value of the tractor. This is money you may not get back. Overall, my B restoration was a great experience. Good luck with your restoration.
|
Posted By: drobCA
Date Posted: 01 Mar 2018 at 9:02am
|
the "probably won't get your money back argument" is quite valid if you're doing this as an investment, but I think does not apply if like me you never intend to sell it or even trade it. ------------- 3 Ford 8N's I loan to neighbors, but the '52CA, '41B and little B1 I do not. |
Posted By: PickyPotatoPosse
Date Posted: 01 Mar 2018 at 9:41am
|
It is not in my plans to get money out of this; I plan on keeping it for the span of its' or my life, which ever ends first(Probably mine, knowing how they built things back then) Unfortunately it's being kept away from my house, so I haven't pulled the plugs yet or started tinkering. I would have to agree that wrenching on things is more my style, but this is a great opportunity to learn a new skill. Seeing as this is tractor is 88 years old, I assumed I would have to dive all the way in, replacing shims, bearings, bushings, etc. I guess that's why I am a bit confused as to why everyone says to get it running first, then decide how deep to go. But I won't argue with experience, if that's the route that everyone suggests, then that is the route I will follow. But if I decide to rebuild the whole engine(which seems like a good idea), does it pay to get it running first? At any rate, I think the easiest thing to start with is slapping a new tube on the rear tire, that will make moving it around a whole lot easier. Now, just have to figure out the tube size... Thanks for the great advice so far, this Forum is more help than I could have imagined! |
Posted By: Reindeer
Date Posted: 01 Mar 2018 at 9:52am
|
You never know what condition the tractor will be in. Assuming the worst is not a bad place to start, but getting the motor working, checking compression, cooling, oil all tell a story that is hidden from view until you can get them turning over. I am working on a 67 D15 Allis, and despite years spent sitting outside, the motor is in quite good shape. Compression on all cylinders was over 140 psi. The oil was dirty, there are oil leaks from dried out seals but after cleaning up the carb, and draining the gas tank it runs very well. Still going to cost more to fix than it would to buy, but I could be spending my money on recreation, and I find the satisfaction of seeing the old tractor run and work is more than enough compensation.
------------- |
Posted By: BEK
Date Posted: 01 Mar 2018 at 10:44am
|
Everybody here is steering you in a good direction. Get it going and proceed as you see fit. These old tractors are like a bar fight. If you go out drinking and looking for trouble, you'll find it. Tear into your tractor thinking it needs to be fixed and you will find something. Restored or unrestored, there will always be stuff to fix. Your tractor is 88 years old. Like people at 88, it will have quirks and character. That's what makes'em fun.
|
Posted By: Hubert (Ga)engine7
Date Posted: 01 Mar 2018 at 11:05am
If it's a 1940 that would make it 78 years old unless I was taught wrong when I was in school many, many years ago.  ------------- Just an old country boy saved by the grace of God. |
Posted By: mdm1
Date Posted: 01 Mar 2018 at 11:10am
|
Everything said so far is true! If it won't run it may not be worth the expense to do what you are considering. You will never get your monetary investment back but hey I have always believed education is expensive. You have to love these old tractors or why would you own one? (just my thought) ------------- Everything is impossible until someone does it! WD45-trip loader 1947 c w/woods belly mower, 1939 B, #3 sickle mower 1944 B, 2 1948 G's. Misc other equipment that my wife calls JUNK! |
Posted By: PickyPotatoPosse
Date Posted: 01 Mar 2018 at 11:16am
| Wow, where did I get 88 from? 78 years is correct. Ok, I'll take the advice and get her running before delving too deep. Seeing as this is now a hobby, cost isn't the *biggest* constraint. I don't plan on selling it. First things now will be to order a carb gasket kit and rear tire tube. What are your guys opinion on websites for parts? I noticed djstractorparts.com has a good selection. |
Posted By: Gary
Date Posted: 01 Mar 2018 at 12:58pm
|
Starting with cleaning the carb is the right idea. But before you reinstall it, remove the gas tank and thoroughly flush it out. A handful of crushed stone shaken all around inside the tank is a cheap scale remover. Flush thoroughly with water and blow dry. Don't forget glass fuel bowl and strainer. Gary |
Posted By: Dick L
Date Posted: 01 Mar 2018 at 3:39pm
|
I am not you but if I were I would first remove the valve cover and make sure all the valves would move down and come up by them selves. You would need to turn the crank over to check all of them for being free. If any were sticky/slow to come up, I would squirt oil on the stem and work them up and down until they were free. Sticky valve stems can cause the engine to turn over hard even though they are not stuck/ needed to be forced up by prying under the spring cap. If any are stuck I would check for a bent push rod. Stuck ones can be worked until free as well in most cases. Unless the pan has been full of water it is unlikely that the rod and main bearings would make it turn real hard unless they were new bearings before not being used. Dry rings can though, so advise in squirting some oil in the spark plug holes is good advise. Some of that magic elixir stuff works well in this case but oil is oil if it is clean and the engine will turn over with a crank. Those would be my personal first things to do on the engine take it or leave it. I would want it free turning before adding spark and fire. Then off to carburetors and magnetos and other need checks and repairs. |
Posted By: Hubert (Ga)engine7
Date Posted: 01 Mar 2018 at 6:27pm
|
DJS is good as are the other vendors that advertise on here and support this Forum. I have bought from them as well as OK Tractor and Tony's Tractors and have never been disappointed. For carburetor and magneto work and wiring kits Steve at B&B Custom Circuits can't be beat. ------------- Just an old country boy saved by the grace of God. |
Posted By: Bill Long
Date Posted: 01 Mar 2018 at 9:51pm
|
Listen Closely to what Dick L says. He is one of the best mechanics I have never met. His advice is Gospel around here. By the Way Welcome to the Forum Again, take good care of my favorite. Good Luck! Bill Long |
Posted By: Ted J
Date Posted: 01 Mar 2018 at 11:07pm
|
All good advice, but the first thing is getting all the old gunky oils and greases out. Drain everything and it should turn easier. Then turn it like Dick says and see if the valves work freely. You also get to look at the valve springs this way to see if any are broken. ------------- "Allis-Express" 19?? WC / 1941 C / 1952 CA / 1956 WD45 / 1957 WD45 / 1958 D-17 |
Posted By: PickyPotatoPosse
Date Posted: 02 Mar 2018 at 7:46am
|
Sounds like a plan! I noticed in one of the manuals I found, it mentions using some pretty thick oil, I think 120 or 140, for the transmission or final drive. After sitting for quite a few years, I have my doubts that it will just drain out, especially in the chilly early spring. Any idea how best to get all the oil out, without tearing it apart and scrubbing? ------------- 1940 B in restoration process |
Posted By: Dick L
Date Posted: 02 Mar 2018 at 8:32am
| Take the (plugs) out of the bottom of the transmission and let it run or drip out first. You can tell by what comes out if other methods are needed. Thick oil will still run out slowly. If it has a hydraulic pump it will most likely be thin if it is not empty. I have bought several that was empty and full of rust. |
Posted By: mdm1
Date Posted: 02 Mar 2018 at 5:22pm
|
The transmission and hydraulics will all run together. 3 drain plugs for them. I put trans/hydraulic fluid in mine. The finals you have to take the pan off and empty it-no factory drain plug. I have not done that yet! ------------- Everything is impossible until someone does it! WD45-trip loader 1947 c w/woods belly mower, 1939 B, #3 sickle mower 1944 B, 2 1948 G's. Misc other equipment that my wife calls JUNK! |
Posted By: Ted J
Date Posted: 03 Mar 2018 at 2:02pm
|
Have you got one of those hand pumps for weeds? The kind you push the handle up and down to put pressure on the inside? Well, put some diesel fuel in one and stick the end down inside and move it around as it's spraying. Some more of that gunk SHOULD come out. You just have to be patient and let it drip. . . . . Put the plugs back in then DON'T fill anything except the oil in the motor. AFTER you've got it running, you can put more diesel in the tranny/hyd pump, and run it down about 50 feet, put it in reverse and come back 50 feet. That should thin any 'gunk' left in there. Drain that and then try to inspect OR,,,,,,,as I do,,,do it again. When the diesel comes out, just about as clean as it went in, then drain that good and fill everything to the full points with Universal Hyd/Trans fluid. You're done with that. Hope this helps... ------------- "Allis-Express" 19?? WC / 1941 C / 1952 CA / 1956 WD45 / 1957 WD45 / 1958 D-17 |
Posted By: PickyPotatoPosse
Date Posted: 06 Mar 2018 at 11:57am
|
Pulled apart the carb this weekend, I was pleasantly surprised at how clean(relatively) it was. On another note, I noticed that there isn't a muffler, just this perforated pipe, which is fairly loose to the touch. Was this ever standard, or just a home job like I assume? What is the proper muffler style for a 1940? The fuel line(rubber) is pretty stiff and cracked, so obviously that will be replaced. But right now it has an inline fuel filter(also needs replacing) but I have a fairly clean sediment bowl sitting on the shelf. Is there a significant advantage to the fuel filter? Assuming I get all loose garbage out of the tank and replace the seal on the cap. I would prefer the sediment bowl, because that was the original style. (Also if anyone has a picture of the original fuel line routing w/ sediment bowl, would be a big help)  ------------- 1940 B in restoration process |
Posted By: ErikR
Date Posted: 06 Mar 2018 at 12:29pm
|
I prefer to see an original looking steel line and sediment bowl instead of a rubber fuel line that someone looped in front of the air cleaner... Replacement steel lines are available from several vendors. FYI, these are not my pics... I found them with a google image search.... Sorry if they belong to someone here.   ------------- 1950 B |
Posted By: Gerald J.
Date Posted: 06 Mar 2018 at 2:39pm
|
Inline fuel filters tend to have a few PSI pressure drop intended for use with a fuel pump, where on most tractors it sees only a fraction of a PSI pressure from gravity flow and so the inline fuel filter can starve the engine for fuel. There is one or two (out of 100) inline fuel filters made for gravity flow but they are rare and hard to find and may not flow enough fuel for anything bigger than a lawn mower. Go with the original sediment bowl with a screen at its top. Be sure to clean the screen above the sediment bowl filter inside the fuel tank. You might need to replace the fuel line, they can be nearly plugged with varnish. Sometimes they can be cleaned by shoving a steel wire through end to end. And check the screen often on the inside of the carburetor at the inlet elbow adapter. I've seen them so plugged that 60 psi from an air tank didn't flow. Gerald J. |
Posted By: steve(ill)
Date Posted: 06 Mar 2018 at 3:02pm
|
I never read how the motor turns over ? If it is tough, you might consider removing the spark plugs and putting 6 oz of diesel or transmission fluid/ acetone in each cylinder.. Let it set for a week and soak down around the rings and loosen them up.. crank the motor over a few times with the plugs out and let the penetrant work around........ remove the valve cover as Dick said and spray / oil the valve stems..... when your ready, crank the motor over faster and pump the penetrant out before installing plugs, or stick a rose gun in the hole and suck the stuff out... ------------- Like them all, but love the "B"s. |
Posted By: PickyPotatoPosse
Date Posted: 06 Mar 2018 at 3:06pm
|
Sorry, forgot to report on that. I haven't pulled the valve cover yet, but I did pull the plugs and give it a few gentle spins to see how everything felt. In neutral, with the clutch locked open, it felt good and rotated very well. I'm thinking I'll slap the carb back on, and change at least the engine oil, then after checking the valves I'll try to start her up and see what happens. ------------- 1940 B in restoration process |
Posted By: LeonR2013
Date Posted: 08 Mar 2018 at 6:48am
| You can add a qt. of enamel thinner to your oil and let it run for a while. Watch temp. and oil pressure. Anyway the thinner is good for the seals to soften them up and in many cases will stop the leak. It will also wash the inside of the engine so that it drains out cleaner. |
Posted By: PickyPotatoPosse
Date Posted: 10 Mar 2018 at 9:20pm
|
Well this weekend was a bust. I cleaned and rebuilt the carb during the week, and planned on returning to the tractor and attempting a start today. But due to my bad memory, I managed to forget the carb, right in the garage! Which is no small drive away... I decided to pull the rear wheel and attempt to replace the inner tube. I must say, it's the hardest tire I've ever tried to work on! After 2 hours and a few beers, I decided that it might be easier to take it to a garage and have them break the bead on the wheel/rim. But after a few calls, I can't seem to find anyone with a big enough machine! Do you guys have any advice for doing this myself, or where I could possibly take it? ------------- 1940 B in restoration process |
Posted By: Dick L
Date Posted: 10 Mar 2018 at 10:07pm
|
https://public.fotki.com/DickL/tractor_parts/removing-tire-from-rim/" rel="nofollow - https://public.fotki.com/DickL/tractor_parts/removing-tire-from-rim/ This is one way I have used. I have used the dozer blade as well as the backhoe along with a bottle jack under the truck trailer hitch. I used the 50 ton hydraulic press on a couple of the 24" rims holding the rim and tire up with a fork truck. Lots of different ways. |
Posted By: LeonR2013
Date Posted: 11 Mar 2018 at 2:02pm
| There's a tool made for breaking them down called a bead breaker. It's basically a slide hammer on steroids. It's about four feet long, has a real slick spoon. that you place against the tire at the bead area. Wait just a minute and I'll look them up and get back to you. |
Posted By: LeonR2013
Date Posted: 11 Mar 2018 at 3:25pm
| Picker did you get the PM I sent? |
Posted By: chaskaduo
Date Posted: 11 Mar 2018 at 3:32pm
|
Here's one https://www.amazon.com/dp/B079TJ7DLM/ref=sspa_dk_detail_3?psc=1&pd_rd_i=B079TJ7DLM&pd_rd_wg=S44QT&pd_rd_r=9D2R3M72TABBFZNV9HMZ&pd_rd_w=GkkJe" rel="nofollow - https://www.amazon.com/dp/B079TJ7DLM/ref=sspa_dk_detail_3?psc=1&pd_rd_i=B079TJ7DLM&pd_rd_wg=S44QT&pd_rd_r=9D2R3M72TABBFZNV9HMZ&pd_rd_w=GkkJe 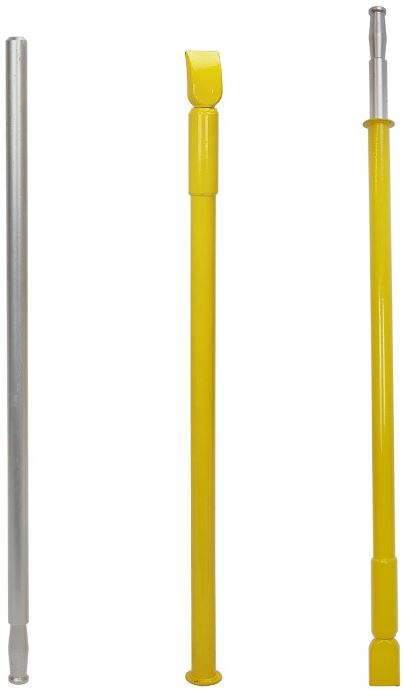 ------------- 1938 B, 79 Dynamark 11/36 6spd, 95 Weed-Eater 16hp, 2010 Bolens 14hp |
Posted By: chaskaduo
Date Posted: 11 Mar 2018 at 3:34pm
|
This is a better link I think. https://www.amazon.com/dp/B079TJ7DLM" rel="nofollow - https://www.amazon.com/dp/B079TJ7DLM ------------- 1938 B, 79 Dynamark 11/36 6spd, 95 Weed-Eater 16hp, 2010 Bolens 14hp |
Posted By: chaskaduo
Date Posted: 11 Mar 2018 at 3:37pm
|
Just click the continue to amazon button. Win 10, they gotta make everything difficult. ------------- 1938 B, 79 Dynamark 11/36 6spd, 95 Weed-Eater 16hp, 2010 Bolens 14hp |
Posted By: ErikR
Date Posted: 11 Mar 2018 at 11:34pm
|
Oh does that bring back memories.... I worked in a heavy equipment shop back in the 80's. We used to break down truck tires. Our slide hammer/bead breaker was just a little different, it had a heavy sliding pipe on the outside. The ones shown above have a heavy rod inside the tool..... same principle, different execution.... If anybody is unclear how they work, here's an in-use pic.....  ------------- 1950 B |
Posted By: Dick L
Date Posted: 12 Mar 2018 at 6:22am
|
The slide hammer type bead breaker works good on tires that the tires have not been on for 30 years. It all depends on the condition of the tire, bead and rim. A tractor tire service would have a clamp type that works quick. When I was farming I had the tire service truck come out in the field and repair tires with fluid. They don't ever work up a sweat. |
Posted By: PickyPotatoPosse
Date Posted: 12 Mar 2018 at 7:43am
|
Thanks for the replies! I believe I've seen one of those sitting around a relatives house, just didn't know what it was for. I planned on calling a Case dealer today and seeing if they could do it, but would still prefer to do it myself(part of the pride of doing the work of restoration myself). I'll have to call around and see which uncle was hiding that. And I guess I'll still quote the dealer and see what they say. ------------- 1940 B in restoration process |
Posted By: Dick L
Date Posted: 12 Mar 2018 at 8:28am
|
If you have a 2 foot long piece of a 2"X 6" or 8" and a block or blocks about 6" high you can lay the 2" by on the tire against the rim with the blocks at the outer end of the 2"by. Set a bottle jack on the 2" by next to the rim with something heavy over the jack like a trailer hitch, drawbar of a large tractor. Something hard to lift. I have seen some use a chain wrapped under the tire over the jack. When the jack goes up the 2" goes down against the tire and blocks. As more pressure is placed with the jack the tire breaks away from the rim. You don't want the block as quite high as the tire so you flatten the tire some as the 2"by goes down. |
Posted By: PickyPotatoPosse
Date Posted: 09 Nov 2018 at 1:18pm
|
Hello all. I know it's been quite a while since I've posted any updates, but hopefully I can still get some advice. I managed to get the tire all squared away, it's been holding pressure for a few months. The new problem I have is fixing the left hand brake. This is an earlier model tractor, with the hand levers instead of foot pedal. The problem is that the bolt welded to the band(that connects it to the lever) was sheared off. I managed to get all the guards off, and took the snaprings off, but I can't get the pins out. Would applying heat be my best bet? The next question is; I'm taking a fair amount of parts off throughout the process of fixing everything. I think it would be best to refinish the parts now, instead of putting it together and taking it apart again later. What's the best way to strip off two layers of lead based paint? And where would one find the orange paint specific to Allis Chalmers, or at least very similar? Thanks for all the help ------------- 1940 B in restoration process |
Posted By: Dick L
Date Posted: 09 Nov 2018 at 5:10pm
Ther is a gap at the ends of pins on the inside. You can break it out to use a punch to drive the pins out. After the pins are out I drill all the way thru the hole. I bought an air hammer that will get the pin out a lot faster than a punch and hammer. Make sure you remove the hair pin clips first.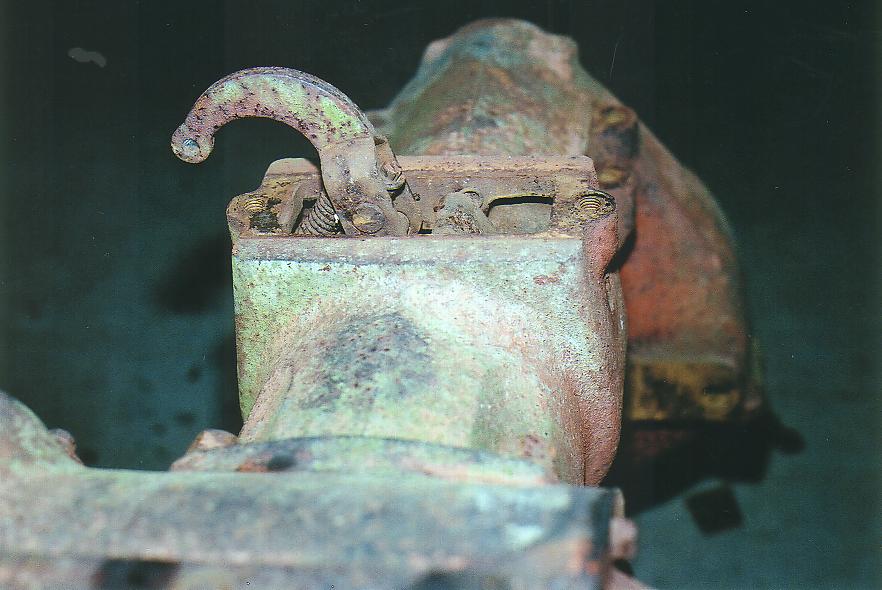 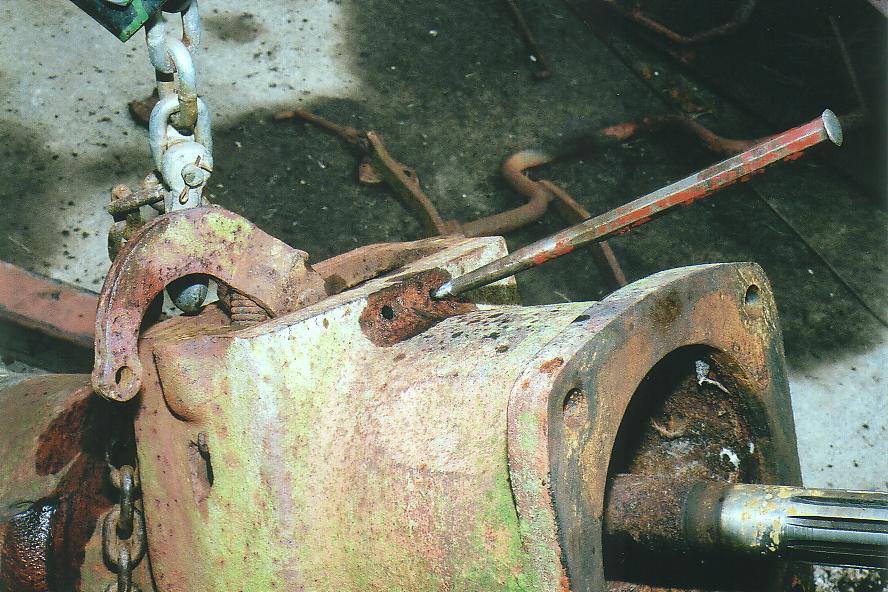 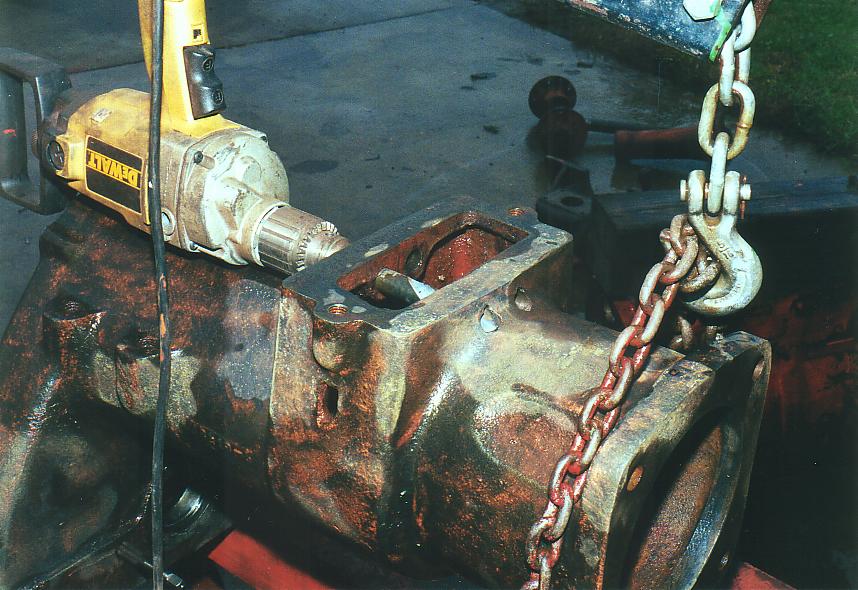
|
Posted By: chaskaduo
Date Posted: 09 Nov 2018 at 5:20pm
|
These 2 videos should be of help. They are doing a model c but they are the same. https://www.youtube.com/watch?v=Pn7vjyyrABc&t=1s" rel="nofollow - https://www.youtube.com/watch?v=Pn7vjyyrABc&t=1s https://www.youtube.com/watch?v=K08inj_bhhE&t=563s" rel="nofollow - - https://www.youtube.com/watch?v=K08inj_bhhE&t=563s ------------- 1938 B, 79 Dynamark 11/36 6spd, 95 Weed-Eater 16hp, 2010 Bolens 14hp |
Posted By: Dick L
Date Posted: 09 Nov 2018 at 6:36pm
You can fight getting the old bands out with a wire if you like. I found it after doing a couple tractors that it saves time and swear words if you remove the final drive from the transmission. You can get at and clean crap that is sure to be there and make the removal of the old band easy and even easier to put the new one back in. 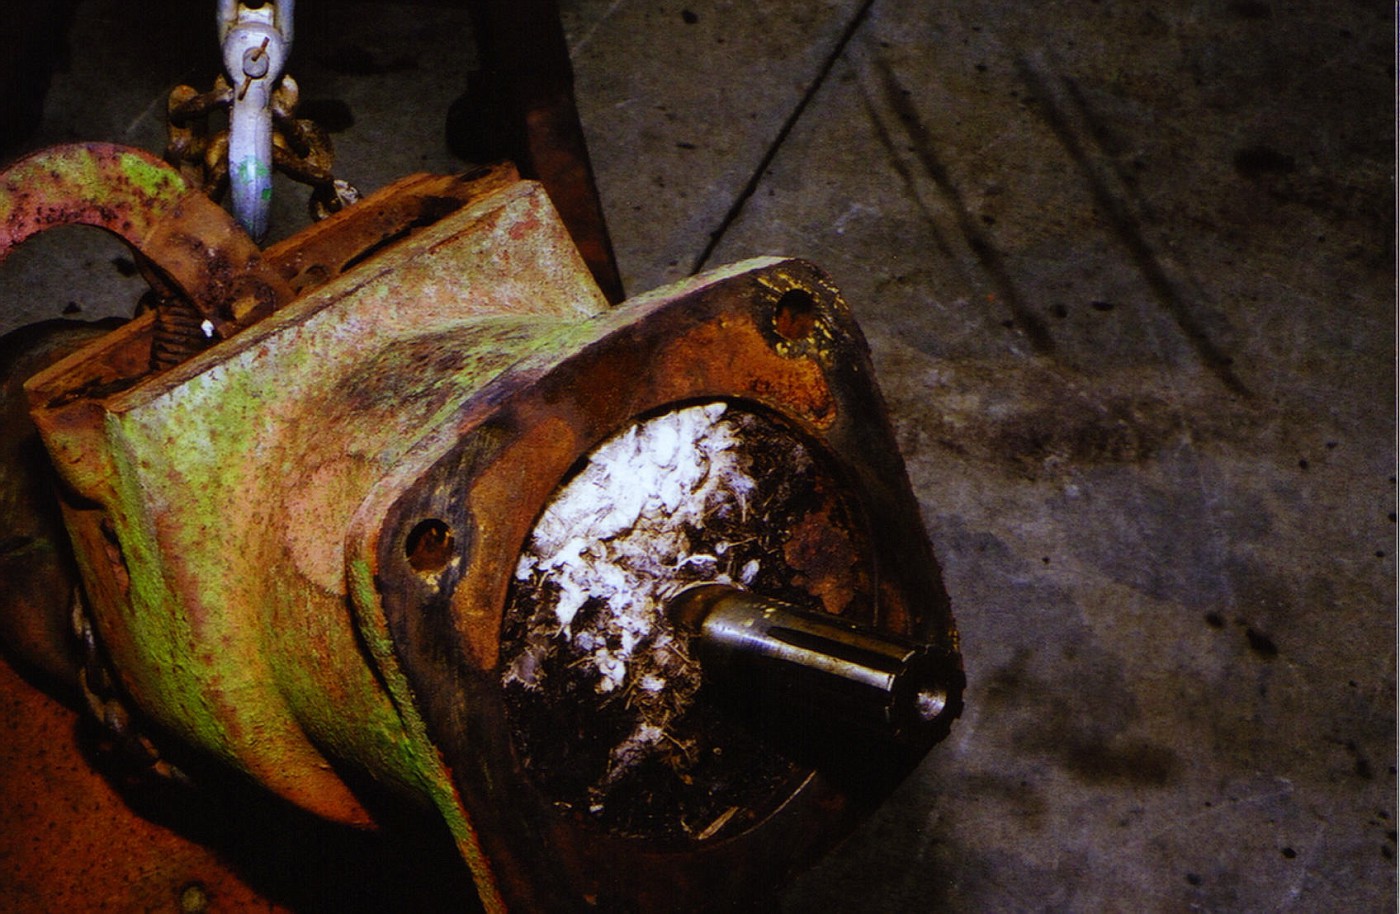
|
Posted By: DaveKamp
Date Posted: 09 Nov 2018 at 9:08pm
|
The real question is... Did you get the engine running? If so, how well? How's compression, did you give the carb and magneto a rebuild? Perhaps I overlooked, but i didn't see where anyone answered, but what you showed for an exhaust pipe... is about one-third of an oval-body muffler... The rest probably rotted loose and someone pulled it off, probably threw a bucket or big can over the top. My first Allis... was a '48 B, and it was stuck TIGHT. I spent about six weeks working on it 'till it finally loosened up... then I refilled it with fresh oil, made sure all the valves moved properly, and fed it some fuel while cranking with the starter on a 12v battery. It filled the shop with blue smoke from all the oil still in the cylinders (from soaking), but it woke up... giving me a heckuva shower in nasty oil, rust and dirt from the exhaust manifold... It was a blast!  I LOVE waking up engines that were left to neglect for years... ah, to hear the sound and fury... to stand in the fire and oily-rusty-rain... I LOVE waking up engines that were left to neglect for years... ah, to hear the sound and fury... to stand in the fire and oily-rusty-rain... ------------- Ten Amendments, Ten Commandments, and one Golden Rule solve most every problem. Citrus hand-cleaner with Pumice does the rest. |
Posted By: PickyPotatoPosse
Date Posted: 16 Nov 2018 at 9:16am
|
Strangely enough, the pin holes are already clearanced all the way through both walls, so maybe the previous owner drilled them out already. I was trying to avoid taking the final drive off, but if that's the best way, then I'll give it some serious thought. Like I said, the problem is getting the pins OUT. They don't want to budge! Looks like heat is going to be my best friend It looks like the muffler is just a piece of perforated pipe held in place with one screw. No baffles, no screens. "muffling" isn't in its job description. I didn't attempt to fully start her yet, because once I do, I'll of course be trying to take her for a ride. And I would like brakes before I do that!(plus I still need to clean the rust out of the tank) But I cranked it a few times with just a small spray of ether, and she popped merrily. I'm sure once I clean the tank and put it back on, she'll start up eagerly. I checked the valves, magneto, spark plugs, etc, and all seems to be in running order. I'm hoping after the holidays I'll have a chance to get back to working on it. ------------- 1940 B in restoration process |
Posted By: chaskaduo
Date Posted: 16 Nov 2018 at 9:26am
|
Heat, penetrant, and a air hammer if you have one. Good to hear she pops off for you. ------------- 1938 B, 79 Dynamark 11/36 6spd, 95 Weed-Eater 16hp, 2010 Bolens 14hp |
Posted By: HoughMade
Date Posted: 16 Nov 2018 at 9:28am
I have a 1951 B that was my Dad's. It sat in a barn and the bores of 2 cylinders got surface rust on them and locked it up tight. I could have stripped everything and done a full rebuild, but I decided to see if I could get it running. I cleaned the carb (replaced no parts other than gaskets), pulled the head, used patience and chemicals to get the rust out of the cylinders and freed up the engine. I hand-lapped the valves, but other than that, nothing deeper. I drained sludgy oil from the pan and replaced it with fresh, replaced the transmission fluid and guess what- it fired up and ran smooth. Eventually, I put a rebuilt magneto on it, but other than that, no deeper mechanically. It has good compression, decent oil pressure, no odd noises. It drips a few drops from th both the front and rear main seals after running for several hours, but I can mow my 2.5 acres about 8 times before I have to add 1/2 quart of oil. So my question is- why rebuild unless you know you have to. I probably will eventually, but no need now. ------------- 1951 B |
Posted By: Dick L
Date Posted: 16 Nov 2018 at 2:33pm
As some of my pictures show I have had some bad rusted ones and never used heat on the pins. I put shims between the housing and the band loop to make them solid to make the pin to move without the band moving and cause a cocked condition which tends to hold the pin tight in the loop. I used a bunch of WD40 on the first pins I took out. Later on after I bought an air hammer I left them dry. I had a person load their final drives and bring them to me. I was told they had tried and didn't think they could be taken out and wanted to trade final drives that I had the pins out of. They had already broke out the inside so after a visit I pulled the air hose out to their trailer and had the pins out of the final drive in minutes. |
Posted By: HoughMade
Date Posted: 16 Nov 2018 at 3:37pm
Well, that's the smart way to do it. Clearly, this means that this was not the way I did it. I took the rim of the tractor and tried all manner of techniques to break the bead... ...Then I got the bright idea to lay it under the hitch on my truck, placed a bottle jack under the hitch with the bottom plate wedged as far into where the tire meets the rim as possible and pumped it up until it almost lifted the truck off the ground...almost. The bead then separated at the jack and I was able to break the rest of it by working around with a large tire iron. I worked up a sweat. It was considerably easier the second time I did it...on the same wheel... because SOMEONE thought that the wheel would still clear the mower frame with the rim flipped around to make it a bit narrower...but that guy was wrong. ------------- 1951 B |
Posted By: Dick L
Date Posted: 16 Nov 2018 at 5:33pm
Back when I had a 310 case dozer and a backhoe I used them both on old rusted on tire beads. I went on a dumb buying streak that lasted about ten years buying old junk tractors that I thought was cheap to make me a prize winning tractor puller with parts I could salvage. I used the bottle jack also when I was not at the farm. At the link I used the rear tire of my Oliver 1650. I used the loader bucket to break the bead on a tire on the tractor to get the tube out of the tire. Go to youtube and type in betterlem68 if you want to see more sections of the video. My camera was set to cut off at 5 minutes. I had to read the instruction a bout a doze times to figure out what was going on. Real fast learner huh. https://public.fotki.com/DickL/tractor_parts/removing-tire-from-rim/" rel="nofollow - https://public.fotki.com/DickL/tractor_parts/removing-tire-from-rim/ https://www.youtube.com/watch?v=ImL0ilPUxcQ&t=88s" rel="nofollow - https://www.youtube.com/watch?v=ImL0ilPUxcQ&t=88s |