Need a little help with my WD
Printed From: Unofficial Allis
Category: Allis Chalmers
Forum Name: Farm Equipment
Forum Description: everything about Allis-Chalmers farm equipment
URL: https://www.allischalmers.com/forum/forum_posts.asp?TID=139283
Printed Date: 01 Apr 2026 at 11:03am
Software Version: Web Wiz Forums 11.10 - http://www.webwizforums.com
Topic: Need a little help with my WD
Posted By: DanC911
Subject: Need a little help with my WD
Date Posted: 10 Jun 2017 at 7:22pm
|
Hi All, I have a steady drip from the part indicated by the arrow that I tried to fix today. 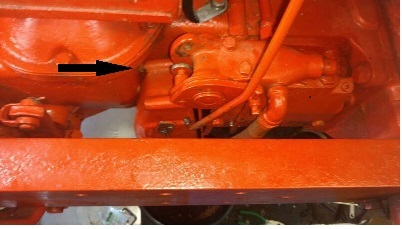 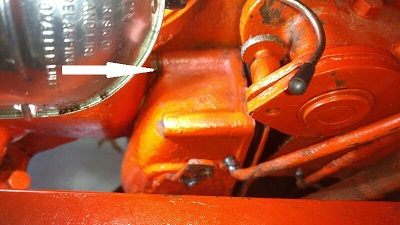 All of the bolts were loose so I tightened them and snapped one off in the process. I can get it out but I cannot figure out how to get the valve (?) off. It binds right where the bolt is and I cannot get it around the spring. Do I need to take the entire pump off? Are there any surprises I should be on the lookout for? Besides gaskets, is there anything else I should do while is it is off? Thanks in advance for your advice.
------------- 1950 WD, 1955 B, 66 Jacobsen Chief-O-Matic, 68 Simplicity 2110, 77 IH Cub Cadet 1450 w/front loader |
Replies:
Posted By: jaybmiller
Date Posted: 10 Jun 2017 at 7:38pm
|
OK, looks like you're having a 'fun' day just like me.... I just scrapped a good rider cause no HUMAN can replace the clutch safety switch... While I don't have a WD... ..is there ANY way you can get a hacksaw blade between the pump case and the tractor? I'm thinking you might be able to saw the end of the busted bolt near the 'tractor'. This would allow pump and busted bolt to come off tractor. Yes, I know shaving will get in 'somewhere', but a good cleaning + a magnet should get them all. Wish you best of luck..... Jay ------------- 3 D-14s,A-C forklift, B-112 Kubota BX23S lil' TOOT( The Other Orange Tractor) Never burn your bridges, unless you can walk on water |
Posted By: DanC911
Date Posted: 10 Jun 2017 at 8:14pm
I should have been clearer. The bolt near the arrow is fine I was just showing where I am getting hung up. The broken one is on the bottom in front. A little 1/4-20 POS that I cannot get to without removing the entire valve unit.
------------- 1950 WD, 1955 B, 66 Jacobsen Chief-O-Matic, 68 Simplicity 2110, 77 IH Cub Cadet 1450 w/front loader |
 jaybmiller wrote:
Posted By: Dakota Dave
Date Posted: 10 Jun 2017 at 10:03pm
| There are only 4 bolts holding the whole pump valve assembly on. Were you got to put it back on stick a flattened nail in each pump arm and it's real easy to put back on. You don't take the frame rail off just the four bolts and wiggle it out. If you don manage to get that off you'll never get it back on without removing the pump. The plunger inside will tear the gasket if you don't put it on straight. |
Posted By: MACK
Date Posted: 10 Jun 2017 at 10:06pm
| Pull the pump. One valve might fall out when you remove the TB housing. MACK |
Posted By: Dakota Dave
Date Posted: 10 Jun 2017 at 10:13pm
| There are only 4 bolts holding the whole pump valve assembly on. Were you got to put it back on stick a flattened nail in each pump arm and it's real easy to put back on. You don't take the frame rail off just the four bolts and wiggle it out. If you do manage to get that off you'll never get it back on without removing the pump. The plunger inside will tear the gasket if you don't put it on straight. When you have it off pull out all the springs and Pistons. I've had a couple the pressure regulator spring was broken. When I pull them apart about 6 coils were broken off the spring. The traction booster piston spring likes to break it's the small piston. I alway remove the check balls and clean the passages. As long as the check balls are round and smooth I don't take the seats out. The traction booster linkage inside that cover sometimes comes apart it's just pressed together. I've had to weld the pivot pin back in place. |
Posted By: Brampton 02 gt
Date Posted: 11 Jun 2017 at 4:27pm
|
I broke one of the same bolts last week trying to tighten up the housing and stop it from leaking. I broke an easy out in the bolt as well. Time for a new housing. I am not getting where to put the nails. I haven't put it back on yet. Usually I do it with the frame rail off. |
Posted By: DanC911
Date Posted: 11 Jun 2017 at 8:39pm
Can you please explain about putting a nail in each pump arm? I am not sure what you mean.  ------------- 1950 WD, 1955 B, 66 Jacobsen Chief-O-Matic, 68 Simplicity 2110, 77 IH Cub Cadet 1450 w/front loader |
Posted By: Ted J
Date Posted: 12 Jun 2017 at 8:06am
To remove, get everything disconnected including the hold valve on top and all 5 mounting bolts (2) and nuts (3). There are two nuts at the top, one at the bottom and two bolts in the middle. To get it out, if I remember right, you slide it out the bottom. You will need to move the pump up some when loose and then tilt outward so the suction pipe clears then drop down and out. To install,take 4 nails (7 penny work best) about 1/8 dia and flatten the pointed end. You compress the roller lever and wedge the nail under the lever to hold it "in" and out of the way to clear the new gasket when installing. Here's a pic: http://www.allischalmers.com/forum/uploads/1434/20130720_114448.jpg%20" rel="nofollow - http://www.allischalmers.com/forum/uploads/1434/20130720_114448.jpg Once it's past the frame and with the gasket hanging on the intake pipe, you pull the nails out and slip it up in place without disturbing the new gasket. It all makes sense when you get to doing it. Make sure to screw the thumbscrew in down on the front side for clearance before you start. Here's an old thread on it: http://www.allischalmers.com/forum/another-hydraulic-question-wd_topic52614.html" rel="nofollow - http://www.allischalmers.com/forum/another-hydraulic-question-wd_topic52614.html ------------- "Allis-Express" 19?? WC / 1941 C / 1952 CA / 1956 WD45 / 1957 WD45 / 1958 D-17 |
Posted By: DanC911
Date Posted: 08 Jul 2017 at 2:37pm
The first link to the pic is not working. Does anyone have one showing how to install the pump? ------------- 1950 WD, 1955 B, 66 Jacobsen Chief-O-Matic, 68 Simplicity 2110, 77 IH Cub Cadet 1450 w/front loader |
Posted By: DanC911
Date Posted: 08 Jul 2017 at 9:12pm
|
Well I finally got the pump back on the WD. The nail trick really made things easier. I just wish I had tried putting it in from the top sooner. Trying to work it in from the bottom didn't work and tore the gasket. Glad I had a new roll pf gasket paper. It looks like all of the leaks from the PTO gearbox have stopped. Thanks Sandy Lake for the quality work. And thanks to everyone that chimed in with tips and advice. I appreciate it and hope that I can pass it along to others someday. ------------- 1950 WD, 1955 B, 66 Jacobsen Chief-O-Matic, 68 Simplicity 2110, 77 IH Cub Cadet 1450 w/front loader |