1952 Allis-Chalmers B Rebuild/Restore Questions
Printed From: Unofficial Allis
Category: Allis Chalmers
Forum Name: Farm Equipment
Forum Description: everything about Allis-Chalmers farm equipment
URL: https://www.allischalmers.com/forum/forum_posts.asp?TID=112069
Printed Date: 14 Mar 2026 at 10:28am
Software Version: Web Wiz Forums 11.10 - http://www.webwizforums.com
Topic: 1952 Allis-Chalmers B Rebuild/Restore Questions
Posted By: mrtractor
Subject: 1952 Allis-Chalmers B Rebuild/Restore Questions
Date Posted: 16 Sep 2015 at 8:11pm
|
Hello, I purchased a (supposedly) 1952 Allis-Chalmers B with a narrow front end (must be from a C from my reading) and I'm looking to first rebuild and get it running and then restore it. I've never owned a tractor before, I didn't even grown up on a farm, but I sure as heck have got the itch to get this beautiful machine running again. I paid $700 dollars for it (I probably overpaid), it has 2 frozen pistons, and has been apart for about 8 years in a garage, it looks in pretty good shape. It came with a Woods L59 belly mower. I know I have to clean up the engine, I was thinking about buying an overhaul kit with pistons and sleeves. Here are my questions: How'd I do? Where do I start with the engine, do I just buy the overhaul kit (on YT ~ $650) and start digging into it? I don't know much about motors but I'm pretty mechanically inclined and can figure things out. I understand it's a big job, it'll be a learning experience. I figured I wouldn't worry about getting the pistons unstuck (was left outside and some rain apparently got in there, it doesn't look all rusty but they're stuck) and just pop them out with the sleeves since the overhaul kit comes with the sleeves, can I do this? Should I do this? He said I should bring the head to have it professionally cleaned, it looks gunked up, not rusty or anything). Do I really need to bring it in? I heard someone online saying to make sure and get it "cooked", what does that mean? Anything I should look for specifically before or after pulling the sleeves/pistons? What should I take pictures of to help on forum questions? Any books you recommend? Best place for parts? (DJs, YT, OK, anywhere else?) Where can I find a picture of an original 1950s B so that I can see the original color scheme for all parts/body? Sorry for the book but I figured I'd ask the experts.  |
Replies:
Posted By: steve(ill)
Date Posted: 16 Sep 2015 at 8:21pm
|
the rear hubs have 5 bolts which appear to be from a model C.. with the narrow front, I assume you have a "C".. serial number is by the shift lever stamped into the case.
Motor stuck, a kit with pistons and liners would be a good start. You might be able to save the liners and pistons, and just install new rings if you really know what your doing. Yes, you can pop them out as a unit, but you need to get the piston out of the liner so you can take out the connecting rod and reuse it.
Motor is very simple. When the liners are out you can pressure wash inside the block and clean out all the gunk. The bottom end is somewhat different than a car motor. The bearing caps normally have a few shims between the block and cap on the bolt. Removal of a couple shims will allow you to tighten up the clearances. YOu will need to measure the crank and bearings and get the clearances set right. If you have not done this, you wil need a little help or advice when you get to that point. A micrometer would help. The crank has to be round. Several thousandths out of round would not be good... Taking the head to a shop and letting them fit the stem guides and lap the valves might be a good idea. ------------- Like them all, but love the "B"s. |
Posted By: steve(ill)
Date Posted: 16 Sep 2015 at 8:23pm
|
You might want to get at IT service book and get a few pointers on rebuild. If you got a buddy that does motors, a few pointers now and then would help. You can ask here, but first hand "look and see" is always nice. ------------- Like them all, but love the "B"s. |
Posted By: CTuckerNWIL
Date Posted: 16 Sep 2015 at 8:26pm
|
Some B's had the 5 bolt rear wheels but no B's had a narrow front end from the factory. I can't tell from the picture how wide the finals are. If they are wide like a C it could be a C with a B tranny if the tractor number starts with a B. If the cylinders don't have a lot of ridge in the top and aren't rusted up or scored, you might be able to get it running without an OH kit. If you buy a kit with bearings, you need to mic the crank before you order it to get the right bearings. ------------- http://www.ae-ta.com" rel="nofollow - http://www.ae-ta.com Lena 1935 WC12xxx, Willie 1951 CA6xx Dad bought new, 1954WD45 PS, 1960 D17 NF |
Posted By: steve(ill)
Date Posted: 16 Sep 2015 at 8:34pm
|
what is the serial number ? photo of tractor from left side to show steering. photo from back to show final drive housings.
---rear hubs are deep dish (C) and rims appear to be set in as far ass possible for narrow width....... looks like new rims ?? Are the 4 mounting bolts of the hub to the rim go thru a steel "loop" welded to the rim ? ------------- Like them all, but love the "B"s. |
Posted By: mrtractor
Date Posted: 16 Sep 2015 at 8:35pm
|
Thanks guys!I tried to look at the serial but it looks to have been painted pretty thick and I couldn't get a good look at it (it was getting pretty late though). I have it stored at my father's house, I'll take a some detailed pictures this weekend and try to figure out what it is. I have the IT and another service manual and have read through them a bit, it actually looks pretty simple, it's just the nuances that I don't know. I'm looking for the owners manual now so I can read about general maintenance that will tell me a bit more on what to grease/lube/etc that will give me a general idea about the tractor.
|
Posted By: Hubnut
Date Posted: 16 Sep 2015 at 8:39pm
|
Welcome. I'm an urban tractor guy too. I've restored two Cs, a Ford 2N, and now working on a B. I agree with CTucker and others, you may have a C there. Could you post a picture of the tractor from behind? I learned on the fly, but I bought a CD on how to rebuild the B,C,CA engine from J&D productions. I think I bought the copy on Amazon. It was excellent for a novice like me. I highly recommend it. People here too are excellent sources of info. DickL on here is arguably the "go to" person on these little tractors. He's been very helpful to me. Enjoy. |
Posted By: Hubnut
Date Posted: 16 Sep 2015 at 8:42pm
|
By the way, here is a thread on my C rebuild. It does get pricey. http://www.allischalmers.com/forum/forum_posts.asp?TID=102874&KW=&title=my-c-restoration-update-29-aug-15 |
Posted By: steve(ill)
Date Posted: 16 Sep 2015 at 8:42pm
|
I have "rebuilt" several of the model B tractors and never bought a piston / liner kit. I have had a couple "stuck" and one burned more oil in an hour than it held... If you can get everything apart and clean it up and measure, you might be able to save quite a few parts... Takes a little extra work to clean up liners / pistons and measure all for round and wear, but could save some $$$...... same for the bearings. Are the worn, or just need a shim adjustment ? I have broke one liner getting it out of the block, and had one cam shaft worn out, and a couple valves that were too worn to relap....... other than that, I have reused MOST parts.......... piston rings, liner O-rings, gaskets, and a LOT of work is what I normally do. ------------- Like them all, but love the "B"s. |
Posted By: mrtractor
Date Posted: 16 Sep 2015 at 8:43pm
|
One thing I did note was that the steering linkage (or whatever it's called, sorry) points up, and apparently on a B it points down. I just assumed that since I was told it was a B, and found out from reading online that B's didn't ever come from the factory with a narrow front, that putting the narrow front on it from a C may require you to change that piece too. I'll take some pics from every angle this weekend. Wow! You guys are very responsive!! Hubnut, thanks for posting that link, that's kind of what I was looking for, only been searching for B stuff ha!
|
Posted By: Dick L
Date Posted: 16 Sep 2015 at 8:53pm
|
Since C fenders are not as easy to find to replace if needed and this tractor has the C fenders I would guess it is a C. A picture from the rear showing the drawbar would be the key to its identity. The center drawbar is from a B the outside one is from a C.  These little engines are great to learn on. They are a little different than an auto engine as how the oil system works and the way the main and rod bearings are shimmed. The bearing bores can be upgraded to not need shimmed but costs more money. The main thing is to make sure how each and every detail works and why. You will find a lot of good help on this site. |
Posted By: steve(ill)
Date Posted: 16 Sep 2015 at 8:55pm
|
If the steering arm points up ( at the gas tank), then you have a "C" gear box also......... starting to look like a C tractor. ------------- Like them all, but love the "B"s. |
Posted By: mrtractor
Date Posted: 16 Sep 2015 at 9:04pm
|
I'm happy with a C as well, that's just what he said and I believed him, I'm sure he'll be surprised too. I saw the tractor and I wanted to work on it and the guy said he didn't have the energy so I asked him a couple weeks later if he'd sell it because I really liked the way it looked and wanted to work on it. Like I said, we'll get this cleared up this weekend, it already sounds like it's a C though. I noticed that the paint is really thick over the serial and I can't even read it clearly, can I chip some of it off or what should I do? Is there multiple places I should be looking?
|
Posted By: Dick L
Date Posted: 16 Sep 2015 at 9:07pm
A narrow C front on a B using a B steering box.
|
Posted By: mrtractor
Date Posted: 16 Sep 2015 at 9:11pm
| Dick L, yeah the one I have points up towards the tank. Also, my rear wheels are about maybe 6 or more inches from the fenders. Must be a C. |
Posted By: steve(ill)
Date Posted: 16 Sep 2015 at 9:12pm
|
I prefer the look of the "B" gearbox on a C tractor... always wondered why AC decided to use the inverted crank box ? ------------- Like them all, but love the "B"s. |
Posted By: mrtractor
Date Posted: 16 Sep 2015 at 9:13pm
| Oh, another question. If I have to buy an overhaul kit, I see standard vs overbore and I'm not sure which I need. How do I tell? |
Posted By: steve(ill)
Date Posted: 16 Sep 2015 at 9:15pm
|
the very early B models were 3- 1/4 inch bore.......... all C models and later B were 3-3/8 bore ............. most if not ALL aftermarket kits are 3-7/16 bore ....... either is fine. ------------- Like them all, but love the "B"s. |
Posted By: mrtractor
Date Posted: 16 Sep 2015 at 9:26pm
|
So if this does turn out to be a C does that mean it's probably not a 1952 either? I was reading "The Little A-Cs" PDF and it said they were made from 1940 to 1950. TractorData says 1940 to 1949.
|
Posted By: steve(ill)
Date Posted: 16 Sep 2015 at 9:38pm
|
correct, but yours has a distributor, not a magneto......... so its probably very late 1948- 49 -50. ------------- Like them all, but love the "B"s. |
Posted By: mrtractor
Date Posted: 16 Sep 2015 at 9:40pm
| He did say the farmer he bought it from converted it to an electric start, not sure if that matters. |
Posted By: steve(ill)
Date Posted: 16 Sep 2015 at 9:53pm
|
well, if it was not electric start in the beginning, then it would be early 1940s...... look at the generator and see if it is bolted to the motor block on cast bosses. The casting was changed when the generator was added....... if the starter was added "later", then they had to change the bellhousing, clutch, ring gear, battery box, etc... lot of work..... he may have ment the tractor was a magneto ignition and was changed to a distributor... several have done that when the old mag dies. ------------- Like them all, but love the "B"s. |
Posted By: steigerbro24
Date Posted: 16 Sep 2015 at 11:01pm
|
What shape is that mower in? Might be worth a decent chunk of that 700 if its in good shape ------------- 5 Steigers, 7 John Deeres, 8 Internationals, 4 Case tractors and combines and 1 Oliver ........... Oh wait they're all 1/64.......and a real '44 B |
Posted By: mrtractor
Date Posted: 16 Sep 2015 at 11:03pm
|
The mower is in really good shape, a little rust but way better than the $400-$600 ones I saw on ebay, and he included a brand new set of woods blades. I post some pics of it this weekend.
|
Posted By: mrtractor
Date Posted: 16 Sep 2015 at 11:04pm
| Oh, and brand new belts as well. |
Posted By: corbinstein
Date Posted: 17 Sep 2015 at 6:45am
|
try one of those simple unsticking methods everybody uses. Before you go tearing it down, pull the spark plugs and add a 50/50 mix of acetone and diesel fuel or atf. fill up the plug holes and let it sit a few days. yank the starter and using a large screwdriver or small prybar, work the flywheel back and forth until it breaks free. |
Posted By: Ken in Texas
Date Posted: 17 Sep 2015 at 7:09am
| Everything I see in the picture has "C" written all over it. |
Posted By: Ken in Texas
Date Posted: 17 Sep 2015 at 7:21am
| If I'm not mistaken all Cs were electric start,even the first ones with short steering arms and handbrakes. The real early Cs had the CE prefix engine number on the back of the block |
Posted By: Dick L
Date Posted: 17 Sep 2015 at 7:30am
All C's had the torque tube with the starter hole. They could be bought without a starter with a delete plug in the hole. I don't know the years they could be bought this way or if it was up until they stopped making the C. I think it takes a serial number to tell the year if it still has the original transmission. |
 Ken in Texas wrote:
Posted By: Ken in Texas
Date Posted: 17 Sep 2015 at 7:52am
| During the war years not all new Bs and Cs had starters but the hole was there for a starter. |
Posted By: steve(ill)
Date Posted: 17 Sep 2015 at 8:00am
|
I think he said the head and oil pan are aleady removed, and two pistons stuck.... makes me wonder WHY they were removed.. Don't think I would put it back together at this point. Also, the liners may have shifted and the o-ring seals cut or scuffed... time to pull it apart and inspect. ------------- Like them all, but love the "B"s. |
Posted By: mrtractor
Date Posted: 17 Sep 2015 at 8:18am
|
I think they were all stuck and he removed 2, it looks in pretty good shape but he said he left it outside and some rain must've gotten in there an it seized up. He said he removed the 2 and honed the sleeves and couldn't get the other two. So at least it's all apart and take some good internal pics. |
Posted By: Ken in Texas
Date Posted: 17 Sep 2015 at 10:12am
|
If it was me, I wouldn't think of overhauling the engine while it's in the tractor. But I'm 75 if that makes any difference. Ask DickL. Dick will not lead you astray when it comes to rebuilding ACs. Especialy the engine. Just hope the guy who pulled it apart marked the rods and caps so it goes back the way it was, in order |
Posted By: steve(ill)
Date Posted: 17 Sep 2015 at 11:18am
|
Pull the motor and put it in an engine stand. That way you can stand up straight and have the motor upside down to do the rod and caps easy.. Easy to fit the crank, check the oil pump, remove cam and inspect, etc..
Wash the water jacket out and get the 75 years of river mud and goo out of the passages.... When you were in the corn field in 1955 and the motor got hot, where do you think the guy got the water to put in the radiator ? ------------- Like them all, but love the "B"s. |
Posted By: CTuckerNWIL
Date Posted: 17 Sep 2015 at 2:29pm
My 51 CA supposedly came with a magneto and has the slot that drives the mag. I didn't think any C's came with a distributor from the factory. ------------- http://www.ae-ta.com" rel="nofollow - http://www.ae-ta.com Lena 1935 WC12xxx, Willie 1951 CA6xx Dad bought new, 1954WD45 PS, 1960 D17 NF |
Posted By: mrtractor
Date Posted: 17 Sep 2015 at 7:37pm
That is amazing to think about, I never would have imagined, it's so foreign to me.
|
Posted By: Bill Long
Date Posted: 17 Sep 2015 at 8:09pm
|
First let me welcome you to the Unofficial Allis Chalmers Forum. As you have seen above there is an almost bottomless wealth of information here. I was going to add something but Gentlemen you have covered just about everything. Let us know how the rebuilding goes. Good Luck! Bill Long |
Posted By: steve(ill)
Date Posted: 17 Sep 2015 at 9:41pm
|
MR, if you find any fish bones or shells mixed in with the "mud" when you clean the block, you will know for sure ! ------------- Like them all, but love the "B"s. |
Posted By: steve(ill)
Date Posted: 17 Sep 2015 at 9:43pm
|
Tucker, you could be right about the distributor on the C... I was thinking the last year or two had them, but old age blurs the facts..... When the CA got it, the B eventually use the distributor... could have been after 1950... I thought all CA had the distrib, guess not ! ------------- Like them all, but love the "B"s. |
Posted By: Steve in NJ
Date Posted: 18 Sep 2015 at 6:34am
|
For $700 bucks with a mower, I think ya did darn good! Like Steve mentioned, I'd take the engine right to an engine stand also and do r' right. When I first bought my B 15 years ago, I rebuilt the engine while it was still in place. A real PIA making sure the bottom end was right and all the dots dotted and t's crossed. Won't do that again. I guess I did alright at the time, cause' its still runs like a dream with no leaks 15 years later. And, the ole' girl does a lot of work around the property especially with the loader on it. If you have the money, I would have it align bored and eliminate the shims. Its a nice upgrade for the bottom end. Its a given to have the cylinder head done also. That's like buying new shoes and using the old laces if you just slam the head back on without having a machine shop go through it. It you don't have the extra dough right now, save up and do it correctly. You'll never regret doing it right the first time... Steve@B&B ------------- 39'RC, 43'WC, 48'B, 49'G, 50'WF, 65 Big 10, 67'B-110, 75'716H, 2-620's, & a Motorhead wife |
Posted By: corbinstein
Date Posted: 18 Sep 2015 at 6:40am
|
Yep, didn't realize the head was off. DUH... Go ahead pull it an put it on the engine stand. |
Posted By: Dick L
Date Posted: 18 Sep 2015 at 11:09am
I would like to add before placing it on an engine stand turn it upside down and pound out the other two sleeves with the pistons in. If the pistons are still in the other two drop all four in a bucket of thin oil and forget them until you need the rods. When your ready and have the new stuff in sight it will be easier to put the force needed to the sledge to poke the pistons out of the old sleeves.  
|
Posted By: mrtractor
Date Posted: 18 Sep 2015 at 5:22pm
|
You guys are an amazing resource, I can't wait to work on this. I'm going to pound out those sleeves tomorrow and take a bunch of pics. I stopped by Harbor Freight to pick up a engine stand (the ones online I wanted were like a grand), they didn't have what I wanted in stock which is probably a good thing since I'm not sure if a standard engine stand will work with a tractor. Will a 1500 lb or 2000 lb work for this? Should I be looking elsewhere than Harbor Freight? I checked on Craigslist but didn't see anything.
|
Posted By: Dick L
Date Posted: 18 Sep 2015 at 5:37pm
Sure the engine stands will work. If you bought one with a single center front caster be careful as they will tip over easy. 
|
Posted By: steve(ill)
Date Posted: 18 Sep 2015 at 7:59pm
|
mrtractor....... a $49. engine stand will work for the B... it only weighs maybe 300 pounds. In Dicks photo above you see a hoist also. That can be used to pull the motor and roll forward away from the tractor.......... I park under a beam in the garage and use a chain fall...... Dick uses the hoist...... again, the light duty stuff at HF is fine for this small tractor. ------------- Like them all, but love the "B"s. |
Posted By: steve(ill)
Date Posted: 18 Sep 2015 at 8:02pm
|
well, the price went up a couple bucks in the last 20 years !
I used this for a 302 FORD about 10 years ago also.
http://www.harborfreight.com/1000-lb-capacity-engine-stand-69886.html" rel="nofollow - http://www.harborfreight.com/1000-lb-capacity-engine-stand-69886.html ------------- Like them all, but love the "B"s. |
Posted By: MrHDC
Date Posted: 18 Sep 2015 at 10:13pm
|
Yep, that's the one I use. Worked great on my CA motor. It does turn a little hard when rotating the engine. A little grease might fix that. Hervey 
|
Posted By: Brian Jasper co. Ia
Date Posted: 19 Sep 2015 at 12:24pm
|
Welcome to the Forum Mr.T. I have a CA that I overhauled almost 20 years ago. Something to think about when you get yours back up and running. Do you want to not ever have to take it apart again because let's say for example it's using oil or low oil pressure? If the answer is yes, don't cut any corners. I would replace the sleeves and pistons, regrind the crank, new bearings, hot tank the block and head to get all of the crud out. That said, pretty good chance you could simply pull it apart, put new rings and have a good running engine. I can say I don't regret one bit going back with all new parts on mine this many years later. ------------- "Any man who thinks he can be happy and prosperous by letting the government take care of him better take a closer look at the American Indian." Henry Ford |
Posted By: mrtractor
Date Posted: 19 Sep 2015 at 8:35pm
|
It looks like it's a C, the serial number is C9291 which from tractordata says it's a 1941 (unless I'm reading it wrong). Easy-off oven cleaner took the paint really well, and quickly! We split the tractor and removed all the outer stuff from the block, I'll take more pictures of the block and internals tomorrow. I think we have to remove the crankshaft/camshaft in order to pop the sleeves out, we tried it with a 2x4 and a mini-sledge but it just chewed up the 2x4 since it was off center because of the crankshaft. I picked up a nice 2000 lb engine stand from harbor freight, I figure buy once, cry once, just in case I work on something bigger in the future. I'm only 34 so I have a few years left in me to get into some stuff. So the block only has the internals and gears left on it, it's sitting on some 2x4's on the engine stand, I may take the crank/cam out tomorrow or wait until next weekend. We'll see how I feel, I pulled something in my arm and it hurts a bit. All in all a good day! Have a great night, gents!
|
Posted By: mrtractor
Date Posted: 19 Sep 2015 at 9:24pm
| Also, if any of you have any info on this tractor year-wise, let me know. I'm interested in learning all about it that I can. |
Posted By: steve(ill)
Date Posted: 19 Sep 2015 at 9:34pm
|
mrtractor, you can down load photos to some place like imgur or photoshop and then link, or you can put the photos on your computer and then download right to this site. Your camera might take big photos like 1900 x 1600.... open that in paintbrush and resize to about 800 x 600 then save as a JPG.... when you post on this site, use the "post reply" button below the last post. Click on the green tree icon and then you can download from your computer to this site. Keep the photo name simple. ------------- Like them all, but love the "B"s. |
Posted By: MotorCityBear
Date Posted: 19 Sep 2015 at 9:44pm
|
Please keep this thread updated. I have a 1953 B that runs but is in need of restoration. This is my first tractor and I am not a Farm guy, but look forward to playing with my B on some property in north GA I recently bought. I am hoping for guidance from the experts here when I start on my project. Good luck with the rebuild. Rob Atlanta, GA ------------- Rob 1953 AC B Kubota L3901 Blairsville, GA |
Posted By: Dick L
Date Posted: 20 Sep 2015 at 7:30am
With Windows 8 after you load pictures from your camera to your computer you can double click on a picture in the folder the right click and choose resize at the top. Click on the pixels. Change to any pixel between 500 and 800 on the top line to keep from flooding the page. You can click on the square with the tree and arrow one time directly from your resized thumb nail picture in the folder that has been resized to post. I use fotki and always chose the one without the arrow because I can never remember if I have shared it before. 
|
Posted By: mrtractor
Date Posted: 20 Sep 2015 at 5:01pm
|
Today I tore the engine down and removed the crankshaft so that I could pound out the sleeves. I tried with a 2x4 and it just chewed up the wood, I tried with an oak log as well and it fared a bit better but wouldn't budge with my mini-sledge. I didn't have time to take more pictures of the internals but I will next weekend for sure. Should I put some acetone/ATF in the bottom of the block so that it can hopefully seep down the sleeve and loosen it up? I'm not sure what else to do. I though about buying a sleeve puller but that wouldn't work because only 1 of the sleeves doesn't have a piston in it. Any other ideas? Should I just be using a pine 2x4 or something else? It all went fairly well so far, there were only two parts that gave me a bit of trouble: 1. The steering arm/drag link (or whatever it's called, the long bar on the side with the ball joints on them), I couldn't find the name of it or anything in my 2 manuals that said what it was or how to take it apart. When I took off one of the nuts I couldn't figure how it was supposed to come off, I hammered on it a few times and it wouldn't budge, I thought maybe I had to pop the ball joint apart. We ended up putting a propane torch on the part the threaded end goes into and heated it up, then I whacked it (the threaded end) about 10 times really hard and it didn't move, I was getting frustrated and I was thinking that it may not come off that way so I was just messing around and just tapped lightly on it 3 times, not even hard enough to hurt your knuckles if you did it to your hand and it popped right out in front of our eyes! My dad and I looked at each other and started laughing so hard, we couldn't believe that happened. 2. The crankshaft pulley - I took the nut off the set screw and didn't see that it had a flat-head slot in it to unscrew it so it took me a little bit to figure that out, then I read online that there was another set screw behind it so I was digging in there trying to get it (it apparently doesn't have a second one), there is a key back inside there that I thought was the second one.. I was wondering why I couldn't get my screwdriver to bite. I also read online that you should use a puller and a bearing splitter to get the pulley off because they break easily.. out came the propane torch again, a crowbar, and the mini sledge. After it got nice and toasty I put the crowbar on the back inside lip and hammered it a few times, then moved to the other side and did the same thing, eventually it started to move and I kept at it until it popped off. I didn't break it! Also, I was able to adjust the images so I'll post them here:           |
Posted By: Dick L
Date Posted: 20 Sep 2015 at 5:23pm
| Good job with the pictures as well with the disassembly. Take a look at my picture of the engine on blocks. I don't think you will find any wood. I use a steel bar. I found after chewing a few blocks of wood that it is only a little better than a block of hard rubber in absorbing the shock needed to break the sleeve loose. I have never damaged a sleeve using a steel bar on wet sleeves on any tractor brand. Just stay on sleeve edge and work back and fourth in the sleeve if needed. If they come out easy with a block of wood they are not stuck in the block. |
Posted By: Chalmersbob
Date Posted: 20 Sep 2015 at 9:13pm
|
You may be able to pop out the pistons with a block of wood. That would make pulling the sleeves easier. I have use 2 3/8" threaded rods and a hydraulic jack to remove stubborn sleeves. But generally you can do as Dick said. You don't need to remove the cam to pull the sleeves. In fact I have yet to find a cam with loose bearing and generally don't remove them. Sounds like you are on the right track. Keep us posted LOL Bob ------------- 4 B's, 1 C's,3 CA's, 2 G's WD, D14, D15, B-1, B10, B12, 712S, |
Posted By: mrtractor
Date Posted: 20 Sep 2015 at 9:23pm
|
That's great to hear Dick, that'll make it a lot easier using a piece of steel. Bob, I'll surely keep this updated.
The connecting rod caps were already off (only 1 piston removed though, so at least I know where each rod goes, I'll mark them before removal), I'll have to figure out which cap goes where. I read that you can use a magnifying glass and look for machine marks/striations to match them up. So I'm going to be taking this all apart and cleaning/degreasing/inspecting all the parts, my question is, how do I know what to grease/lube/oil/etc when putting it back together? Will it tell me in the owners manual (I don't currently have that or the parts book)? The parts that I've looked at in the service manuals don't seem to hit too much on the subject. Thanks again for all the help guys, it's really nice to have your wisdom while I'm learning-by-doing this stuff. |
Posted By: Dick L
Date Posted: 20 Sep 2015 at 9:58pm
| A good rule of thumb is to lube everything that rotates or moves up and down. That includes head bolts. |
Posted By: JohnCO
Date Posted: 20 Sep 2015 at 11:39pm
|
I noticed that no one mentioned that some of the advertisers on this site sell engine kits and parts. They support this site and have good prices. Oh and welcome to the forum. Looks like you got a great deal. ------------- "If at first you don't succeed, get a bigger hammer" Allis Express participant |
Posted By: Ken in Texas
Date Posted: 21 Sep 2015 at 6:01am
| What you have there is what is commonly called a "SHORT ARM C".Short steering arms were used on Cs prior to C-18163. |
Posted By: mrtractor
Date Posted: 27 Sep 2015 at 10:39pm
|
Here's another update along with a ton of pictures (kind of an inventory), hopefully you can tell me if I'm missing anything and what you think of the general condition of it. I picked up a two foot long 1 1/4" steel bar to bang on the sleeves/pistons, it definitely made a difference. I hammered all the sleeves out and then hammered the pistons out of the sleeves so that I could get to the connecting rods. I also removed the camshaft and power-washed the block. The previous owner marked 2 caps and 1 rod, upon closer inspection though, the original owner marked all the caps and rods with a chisel, very nice of him! I'm going to call up a machine shop this week and see what it would cost to get the block/head cleaned/machined/line bored and check out the cam/crank to see if they need any work. I'm not really sure what I should have them do, I'm just going off your suggestions. I'm thinking about purchasing the major overhaul kit on YT, I checked out the parts dealers in the parts link at the top of this forum but it didn't look like any of them had any kits with the valves/springs/etc, it looks like I need them as well. I'll call them up (or any other place you guys recommend) and get a quote before I pull the trigger. http://imgur.com/a/Ly9On" rel="nofollow - http://imgur.com/a/Ly9On I know absolutely nothing when it comes to telling if something is good or bad by looking at it because this is the first time I've seen most of these components and I have no reference for what a good one looks like.
|
Posted By: Redwood
Date Posted: 28 Sep 2015 at 4:12am
|
The wire at the end labeled "not sure what this is" is a hose clamp. |
Posted By: Dick L
Date Posted: 28 Sep 2015 at 6:52am
| Very good pictures. I would not worry about new valve springs. I have tested over a hundred valve springs for these engines and have only found a couple that could not be used. In testing I do 50 to 75 at a time. Most test at the proper pressure, those that don't are only slightly below and would not make a difference with this slow of a high RPM. |
Posted By: StanInLowerAL
Date Posted: 28 Sep 2015 at 12:06pm
| I have an extra "B" & "C" service manual. I sent you a PM if you are interested. Stan |
Posted By: mrtractor
Date Posted: 28 Sep 2015 at 12:39pm
|
I definitely am, it would be very helpful, I've sent my info. Thanks!
|
Posted By: StanInLowerAL
Date Posted: 28 Sep 2015 at 12:41pm
|
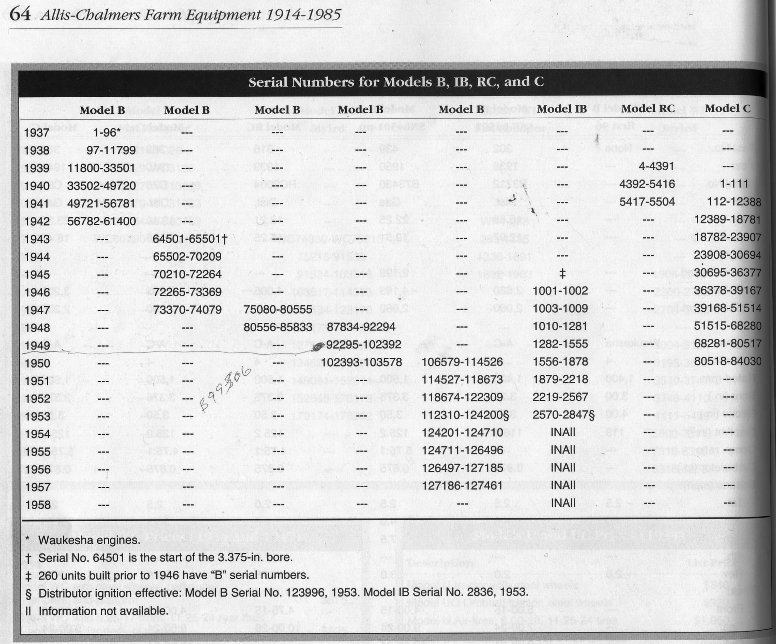
Posted By: StanInLowerAL
Date Posted: 28 Sep 2015 at 12:44pm
| The production info is from NORM SWINFORD'S book HISTORY OF ALLIS CHALMERS FARM EQUIPMENT 1914-1985. Maybe this will be helpful. Stan |
Posted By: StanInLowerAL
Date Posted: 28 Sep 2015 at 12:46pm
| OK, I'll get it to you when I get your information. Stan |
Posted By: MrHDC
Date Posted: 28 Sep 2015 at 12:57pm
|
To answer your question "Is this hole supposed to be here?". The answer is Yes. Hervey 
|
Posted By: mrtractor
Date Posted: 01 Oct 2015 at 10:15pm
|
I talked to a machine shop up here in MN and they said they are pretty busy (like months). They referred me to another place that I need to call tomorrow when the right guy is in. I also asked them what it would take to get it done right and they said around $1000 depending on what I want done. I bought the DVD on how to rebuild the B, C, and CA engine from J&D productions, it was helpful but they didn't go much into what should be done at the machine shop. With the pictures I've posted and knowing that I'm going to replace the pistons, sleeves, gaskets, bearings, etc with a rebuild kit, what do you think I should have done at the machine shop? Do I just bring them the entire engine and have them tell me what I need? Unfortunately, I don't know anything about rebuilding engines so I don't want them to have me do stuff that I don't need or that is easy enough for me to do it myself. Here's what I'm thinking so far: Hot tank block/head Regrind crank/cam Line bore Should I have them lap the valves or should I do that myself? Anything else? |
Posted By: MrHDC
Date Posted: 01 Oct 2015 at 11:10pm
|
I would replace the core plugs in the head while I had it off. Hervey |
Posted By: MrHDC
Date Posted: 01 Oct 2015 at 11:26pm
|
I have the video from J&D Productions and it was very helpful. I do believe he installed the vanes in the oil pump backwards though. If you look at the way the pump rotates and the AGCO parts diagram of the pump I'll think you'll see the vanes go in the other way. I installed new vanes from Sandy Creek and have good oil pressure. Hervey |
Posted By: wbecker
Date Posted: 02 Oct 2015 at 3:51pm
|
The rods should be reworked. Line bore, have it checked, does not always need to be done. Valve seats will need to be ground. Valves should be ground, then lapped. Have the head milled. The cam could be polished if not pitted. Lifters checked to see if they need reconditioning. ------------- Allis B, IB, Low B, G, D10, JD M, 8KCAB, C152 |
Posted By: mrtractor
Date Posted: 05 Nov 2015 at 7:58pm
|
I brought the block, head, crank, cam and flywheel ring gear to a machine shop in northern Wisconsin, here is what I'm having him do: Hot tanked Magnafluxed Reground Crank to .020 Line bored Put on the new flywheel ring gear (it had some eaten up teeth on it). Grind and lap the new valves I purchased. I called him 2 days ago and he said the block is done but he said he thinks theres a crank in the head.. I told him that I wanted him to magnaflux them before I bought the parts but he told me to go ahead and order the parts last week. I'm running up there this weekend and he said worse case he'll send me home with the block and he might have a head. What if there is a crack in the head? Any worries if there is?
|
Posted By: wbecker
Date Posted: 05 Nov 2015 at 9:34pm
|
Should be easy to find a head for a B or C. There is one on eBay http://www.ebay.com/itm/Allis-Chalmers-B-IB-C-Tractor-AC-engine-motor-gas-cylinder-head-/321901719203?hash=item4af2d66ea3:g:olYAAOSwKIpV~q0B You could make an offer on that one, or call around to local tractor salvage yards. ------------- Allis B, IB, Low B, G, D10, JD M, 8KCAB, C152 |
Posted By: Orange Tractors
Date Posted: 05 Nov 2015 at 11:26pm
|
For $700 I think you did okay. If you put $1,000 in the rebuild, you will have a lawnmower that will outlast anything made today. The tractor looks pretty straight, it already has turf tires, so you won't tear up your yard, just watch the low hanging limbs. I mowed my yard for years with a Kubota L175 (at least its orange) with a Woods belly mower. Do it right the first time, nothing is worse than redoing a job while thinking "I knew I should have spent the extra fifty dollars." I watch these threads to for ideas, I need to rebuild my WD that Grandpa bought new for Dad when he was ten. Robert |
Posted By: mrtractor
Date Posted: 12 Nov 2015 at 7:37am
|
I picked up the block, he still has the head, luckily he said that the head is NOT cracked and that it was just a casting mark, he pressure tested it and it was good, that's a relief! He didn't machine the block surface where the head attaches, he said I can just go over it with a flat file to remove the high points and the gasket will seal it up tight. Is this ok to do or does it need to be machined? He seemed really knowledgable so I kind of trust him but I'd rather have a second opinion from you folks. I'll start rebuilding the block in a week or two after I order a bunch of parts and I'll pick up the head during gun deer season. I can't wait, I should have it running before the new year! I think I'm just going to wait until spring/summer before I tear it down again and blast/repaint it.
|
Posted By: wbecker
Date Posted: 12 Nov 2015 at 7:50am
|
You likely don't need to do anything with the block. But it wouldn't hurt to use a very large single cut Mill Bastard file on it. If you do, you need to be sure to get all the fine fillings cleaned off so they don't get in the engine.
------------- Allis B, IB, Low B, G, D10, JD M, 8KCAB, C152 |
Posted By: CTuckerNWIL
Date Posted: 12 Nov 2015 at 1:23pm
|
You can't machine the deck of the block without re-cutting the counter bores for the sleeves. Sleves MUST protrude from the top 3 or 4 thousandths to seal the cylinder to the head. ------------- http://www.ae-ta.com" rel="nofollow - http://www.ae-ta.com Lena 1935 WC12xxx, Willie 1951 CA6xx Dad bought new, 1954WD45 PS, 1960 D17 NF |
Posted By: mrtractor
Date Posted: 13 Nov 2015 at 3:17pm
That's good to hear, thanks guys! I picked up a nice set of files since he said I should (and I love buying more tools): http://www.grobetusa.com/9-piece-file-set-with-handles-item-32-4809/ What is the best way to clean all the filings off? Also, I noticed this brass piece was in the bottom of the torque tube (where the engine connects to the back part). What do you think it's from??? I'm assuming I'll need a new one of whatever it is:  You can see where I found it here:  Thanks again, more updates to come with better pictures since I got a better camera.
|
Posted By: Hubnut
Date Posted: 13 Nov 2015 at 3:34pm
| That is the pilot bushing. |
Posted By: Dick L
Date Posted: 13 Nov 2015 at 4:09pm
I had the block of my pulling C decked with the sleeves cemented at the bottom. No problem with blowing head gaskets with a 4 inch stroke and .150 off the head. To deck the head .002 and not cut the counter bore could cause a problem with to much protruding when putting the sleeves back in. I am not sure how high the sleeves can be without causing a problem. It would probly depend on the head gasket. Many cast auto blocks without sleeves that are smooth from the factories. |
Posted By: Dick L
Date Posted: 13 Nov 2015 at 4:16pm
| the way I was taught to make sure all grinding dust was off a magnetic chuck on a surface grinder was with my bare hand and never a rag. However wiping the top of the block with a clean rag would work fine. |
Posted By: Sugarmaker
Date Posted: 13 Nov 2015 at 4:34pm
|
And yes you will need a new one:) Lots of good pictures. Looks like you may have enough parts to put a tractor together. Take your time on the engine rebuild and ask a lot of questions. There are a lot of little things that need to happen to get the build correct and I am not a expert by any means. Should be a real nice project. Regards, Chris ------------- D17 1958 (NFE), WD45 1954 (NFE), WD 1952 (NFE), WD 1950 (WFE), Allis F-40 forklift, Allis CA, Allis D14, Ford Jubilee, Many IH Cub Cadets, 32 Ford Dump, 65 Comet. |
Posted By: wbecker
Date Posted: 13 Nov 2015 at 6:10pm
|
If you use the Mill file on the deck of the block, just pull it down the length of the surface, one way then the other, with the file 90 deg to the length of the surface.
------------- Allis B, IB, Low B, G, D10, JD M, 8KCAB, C152 |
Posted By: mrtractor
Date Posted: 13 Nov 2015 at 6:25pm
|
Any ideas where I can find a pilot bushing? I searched online and didn't find anything. One hiccup is that when I picked the block up the deck has two 1/16" to 1/32" deep gashes that run right across the cylinder like so:  They are a little thinner than that but I wanted you to be able to see the location of them, that's as best as I can remember, I'll grab an actual picture tomorrow. I called him up and told him that those were not in there (and I have pictures) before I brought it to him and he said he'd make it right whether it was machining it or whatever. He originally said they won't cause any problems but I'm not sure what to do. Now I'm wondering what can actually be done if those sleeves have to fit just right? It's always something, isn't it? Oh well. |
Posted By: Hubnut
Date Posted: 13 Nov 2015 at 7:34pm
| You can find the pilot bushing at many of the vendors that support this site. If you are going to get a new clutch, many times the new pilot bushing will come with the new clutch and throwout bearing. |
Posted By: MrHDC
Date Posted: 13 Nov 2015 at 7:55pm
|
I got a new pilot bushing from AGCO. If no AGCO you can measure the ID/OD and order an Oilite bushing. Probably folks on here that already have the measurements and a good website to order. There's a wick in the crank that lubricates the bushing. With an Oilite bushing you can plug where the wick is and eliminate that pesky leak. Again folks on here have done it lots of times and have used different stuff as plugs. Hervey |
Posted By: mrtractor
Date Posted: 14 Nov 2015 at 4:56pm
Ok, they're not quite as bad as I remember, should I be concerned about these or just use it?
     |
Posted By: CTuckerNWIL
Date Posted: 16 Nov 2015 at 12:19pm
|
Those little scratches in the deck won't hurt a thing.
------------- http://www.ae-ta.com" rel="nofollow - http://www.ae-ta.com Lena 1935 WC12xxx, Willie 1951 CA6xx Dad bought new, 1954WD45 PS, 1960 D17 NF |
Posted By: mrtractor
Date Posted: 17 Nov 2015 at 7:40pm
|
That's good to hear about the scratches, thanks! I should have the head back this weekend so I'm putting in an order for things that I will need to get the engine running next week (if possible), here's what I have so far: Temp Gauge Oil Pressure Gauge Plugs Fan Belt Radiator Hose Lower Radiator Pipe Lower Wiring Harness - Any recommendations? Air Cleaner Cap Oil Filter Oil Pan Drain Plug Muffler - I think I'd like an under the hood model do I get this: http://oktractor.com/zen/index.php?main_page=product_info&cPath=1_12_204&products_id=45 Or this: http://oktractor.com/zen/index.php?main_page=product_info&cPath=1_12_204&products_id=44 ? Thermostat - Do I get the 160 degree or the 180 degree? Carb Kit - I have a Zenith but how do I tell which one I need? I assume everything will need to be replaced on it. Can you guys think of anything else I might need to replace to get the engine running? Thanks!!
|
Posted By: CTuckerNWIL
Date Posted: 18 Nov 2015 at 11:29am
|
180 is about the minimum temp to run GOOD. The decal for my CA says run at 190. ------------- http://www.ae-ta.com" rel="nofollow - http://www.ae-ta.com Lena 1935 WC12xxx, Willie 1951 CA6xx Dad bought new, 1954WD45 PS, 1960 D17 NF |
Posted By: wbecker
Date Posted: 18 Nov 2015 at 12:11pm
|
The under hood muffler is the 70210082. If your looking for the whole tractor wire harness go to B&B Custom Circuits. ------------- Allis B, IB, Low B, G, D10, JD M, 8KCAB, C152 |
Posted By: mrtractor
Date Posted: 23 Nov 2015 at 8:27pm
|
Is a pilot bearing the same as a pilot bushing? I'm having trouble finding exactly what I'm looking for (original part or oillite). I don't really know what it looks like originally and the service manual doesn't show it. I took this week off hoping that I would get it running, the head isn't done yet which sets me back a little bit but I ordered all the parts and they should all be here in the next couple of days so I can work on putting the block together. I still need to order a carb kit (need to find out which model Zenith I have tomorrow) and the pilot bushing. I suppose I'll run into things here an there that will need to be replaced, I'll update the thread as I go. I'm just going to get it running before the end of the year, I'll break it all back down this spring/summer to sand blast and paint it. I'm looking forward to buying a nice air compressor and the blasting/painting equipment.
|
Posted By: steve(ill)
Date Posted: 23 Nov 2015 at 9:11pm
|
yes, the pilot "bearing" in a B is a bushing.. just guides the end of the shaft .. couple thousands larger than the shaft. ------------- Like them all, but love the "B"s. |
Posted By: mrtractor
Date Posted: 24 Nov 2015 at 9:20am
Isn't the pilot bushing what goes in the center of the flywheel? If it is, it looks like it's in there. Or am I wrong on where it goes? |
Posted By: Hubnut
Date Posted: 24 Nov 2015 at 6:43pm
| Looks to be there to me. The other one that was damaged was probably left in the torque tube after repair. |
Posted By: mrtractor
Date Posted: 24 Nov 2015 at 9:01pm
| If you look back at those pictures that brass piece that's broken is quite a bit thinner than the pilot bushing, I'm wondering if it goes somewhere else? |
Posted By: dano
Date Posted: 23 Dec 2015 at 6:37pm
| I read all about you restoring your tractor, I just got a 1948 model b and hoping to start on it in a few weeks I have did all my work on my cars and trucks motors paint etc but this in just a little worried about, I got a lot out of your post and feel a little better about starting on it, the tractor I got was 300.oo and et up a couple of years so maybe it will not be to bad guy said it ran when he stopped using it im sure I will be asking a lot of questions , thanks to all the guys that replied to your thread |
Posted By: mrtractor
Date Posted: 24 Dec 2015 at 12:18pm
|
That's great, I'm having a lot of fun, I'm sure you will too. There are tons of youtube videos out there that have helped me learn. I built a large electrolysis rust removal system to help me remove the rust from the parts I'm reusing, here's a small example of how great it works (I started with a 5 gallon bucket but scaled mine up a bit to a 14 gallon tub): https://www.youtube.com/watch?v=ka6ArN_ehas I'm also looking at purchasing an ultrasonic cleaner but the ones I want cost about $1000 (Sweepzone 310 by L&R ultrasonics). I heard Crest makes good ones as well. I'm still waiting on getting the head back from the machine shop, the guy was in and out of the hospital and hasn't finished it yet. I have purchased all the parts and received them, I went to put the block back together and realized the machine shop never but my cam bearings back in and they still have them so I'm stuck until I go pickup my head. My uncle has a Ford Jubilee that I'm going to work on next, he thinks the bearings went out on it and he's unable to work on it because of health issues so he said he'd give it to me. I love tractors! |