| Author |
 Topic Search Topic Search  Topic Options Topic Options
|
chaskaduo 
Orange Level


Joined: 26 Nov 2016
Location: Twin Cities
Points: 5203
|
 Post Options Post Options
") Thanks(0) Thanks(0)
 Quote Quote  Reply Reply
 Posted: 09 Oct 2019 at 10:07am Posted: 09 Oct 2019 at 10:07am |
2 Allis carb rebuild vids for ya. You'll love this little beastie.
Edited by chaskaduo - 09 Oct 2019 at 10:08am
|
|
1938 B, 79 Dynamark 11/36 6spd, 95 Weed-Eater 16hp, 2010 Bolens 14hp
|
 |
|
Sponsored Links
|
|
|
miketothesteve
Bronze Level

Joined: 27 Sep 2019
Location: Nova Scotia
Points: 41
|
Post Options
Thanks(0)
Quote Reply
Posted: 10 Oct 2019 at 12:19pm |
Keep forgetting to confirm which type of carb it is. From the pictures and my memory, I think it's a Zenith. But want too be sure before I order a kit. Since I'll have to pay and wait for shipping, I'll likely get a rebuild kit.
Also removed the sediment bowl and everything that comes from the fuel tank. I've never seen fuel turn into a sludge (or molasses). the bowl was filled with it.
It looks like there was some sort of screen or filter. Online it looks like there are two options, one that just looks like a screen, and one with plastic around the outside, and straight through the middle. (Been looking on DJS. Will likely order soon once I finalize some things).
Pulled the trigger on ordering a rim today. Still need to source somewhere to remove the tire from the half-rim. And a tube.
Is it possible to remove the fluid from the other tube?
|
|
Rhoadesy_65
Bronze Level

Joined: 28 Jul 2019
Location: Versailles, OH
Points: 147
|
Post Options
Thanks(0)
Quote Reply
Posted: 11 Oct 2019 at 5:34am |
|
Yes I would remove the fluid. Theres likely a local tire shop that does in field repairs on farm equipment. Call them up and ask them to mount the tire and drain the other one. thats what i did for great grandpas H, bought tires and had them come to the house and mount them.
|
|
Farmin' with 1981 7010 PD, Great Grandpas 1947 Farmall H, JD 7000 planter, JD model B drill, NH 316 Baler, NH 1411 Discbine ,JD 100 8 Shank Chisel. Darke County OH
|
|
miketothesteve
Bronze Level
Joined: 27 Sep 2019
Location: Nova Scotia
Points: 41
|
Post Options
Thanks(0)
Quote Reply
Posted: 11 Oct 2019 at 5:37am |
Going to be ordering from DJS. Trying to confirm which parts to order.
Which sediment bowl?
Do I assume the sediment bowl comes with screen and gasket?
In addition, getting the carb rebuild kit. Pretty sure it's a Zenith carb
And gasket set because I know I at least need some of these now:
Anything else I should absolutely be getting?
|
|
chaskaduo
Orange Level
Joined: 26 Nov 2016
Location: Twin Cities
Points: 5203
|
Post Options
Thanks(0)
Quote Reply
Posted: 11 Oct 2019 at 10:13am |
Zenith carburetors have a round tag, approximately the size of a US dime, riveted to the body of the carburetor. Original equipment carburetors will have two sets of numbers stamped on this tag. The outer circle will be the O.E. part number (ie Allis Chalmers, GMC, IHC, etc.). The inner circle will be the Zenith number. Aftermarket carburetors made during this period will have the Zenith part number only on the tag. Rachel also shows this at 7:07 to 7:13 in the first video I have previously listed for you. HTH
Edited by chaskaduo - 11 Oct 2019 at 10:22am
|
|
1938 B, 79 Dynamark 11/36 6spd, 95 Weed-Eater 16hp, 2010 Bolens 14hp
|
|
miketothesteve
Bronze Level
Joined: 27 Sep 2019
Location: Nova Scotia
Points: 41
|
Post Options
Thanks(0)
Quote Reply
Posted: 17 Oct 2019 at 6:55am |
It's a Zenith Carb with both rows of #'s on the tag.
I just ordered a rebuild kit and the other items mentioned above.
Yesterday I was able to put a new wheel on it after having a original tire mounted on a new rim and tube. Then I towed it with the Polaris and moved it into the garage for the foreseeable future.
But I've had something nagging at me the last few days. When I originally got it home, I found out there was nothing in the rad. I only had good intentions when I put a gallon of coolant in.
I'm fairly certain that since that time, I've had a drip coming from the bottom of it, near the rear of the oil pan somewhere. Maybe a drop every few minutes.
Since this occurred to me, I've not loosened the oil plug to see if there's water or coolant in the oil, but I'm guessing there will be. I've read other posts off this, and the culprit is typically sleeve seals or o-rings? I just went through the manual hoping to get a visual of where or what they might be referring to, so I can have a mental plan of attack in my head. Anyone help me out with that?
I suspect I should try and fix this issue before I try starting it?
I'll repeat again that this is all new to me.
|
|
CTuckerNWIL
Orange Level

Joined: 11 Sep 2009
Location: NW Illinois
Points: 22807
|
Post Options
Thanks(0)
Quote Reply
Posted: 17 Oct 2019 at 8:33am |
|
If you do have coolant in the oil, the FIRST thing to check is the cheapest thing to fix. There are 3 core plugs in the top of the head, visible once the valve cover is off. They rust from the bottom up and will let coolant leak by, draining into the oil sump.
Best to knock them all out, and replace them for a couple $ each.
|
|
|
|
miketothesteve
Bronze Level
Joined: 27 Sep 2019
Location: Nova Scotia
Points: 41
|
Post Options
Thanks(0)
Quote Reply
Posted: 17 Oct 2019 at 9:23am |
 CTuckerNWIL wrote: CTuckerNWIL wrote:
If you do have coolant in the oil, the FIRST thing to check is the cheapest thing to fix. There are 3 core plugs in the top of the head, visible once the valve cover is off. They rust from the bottom up and will let coolant leak by, draining into the oil sump.
Best to knock them all out, and replace them for a couple $ each.
|
What would these plugs look like? And where could someone buy them?
|
|
mdm1
Orange Level

Joined: 12 Sep 2009
Location: Onalaska, WI
Points: 2592
|
Post Options
Thanks(0)
Quote Reply
Posted: 17 Oct 2019 at 9:36am |
 They are the 3 round plugs in the pic. Pull the valve cover off. You can get them at any parts store. Just take one with to get the right size.
|
|
Everything is impossible until someone does it! WD45-trip loader 1947 c w/woods belly mower, 1939 B, #3 sickle mower 1944 B, 2 1948 G's. Misc other equipment that my wife calls JUNK!
|
|
CTuckerNWIL
Orange Level
Joined: 11 Sep 2009
Location: NW Illinois
Points: 22807
|
Post Options
Thanks(0)
Quote Reply
Posted: 18 Oct 2019 at 7:34pm |
|
Your local auto parts store would call them "freeze plugs".
|
|
|
|
miketothesteve
Bronze Level
Joined: 27 Sep 2019
Location: Nova Scotia
Points: 41
|
Post Options
Thanks(0)
Quote Reply
Posted: 21 Oct 2019 at 5:50am |
For these freeze plugs, would coolant seep by upward? I removed the valve cover late night on Saturday, and believe I found the freeze plugs. Each had a little oil pool in it. Are they kind of beneath/inbetween the rocker arms?
I was also able to tell someone else has removed the cover before, likely for some sort of leak. In addition to a gasket, there was a bunch of that squeeze tube gasket all around. I peeled all that off for now. Since I have new gaskets on the way.
Between Saturday and Sunday I also drained all the coolant, simply to save it, and stop it from leaking into the engine. I drained approximately 5 L.
Sunday, I figured I'd drain the coolant from the oil, and started with unscrewing the oil plug just enough to allow water or coolant to drain by. I was able to get a slow stream, and let it go for an hour and it kept coming. So I tried to loosen it a little more, and well, guess what happened...I unthreaded the whole plug and a monsoon of coolant came pouring out. I got it threaded back on before my pan overflowed. Replaced the pan with a 20L pail, and drained the whole thing. All in, I drained about 10L of fluid (oil+coolant) from the engine..
If you've been following along this whole time, you'll recall me saying I put a quart of coolant in a couple weeks ago. Since 5L or ~1.25 quarts came out, I assume the point where it's leaking into the engine is lower (this assumes that coolant is evenly dispersed from top to bottom).
|
|
Sugarmaker
Orange Level

Joined: 12 Jul 2013
Location: Albion PA
Points: 8167
|
Post Options
Thanks(0)
Quote Reply
Posted: 21 Oct 2019 at 7:30am |
Mike, I am just catching up on your B project. First its a family tractor! Hope folks are still around to remember it doing work around the farm? Second you have done a great job getting it home and up on 4 wheels again! Your doing the right research and gathering parts as needed. The water in oil thing means more investigative work. As they say its easier to find the leak BEFORE you tear the engine down. Very low pressure on the cooling system will allow you to find the water leak. And it could be several areas as mentioned. freeze plugs, head gasket, or worse case cracked block. Hope its not the latter. Enjoyed the thread. You have a good looking tractor! Regards, Chris
Edited by Sugarmaker - 21 Oct 2019 at 7:31am
|
|
D17 1958 (NFE), WD45 1954 (NFE), WD 1952 (NFE), WD 1950 (WFE), Allis F-40 forklift, Allis CA, Allis D14, Ford Jubilee, Many IH Cub Cadets, 32 Ford Dump, 65 Comet.
|
|
CTuckerNWIL
Orange Level
Joined: 11 Sep 2009
Location: NW Illinois
Points: 22807
|
Post Options
Thanks(0)
Quote Reply
Posted: 21 Oct 2019 at 7:55am |
|
With a full radiator( water to the top of the core) you might have a quart of water above the level of the core plugs. gravity will let it drain down, but I would think the oil collected in the plug would be displaced by the water????
Once the coolant level gets even with the core plug, it wouldn't leak anymore, unless the radiator is brought up to working temp, and system is pressurized.
At this point, I would plug the fill hole on the radiator and connect regulated air pressure to it. 7 PSI would be plenty to test for a leak in any of those plugs.
If that doesn't show a leak, I would drop the oil pan, and do the pressure test again, to see if coolant comes from around the outside of a cylinder sleeve, or comes down from inside the cylinder from a head gasket leak.
|
|
|
|
miketothesteve
Bronze Level
Joined: 27 Sep 2019
Location: Nova Scotia
Points: 41
|
Post Options
Thanks(0)
Quote Reply
Posted: 21 Oct 2019 at 8:59am |
CTuckerNWIL wrote:
With a full radiator( water to the top of the core) you might have a quart of water above the level of the core plugs. gravity will let it drain down, but I would think the oil collected in the plug would be displaced by the water????
Once the coolant level gets even with the core plug, it wouldn't leak anymore, unless the radiator is brought up to working temp, and system is pressurized.
At this point, I would plug the fill hole on the radiator and connect regulated air pressure to it. 7 PSI would be plenty to test for a leak in any of those plugs.
If that doesn't show a leak, I would drop the oil pan, and do the pressure test again, to see if coolant comes from around the outside of a cylinder sleeve, or comes down from inside the cylinder from a head gasket leak.
|
This is what I would've thought as well, and it's coolant (green) as well. So should be even more noticeable. When I took the cover off I ran out of rags so I didn't wipe the plugs off to see for sure. But I knew I'd be back in there anyway. Wondering if when I tested it to see if it turned over, if I moved some oil around maybe. And I assume this mean (with regards to the freeze plugs) coolant would seep upwards.
|
|
miketothesteve
Bronze Level
Joined: 27 Sep 2019
Location: Nova Scotia
Points: 41
|
Post Options
Thanks(0)
Quote Reply
Posted: 31 Dec 2019 at 12:17pm |
Happy holidays everyone! Just thought I would post an update. It had been awhile since I was able to get any real time with the ol' B, but over the holiday's I had a chance to dedicate some time. I removed the head and replaced the head gasket, tidied up the carbon build up and cleaned up the old grimy oil.
Just a few minutes ago, i had finished putting the oil pan back on with a new gasket. I removed it because I suspected the old gasket was leaking, and I wanted to clean-up as much of the old oil from the pan as I could. I'm glad I did, it was pretty sludgy.
Added some new oil, and compression tested the cylinders. The first test before anything was replaced, had 3 cylinders at 90psi, and one at 80. They are now all around 125psi ( +/- 3 psi).
So all in all, I feel like I'm making progress. Next chance I get, I'll check to see if coolant is still leaking into the engine. Otherwise, I'll move on to spark.
|
|
chaskaduo
Orange Level
Joined: 26 Nov 2016
Location: Twin Cities
Points: 5203
|
Post Options
Thanks(0)
Quote Reply
Posted: 31 Dec 2019 at 1:25pm |
|
Was there coolant in the oil pan? 125 psi is a good compression reading. Sounds like you are making headway. I would shoot some penetrate into the cylinders to lube the walls and coat them until your ready to fire her up. Some guys would even recommend tranny fluid. Keep poking at her, we are all here for ya.
|
|
1938 B, 79 Dynamark 11/36 6spd, 95 Weed-Eater 16hp, 2010 Bolens 14hp
|
|
miketothesteve
Bronze Level
Joined: 27 Sep 2019
Location: Nova Scotia
Points: 41
|
Post Options
Thanks(0)
Quote Reply
Posted: 09 Mar 2020 at 5:32am |
Good morning everyone, I'm back again. Had taken a little break over the winter, and didn't poke around too much on the ol' B. Before she was moved in the garage, we quickly tested for spark, and there was none. Now that there are fresh fluids in it, I wanted to thoroughly test.
Initial result was no spark. Tested the grounding on the magneto to find out the on/off switch to ground it seems bad: regardless of the switch position I measure 0 resistance using a multi-meter, across the two points.
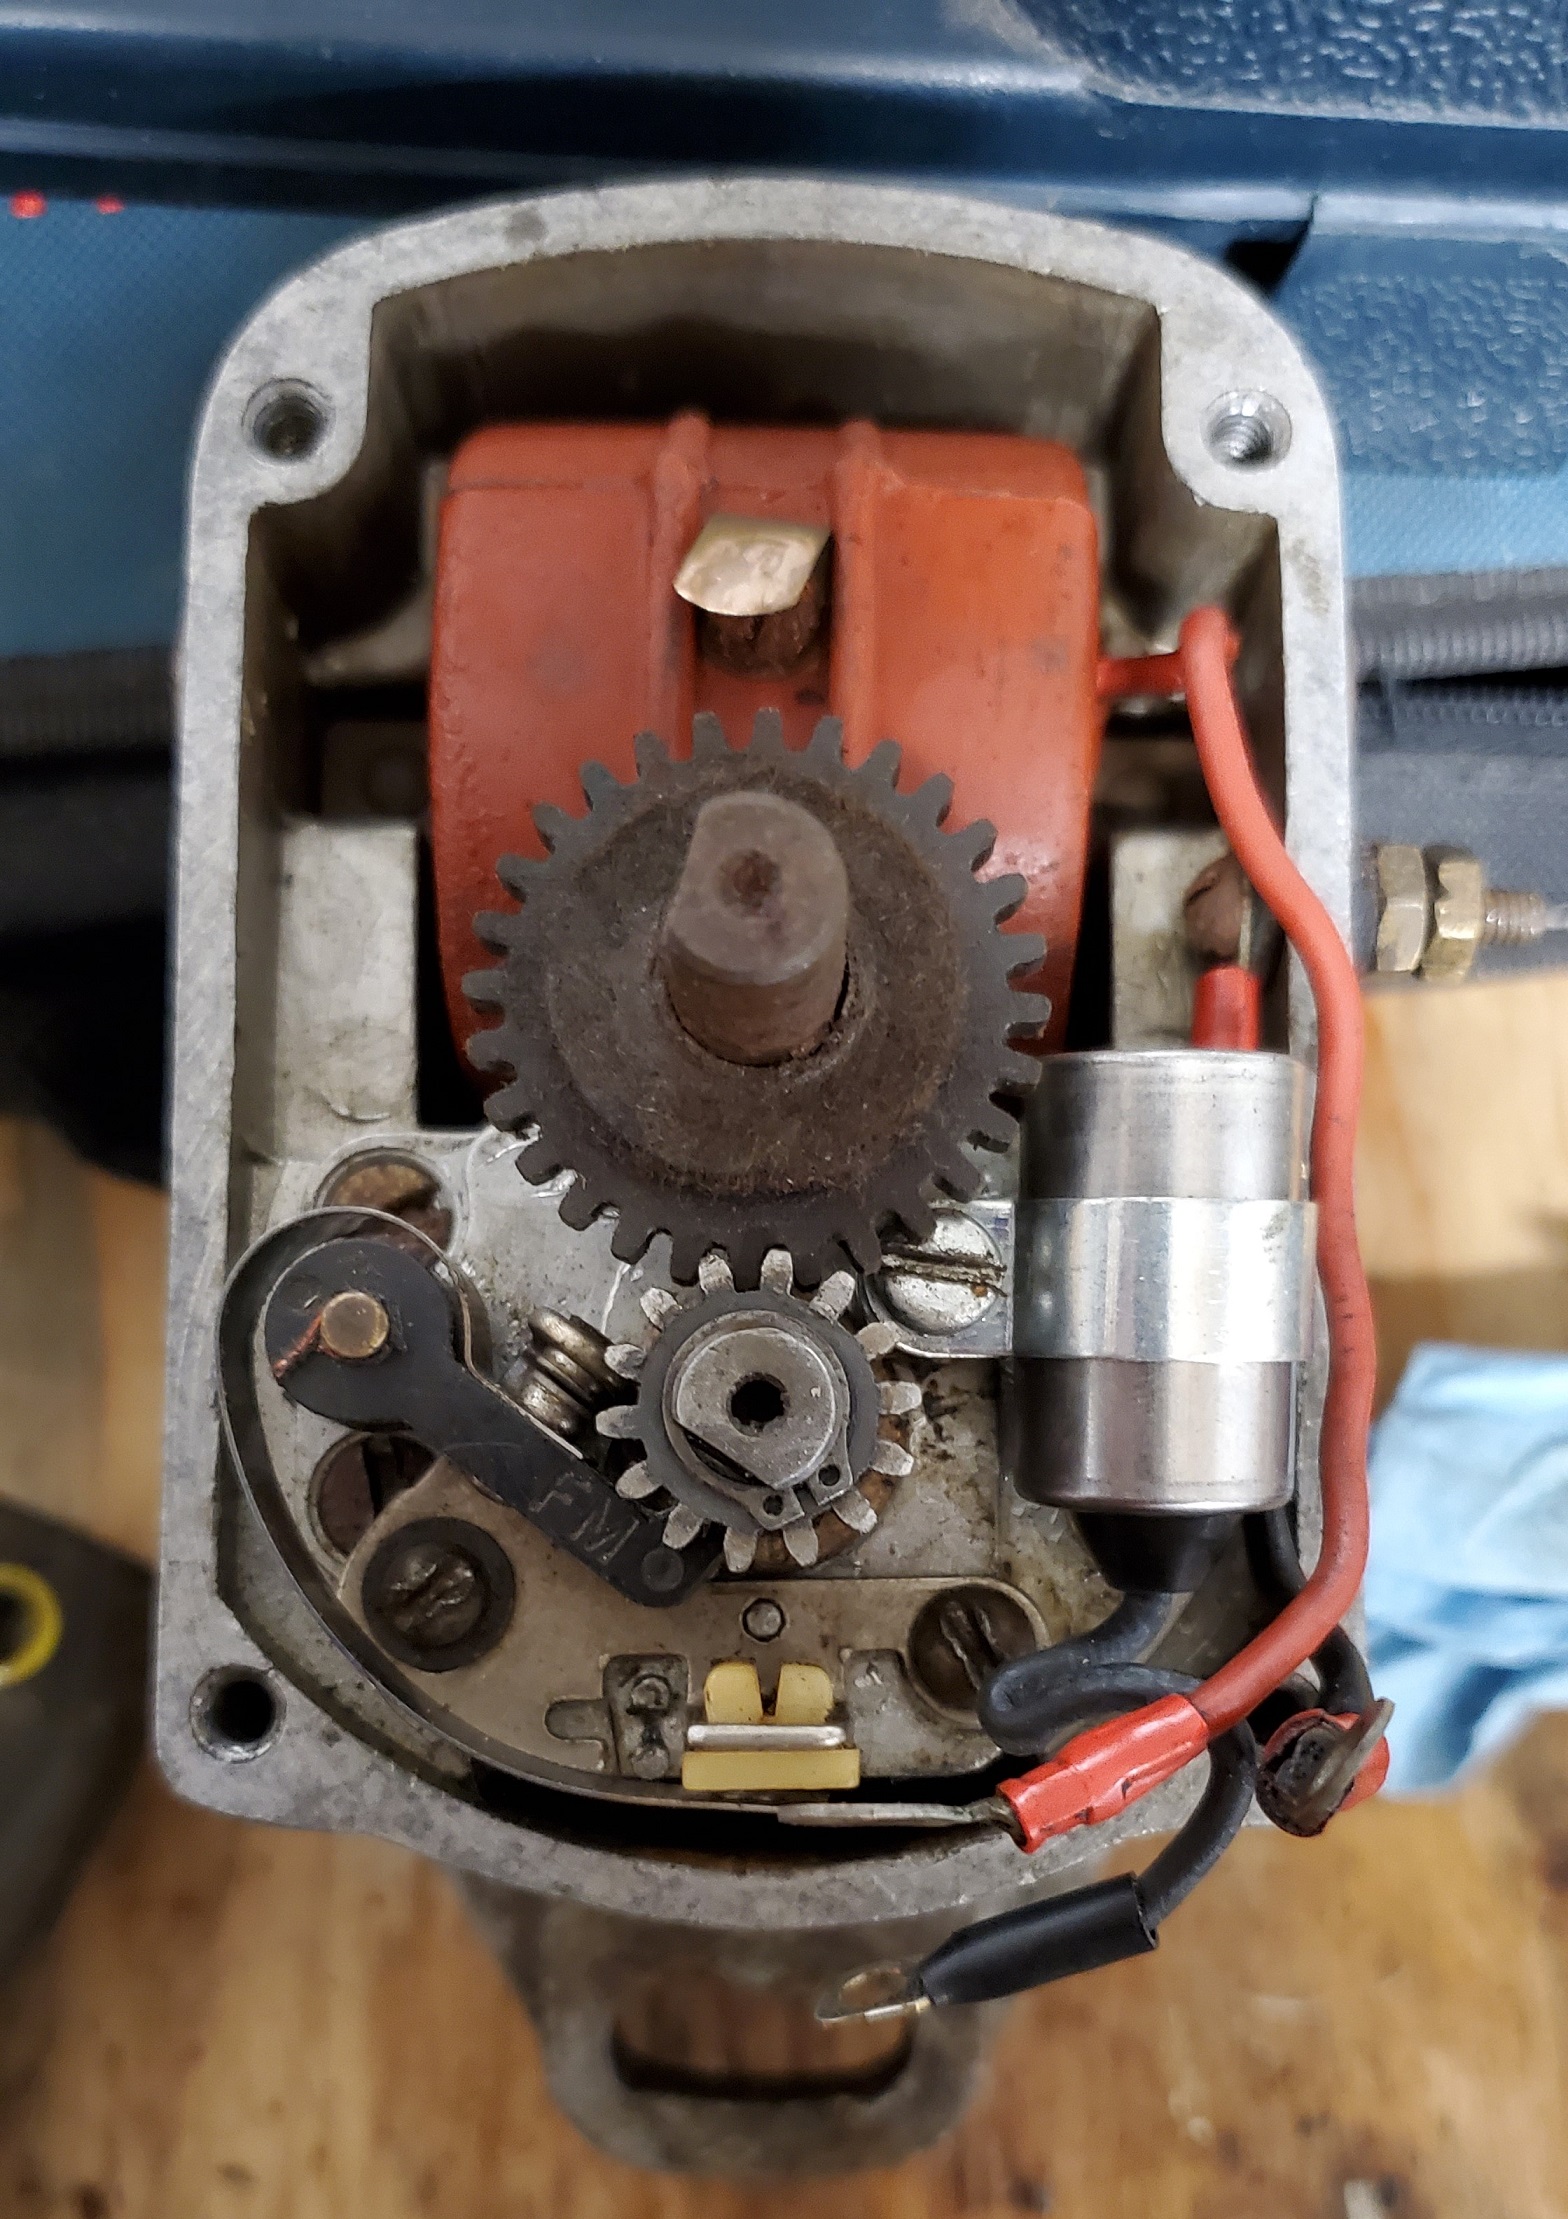
Disconnected the grounding wire, tried again, still no spark. So all I've done so far has been remove the mag (took some pictures to remember the position of everything), cleaned the points on the cap, and tried to test the magneto.
To test the magneto, I connected the meter to the brass tab on the red coil(?) at the top of the meter, and the other to ground. I used a drill to spin the magneto from the back, and can see on the measure the voltage fluctuate. So this tells me something is happening. But that's about the extent of my knowledge with a multi-meter.
What's the best approach to testing/troubleshooting the magneto? It's a Fairbanks Morse, Type FM X4B16A
I was also turning it in the direction with basically no resistance. Looking at the back, might be called the armature, it was spinning counter clockwise. If someone could tell me the firing order of the cylinders from left to right, I could figure out which way it's supposed to spin.
|
|
ac fleet
Orange Level
Joined: 12 Jan 2014
Location: Arrowsmith, ILL
Points: 2204
|
Post Options
Thanks(0)
Quote Reply
Posted: 10 Mar 2020 at 12:52pm |
|
The dogs have to catch, get hard, then snap over center! sounds like you turned it backwards. Spark occurs after hard snap of the impulse coupling.
|
|
http://machinebuildersnetwork.com/
|
|
CTuckerNWIL
Orange Level
Joined: 11 Sep 2009
Location: NW Illinois
Points: 22807
|
Post Options
Thanks(0)
Quote Reply
Posted: 10 Mar 2020 at 1:08pm |
|
You gotta turn it clockwise to make it spark. You really shouldn't turn it over without a plug and wire in each hole, with the plugs grounded to the case of the mag. It gets done a lot, but can lead to arching inside the cap, which can ruin a good cap.
|
|
|
|
miketothesteve
Bronze Level
Joined: 27 Sep 2019
Location: Nova Scotia
Points: 41
|
Post Options
Thanks(0)
Quote Reply
Posted: 10 Mar 2020 at 5:46pm |
|
I just had some new plugs arrive today and put it back together to see if it was just a matter of cleaning the points. Seems like a no go so far. I had the plug touching the frame. Should I try it touching the mag casing? Will it make a difference?
|
|
Oniondip
Bronze Level

Joined: 11 Jan 2021
Location: Nova Scotia
Points: 9
|
Post Options
Thanks(0)
Quote Reply
Posted: 11 Jan 2021 at 10:15pm |
Hey everyone,
Im new here, my name is Jeff. Mike is my brother-in-law, and I got offered this project and without question I took it. This is my grandfathers old tractor, so Im pretty excited to get it up and running.
Im jumping right into it though, and I hit a point where I need some help from the experts. I am following up with the no spark. I checked the p-lead for continuity to ground and I had it. So I played with both switches on the "dash" and no change. I disconnected the wire, the wire remains open in every switch position. Mike already gave me the handover to say the switches weren't working, so that is confirmed. The p-lead is the problem. So I tore the cap then cover off the mag to verify the condition of all the parts and everything seems in good shape.
The actual workings of the mag is where I need help with. I understand the ground will kill spark ie. killswitch so p-lead needs to remain open for spark to be delivered. I removed the screw holding the coil, condenser, and p-lead wires to the points and checked each component for a possible case ground/short. The red with coming off the coil is the culprit. So here is the question, before I spend money on a new coil can a expert chime in and agree with this troubleshooting. Or am I wrong and this red wire should case ground?
The next question is the gears inside the mag dont have any timing mark from what I can tell. Do I just mark with a sharpie a easy reference or is there a better way? Because marking it with a sharpie only put it back to how I took it apart, but it may never have been timed correctly from the start.
Edited by Oniondip - 11 Jan 2021 at 10:22pm
|
|
Mikez
Orange Level Access

Joined: 16 Jan 2013
Location: Usa
Points: 8143
|
Post Options
Thanks(0)
Quote Reply
Posted: 11 Jan 2021 at 10:27pm |
welcome Jeff. Take your question and start a new post in the farm equipment section. You will get a better response that way. Good luck
|
|
Oniondip
Bronze Level
Joined: 11 Jan 2021
Location: Nova Scotia
Points: 9
|
Post Options
Thanks(0)
Quote Reply
Posted: 04 Feb 2021 at 6:01pm |
Im back with an update: After talking with Steve NJ at BB Custom Circuits I was able to make a decision on what to do with my magneto and not getting good spark. I purchase a new set of points and condenser from his business and I now have a nice strong spark. I put the carb back on the tractor and started cranking it with not much luck. I had to turn the magneto hard to one direction, then slowly turn it 1/16" at a time until I found the position it began to react in. Eventually, after many many pulls on the starter it woke up! Exciting to hear it knowing this is the first time in 10+ the tractor has been running.
I took some shortcuts just to make sure it would fire up. So before I start working it I have a list of things I need to do. I put the bucket on and did a functional of everything I could think of. Alternator is putting out atleast 14v (slow build, and I took the meter off when I hit 14), hydraulics are working nice and smooth, lifted a entire bucket full of wet snow, PTO was working. I dont know how the kill switch is wired, but the switch seemed dead when metered, however it actually functions as it should. So my list of things I still need to do is rinse the gas tank and coat it, it has some light rust inside and lots of sediment. Replace the old sediment bowl and filter with new ones (especially after running sediment through them). And the governor seems like its slow, but then overacting, which is causing a huge surge in RPM for a few seconds until it sorts itself out or sometimes stalls.
Here is the idle video. Time to get this old girl out doing some work soon!
[TUBE]utQBWFWWy4Q[/TUBE]
Edited by Oniondip - 04 Feb 2021 at 6:03pm
|
|
steve(ill)
Orange Level Access

Joined: 11 Sep 2009
Location: illinois
Points: 77694
|
Post Options
Thanks(0)
Quote Reply
Posted: 04 Feb 2021 at 7:45pm |
|
congratulations............. motor sounds good !
|
|
Like them all, but love the "B"s.
|
|
CTuckerNWIL
Orange Level
Joined: 11 Sep 2009
Location: NW Illinois
Points: 22807
|
Post Options
Thanks(0)
Quote Reply
Posted: 06 Feb 2021 at 9:45pm |
steve(ill) wrote:
congratulations............. motor sounds good ! |
It will sound even better, when it's running on all 4 cylinders!
|
|
|
|
Oniondip
Bronze Level
Joined: 11 Jan 2021
Location: Nova Scotia
Points: 9
|
Post Options
Thanks(0)
Quote Reply
Posted: 07 Feb 2021 at 1:50pm |
Well I got some more work done after that first start. I dialed in the mag a bit better, and found a spark plug wire was grounding to the oil filter. I also knew one other wire was loose, and the insulation is torn and the wire has been compromised. I will be ordering a set of plug wires from Steve at BB when I finish my list of items I need to repair/replace.
So in that video I had a mis-fire, and the tractor wouldnt go to high RPM. RPM issue is governor related. I freed it up as best I can without removing it, which will be the next step when I have a day to work on it.
New video with alot smoother run.
[TUBE]22vrKMw5yIo[/TUBE]
|
|