| Author |
 Topic Search Topic Search  Topic Options Topic Options
|
Hunt4Allis 
Orange Level

Joined: 13 Mar 2018
Location: Ohio
Points: 1160
|
 Post Options Post Options
") Thanks(0) Thanks(0)
 Quote Quote  Reply Reply
 Topic: Ca wide front end/ trip loader bucket install Topic: Ca wide front end/ trip loader bucket install
Posted: 03 Apr 2020 at 7:35am |
|
Hey all,
I will probably start to switch my narrow front to a wide front and install a trip loader bucket that I bought last spring from Wayne 180.
I haven't seen him on here for a while hope he's okay, but I'm planning on draining the radiator and doing a complete clean out on it because I need to remove the radiator anyways to swap the front end (any tips on draining/ flushing the entire system and refilling would be greatly appreciated)
Secondly if anyone has any pictures on there CA I would appreciate those pictures also so I can reference how to install mine. (I know there's probably many variations of these trip loader buckets but maybe with a bunch of different ones I can get this thing installed)
Thanks Matt 👍
|
 |
|
Sponsored Links
|
|
|
Brian F(IL)
Orange Level Access
Joined: 14 Sep 2009
Location: Paxton, IL
Points: 2688
|
Post Options
Thanks(0)
Quote Reply
Posted: 03 Apr 2020 at 7:43am |
Here are two pictures of the left-side brackets on my CA, from the front side to the rear side. These were with a #8 AC Freeman loader. To be honest, I don't remember how they attached to the mainframe of the loader.
You can also see the rear supports that bolt onto the rear frame. 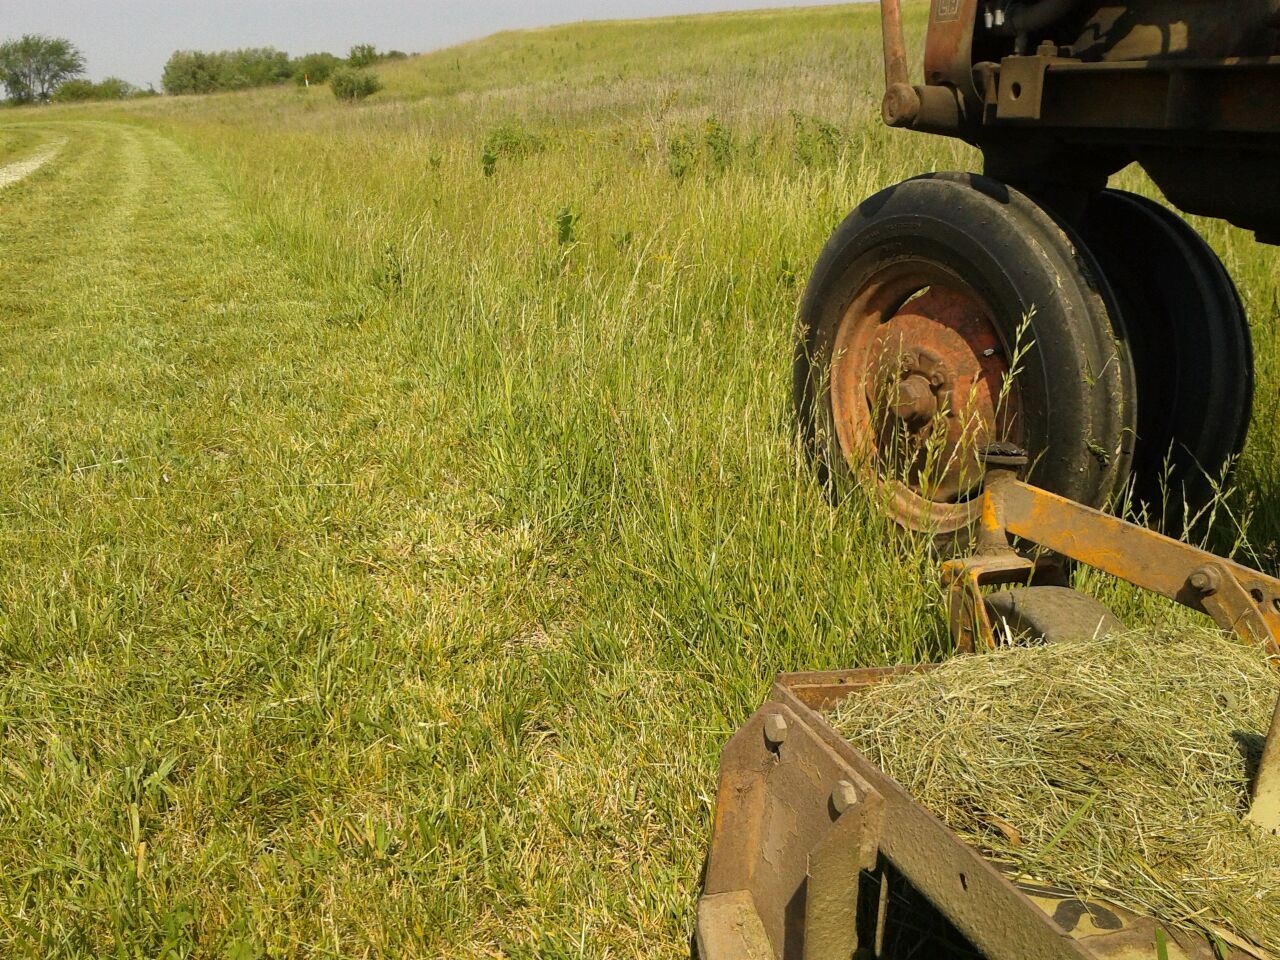 |
|
Hunt4Allis
Orange Level
Joined: 13 Mar 2018
Location: Ohio
Points: 1160
|
Post Options
Thanks(0)
Quote Reply
Posted: 04 Apr 2020 at 1:13pm |
|
Ok thanks, keep some more pictures and info/ tips coming fellas 👍
|
|
Hunt4Allis
Orange Level
Joined: 13 Mar 2018
Location: Ohio
Points: 1160
|
Post Options
Thanks(0)
Quote Reply
Posted: 05 Apr 2020 at 1:53pm |
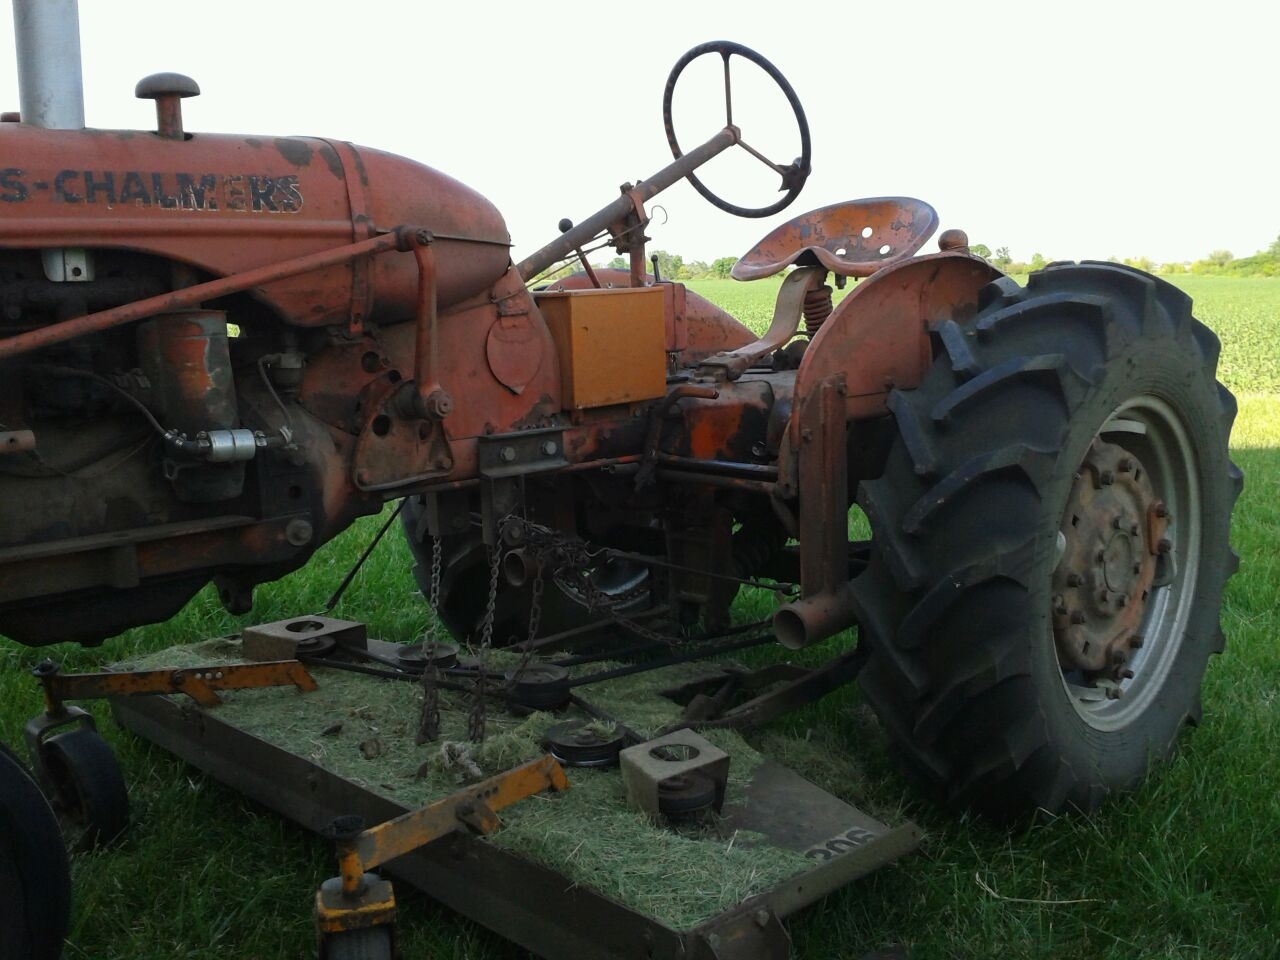
In my next course of action 2 swap my front end out that is a narrow front to a wide front I also found the leak that looks to be the gasket over the valve cover where the screwdriver is pointing there's a crack about an eighth of an inch wide that the oils coming from. I can't seem to get this cover off oh, what does it take? (It seems like there are rubber washers on top of the four bolts that hold the valve cover down that maybe holding up the cover from coming off) 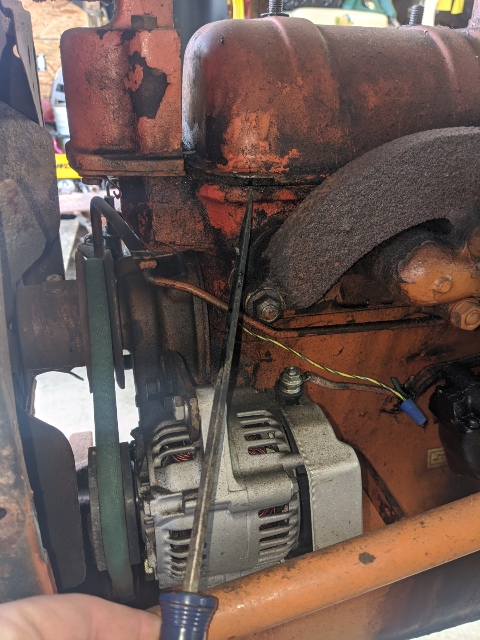
|
|
Dave(inMA)
Orange Level

Joined: 12 Sep 2009
Location: Grafton, MA
Points: 2395
|
Post Options
Thanks(0)
Quote Reply
Posted: 05 Apr 2020 at 2:35pm |
|
The valve cover is likely sealed to the gasket which is sealed to the head. The rubber washers will come off with some gentle persuasion. As to the valve cover....find a spot where the bottom edge of the cover doesn't extend down over the gasket. I think you have a spot right in front. Carefully drive a putty knife through the gasket - between the head and the cover. You can then carefully pry the cover loose by working both directions from that corner. You'll need a new gasket.
|
|
WC, CA, D14, WD45
|
|
Hunt4Allis
Orange Level
Joined: 13 Mar 2018
Location: Ohio
Points: 1160
|
Post Options
Thanks(0)
Quote Reply
Posted: 05 Apr 2020 at 2:47pm |
|
Yep I was trying all that but it did not want to come off. I left it alone because in my experience when I try to force something that's when it will break so I didn't want to get that far and mess something up if I was missing something else holding it on...
Thanks Matt
|
|
Hunt4Allis
Orange Level
Joined: 13 Mar 2018
Location: Ohio
Points: 1160
|
Post Options
Thanks(0)
Quote Reply
Posted: 05 Apr 2020 at 8:46pm |
|
My plan is to drain radiator(flush system)from petcock at radiator and engine petcock, remove radiator.
Either hoist up or jack up from below to remove center column post that hold tires.
Install wide front end, reinstall radiator ( fill).
Install trip loader bucket( flush out hydraulics) install new hoses
Hopefully use tractor/ trip loader to clean up pasture...
Any tips or thoughts?
|
|
Hunt4Allis
Orange Level
Joined: 13 Mar 2018
Location: Ohio
Points: 1160
|
Post Options
Thanks(0)
Quote Reply
Posted: 06 Apr 2020 at 7:39am |
|
I'm pretty sure I need to remove the radiator to get to the large inch and a quarter nut on top of where the main bearing is above the steering gear?
I'm going to look in my manual to see if it shows anything...
I'm just not sure if I need to remove the radiator or if it will come out without doing so.
Edited by Hunt4Allis - 06 Apr 2020 at 7:40am
|
|
Dakota Dave
Orange Level

Joined: 12 Sep 2009
Location: ND
Points: 3893
|
Post Options
Thanks(0)
Quote Reply
Posted: 06 Apr 2020 at 10:00am |
|
the radiator is attached to the front bolster which must come off the put the wide front bolster on. I was wrong I looked it up and they do use the same front support. When I swaped the front on my C the CA pedestal gears wouldn't mesh with the C front support. My C was from before the production break. My C was very early it still had hand brakes. I swapped those out also. the parts are still laying out in the shed at my moms place.
Edited by Dakota Dave - 06 Apr 2020 at 10:47am
|
|
Hunt4Allis
Orange Level
Joined: 13 Mar 2018
Location: Ohio
Points: 1160
|
Post Options
Thanks(0)
Quote Reply
Posted: 06 Apr 2020 at 10:44am |
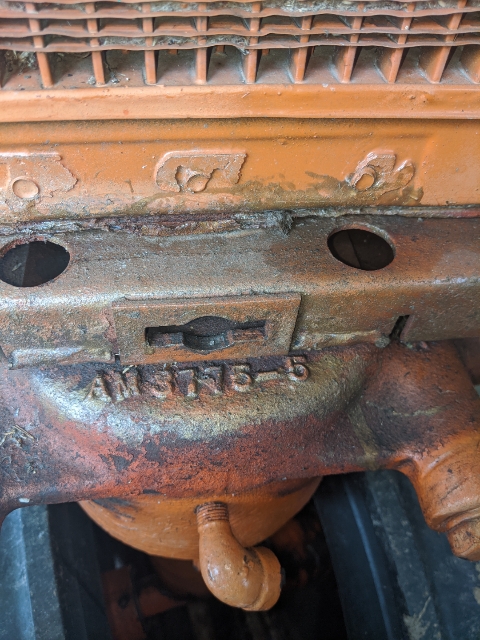 Can anyone confirm that the front bolster that is required for the wide front end is the casting number in my picture?
|
|
Dakota Dave
Orange Level
Joined: 12 Sep 2009
Location: ND
Points: 3893
|
Post Options
Thanks(0)
Quote Reply
Posted: 06 Apr 2020 at 10:48am |
|
your good.
|
|
Hunt4Allis
Orange Level
Joined: 13 Mar 2018
Location: Ohio
Points: 1160
|
Post Options
Thanks(0)
Quote Reply
Posted: 06 Apr 2020 at 11:19am |
|
That's weird because it's on my tractor right now that has a narrow front end on it?
|
|
Hunt4Allis
Orange Level
Joined: 13 Mar 2018
Location: Ohio
Points: 1160
|
Post Options
Thanks(0)
Quote Reply
Posted: 06 Apr 2020 at 11:20am |
|
I still need to remove the radiator to get to the large inch and a quarter nut on top of the bearing though correct?
|
|
Dakota Dave
Orange Level
Joined: 12 Sep 2009
Location: ND
Points: 3893
|
Post Options
Thanks(0)
Quote Reply
Posted: 06 Apr 2020 at 12:51pm |
|
When you pull your pedestal down the gear and nut come with it. The lower support for the wide front looks just like it. I edited my previous post I was wrong. I had to swap mine out because the gears didn't mesh. my C upper support was a very early model so when I swapped it didn't work. I had to do the bolster only because it it was before the production splits in a C. the CA used the same Tru the entire production.
|
|
Hunt4Allis
Orange Level
Joined: 13 Mar 2018
Location: Ohio
Points: 1160
|
Post Options
Thanks(0)
Quote Reply
Posted: 06 Apr 2020 at 3:54pm |
|
Okay then maybe I don't need to remove the radiator, just the four big nuts on the bottom of the pedestal?
Edited by Hunt4Allis - 06 Apr 2020 at 3:54pm
|
|
Hunt4Allis
Orange Level
Joined: 13 Mar 2018
Location: Ohio
Points: 1160
|
Post Options
Thanks(0)
Quote Reply
Posted: 07 Apr 2020 at 10:05am |
|
either jack up the front from underneath or hoist it up from above?(to dismantle the front and start to change it to a wide front end.)
Is there any advantage or disadvantage to either jacking it up or hoisting it up?
Edited by Hunt4Allis - 07 Apr 2020 at 10:07am
|
|
chaskaduo
Orange Level

Joined: 26 Nov 2016
Location: Twin Cities
Points: 5203
|
Post Options
Thanks(0)
Quote Reply
Posted: 07 Apr 2020 at 10:59am |
|
If you hoist it, you can raise and lower the tractor front as needed during diss-and-reassembly. If you jack, you'll only be able to move the front steering assembly alone.
Edited by chaskaduo - 07 Apr 2020 at 11:00am
|
|
1938 B, 79 Dynamark 11/36 6spd, 95 Weed-Eater 16hp, 2010 Bolens 14hp
|
|
Dale (Stonelick)
Bronze Level


Joined: 13 Jun 2019
Location: Stonelick, Ohio
Points: 157
|
Post Options
Thanks(0)
Quote Reply
Posted: 07 Apr 2020 at 4:39pm |
A friend & I just now completed the replacement of my NFE with a WFE on a 1951 CA. More difficult than I expected. The front bolster for the WFE on my 1951 is different design than the NFE, so the entire unit needed to be removed and replaced.
I drained the coolant, removed radiator, fan pulley and fan belt. I raised the tractor front end with another tractor/loader. I attached two jack supports (2 verticle 2 x4s) using 5/8ths bolts into the flywheel housing (2 bolts on each side). Removed the old NFE (4 bolts) while supporting with chain on my other tractor/loader.
I my case, the WFE didn't have tires/rims/hubs/ bearings. So I had to swap them out from my old NFE. Of course the bearing oil seals were shot and had to wait a week before the new ones were delivered. Not to mention the inside bearings fell apart as I beat on them with hammer and 2 x 4 - but I digress.
Dakota Dave sent me a PM and said he was able to roll the new WFE in place and bolt it together within 30 minutes. This wasn't the case for me - the WFE was just too heavy for me to handle.
I bolted a long 5/4 x 4" board on the WFE front horns, parallel to the axle. Then used straps to secure the axle and center support to this board. Lifted the complete WFE unit up with the other tractor/loader.
The trick is to keep everything straight and square. You have to line up the 4 mounting bolts, but at the same time get the center yoke lined up correctly underneath the CA. Doing both at the same time was difficult for us. It took us about an hour and a half, but we got it done. Luckily my friend is mechanically inclined, and it only cost me 1 bottle of Corona.
I do suggest that you make sure the existing stearing arm is set upright in vertical position before installing WFE. I didn't.
|
|
Hunt4Allis
Orange Level
Joined: 13 Mar 2018
Location: Ohio
Points: 1160
|
Post Options
Thanks(0)
Quote Reply
Posted: 07 Apr 2020 at 5:09pm |
|
Awesome information, thanks for your time
|
|