| Author |
 Topic Search Topic Search  Topic Options Topic Options
|
BigGuy1000 
Bronze Level

Joined: 06 Dec 2013
Location: NWIL
Points: 107
|
 Post Options Post Options
") Thanks(0) Thanks(0)
 Quote Quote  Reply Reply
 Topic: AC175wf loader, broken rt. steering arm! Topic: AC175wf loader, broken rt. steering arm!
Posted: 03 Feb 2019 at 8:10am |
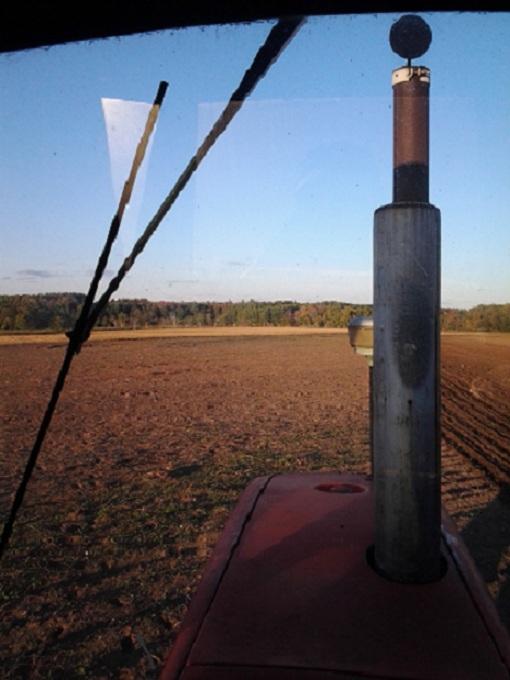
 This is the second broken arm(original AC not available, poor quality Chinese A&I parts) on this loader tractor, cast iron, breaks right at the keyway where thinnest! Bought another A&I part, pix below, now what to do by welding outside the arm at the keyway??? Plenty of room there to weld, but what method of welding and what material will be best here? Especially if you have experienced this and fixed successfully!!!
|
 |
|
Sponsored Links
|
|
|
DrAllis
Orange Level Access

Joined: 12 Sep 2009
Points: 19477
|
Post Options
Thanks(0)
Quote Reply
Posted: 03 Feb 2019 at 8:28am |
|
Best case scenario would be to buy another new one and install it. Weld on top of the weak area building it up to add strength. Pre-heat with a torch before welding. I'd have the whole knee assembly removed from the tractor so I could lay it in a good welding position.
|
|
Rick
Orange Level

Joined: 11 Sep 2009
Location: Jonesburg,Mo.
Points: 3639
|
Post Options
Thanks(0)
Quote Reply
Posted: 03 Feb 2019 at 9:36am |
|
That metal looks a bit porous to me where it broke. I would get one from Hy-Capacity and send the one from A&I back to them. I've bought several from Hy-Capacity and never had a problem. Rick
|
|
DMiller
Orange Level Access
Joined: 14 Sep 2009
Location: Hermann, Mo
Points: 29441
|
Post Options
Thanks(0)
Quote Reply
Posted: 03 Feb 2019 at 9:43am |
|
I had a replacement break, dealer traded for another. I then used a Sunnen hone and micrometers to reduce the interference fit. Any decent machine shop can do similar where the aftermarket was TOO tight on interference, almost .015 interference, That need only be .003-.005 to work effectively.
|
|
Tracy Martin TN
Orange Level Access

Joined: 11 Sep 2009
Location: Gallatin,TN
Points: 10551
|
Post Options
Thanks(0)
Quote Reply
Posted: 03 Feb 2019 at 10:02am |
|
How wide are your front tires? How much air in them? Makes a lot of difference in how easy it steers. A little grease will help too. JMHO, Tracy
|
|
No greater gift than healthy grandkids!
|
|
DrAllis
Orange Level Access
Joined: 12 Sep 2009
Points: 19477
|
Post Options
Thanks(0)
Quote Reply
Posted: 03 Feb 2019 at 10:19am |
|
50 lbs of air in front tires is probably too hard. A softer tire will cushion the shock to the whole front axle.
|
|
LYNNMN
Bronze Level

Joined: 13 Sep 2009
Location: Garfield, MN
Points: 118
|
Post Options
Thanks(0)
Quote Reply
Posted: 03 Feb 2019 at 10:42am |
|
I put 7000 hours on a 175 with loader and never broke an arm.
|
|
BigGuy1000
Bronze Level
Joined: 06 Dec 2013
Location: NWIL
Points: 107
|
Post Options
Thanks(0)
Quote Reply
Posted: 15 Feb 2019 at 5:20pm |
Thanks to all for suggestions, hycal is probably better, but already have the A&I part!!! Have gotten welded, will this do the job??? Had a 3rib tire there, now replaced with a wagon tire, very small ribs.
|
|
BrianC
Orange Level
Joined: 16 Jun 2011
Location: New York
Points: 1613
|
Post Options
Thanks(0)
Quote Reply
Posted: 15 Feb 2019 at 7:01pm |
Just curious, is the key slot on the left side arm also in a thin section?
|
|
jaybmiller
Orange Level Access
Joined: 12 Sep 2009
Location: Greensville,Ont
Points: 21451
|
Post Options
Thanks(0)
Quote Reply
Posted: 15 Feb 2019 at 7:12pm |
That welded area is way too thin for me.
Is there some real good reason why you can't add a LOT of weld between the 'nubs' on either side of the keyway? To me it should be at least as thick as the rest of the 'circular' area. Sorry for the non technical names.... Jay
|
|
3 D-14s,A-C forklift, B-112
Kubota BX23S lil' TOOT( The Other Orange Tractor)
Never burn your bridges, unless you can walk on water
|
|
MACK
Orange Level
Joined: 17 Nov 2009
Points: 7664
|
Post Options
Thanks(0)
Quote Reply
Posted: 15 Feb 2019 at 9:43pm |
|
Not the first thing A&I made that was junk. MACK
|
|
DrAllis
Orange Level Access
Joined: 12 Sep 2009
Points: 19477
|
Post Options
Thanks(0)
Quote Reply
Posted: 16 Feb 2019 at 7:13am |
|
It will be interesting to see if it still fits the spindle TIGHT. It has to be tight.
|
|
Gary Burnett
Orange Level Access

Joined: 11 Sep 2009
Location: Virginia
Points: 2851
|
Post Options
Thanks(0)
Quote Reply
Posted: 16 Feb 2019 at 7:45am |
|
I agree probably poor parts.That said ag tractor front ends were designed to carry the weight of the front of the tractor the loader puts a lot more stress on them.For light duty work it usually works OK but if you're doing heavy work with a loader you'd be way ahead to look for an industrial tractor.
|
|
lentsch
Silver Level


Joined: 10 Feb 2011
Location: Glencoe,Mn.
Points: 212
|
Post Options
Thanks(0)
Quote Reply
Posted: 16 Feb 2019 at 9:48am |
|
That area looks really thin near the keyway. If I were to build it up I would heat it red hot with a torch and use a nickel rod to make it at least as thick as the other side (maybe thicker) and then bury it in a bucket of sand to let it cool gradually. JMHO.
|
|
WD,D15,190XT,7000,8010x2,7060,8070
|
|
BigGuy1000
Bronze Level
Joined: 06 Dec 2013
Location: NWIL
Points: 107
|
Post Options
Thanks(0)
Quote Reply
Posted: 17 Feb 2019 at 4:05pm |
Had the broken one machined by a shop to proper interference fit, according to the shop. The welder says that adding too much there as suggested by some will crack the cast when it cools. It looks like the left one is a little thicker there, hard to tell for sure.
|
|
BigGuy1000
Bronze Level
Joined: 06 Dec 2013
Location: NWIL
Points: 107
|
Post Options
Thanks(0)
Quote Reply
Posted: 12 Mar 2019 at 11:38am |
DrAllis, you are right, but you did not say why, the arm should be welded while on the spindle downhand!! But I did not know that soon enough!!! As welded in the pix, the keyway below the weld was compressed so that the key would no longer fit, had to get broached at the machine shop, then it went on OK shrink fit!!! Rick thanks for HYCAL info but I did not know that before buying A & I poor quality!!! ALso replaced the tire with an almost smooth wagon tire...and THANKS to all who replied!!! Hope that this will work now! I am not about to buy a loader tractor to fix this problem!!!
|
|
Tbone95
Orange Level Access
Joined: 31 Aug 2012
Location: Michigan
Points: 11388
|
Post Options
Thanks(0)
Quote Reply
Posted: 12 Mar 2019 at 2:26pm |
|
If you have a helper, keeping the whole thing heated with a rose bud while you're welding and building up that thin area, and let it cool very slowly by burying it in sand (hot sand if you can rig it up), it should not crack.
|
|
Macon Rounds
Orange Level
Joined: 18 Feb 2010
Location: Pittsburgh Pa
Points: 2054
|
Post Options
Thanks(0)
Quote Reply
Posted: 12 Mar 2019 at 3:10pm |
I have had them break when operators consistently run them up against the stop.
|
|
The Allis "D" Series Tractors, Gravely Walk behind Tractors, Cowboy Action Shooting !!!!!!! And Checkmate
|
|
Macon Rounds
Orange Level
Joined: 18 Feb 2010
Location: Pittsburgh Pa
Points: 2054
|
Post Options
Thanks(0)
Quote Reply
Posted: 12 Mar 2019 at 4:00pm |
Here is another option: Brass or brazing is typically as strong as the original cast material ... I once saw a machinist / welder, brazing a broken drive sprocket on a bull dozer. until I did some research I thought he was crazy. Why Choose BrazingFirst, a brazed joint is a strong joint. A properly-made brazed joint (like a welded joint) will in many cases be as strong or stronger than the metals being joined. Second, the joint is made at relatively low temperatures. Brazing temperatures generally range from about 1150°F to 1600°F (620°C to 870°C). Most significant, the base metals are never melted. Since the base metals are not melted, they can typically retain most of their physical properties. And this “integrity” of the base metals is characteristic of all brazed joints, of thin section as well as thick-section joints. Also, the lower heat minimizes any danger of metal distortion or warping. |
|
The Allis "D" Series Tractors, Gravely Walk behind Tractors, Cowboy Action Shooting !!!!!!! And Checkmate
|
|
Mike Kroupa
Orange Level
Joined: 02 Oct 2009
Location: pierce, ne
Points: 335
|
Post Options
Thanks(0)
Quote Reply
Posted: 12 Mar 2019 at 4:45pm |
|
My neighbor's 180 did the same thing. If the arm contacts the stop and there is stroke left in the cylinder it will break it every time. Good Luck, Mike
|
|
CTuckerNWIL
Orange Level

Joined: 11 Sep 2009
Location: NW Illinois
Points: 22807
|
Post Options
Thanks(0)
Quote Reply
Posted: 12 Mar 2019 at 5:27pm |
 Tbone95 wrote: Tbone95 wrote:
If you have a helper, keeping the whole thing heated with a rose bud while you're welding and building up that thin area, and let it cool very slowly by burying it in sand (hot sand if you can rig it up), it should not crack. |
Not everyone that welds, knows how to do it right, by preheating, post heating and slow cooling. We had a barrel split long ways at the shop. Anything cast that needed welding was buried in charcoal in the barrel to pre heat, then buried in warm sand to cool off for as long as it took.
If I was going to use that welded one, I would want at least another 1/4 inch of material added to the outside.
Edited by CTuckerNWIL - 12 Mar 2019 at 5:27pm
|
|
|
|
DougG
Orange Level
Joined: 20 Sep 2009
Location: Mo
Points: 7943
|
Post Options
Thanks(0)
Quote Reply
Posted: 12 Mar 2019 at 7:17pm |
|
Hhhhmmm if this 180 in the second last response has this problem every time it hits the stop, something is not adjusted right , in my opinion
Edited by DougG - 13 Mar 2019 at 4:22am
|
|
DaveKamp
Orange Level Access
Joined: 12 Apr 2010
Location: LeClaire, Ia
Points: 5637
|
Post Options
Thanks(0)
Quote Reply
Posted: 13 Mar 2019 at 8:28pm |
So... loaders are a tough thing. This arm broke for two reasons... first... there's too damned little metal in there... second, the stress is totally concentrated on the weakest point. A loader puts more strain on, because you're turning a steering wheel while the tires are heftly planted. IF you were to make a stronger steering arm, the next thing that would happen, is that you'll twist off the keyed shaft. The DESIGN is the biggest problem here... and I addressed this substantially when dealing with my little Cub Cadet loader... and I'll be dealing with it same way on Schwartz (my WD-based TL) The REAL solution, is to build a better spindle/knuckle design, where the steering arms are physically PART OF the knuckle... I'm all out of photo space, so I can't post 'em here, but they're probably posted on the Cub Cadet forums of years ago. If you want a stout loader steering system that will NOT break, setting it up so that steering forces originate from hydraulic cylinders mounted TO the axle beam, and acting on the knuckles directly... but you probably don't think that's such a fun task... but I'll assure you from experience... it's the ONLY way to do it right. 
|
|
Ten Amendments, Ten Commandments, and one Golden Rule solve most every problem. Citrus hand-cleaner with Pumice does the rest.
|
|
BigGuy1000
Bronze Level
Joined: 06 Dec 2013
Location: NWIL
Points: 107
|
Post Options
Thanks(0)
Quote Reply
Posted: 15 Mar 2019 at 4:48pm |
What is the correct toein setting for this tractor??? The operators manual does not tell!! We currently have 1/8 in toein, measured at the fat part of the tire and at wheel center level. It was toe out before, about 1/2 in. so we changed it and guessed at the setting, hope that this works!
|
|
DrAllis
Orange Level Access
Joined: 12 Sep 2009
Points: 19477
|
Post Options
Thanks(0)
Quote Reply
Posted: 15 Mar 2019 at 4:53pm |
|
That should work.
|
|


