190XT 3pt Lift Link Repair Problem
Printed From: Unofficial Allis
Category: Allis Chalmers
Forum Name: Farm Equipment
Forum Description: everything about Allis-Chalmers farm equipment
URL: https://www.allischalmers.com/forum/forum_posts.asp?TID=163508
Printed Date: 27 Jul 2025 at 9:30am
Software Version: Web Wiz Forums 11.10 - http://www.webwizforums.com
Topic: 190XT 3pt Lift Link Repair Problem
Posted By: calico190xt68
Subject: 190XT 3pt Lift Link Repair Problem
Date Posted: 09 Aug 2019 at 8:54am
|
I am trying to replace the welded version of the lift link with my new lift link that will adjust as shown in the picture. After pounding for about 20 minutes, I finally got the pin out of the hole that holds the screw to the collar handle. It looks like the screw part is completely rusted together though on that ball joint collar so this may also take some significant time to remove. I am looking for advice on how best to remove this screw from the collar? There isn't any way that they made that screw and collar as one piece on early 190XTs? Mine is a around 1967-1968. Anybody taken one of these apart? It dawned on me that I am going to have to saw off the screw part above the cast iron part since it is welded. I think, normally, you would unscrew the cast iron piece and push the screw part out of the collar, but I can't. So mine is a little more of a problem than normal. The new part does not have grease fitting threads. Do I need to cut threads or will a grease fitting cut it's own threads for a Zerk fitting? Never had to deal with that before. Any help or ideas are appreciated! 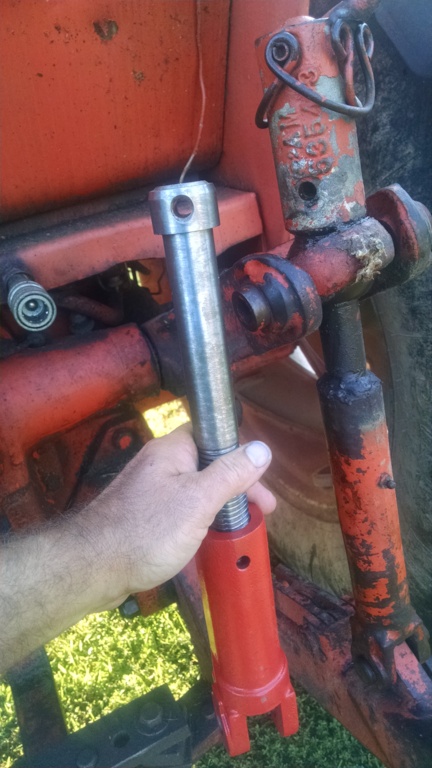 ------------- 80 7010, 80 7020. 67 190XTD Series I w/500 Loader, AC 2000 Plow, Member Indiana A-C Partners, Member TAC |
Replies:
Posted By: Alvin M
Date Posted: 09 Aug 2019 at 9:24am
| Cut Off Shaft You Can Use Tap In Grease Fitting |
Posted By: SteveM C/IL
Date Posted: 09 Aug 2019 at 10:05am
| Torch it off just above the weld. You could likely saw it just below the weld and have a useable lower threaded piece....maybe not. |
Posted By: calico190xt68
Date Posted: 09 Aug 2019 at 11:44am
|
That's not a bad idea. Cutting it off below the weld might allow it to work. I noticed that the new cast iron piece is significantly smaller than the old one. I was going to buy a matching one for the other side once I got this one installed, but wouldn't have to do that if I could if resurrect the old one. I was going to use a reciprocating saw so might take my time and make a cleaner cut to save it. The negative is that I will have to cut twice to remove the weld bead from shaft. Thanks for the idea. ------------- 80 7010, 80 7020. 67 190XTD Series I w/500 Loader, AC 2000 Plow, Member Indiana A-C Partners, Member TAC |
Posted By: SteveM C/IL
Date Posted: 09 Aug 2019 at 12:27pm
| I would guess the owner broke (somehow) the threaded part and just welded it together. The old screw may be in there and might be ok other than rusted in meaning if you could remove it,you'd have a useful piece. You have to make the top cut either way. |
Posted By: Joe(TX)
Date Posted: 09 Aug 2019 at 12:43pm
|
Most likely the threads in the lower part are striped. Most replacements have a different thread than the original ones. ------------- 1970 190XT, 1973 200, 1962 D-19 Diesel, 1979 7010, 1957 WD45, 1950 WD, 1961 D17, Speed Patrol, D14, All crop 66 big bin, 180 diesel, 1970 170 diesel, FP80 forklift. Gleaner A |
Posted By: SteveM C/IL
Date Posted: 09 Aug 2019 at 1:15pm
| Joe may have nailed it. That would explain weld better than a break. |
Posted By: Allis_Cooper
Date Posted: 10 Jan 2022 at 5:23pm
|
But I'm still curious as to how the ball joint collar comes out? Is it a strange pin of sorts? Does it have to be cut off on either side of the collar? In other words, if you wanted to install a more generic lift link and had to remove this 'collar', what do you do? |
Posted By: MACK
Date Posted: 10 Jan 2022 at 8:07pm
| Cut it off above the weld, remove the top pin, and it will all come out the top. Next step, throw what is left in junk pile because that is what is left of old link. MACK |
Posted By: rw
Date Posted: 10 Jan 2022 at 8:07pm
|
To get the swivel ball out of its yoke there are round hollow collars (item 14) bit like universal joints that drive in from each side. https://parts.agcocorp.com/en_US/apbsearch?q=agcoallis/79001625/l&name=190+%2F+190XT+%2F+190XT+III+TRACTOR" rel="nofollow - https://parts.agcocorp.com/en_US/apbsearch?q=agcoallis/79001625/l&name=190+%2F+190XT+%2F+190XT+III+TRACTOR #
https://parts.agcocorp.com/en_US/apbsearch?q=agcoallis/79001625/l&name=190+%2F+190XT+%2F+190XT+III+TRACTOR#%20" rel="nofollow - https://parts.agcocorp.com/en_US/apbsearch?q=agcoallis/79001625/l&name=190+%2F+190XT+%2F+190XT+III+TRACTOR#
Check this second picture out. The threaded link in your hand drops in from the top after you remove the roll pin that goes through the adjuster handle. Hack Saw the old threaded shaft in two and press/drive it out of the swivel ball. probably going to need some help from a torch to get it through the ball. |
Posted By: Mikez
Date Posted: 10 Jan 2022 at 9:17pm
|
yup cut it above weld. Top part will go up out of top. Unscrew the new one and drop it down through ball an socket. Then the top handle pins back to top. And bottom part pins to your 3pt arm. |