7080 dual PTO install
Printed From: Unofficial Allis
Category: Allis Chalmers
Forum Name: Farm Equipment
Forum Description: everything about Allis-Chalmers farm equipment
URL: https://www.allischalmers.com/forum/forum_posts.asp?TID=113779
Printed Date: 14 Apr 2026 at 6:01am
Software Version: Web Wiz Forums 11.10 - http://www.webwizforums.com
Topic: 7080 dual PTO install
Posted By: LB0442
Subject: 7080 dual PTO install
Date Posted: 25 Oct 2015 at 9:01pm
All the implements I have are 540 so I decided to convert my latest purchase, 7080, to dual 540/1000 PTO.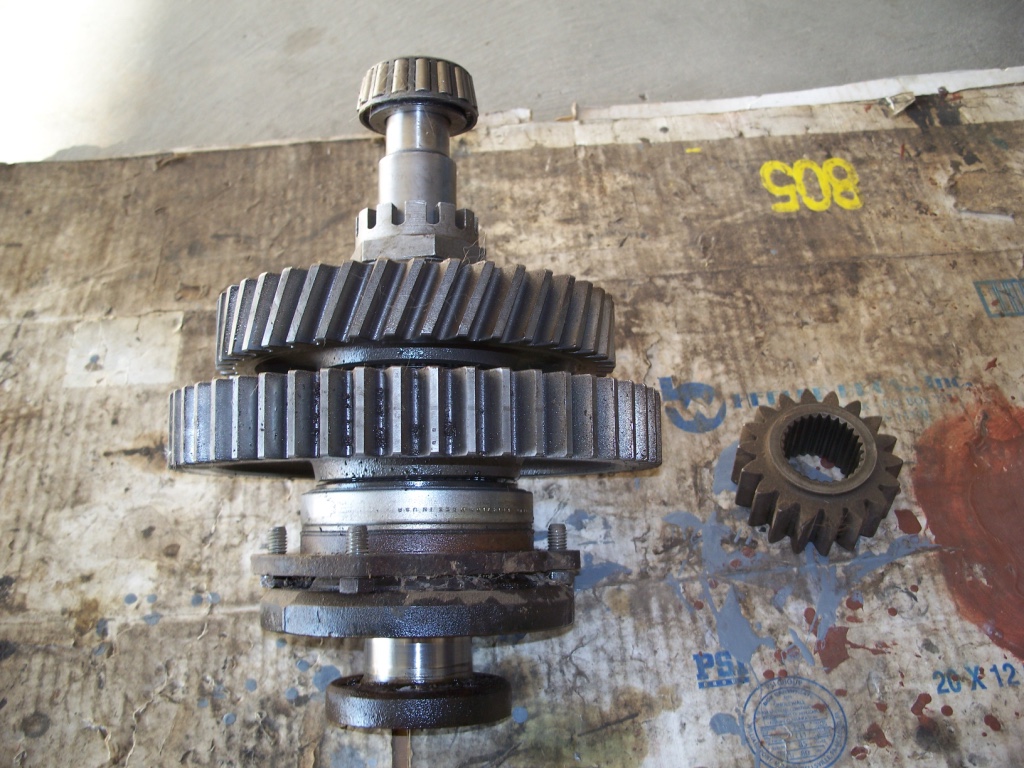 This is what I got at the junkyard, I pulled it out of a 7045 rear end. They were nice enough to flip it upside down which made it awesome to pull out. 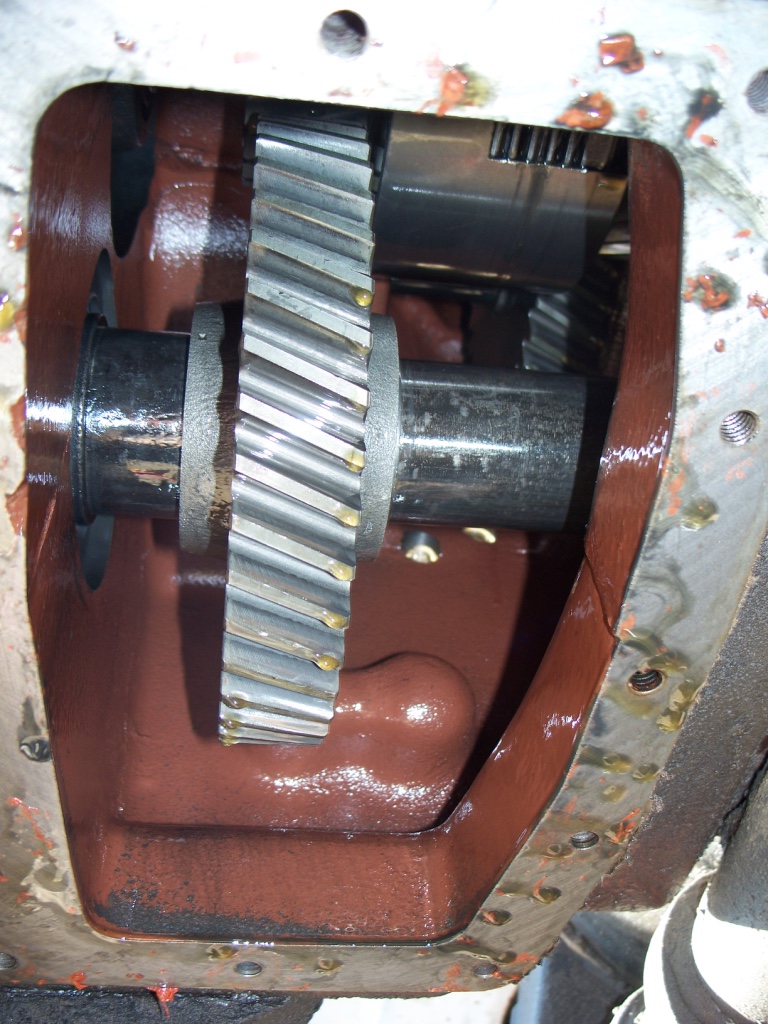 This is what it looks like with the lower plate pulled, you can see this shaft is just made for the 1000 gear. 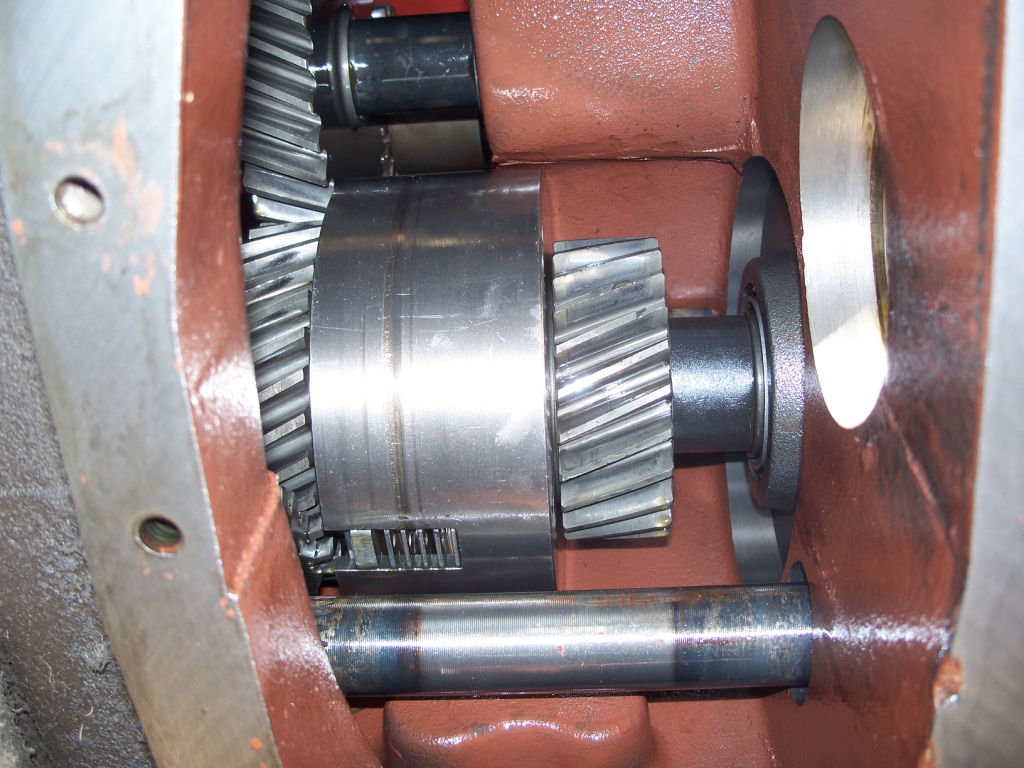 This is a shot of the clutch pack just above the previous shaft asm. It has the spacer installed on the right of the picture instead of a 540 gear. 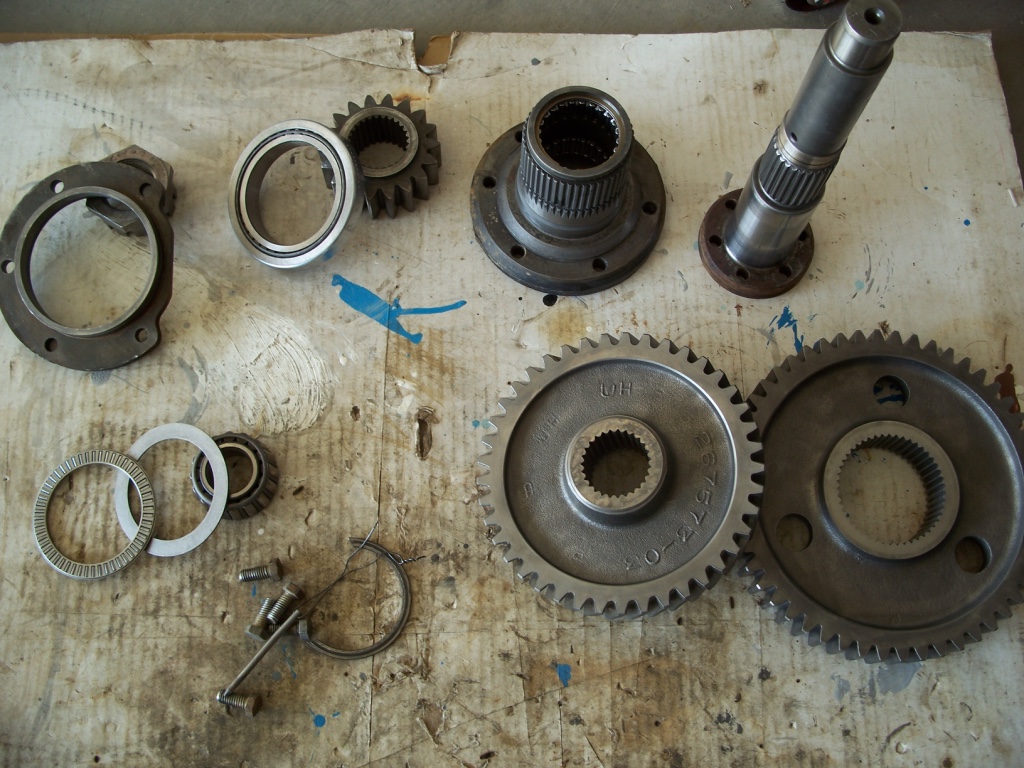 I decided to dismantle everything to clean and reseal. This is the lower shaft asm. 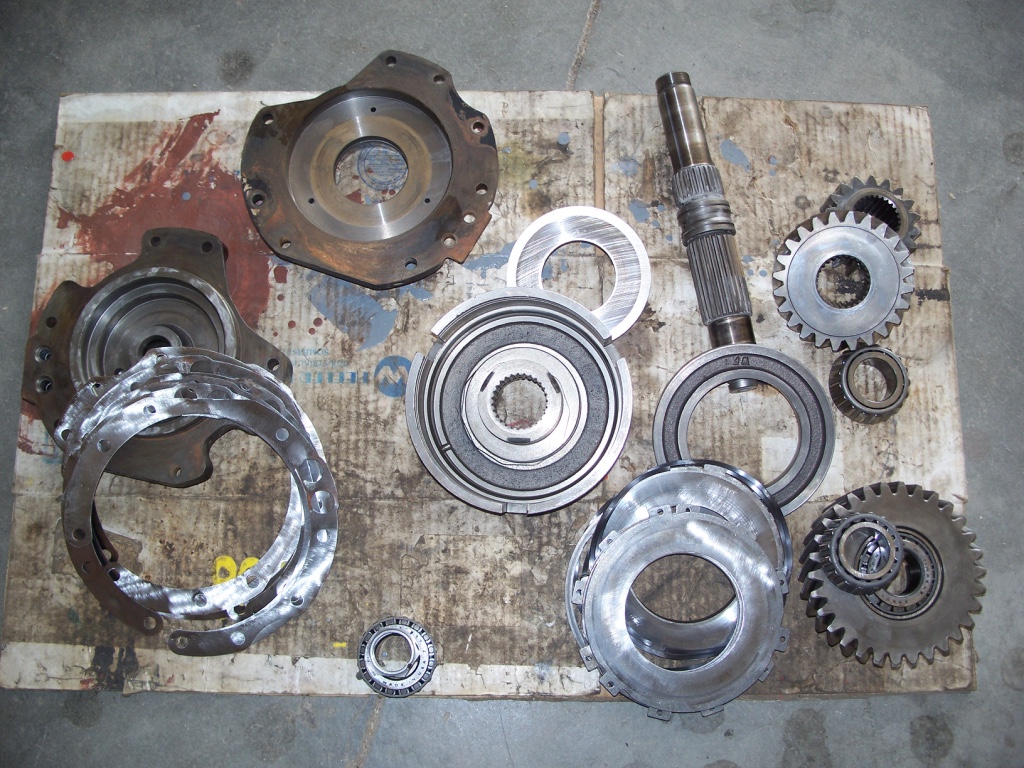 This is the clutch pack asm. 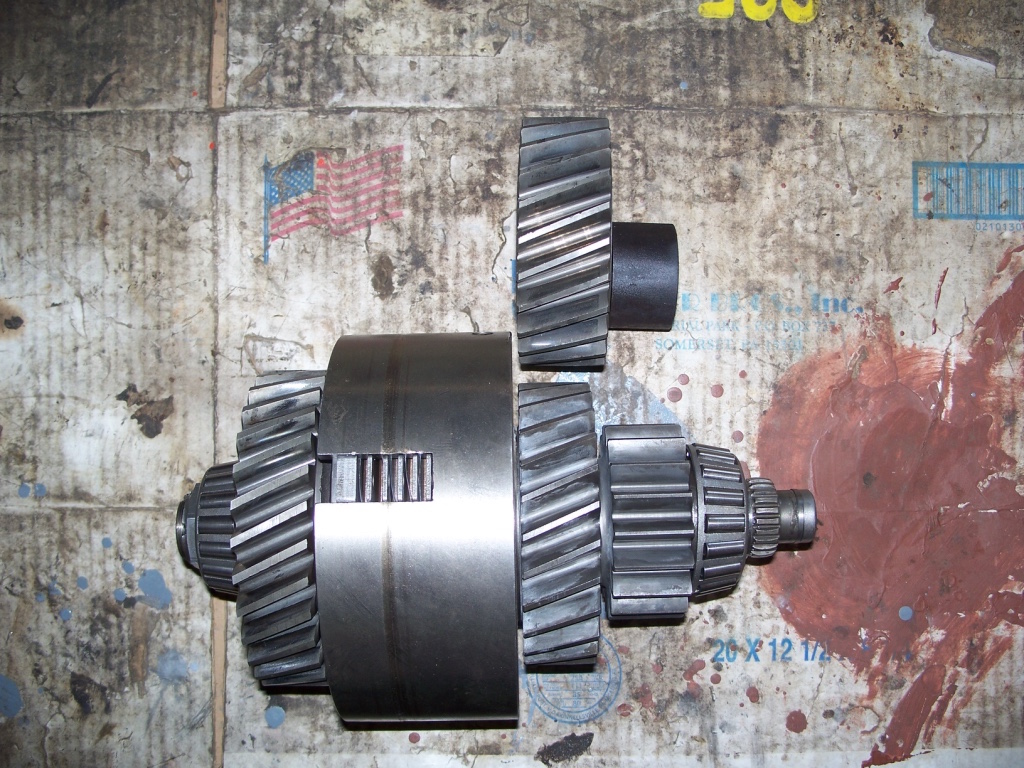 This is where I ran into a little issue. I went to put the junkyard gear on the clutch pack and it was a no go. The original 1000 gear and spacer is on top, you can see it is about .250 wider than I can get on the shaft. So back to the junkyard I go, guess I should have looked at the parts book a little closer, remember in addition to the parts in the first picture you need the additional gear on the end of the clutch pack. The FSM says to set the preload on the clutch pack bearing set to 5-10 inch pounds, I tried to go with the lower end as they are used bearings, came out to 7 inch pounds. 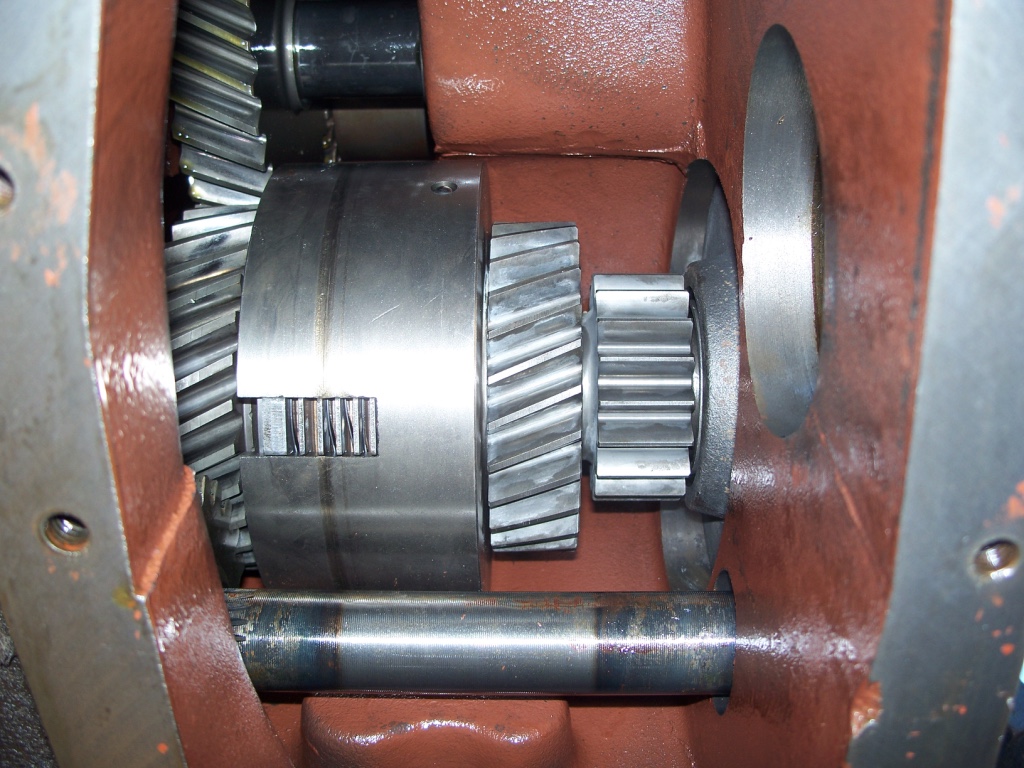 This is the new clutch pack setup installed. That mark on the housing must have been from a previous repair(had red silicone on the lower plate) I didn't find any evidence as to where it came from. I took apart both the pistons, clutches, all looked good. I reseal the pistons as I like to make sure everything is good to go. The apply piston is teflon seals and the brake piston is cast rings. I have to say they looked perfect, but I figured it didn't cost much for seals. 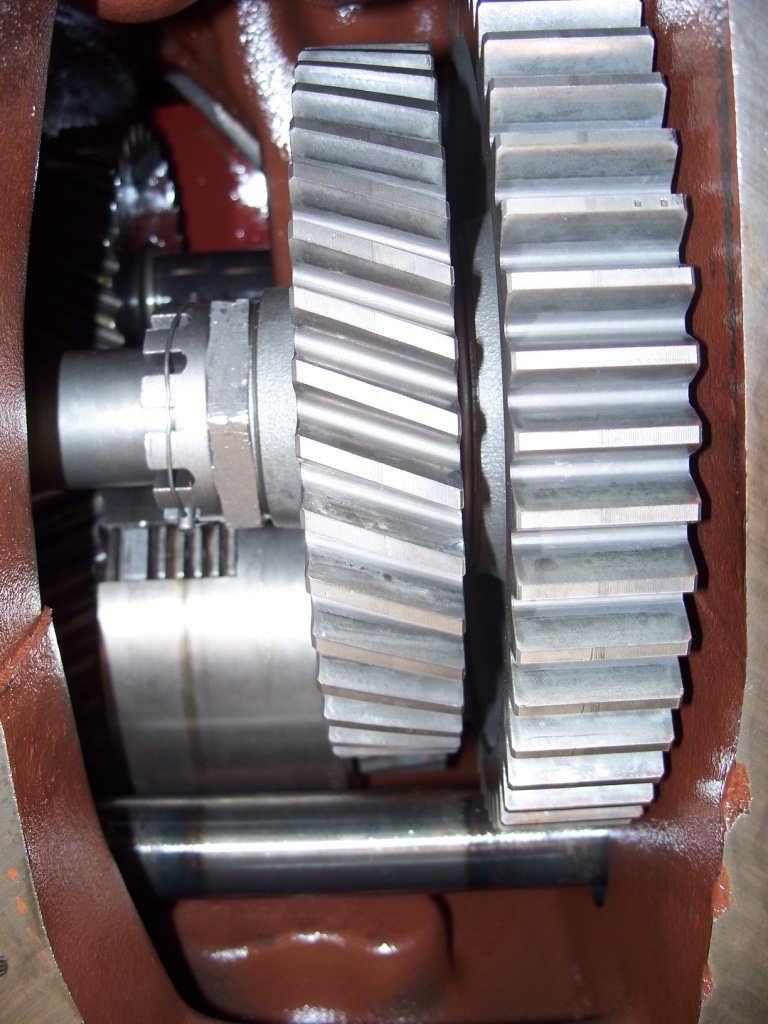 This is the lower shaft asm installed. The FSM says to set it to 20 inch pounds more than the nominal turning torque. My dial type wrench only goes to 150in lbs and it maxed it out so the next bigger one I have is digital and that was difficult to get a correct turning torque, got it narrowed down to 185in lbs turning. I then tightened it up to an additional 20 in lbs. If I was going to do any more of these I would get a 250-300 in lb DIAL torque wrench. I changed the 2 axle filters filled it up, works perfect, nice and quiet. I know this is a long post, but everyone likes pictures and it does come up time to time about how to do this.
|
Replies:
Posted By: CAL(KS)
Date Posted: 25 Oct 2015 at 9:17pm
|
excellent post with pictures and descriptions. this should be made into a sticky for all to see what is necessary when converting 1000 only to dual pto ------------- Me -C,U,UC,WC,WD45,190XT,TL-12,145T,HD6G,HD16,HD20 Dad- WD, D17D, D19D, RT100A, 7020, 7080,7580, 2-8550's, 2-S77, HD15 |
Posted By: LB0442
Date Posted: 25 Oct 2015 at 10:06pm
|
This is the parts list I used for this project. 70226012 Diff drain plug gaskets 70244461 PTO brake clutch end seal 70927925 PTO brake clutch inner cover oring 70923596 PTO brake clutch outer cover oring 70923663 PTO lines to outer clutch cover orings (2) 70925310 PTO shaft housing oring 70261957 PTO shaft large outer seal (dual 540/1000) 70928737 PTO shaft inner seal (dual 540/1000) 70923933 PTO clutch housing shaft orings 70253453 PTO clutch piston inner seal 70248064 PTO clutch piston outer seal 70267622 PTO brake clutch piston inner seal 70267623 PTO brake clutch piston outer seal |
Posted By: Ron(AB)
Date Posted: 25 Oct 2015 at 11:25pm
|
Very Helpful! I have this on my "to do" list on a 8070. Thanks again. |
Posted By: aras
Date Posted: 26 Oct 2015 at 9:26am
| Well done!!! |
Posted By: Kevin in WA
Date Posted: 26 Oct 2015 at 10:47am
| Pretty sure the tooth count on that 7080 clutch pack gear is different also. |
Posted By: charlesbendal
Date Posted: 11 Sep 2016 at 7:17pm
|
is their any way to get the pictures back up on this post i would love to see it |
Posted By: shameless (ne)
Date Posted: 11 Sep 2016 at 10:53pm
| me too...can't see the pics |
Posted By: Orange Blood
Date Posted: 11 Sep 2016 at 11:01pm
|
The only way, would be for the original poster to upload them again, using the same file names. This happens anytime someone purges old pictures as there is a limit to how much we can have uploaded at any one time. ------------- Still in use: HD7 WC C CA WD 2-WD45 WD45LP WD45D D14 3-D17 D17LP 2-D19D D19LP 190XTD 190XTLP 720 D21 220 7020 7030 7040 7045 3-7060 Projects: 3-U UC 2-G 2-B 2-C CA 7-WC RC WDLP WF D14 D21 210 7045 N7 |
Posted By: LB0442
Date Posted: 12 Sep 2016 at 9:29am
| Like was said before you have to delete old photos before posting new ones. I understand their server space is limited for storage. I have them on the computer and will get them posted tonight. |
Posted By: LB0442
Date Posted: 12 Sep 2016 at 8:20pm
Well I re uploaded the pictures, looks like they are there. Of course I had to delete some others to do it, oh well. Here is one more I had that was not on the original post.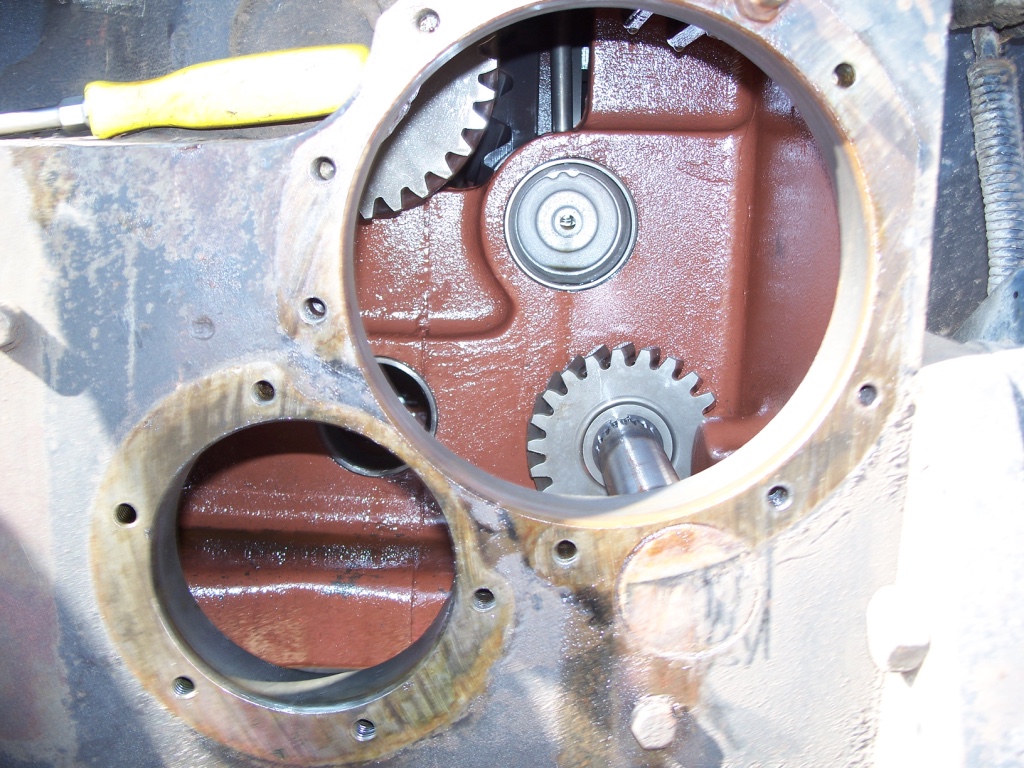 Just the back half, empty.
|
Posted By: LB0442
Date Posted: 12 Sep 2016 at 8:22pm
| It is still working great, no leaks and quiet. |
Posted By: Tcmtech
Date Posted: 12 Sep 2016 at 9:04pm
|
I did the same conversion to our 7050 by swapping the 7050's 1000 RPM single speed with the dual speed PTO and clutch from our 8030 that just does loader work. Worked great all winter until I got into baleing this summer and somehow that pin that holds the crown nut in place broke in half and came out so I had to go back in and replace it.  Back when I did my swap I drilled and tapped the bottom access plate so that I had a drain plug there. That made the going in and replacing the two seals and pin (8 or 10ga cotter pin now) so much cleaner faster and easier to do!
|
Posted By: charlesbendal
Date Posted: 13 Sep 2016 at 11:28am
| This is a fantastic post does anyone have an estimate on what the parts would cost from a salvage yard? |
Posted By: LB0442
Date Posted: 13 Sep 2016 at 4:48pm
| It's been about a year since I did this. The salvage yard I got the parts from was getting ready to be sold and I knew the owner fairly well so he let me pull the parts myself and charged me $400. I'm pretty sure that was a better deal that normal. The seals/filters from agco were about $300 if I remember correctly. |
Posted By: LB0442
Date Posted: 20 Jun 2017 at 9:46am
| I had a request to repost these pictures. They had been deleted due to space limitations on the server. Last time I saved them in it's own folder so it was a little quicker. Is there any way to put this in the knowledge section? Just a thought as I have gotten quite a few questions on it from time to time. |
Posted By: chadn
Date Posted: 20 Jun 2017 at 4:53pm
|
Thanks for posting the pics. Makes it easier to follow. So what I am seeing is, you used your 7080 rear end. 7045 guts inside. I see the 5 bolt pattern on the housing, correct. Looks like I need to hunt down a clutch pack assembly and lower shaft assembly. 7020 thru 7050 would work ? |
Posted By: LB0442
Date Posted: 20 Jun 2017 at 7:04pm
| I believe you can use parts from 7010 thru 7060, and 8010 thru 8050. There are some good people here that should be able to confirm or correct that. It makes the tractor much more useful for my operation, had no problems with it since I changed it over. |
Posted By: Lynn Marshall
Date Posted: 20 Jun 2017 at 10:14pm
| I believe that the higher horsepower tractors used 5 friction and separator discs whereas the smaller tractors only used 4. I would be sure to use a clutch pack with the extra plates in it. They can be added to the pack by just moving the snap ring to a different groove. |
Posted By: AC720Man
Date Posted: 01 Mar 2018 at 7:30pm
|
Mmmm, sounds above my knowledge level and my equipment! Thank you so much for posting this thread. I have not had any luck with the search. I must not be doing something correct. ------------- 1968 B-208, 1976 720 (2 of them)Danco brush hog, single bottom plow,52" snow thrower, belly mower,rear tine tiller, rear blade, front blade, 57"sickle bar,1983 917 hydro, 1968 7hp sno-bee, 1968 190XTD |
Posted By: AC7060IL
Date Posted: 02 Mar 2018 at 10:44am
|
Excellent post. Thank you. I have a 77' 7040 that is leaking oil at its 540/1000 pto. I've purchased an AGCO seal kit for it. When our weather improves, I'll be tackling it. While I'm in it, is there anything else I should check? |
Posted By: Orangejbird
Date Posted: 20 Jun 2018 at 11:21am
Ours is a '76 and we need to do the same. BTT
|
 AC7060IL wrote:
Posted By: LB0442
Date Posted: 20 Jun 2018 at 9:56pm
|
If it is leaking out of that lower rear shaft area I think the biggest thing to worry about would be getting the correct turning torque on that lower assembly, the seal install is pretty basic. You certainly don't want it too loose. One of my sockets fit on the PTO shaft to put a torque wrench on. I guess you could check the large nut before you took it off and somehow put it on the same amount? I would probably get an inch pound torque wrench for an accurate measurement. Possibly there is a shortcut some more knowledgeable people on here know?
|
Posted By: LB0442
Date Posted: 20 Jun 2018 at 9:59pm
| Oh and I would use a good quality wire for that pin. Don't want that coming undone. |
Posted By: LB0442
Date Posted: 06 Oct 2019 at 9:19am
| Bump |
Posted By: tornado8070
Date Posted: 10 Feb 2020 at 4:09pm
|
Going through this process on and 8070. Have .025-.030 play on rear side of clutch between gears. Tighten nut and loose the free play in the drive gear. And ideas/help? ------------- 09’ DT205B, 08’ DT220A, 83' 8070 MFWD, 83’ 8070 85’ 8050 MFWD, 83' 8030, 82' 8010, 85’ 6080 MFWD, 84’ 6080, 79' 7020, 85' M3 RWD, 85' 920 diesel,AC C-50 forklift. |
Posted By: LB0442
Date Posted: 10 Feb 2020 at 6:36pm
| Been a while since I had one apart, if I remember the 2 gears (540 & 1000) are splined to the shaft and they butt up against a lip in the center part, then you press the bearing on then a snap ring holds the bearing. Then on the clutch pack side, clutch pack goes on then the drive gear has 2 tapered bearings in it and the large staked nut holds it on and you tighten that nut down until you get 5-10 in lbs turning torque on that gear. 10 in lbs turning torque is fairly snug so it would be a good idea to have a tool to check it. If the 2 gears that are splined on are loose, possibly the bearing is not pressed on far enough? I can post some pages from the FSM later when I get home if needed, they might be more clear than me. |
Posted By: LB0442
Date Posted: 10 Feb 2020 at 6:49pm
| Parts book is showing 2 different bearing numbers for each end of that shaft. Possibly 1 is slightly thicker allowing it to press on those gears more? I looked at my pictures and I could see I had 1 set with the staked nut but I don't remember if it looked similar to the other one. You're right I would sure want those splined gears to be on tight and not have a clearance. |
Posted By: tornado8070
Date Posted: 10 Feb 2020 at 7:59pm
|
So the stake nut only tightens that side of the assembly/clutch pack? And the snap ring holds the gears on the opposite end? Tightening the stake nut will not remove play between the 540/1000 drive sprocket.... ------------- 09’ DT205B, 08’ DT220A, 83' 8070 MFWD, 83’ 8070 85’ 8050 MFWD, 83' 8030, 82' 8010, 85’ 6080 MFWD, 84’ 6080, 79' 7020, 85' M3 RWD, 85' 920 diesel,AC C-50 forklift. |
Posted By: Unit3
Date Posted: 10 Feb 2020 at 9:22pm
|
So why was there not a reversing PTO for a small 1000 and a BIG 1000? ------------- 2-8070FWA PS/8050PS/7080/7045PS/200/D15-II/2-WD45/WD/3-WC/UC/C |
Posted By: LB0442
Date Posted: 10 Feb 2020 at 9:42pm
Yes the 2 splined gears go on one end of the shaft and the clutch pack and driven gear go on the other end. Once you get the splined gears on with the bearing and snap ring installed you press them down against that bearing, that takes up the slack there. Then on the other end you will install the clutch pack and gear and tighten that stake until you get the preload. That shaft cannot go all the way through everything as the splines stop it you have to work from each end. The center of the shaft has 2 orings for pressure flow to the clutch. Here are a few pages from the FSM might make it a little clearer.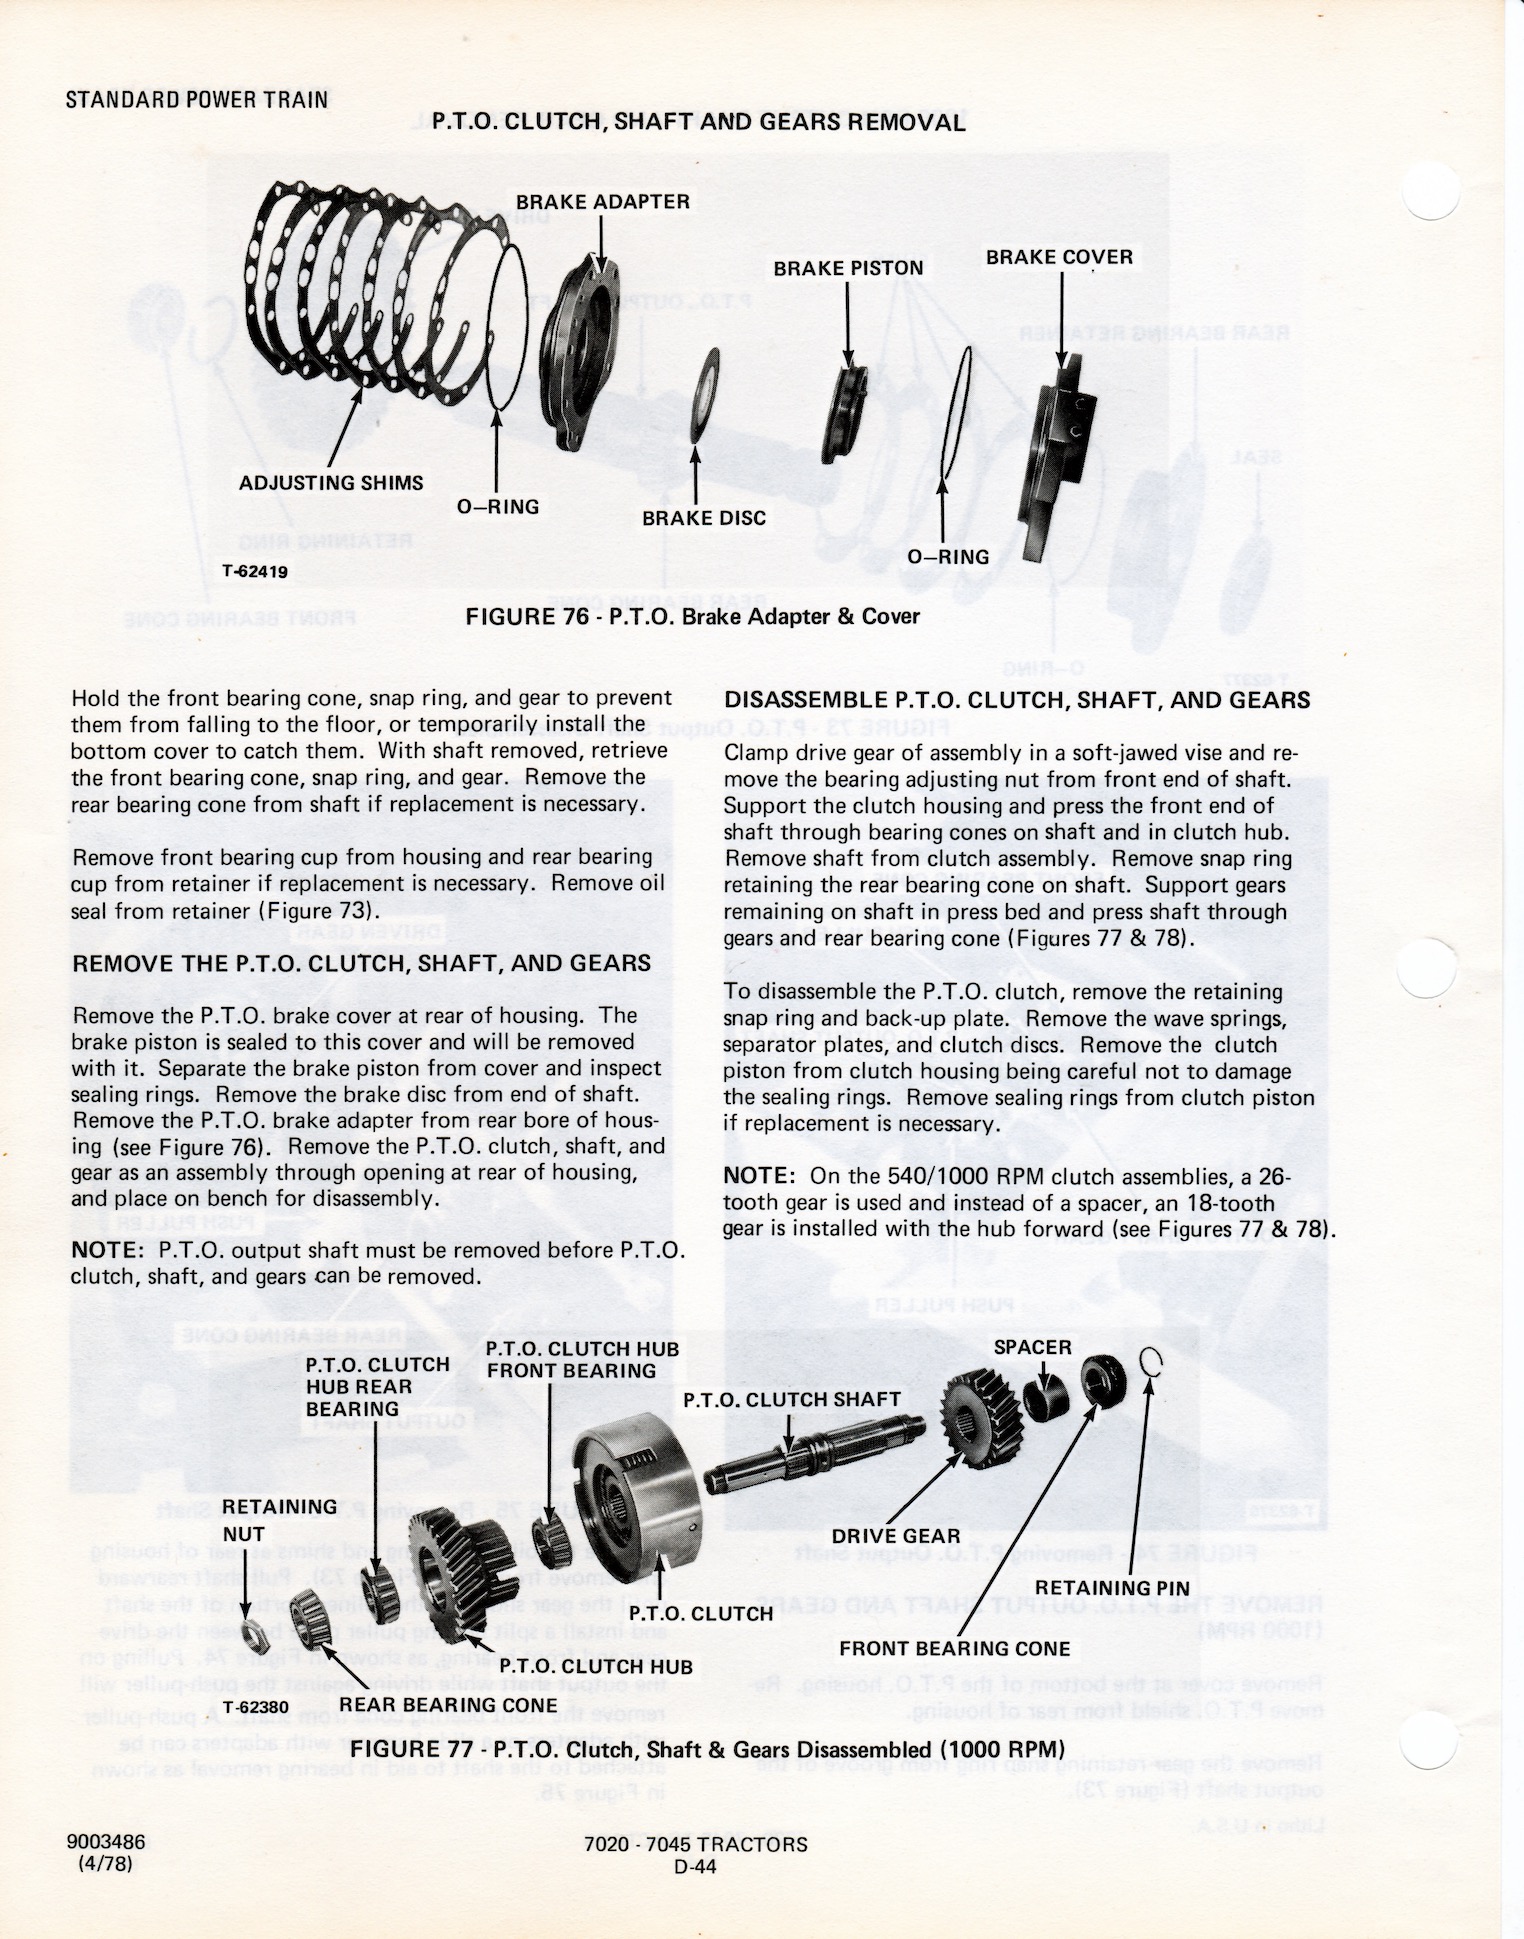 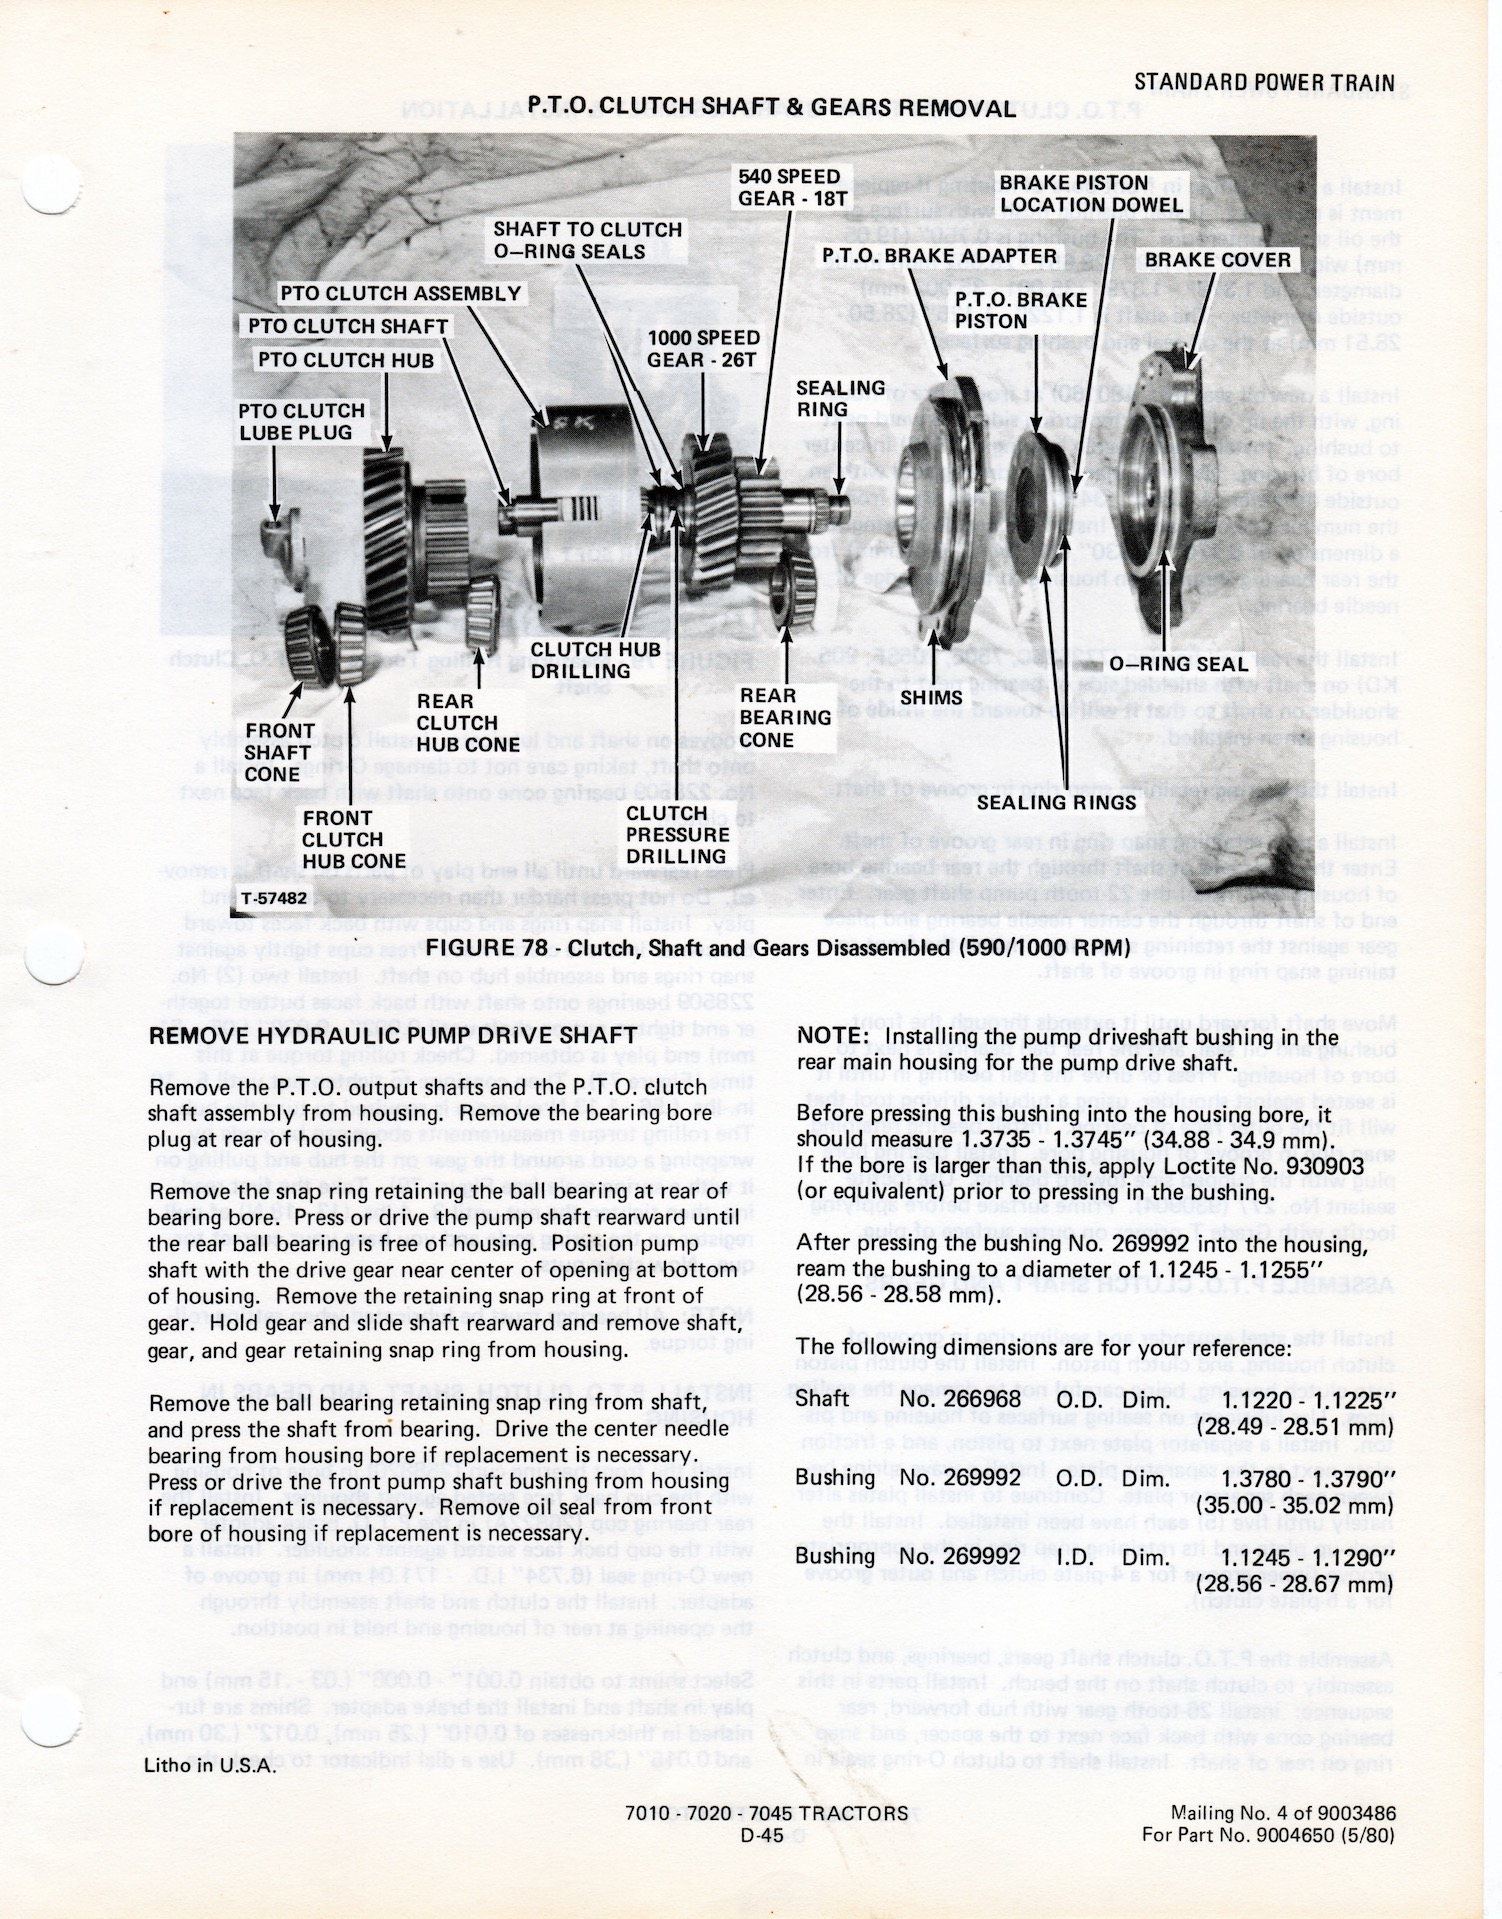 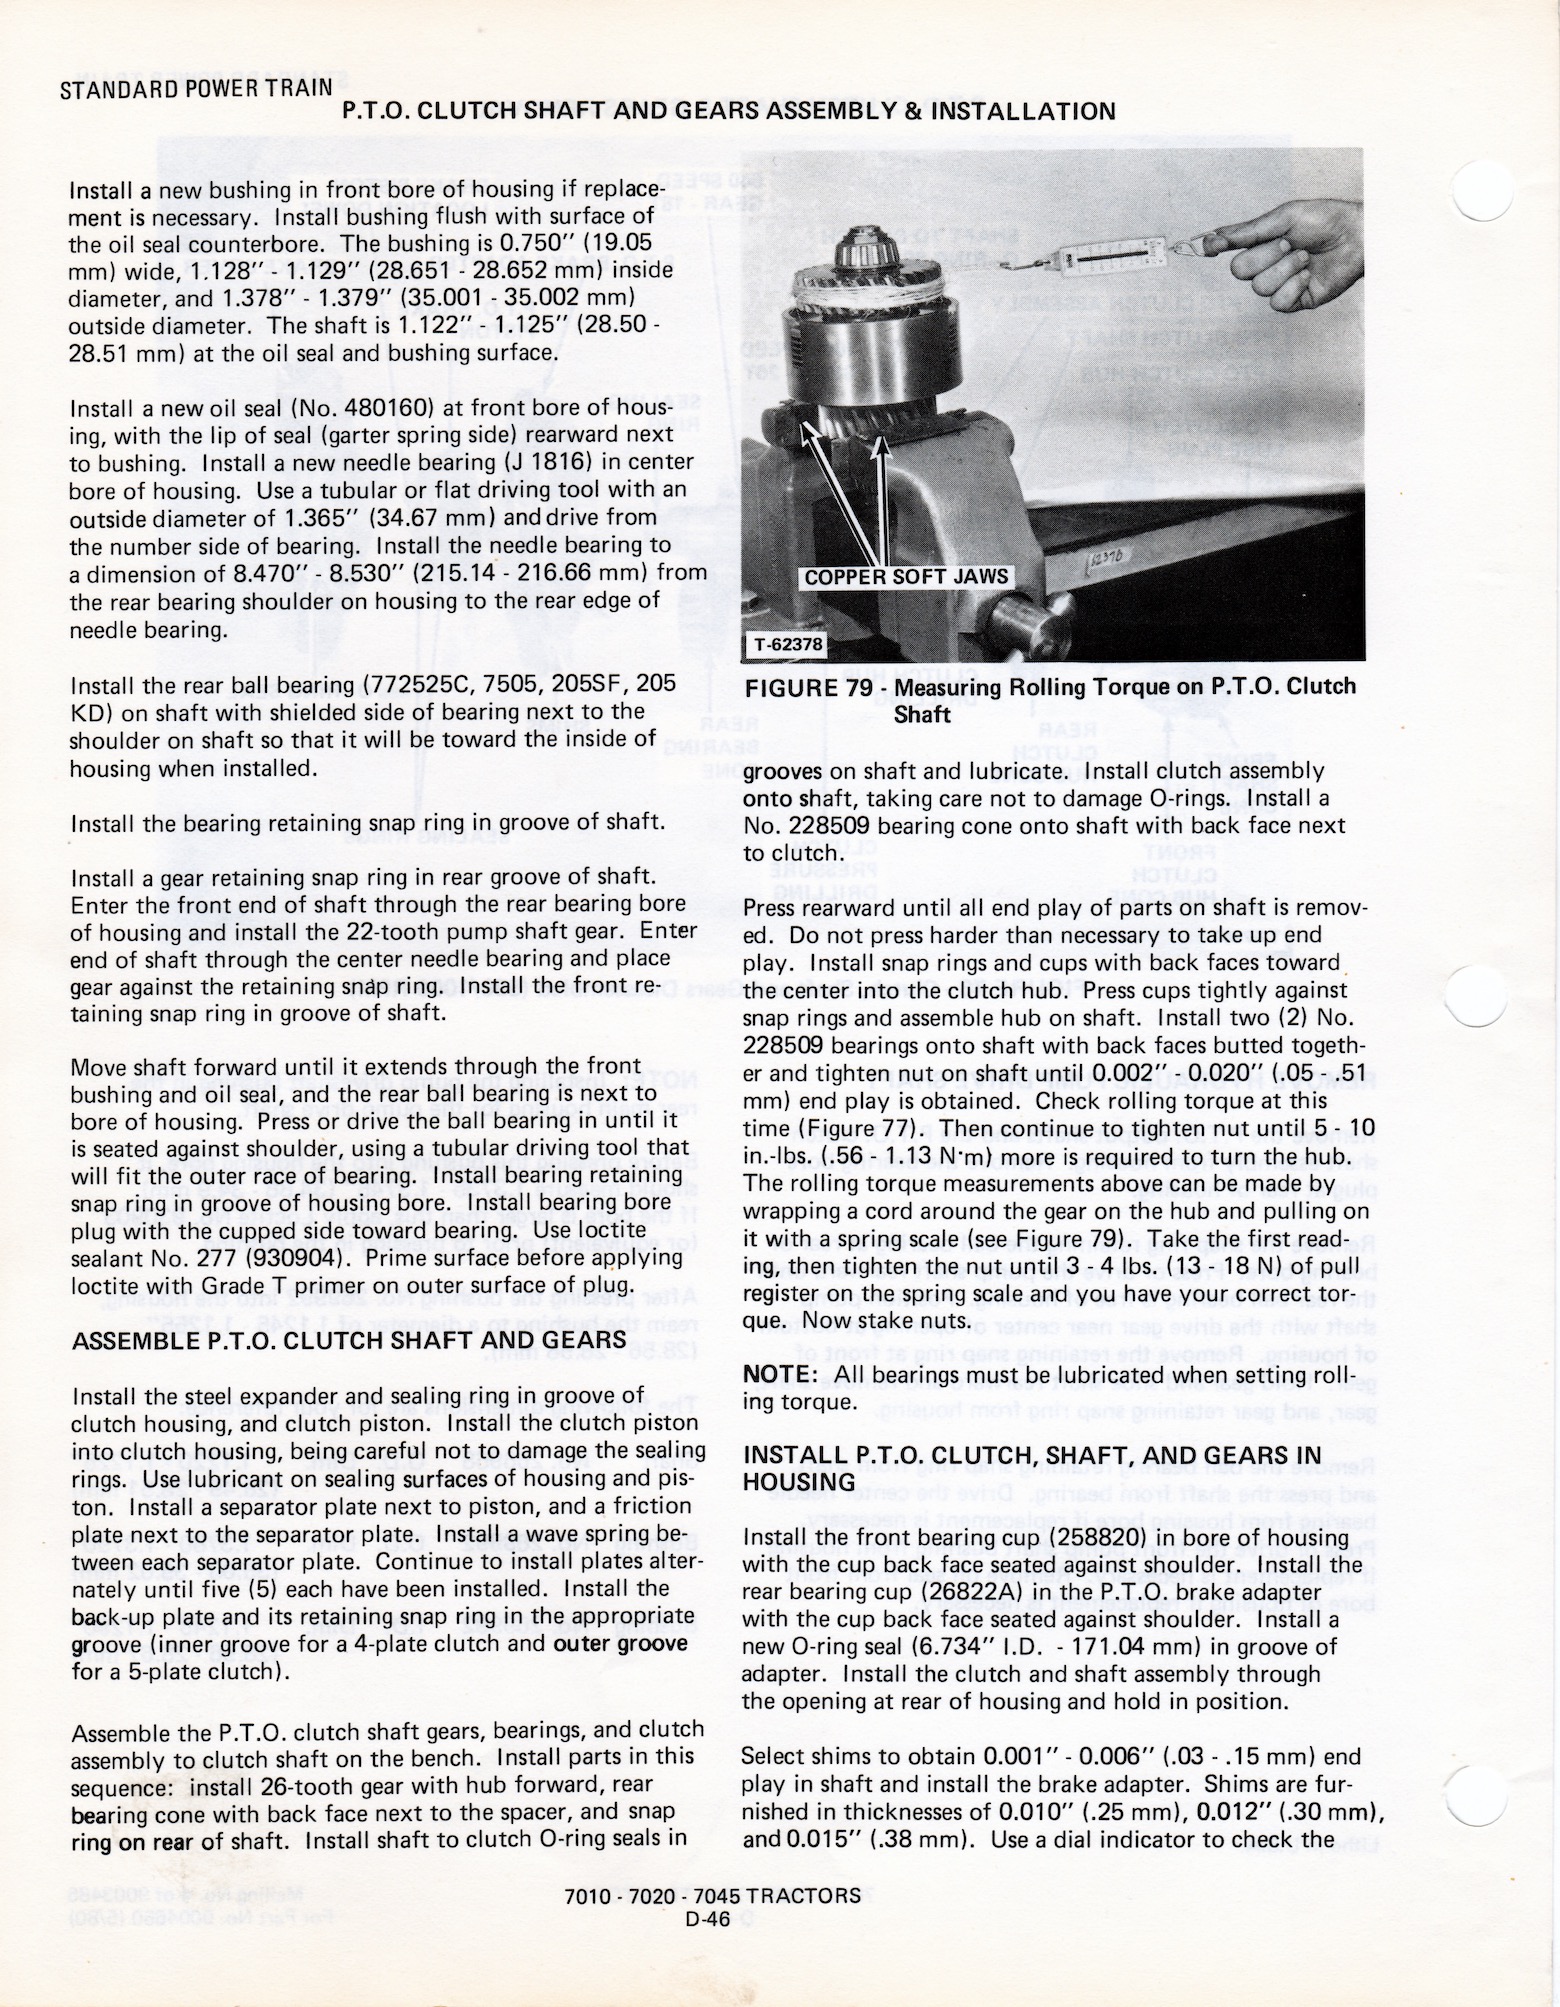 |
Posted By: tornado8070
Date Posted: 11 Feb 2020 at 6:49am
|
Thank you. This explains it better than my 8000 series service manual. And the pictures are not blurry. ------------- 09’ DT205B, 08’ DT220A, 83' 8070 MFWD, 83’ 8070 85’ 8050 MFWD, 83' 8030, 82' 8010, 85’ 6080 MFWD, 84’ 6080, 79' 7020, 85' M3 RWD, 85' 920 diesel,AC C-50 forklift. |
Posted By: PAFarmer
Date Posted: 10 Mar 2021 at 3:34pm
|
Thank you for all the effort in this. It's really a good thing to have. For what it's worth, I archived this post on the internet WayBackMachine just in case...
|