My C Restoration (Update 9 July 16)
Printed From: Unofficial Allis
Category: Allis Chalmers
Forum Name: Farm Equipment
Forum Description: everything about Allis-Chalmers farm equipment
URL: https://www.allischalmers.com/forum/forum_posts.asp?TID=102874
Printed Date: 29 Apr 2024 at 2:59am
Software Version: Web Wiz Forums 11.10 - http://www.webwizforums.com
Topic: My C Restoration (Update 9 July 16)
Posted By: Hubnut
Subject: My C Restoration (Update 9 July 16)
Date Posted: 07 Mar 2015 at 6:09am
|
My early C Kerosine-burner is rough and has had a hard life. She deserves a proper overhaul. I realize that this tractor will never be worth any more than $2000 or so, but I really like restoring tractors. She was running, but water was getting in to the crankcase somewhere--probably through a sleeve. I began the teardown. I will have many questions in the future! http://s202.photobucket.com/user/cytochromeP450/media/DSCN4542_zpsn7wya2cy.jpg.html" rel="nofollow"> 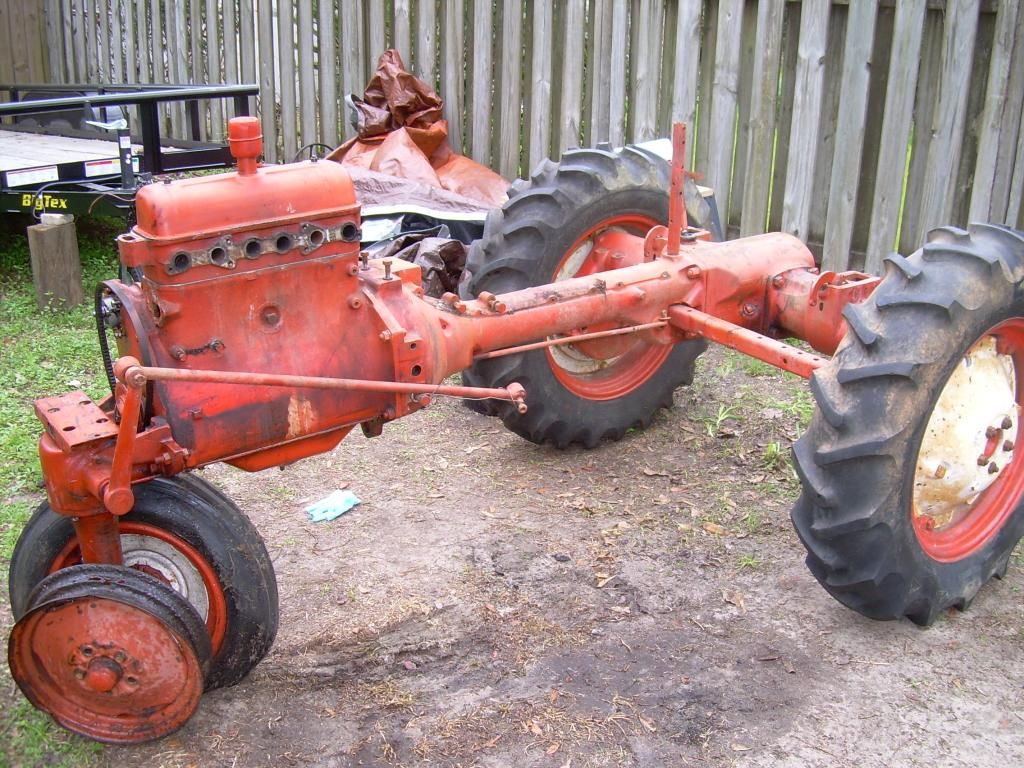 http://s202.photobucket.com/user/cytochromeP450/media/DSCN4544_zpsdv1nkvkk.jpg.html" rel="nofollow"> 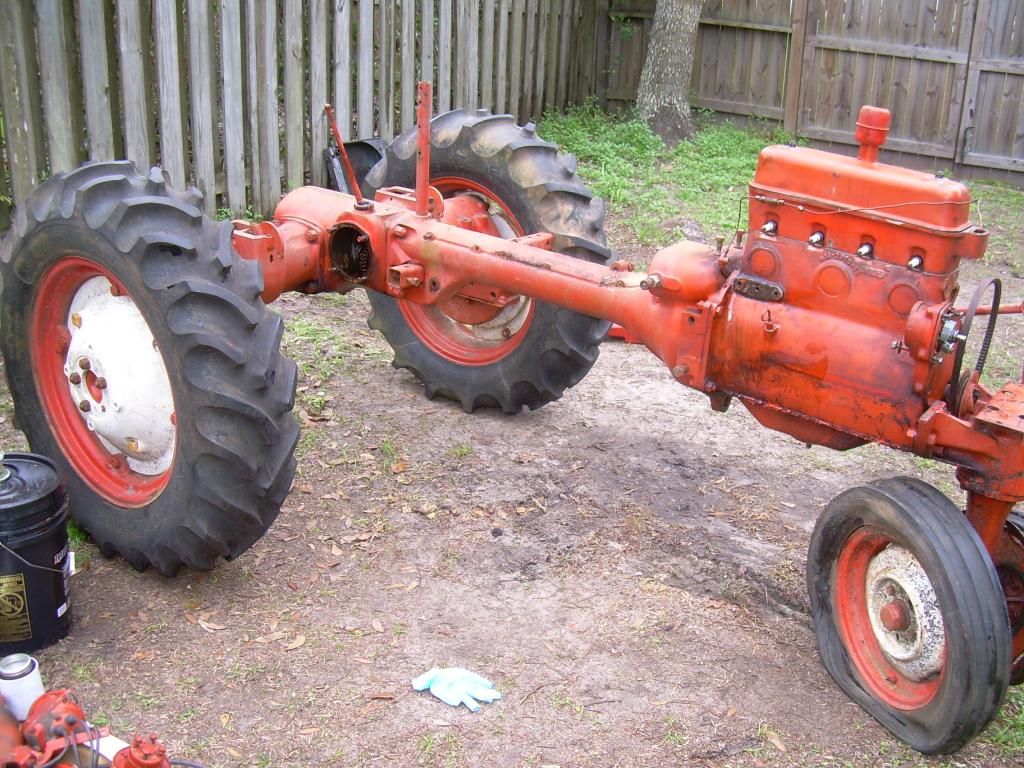 http://s202.photobucket.com/user/cytochromeP450/media/DSCN4543_zpsr1hgvkkc.jpg.html" rel="nofollow"> 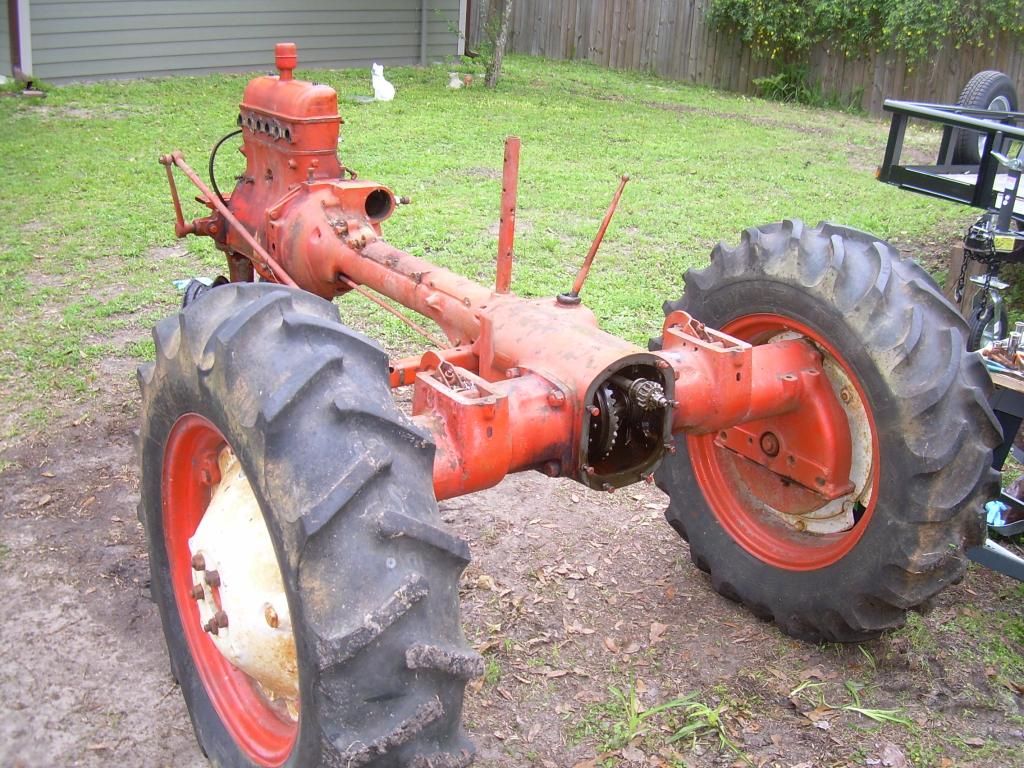 ------------- 1940 B "Lucy" 1941 B w/ Woods L59 "Flavia" 1942 B w/ finish mower "Dick" 1941 C w/ 3-point "Maggie" 1947 C SFW w/ L306 "Trixie" 1972 314H |
Replies:
Posted By: B26240
Date Posted: 07 Mar 2015 at 6:43am
| Tractor restoration does add up to some real money BUT as I tell people it's my hobby. A few years ago I had just finished a RC and drove it up to the house to show it off to the wife, she looked out the window at it and asked "how much is it worth" to which I answered "maybe $2500" she then asked "how much do we have in it" and I answered $3500. A couple years latter I sold it for $2400 so I was real close on the estimate. To me the big payout is the enjoyment of working on them, making friends who share the same interest, and satisfaction of looking/useing them after they are like new again. Keep us posted on your progress!! |
Posted By: sandman2234
Date Posted: 07 Mar 2015 at 6:48am
|
I think that the side engine weights "bolt" needs a longer bolt and a short piece of pipe to make them stay on. The short piece of pipe acts as a bushing. Tear down looks like fun! David from jax ------------- A proud member of the Allis Express movement! Northeast Florida |
Posted By: Sugarmaker
Date Posted: 07 Mar 2015 at 7:35am
|
Hey, It looks a whole lot warmer down there! Nice project you have started too. Yea don't count up the dollars as these do take on a life of there own. The first tractor I bought was a very nice gray and red Ford Jubilee. The owner bought it from a guy that said he had over $7,000 into it. I bought it for $4000 and it is a good tractor and has not needed many things. So you can buy them cheaper than you can build them. But I like to fix them also. So that's why I am here to learn about AC machines. Please keep us posted of your progress. Regards, Chris ------------- D17 1958 (NFE), WD45 1954 (NFE), WD 1952 (NFE), WD 1950 (WFE), Allis F-40 forklift, Allis CA, Allis D14, Ford Jubilee, Many IH Cub Cadets, 32 Ford Dump, 65 Comet. |
Posted By: SHAMELESS
Date Posted: 07 Mar 2015 at 8:53am
| any hobby is gonna cost ya money! |
Posted By: Stan IL&TN
Date Posted: 07 Mar 2015 at 9:36am
And if it has family history then a $2500 tractor could cost you $10000 by the time it's finished and I would consider that money well spent. Very few will get rich restoring tractors, for most of us it's a labor of love.  ------------- 1957 WD45 dad's first AC 1968 one-seventy 1956 F40 Ferguson |
Posted By: DSeries4
Date Posted: 07 Mar 2015 at 10:12am
|
You never make money doing a "proper" restoration. You do it for the love of doing it and the feeling of preserving history. You might be able to make some money doing a 30 minute paint job, but I do not consider that restored at all. ------------- '49 G, '54 WD45, '55 CA, '56 WD45D, '57 WD45, '58 D14, '59 D14, '60 D14, '61 D15D, '66 D15II, '66 D21II, '67 D17IV, '67 D17IVD, '67 190XTD, '73 620, '76 185, '77 175, '84 8030, '85 6080 |
Posted By: PaulB
Date Posted: 07 Mar 2015 at 10:58am
It will be much cheaper and much less frustrating than chasing a little white ball around a cowpasture! 
|
Posted By: Hubnut
Date Posted: 07 Mar 2015 at 5:52pm
|
Thanks for all the comments. I made some progress today. I can't get the dang the brake drums off the pinion shaft. Any suggestions. Tractor is missing a bunch of stuff and it's been ridden hard and hung up wet. May be just a parts tractor really. I need to think about it. http://s202.photobucket.com/user/cytochromeP450/media/DSCN4545_zpspgoknfsj.jpg.html" rel="nofollow"> 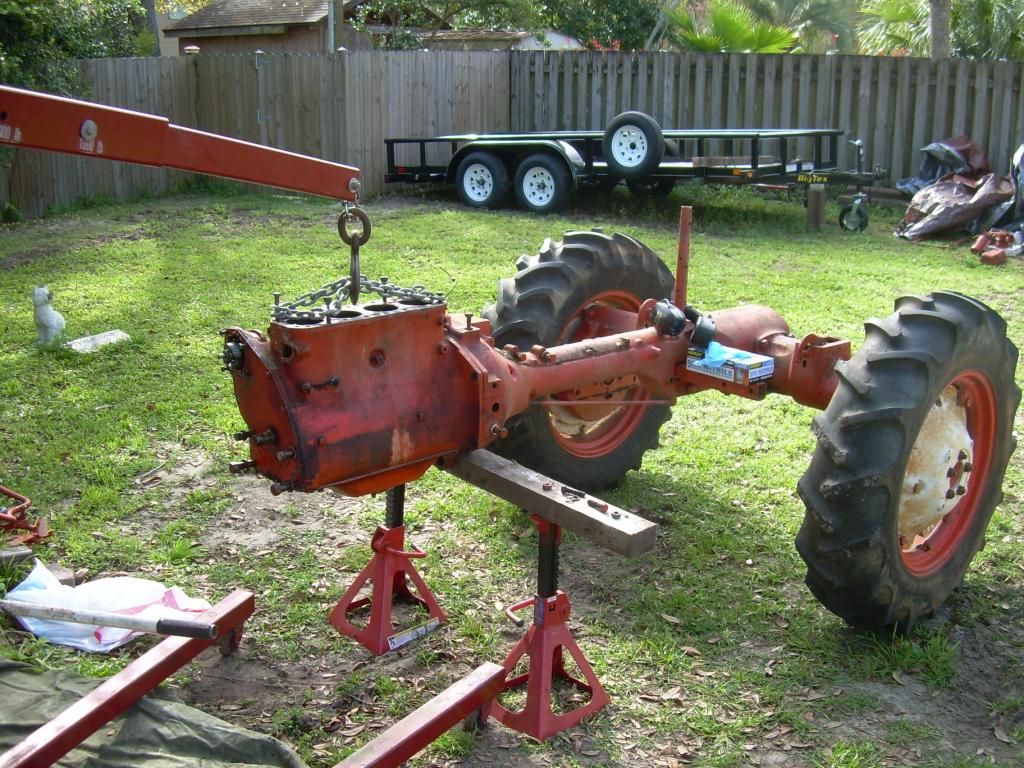 http://s202.photobucket.com/user/cytochromeP450/media/DSCN4550_zpscbang9go.jpg.html" rel="nofollow"> 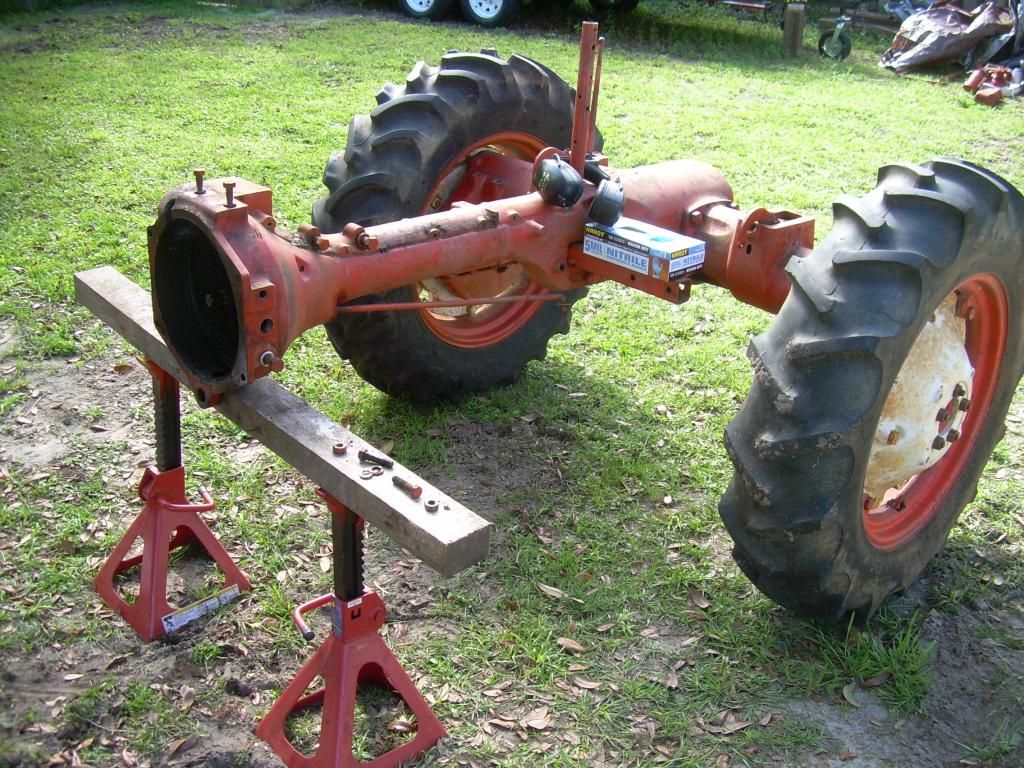 |
Posted By: PaulB
Date Posted: 07 Mar 2015 at 6:11pm
| On B & C tractors there is a set screw with a jam nut that holds the brake drums to the pinion shaft. You have to go in through the hole in the bottom of the axle housing. |
Posted By: Dick L
Date Posted: 07 Mar 2015 at 6:25pm
Like Paul said there is a setscrew you can get out from the bottom. After the set screw is out I use a hydraulic press to the shaft out. the square key takes a nice slice out of the seal but you will need to replace it anyway. It the housing was full of trash causing a lot of rust on the shaft I scale it off the best I can before pressing it out.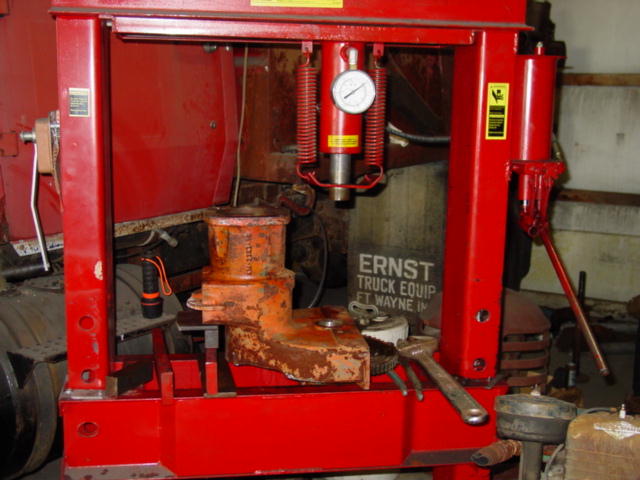
|
Posted By: Hubnut
Date Posted: 07 Mar 2015 at 7:51pm
| I'll give it another lash tomorrow. While I'm asking, how do you get the brake pivot out? I see a through hole to drive one pin out, but the pivot has no corresponding hole. |
Posted By: Dick L
Date Posted: 07 Mar 2015 at 9:01pm
You have to make it.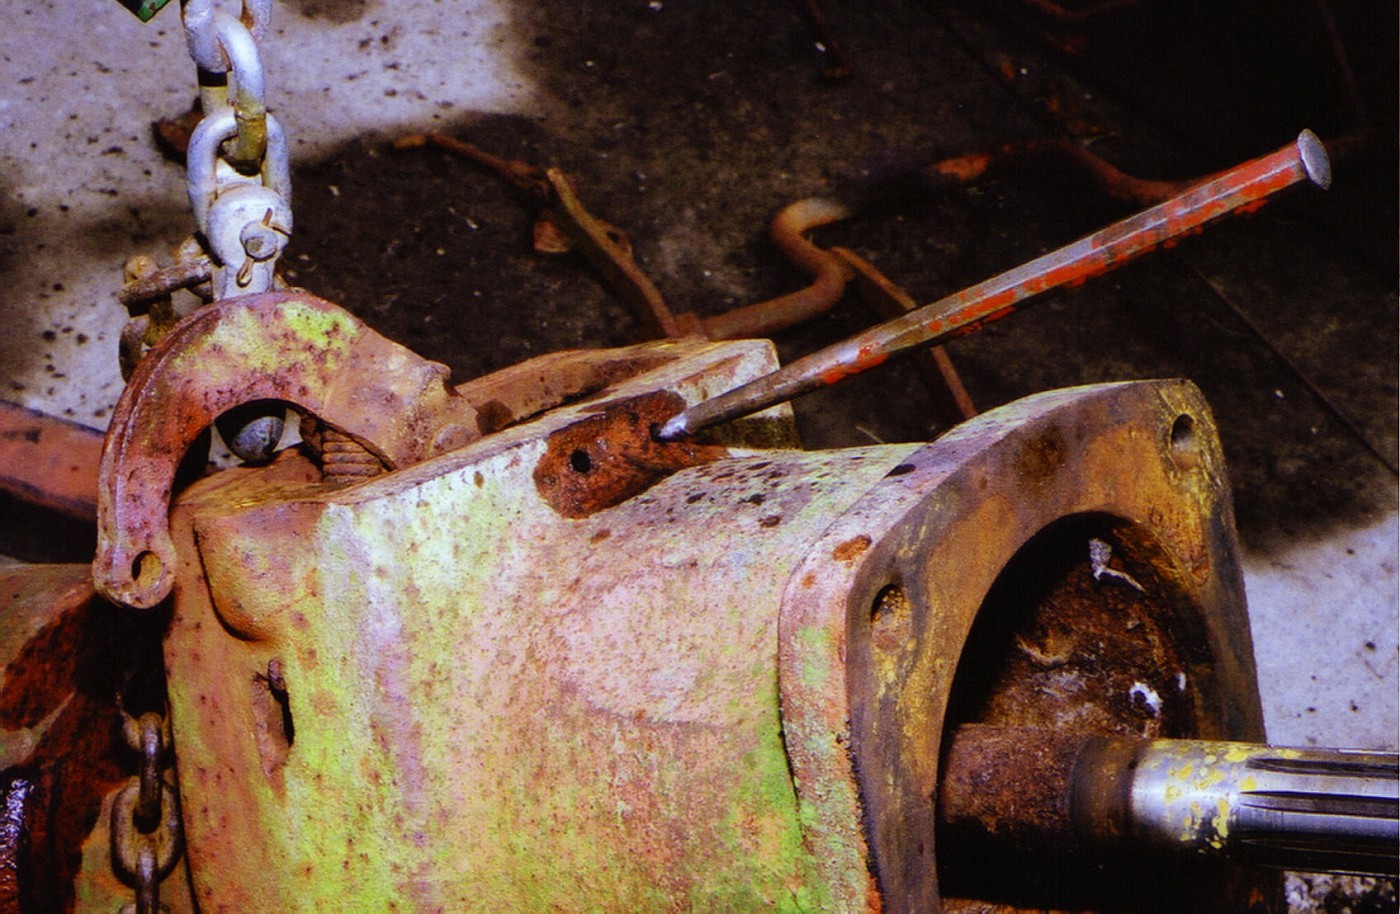 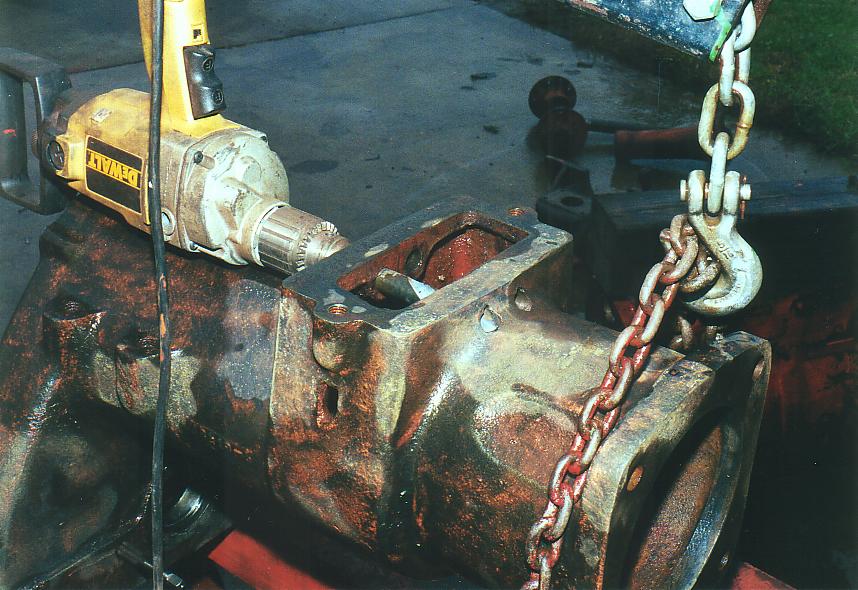 |
Posted By: Hubnut
Date Posted: 08 Mar 2015 at 5:10am
| Doh! Got it. Thank you sir. |
Posted By: Ken in Texas
Date Posted: 08 Mar 2015 at 8:28am
|
If you lived closer to Henderson Texas You could find any and all the missing pieces you need for your C except for kerosene engine parts. I also have complete 1947 C ready to reassemble if your interested. This C drove absolutely great before tear down for painting. $600 loaded on your trailer. New Battery box and brakes and C parts book. I would love you to have it. Or anyone else for that matter. Kenny |
Posted By: Hubnut
Date Posted: 08 Mar 2015 at 4:37pm
| Those pins didn't come out easy. I got 3 out. One I had to cut and punch the pieces out. Didn't mess with the brake drum. I need to ruminate on it a bit. Got all the pieces sorted and parts bagged. Now the really hard part starts. |
Posted By: Hubnut
Date Posted: 08 Mar 2015 at 4:38pm
|
Kenny, I'd take you up on that off if you were closer. Thank you. Hubnut |
Posted By: Steve in NJ
Date Posted: 09 Mar 2015 at 6:34am
What? No snow? What's up wit' dat?? LOL!  ------------- 39'RC, 43'WC, 48'B, 49'G, 50'WF, 65 Big 10, 67'B-110, 75'716H, 2-620's, & a Motorhead wife |
Posted By: BrianC
Date Posted: 09 Mar 2015 at 8:17am
|
Well dad left us with his very first and last tractors, so they have sentimental value. The 1948 C I decided to fix up under a "whatever it takes mandate". Tally so far parts and supplies from tires/wheels and sheet metal to nuts and bolts and paint is $5340. Currently spending money on the cultivator system, shanks and such. And oh, did I forget to mention I didn't touch the inside of the engine, it needs rebuild. I figure that will be $2500. The shop had been "raided" over the years by relatives. Not a single tire changing tool could be found for instance. I decided to "go for it" tool wise and buy air compressor and sandblast cabinet air tools and other tools, floor jacks... Tool total=$5700 Now under lock and key. Time spent working I would estimate at 600 hours, countless trips to hunt for parts and tools and supplies and time on the web. My idea of fun. |
Posted By: Ken in Texas
Date Posted: 09 Mar 2015 at 9:21am
|
Hubnut. I made a brake drum puller using 3/4 allthread, nuts, washers and a 5x5 piece of 3/4 plate drilled with the appropriate holes. With the finals off and the set bolt out of the drum, work nuts and washers under the drum and thread 2 foot long allthreads thru opposite holes in the drum. Slide the pulling block over the allthread and secure with nuts and washers. center block on end of axle so as to pull drum up and out of the housing. I hope you can visualize how this homemade puller works. It helps to clean and lube up the axle shaft as best as you can before trying to pull the drum over a rusty axle. As you tighten the nuts some heat on the drum hub helps. A good rap on the block under tension to get the drum loose and moving helps. Once broke loose it goes pretty easy. I have broken a few drums using this puller but 9 out of 10 come out in one piece. Good luck If your old axle seals are ok you can work a set of new brake bands in place without pulling the drums. |
Posted By: Hubnut
Date Posted: 09 Mar 2015 at 4:02pm
|
Ken, Thanks. Can you tell me what seal your talking about? The only seal I see is the one on the hub stub shaft, just outside the bearing. Thanks. Steve (hubnut) |
Posted By: Hubnut
Date Posted: 15 Mar 2015 at 5:55pm
|
Got the pinion shaft out. Unfortunately the brake drum broke in the process. Did a few things this weekend. The main transmission shaft is really worn and needs a replacement. A few parts ready for the powdercoater. http://s202.photobucket.com/user/cytochromeP450/media/DSCN4560_zpsmyud5i9z.jpg.html" rel="nofollow"> 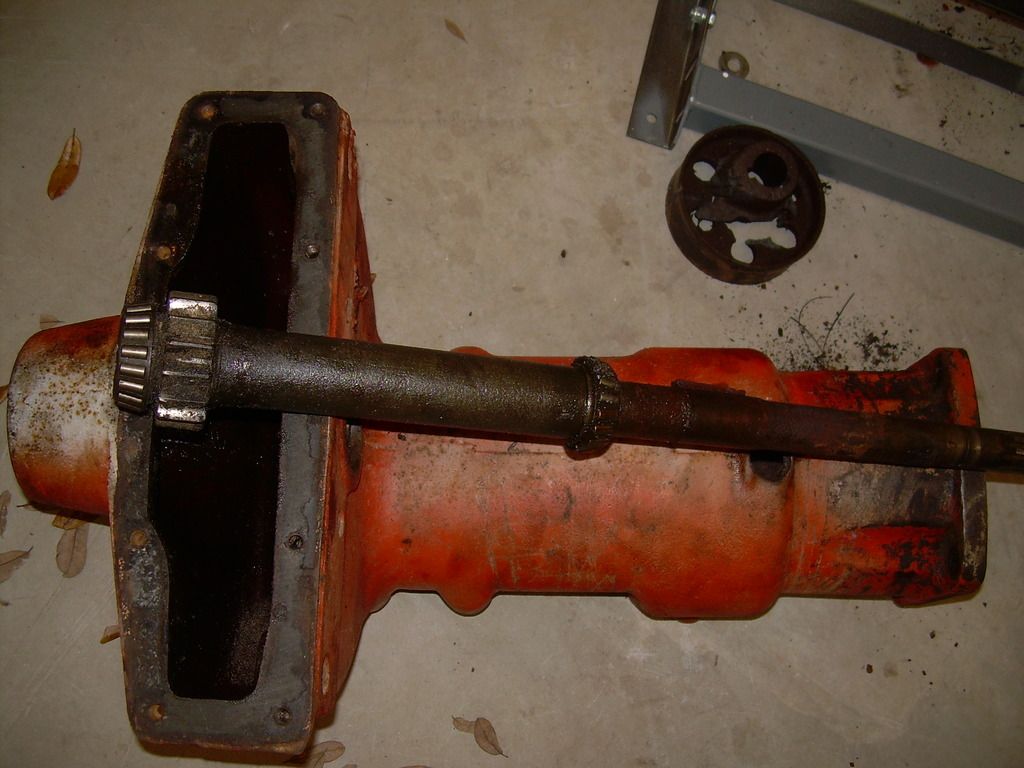 http://s202.photobucket.com/user/cytochromeP450/media/DSCN4561_zpslgy8dw8n.jpg.html" rel="nofollow"> 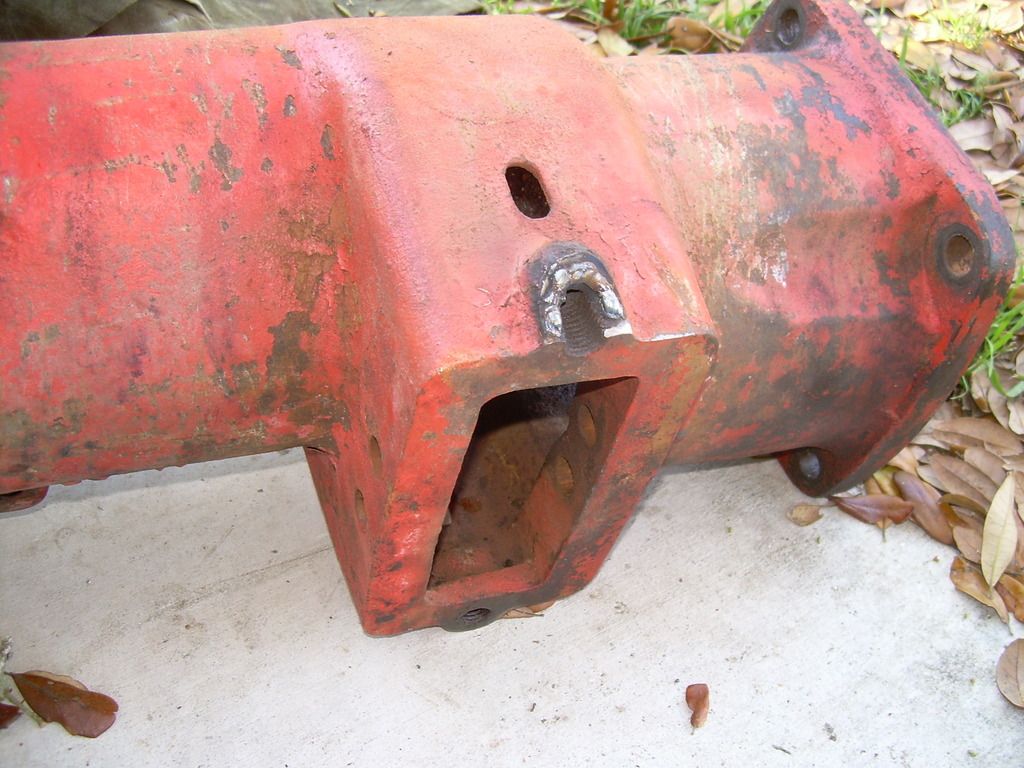 http://s202.photobucket.com/user/cytochromeP450/media/DSCN4562_zps7hlqgwss.jpg.html" rel="nofollow"> 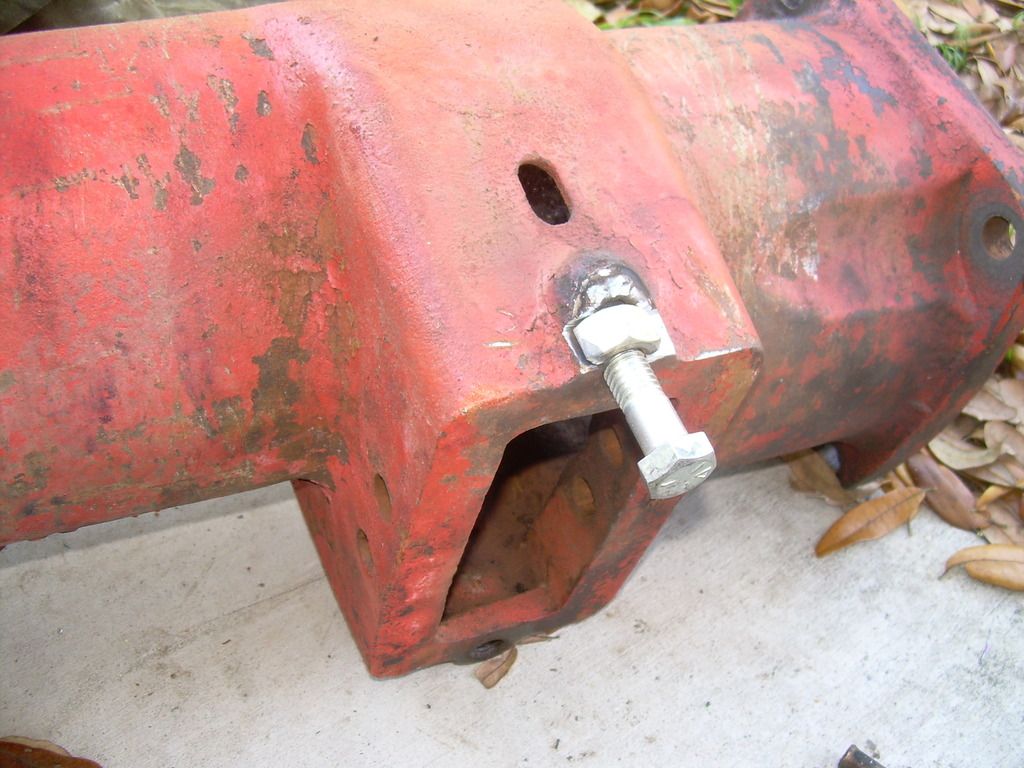 http://s202.photobucket.com/user/cytochromeP450/media/DSCN4565_zpsxnksqxzl.jpg.html" rel="nofollow"> 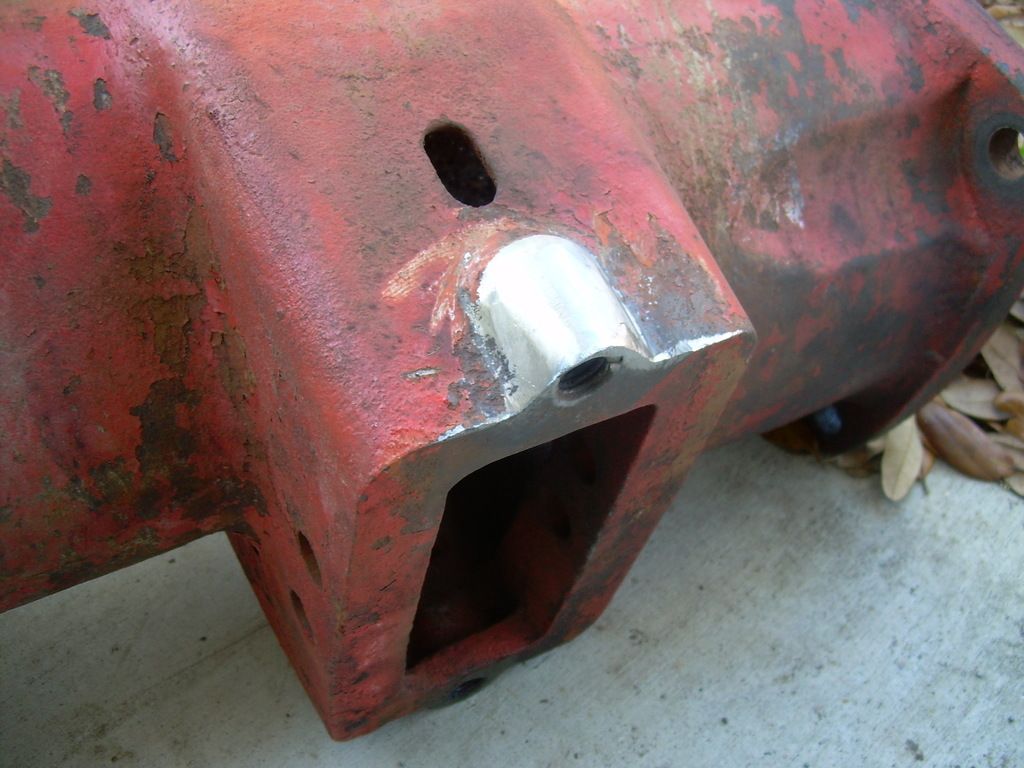 http://s202.photobucket.com/user/cytochromeP450/media/DSCN4567_zpsyjcu3wak.jpg.html" rel="nofollow"> 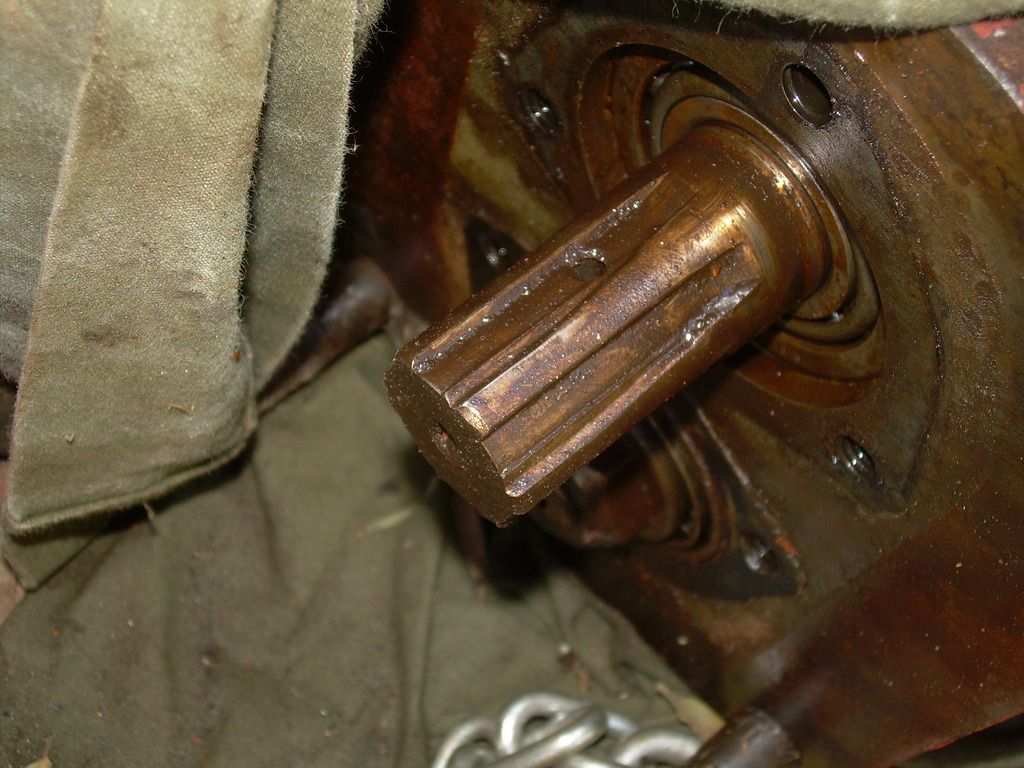 |
Posted By: Hubnut
Date Posted: 15 Mar 2015 at 5:58pm
|
A few more http://s202.photobucket.com/user/cytochromeP450/media/DSCN4584_zpswvfu4cgf.jpg.html" rel="nofollow"> 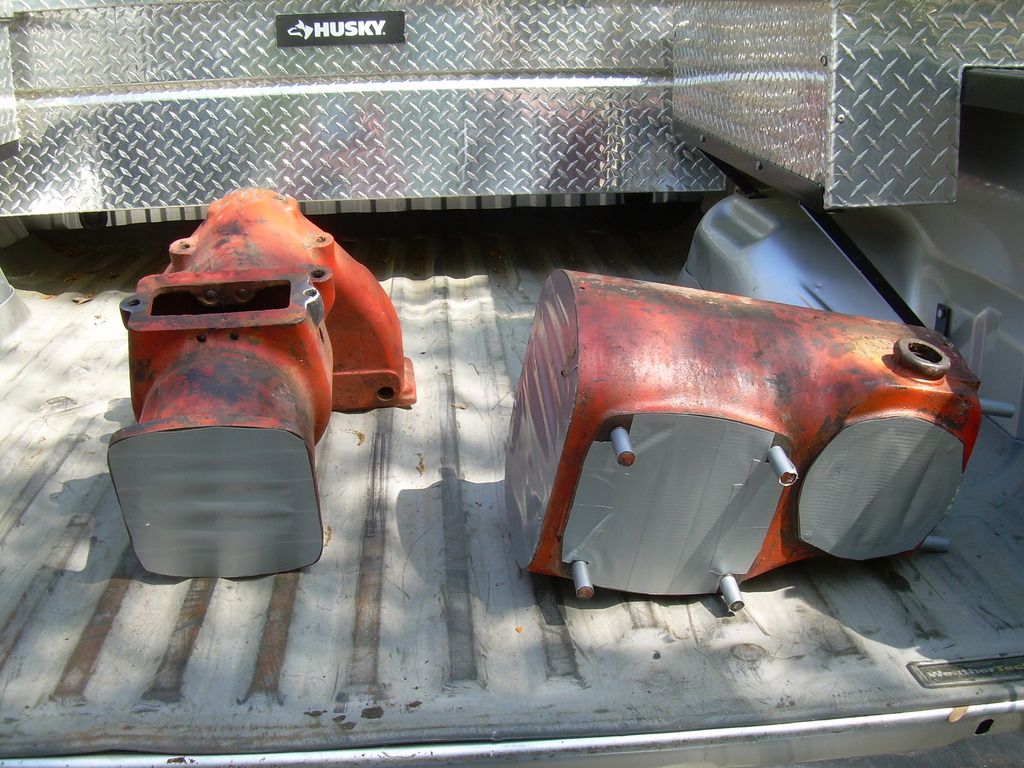 http://s202.photobucket.com/user/cytochromeP450/media/DSCN4581_zpschtuzahq.jpg.html" rel="nofollow"> 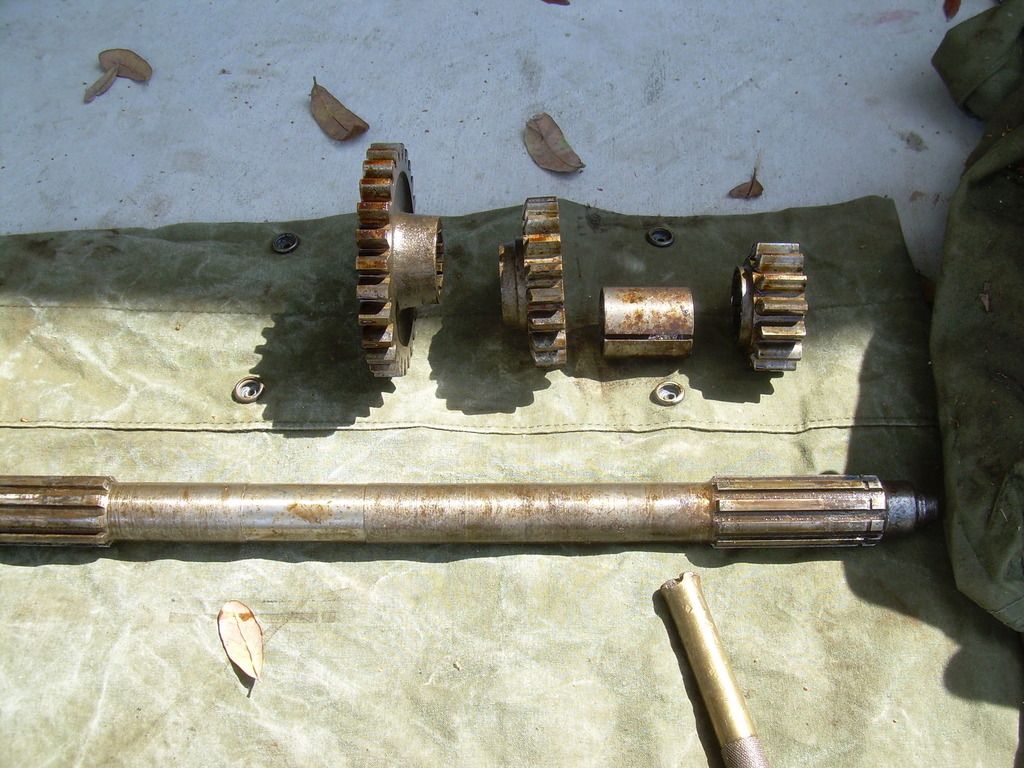 |
Posted By: Dick L
Date Posted: 15 Mar 2015 at 7:18pm
| Your getting there! |
Posted By: Hubnut
Date Posted: 15 Mar 2015 at 8:27pm
| Thanks for the help Dick. It's going slow, but been fun. |
Posted By: sandman2234
Date Posted: 15 Mar 2015 at 11:31pm
|
Does look like it is coming along nicely! David from jax ------------- A proud member of the Allis Express movement! Northeast Florida |
Posted By: rasman57
Date Posted: 16 Mar 2015 at 6:07am
| You are into it now for sure. Enjoy the process. Your attention to detail is evident so it will be fun to watch. You will be preserving and restoring another one...well done....keep sharing your hard work! |
Posted By: ACJohn
Date Posted: 16 Mar 2015 at 6:37am
| Nice looking repair on that tapped hole! Had to do the same on a G. Now, that worn spline on the other hand...good luck! |
Posted By: Sugarmaker
Date Posted: 16 Mar 2015 at 8:48am
|
Great pictures and work you are doing on the C! Repairing that broken out hole looks real good. Will you sand blast the parts you have masked, then powder coat? Regards, Chris ------------- D17 1958 (NFE), WD45 1954 (NFE), WD 1952 (NFE), WD 1950 (WFE), Allis F-40 forklift, Allis CA, Allis D14, Ford Jubilee, Many IH Cub Cadets, 32 Ford Dump, 65 Comet. |
Posted By: Ken in Texas
Date Posted: 16 Mar 2015 at 8:58am
|
Humm. With the hundreds of old Cs in pretty decent shape out there I would have been looking for something in more complete and better shape to restore. I do admire your spunk to take on something run that hard and put up that wet. Make me a list of parts you know you need and I will assemble a pile of pieces on a pallet and we can figure a way to move the pallet from Texas to Florida by AC parts express. Sandman from Jax got some rare B fenders moved from YX to FL using AC express delivery. I have a good C tranny ready to go and final drives too if your interested. 12 cents a pound. I will toss in a extra Brake drum for free. Is your powder coater able to match PO#1. What us purist AC restorers notice the most is the wrong color orange. However. It's your C and you can paint it blue if you like blue. |
Posted By: Ken in Texas
Date Posted: 16 Mar 2015 at 9:10am
|
About the seal you destroy when pressing the axle out like DickL does. There is a axle grease seal in the housing behind the brake drum. The keyway holding the drum destroys the seal on its way out. If you don't have a B/C parts book you need to get one. ken |
Posted By: Hubnut
Date Posted: 16 Mar 2015 at 6:12pm
BrianC--Thanks for the story. It's nice to hear of this because I know already that I'll have 8 to 10 grand in this little tractor. Maybe a bit insane, but there sure is something special about making things this old run and look like new. |
 BrianC wrote:
Posted By: Hubnut
Date Posted: 16 Mar 2015 at 6:18pm
|
Thanks to everyone for their positive comments (DickL, B26240, sugarmaker, shameless, stan IL&TN,Dseries4, PaulB, Steve in NJ, BrianC, Rasman57, ACJohn, and Ken in TX). Sure helps to have some affirmation of money well-spent. |
Posted By: Hubnut
Date Posted: 17 Mar 2015 at 8:13pm
|
Got a few parts back from powdercoat. Maybe not the perfect color match for purists, but not bad. The guards (fenders) have been patched and had a good layer of bondo on them. They definitely look patched, but they are solid. http://s202.photobucket.com/user/cytochromeP450/media/DSCN4585_zpsbujjyawk.jpg.html" rel="nofollow"> 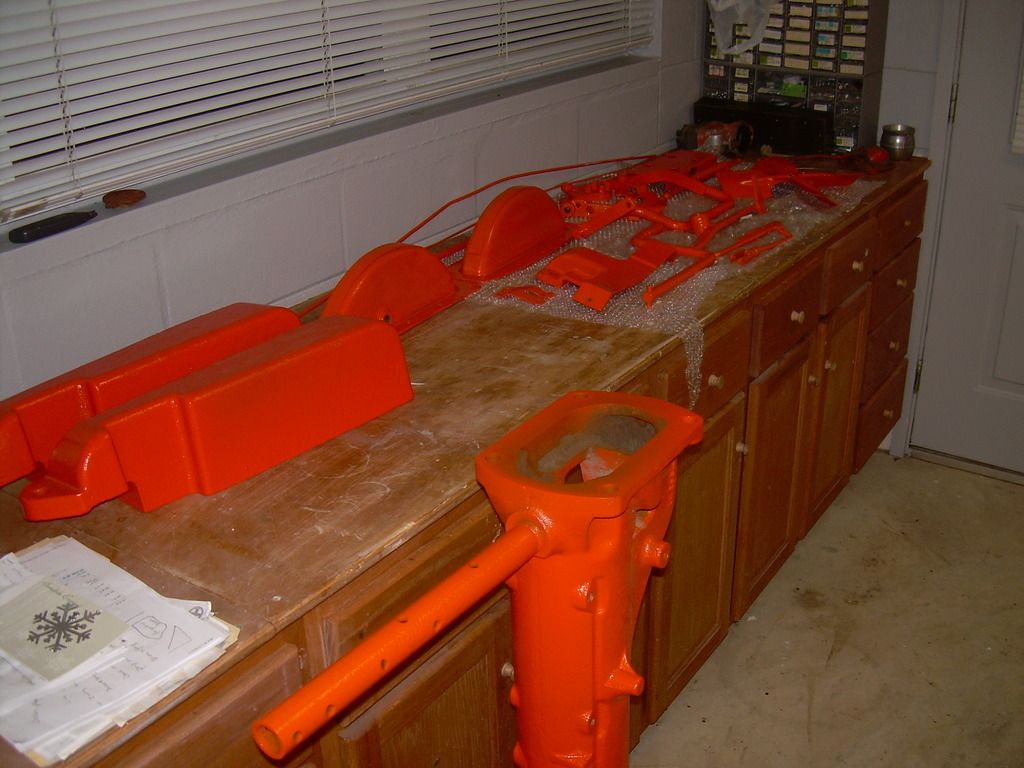 http://s202.photobucket.com/user/cytochromeP450/media/DSCN4586_zpsn8paqutq.jpg.html" rel="nofollow"> 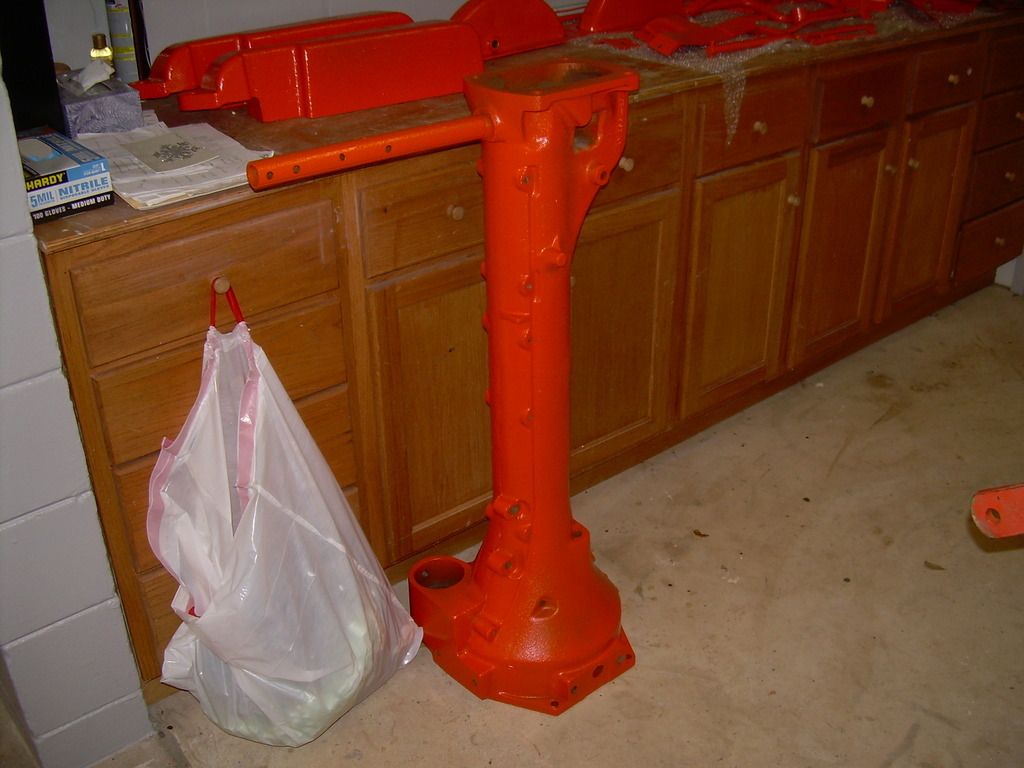 http://s202.photobucket.com/user/cytochromeP450/media/DSCN4587_zpsrdfadpig.jpg.html" rel="nofollow">  |
Posted By: Hubnut
Date Posted: 17 Mar 2015 at 8:15pm
| Also broke the other brake drum today while pressing it off the pinion shaft. I'm 2 for 2! |
Posted By: Steve in NJ
Date Posted: 18 Mar 2015 at 6:38am
|
Keep goin' Stevo you're doin' great man! Everything is lookin' nice. Don't worry bout' the correct Police. Every Tractor I have isn't 100% OEM especially the color. My body man has the formula that I use for color on my Tractors. It starts out as PO#1... sorta'.. LOL! Steve@B&B ------------- 39'RC, 43'WC, 48'B, 49'G, 50'WF, 65 Big 10, 67'B-110, 75'716H, 2-620's, & a Motorhead wife |
Posted By: Les Royer
Date Posted: 18 Mar 2015 at 7:06am
|
I'm impressed. What a challenge you took on there. How are you able to do it so fast?
------------- I still gots my A/C but it's clear out in the barn now. |
Posted By: Ken in Texas
Date Posted: 18 Mar 2015 at 8:33am
| It's like TV. It went out for upholstery today and we got it back all done 3 weeks ago. |
Posted By: Ted J
Date Posted: 18 Mar 2015 at 11:21am
|
The bill for the powder coat will be through the roof...I think. If you don't mind telling us? There is a place close by that does it, I just wonder.
------------- "Allis-Express" 19?? WC / 1941 C / 1952 CA / 1956 WD45 / 1957 WD45 / 1958 D-17 |
Posted By: Hubnut
Date Posted: 18 Mar 2015 at 2:55pm
|
TedJ, It has been pricey, but I think worth it. I had all the tin done first which cost me $225. Realize that they mediablast everything first down to bare metal. Then I had 31 pieces (in the photos above) done for $425. He has the tranny case, final drives, and about 7 other pieces that should be ready Friday. I'll let you know the final costs to powdercoat the entire thing. I still need to get the wheels and rims over and a few odds and ends. My guess is it will cost around $1500. I guess buying a can of Tisco Prussian Orange for $68 doesn't look that bad  . However, I figure the sandblasting would have been farmed out too. So, it's all good. . However, I figure the sandblasting would have been farmed out too. So, it's all good. |
Posted By: Ken in Texas
Date Posted: 18 Mar 2015 at 6:03pm
|
Front wheels and rims were tractor color . Rear rims were galvanized, not painted. You can powder coat them to look like galvanized steel. I have plenty of extra good brake drums and other C parts. If your needing something else that missing, I may have it. f your needing |
Posted By: sandman2234
Date Posted: 18 Mar 2015 at 7:46pm
Tractors in Florida don't tend to be as nice or plentiful as some I have seen in Texas or other places. I am pretty sure Steve looked at most of the available tractors within several hundred miles. Those fenders got a really nice ride to Florida, and thanks AGAIN! Sounds like a good price on that C tranny! David from jax ------------- A proud member of the Allis Express movement! Northeast Florida |
Posted By: Hubnut
Date Posted: 18 Mar 2015 at 8:08pm
| I'm going with the creme color on the wheels. I just loaded the wheels, rims, and weights in the pickup. Will take them to the powdercoater tomorrow. All of my rims were toast, I got some really nice ones from 1953CA. Thanks Andrew! Got a bunch of seals and bearings today too. I hope to get the final drive assemblies rebuilt this weekend. |
Posted By: Sugarmaker
Date Posted: 19 Mar 2015 at 6:44am
|
Wow! I think the powder coated parts look real good. Nice to have nice clean components to assemble! Great job! Regards, Chris ------------- D17 1958 (NFE), WD45 1954 (NFE), WD 1952 (NFE), WD 1950 (WFE), Allis F-40 forklift, Allis CA, Allis D14, Ford Jubilee, Many IH Cub Cadets, 32 Ford Dump, 65 Comet. |
Posted By: Ken in Texas
Date Posted: 19 Mar 2015 at 8:28am
|
wheels from a CA? I have both CAs and Cs The front wheels will swap ok. The rears on the other hand are way too different to just swap out either way. I'm afraid your putting your cart before the horse by powder coating the CA 6 hole wheels to fit on 5 stud C hubs. CA rims won't bolt up to c wheel centers either. I guess you could fabricate 5 hole to 6 hole adapters to use CA wheels, wheel weights and power adjust rims on a C The bolt circle on the 6 hole CA is way bigger than on a C. You probably already know this. Why Cream? That cream wheels came later with the D series ACs |
Posted By: sandman2234
Date Posted: 19 Mar 2015 at 8:51am
Ken, I think he means he got C rims from the member known as 1953CA... David from jax ------------- A proud member of the Allis Express movement! Northeast Florida |
Posted By: Ken in Texas
Date Posted: 19 Mar 2015 at 9:36am
|
Thanks Sandman. Now that I read the post again. I put my cart in front of my horse. I better behave myself. Steve is PMing me for Pictures and SNs of the C "kit" tractor I have for sale. By the time he spends the 8 grand on the powder coated C he won't have anything left for another C "Restoration". I would like to see a guy with his talents "Restore" my C back to as close to AC factory original as humanly possible for allot less out of pocket expense. I'm pretty sure Bill Long would appreciate seeing a C as he remembers them rolling off the flat cars at his place of business. Aren't C rear wheel weights rarer than CA? I don't thing I remember ever seeing any cast specific for a C. |
Posted By: Ken in Texas
Date Posted: 19 Mar 2015 at 9:56am
|
Hubnut I have a extra set of real AC engine sideweight BUSHINGS to mount them correctly. Your cost will the shipping. Anybody else would be $10 plus shipping. |
Posted By: Hubnut
Date Posted: 21 Mar 2015 at 5:25pm
|
Worked on the tractor some. I think I should have chosen a better tractor to start with. This poor thing has been rawhided!! Couple questions. The front spindle is ate up a bit, but the areas for the bearing races are okay. Is this piece serviceable as is (see pic). Also, notice the cover for the Ross box. Is this the correct cover? Looks too small. I found a hub that was cracked. Just another example of the abuse. Are the inner hub bearings pressed on? I had to use the impact chisel to get them off. They were toast anyway. The pitman arm was REALLY worn. I built the metal back up and polished it. It works good in the unit. Nice and tight. http://s202.photobucket.com/user/cytochromeP450/media/DSCN4590_zpsivyzxdbr.jpg.html" rel="nofollow"> 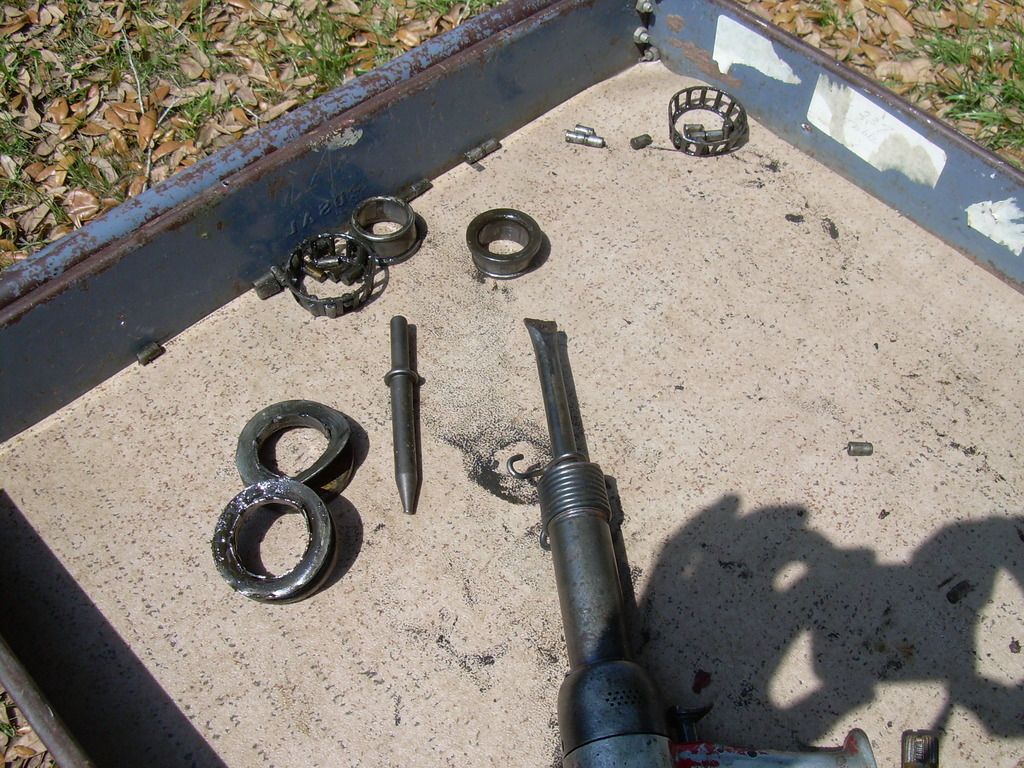 http://s202.photobucket.com/user/cytochromeP450/media/DSCN4594_zpsdoaplcwm.jpg.html" rel="nofollow">  http://s202.photobucket.com/user/cytochromeP450/media/DSCN4596_zpskqkpafns.jpg.html" rel="nofollow"> 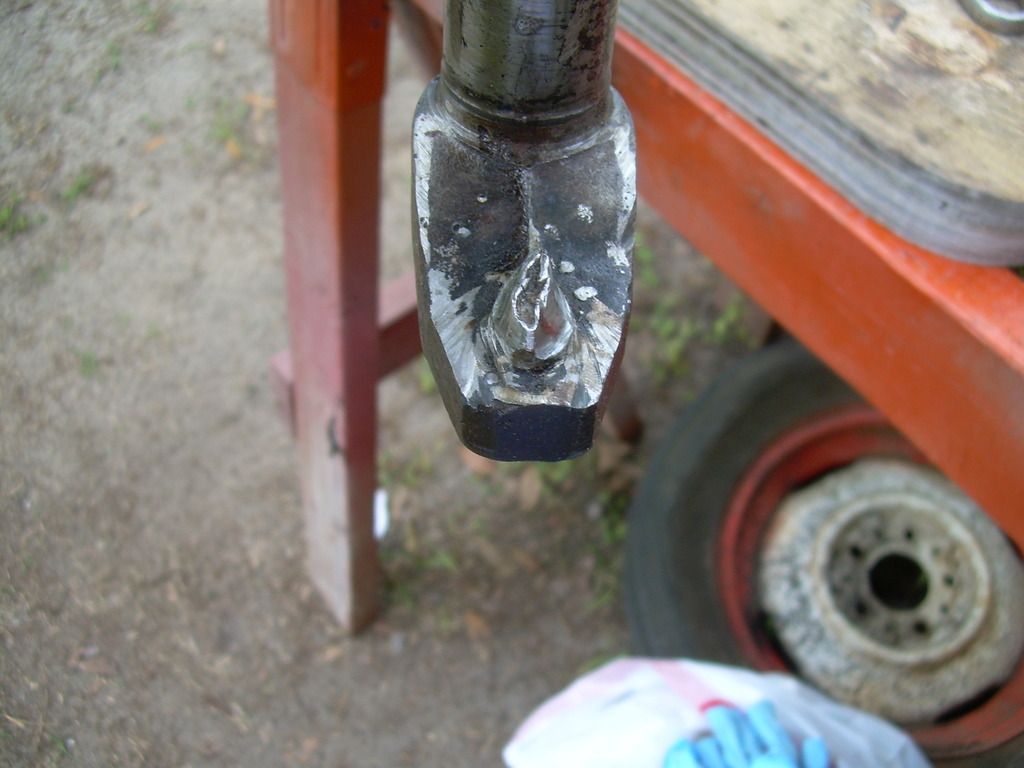 http://s202.photobucket.com/user/cytochromeP450/media/DSCN4597_zpsw1byzfkg.jpg.html" rel="nofollow"> 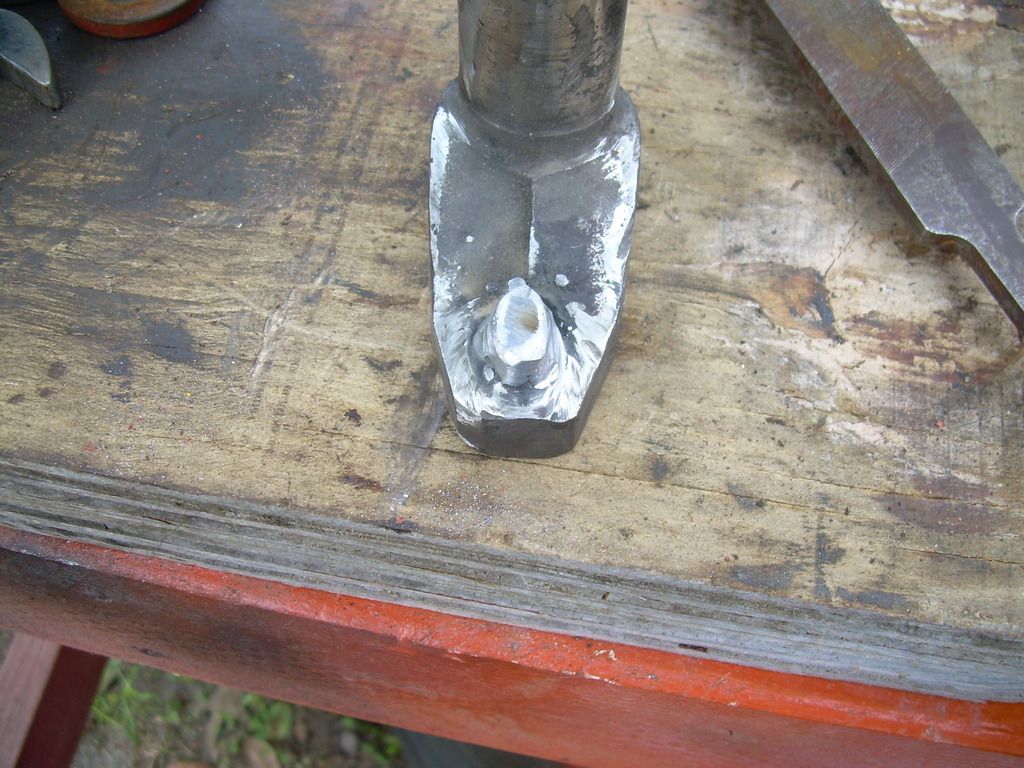 http://s202.photobucket.com/user/cytochromeP450/media/DSCN4598_zpsr26isngu.jpg.html" rel="nofollow"> 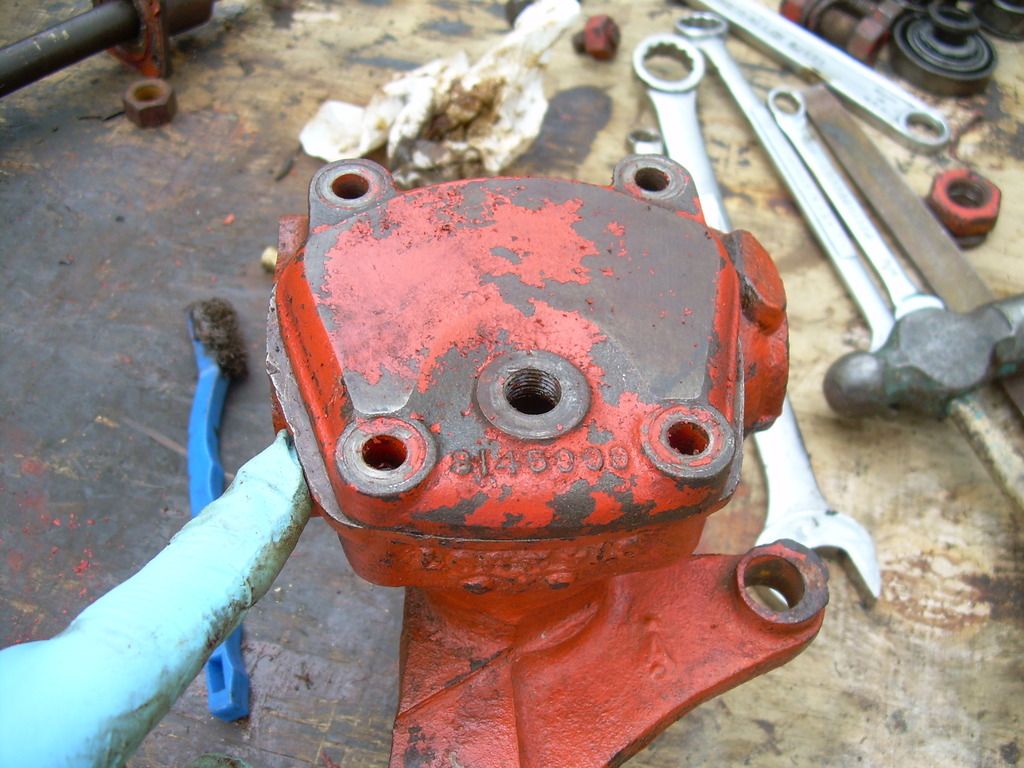 http://s202.photobucket.com/user/cytochromeP450/media/DSCN4591_zpsyekuz2zz.jpg.html" rel="nofollow"> 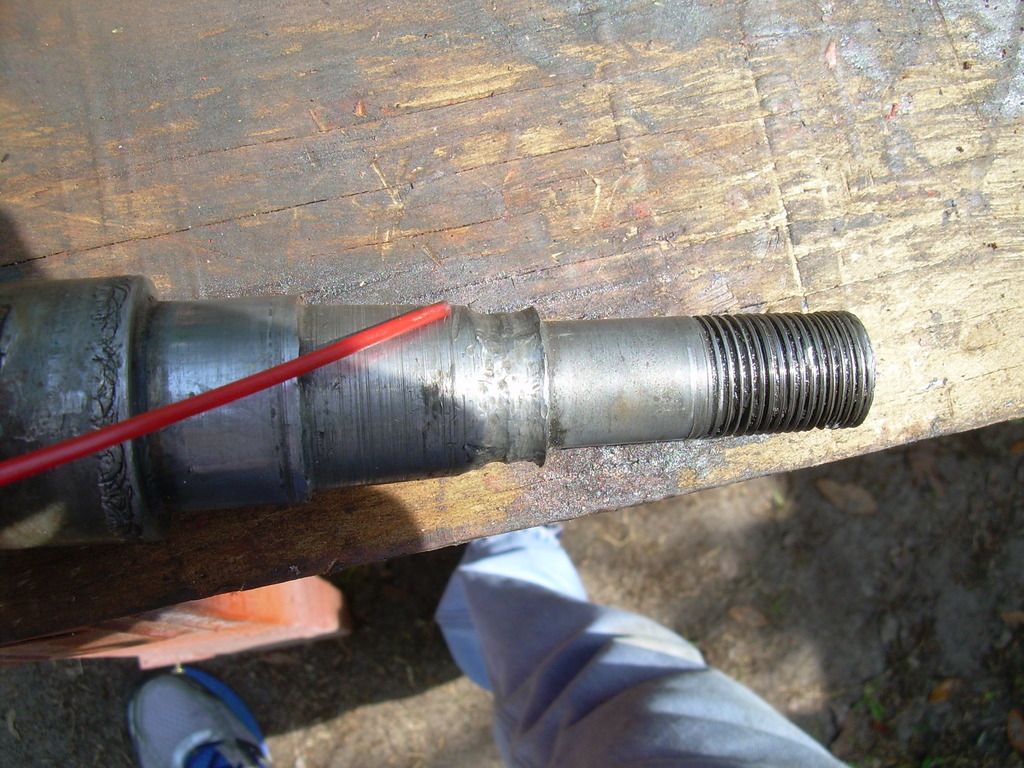 |
Posted By: Ken in Texas
Date Posted: 21 Mar 2015 at 6:15pm
|
Looks like your poor old C needs lots more stuff than was on the first list you sent me............ I would replace those chewed up parts with better if it was me. To bad there are so many miles between us. |
Posted By: Hubnut
Date Posted: 21 Mar 2015 at 6:29pm
|
Kenny, I know. I know. Don't rub it in. |
Posted By: Hubnut
Date Posted: 22 Mar 2015 at 2:12pm
|
Tore into the engine. Looks like the crank may be cracked. I don't know how deep it goes. See pics. Also, look at this pickup tube. The engine was full of dirt/grit. The crank oil holes were clogged. The crank is scored. Any advice? Is this engine worth the effort? http://s202.photobucket.com/user/cytochromeP450/media/DSCN4602_zps0x3hvpnn.jpg.html" rel="nofollow"> 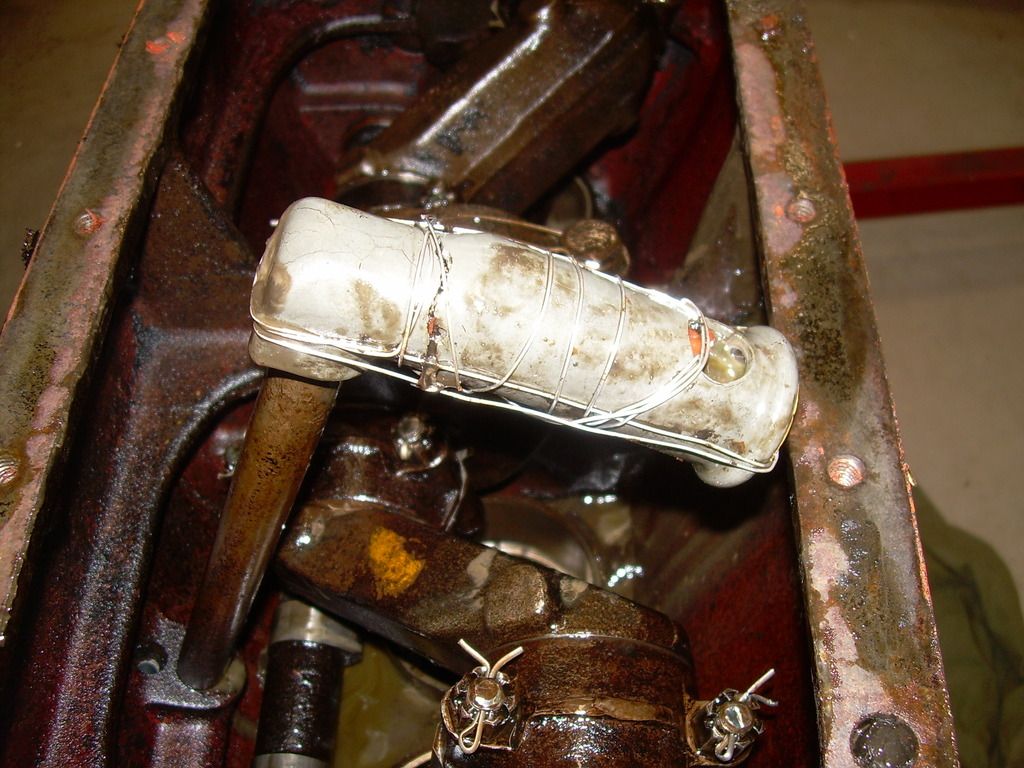 http://s202.photobucket.com/user/cytochromeP450/media/DSCN4603_zpsknzppxl1.jpg.html" rel="nofollow"> 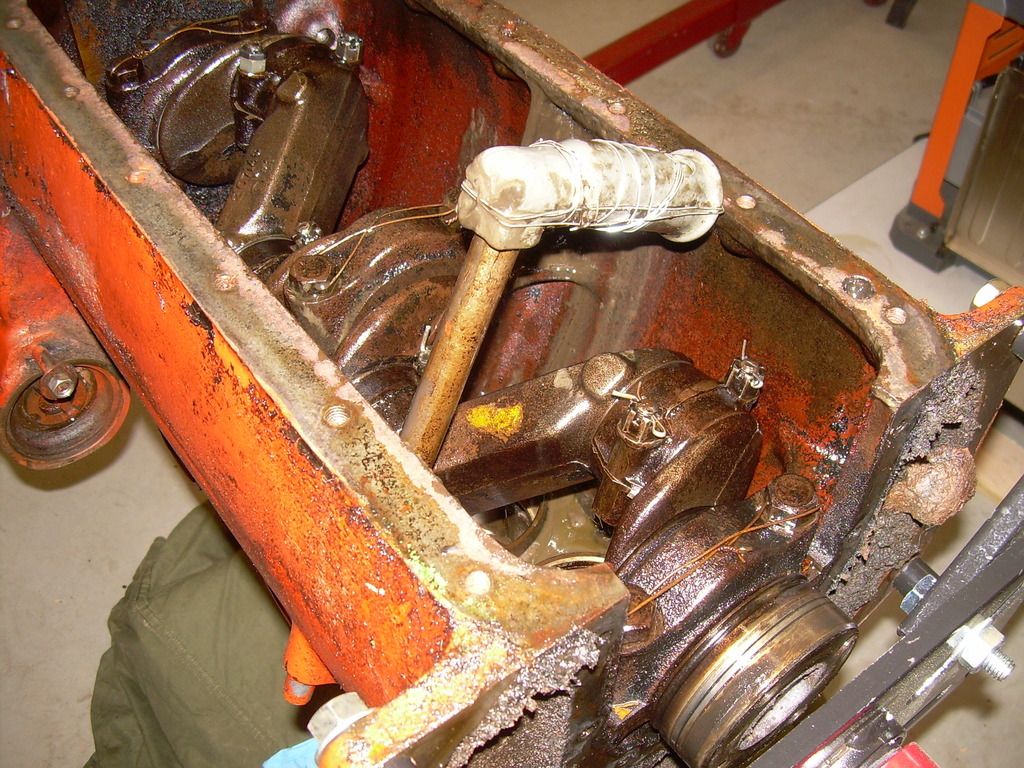 http://s202.photobucket.com/user/cytochromeP450/media/DSCN4607_zpshwc92kfc.jpg.html" rel="nofollow"> 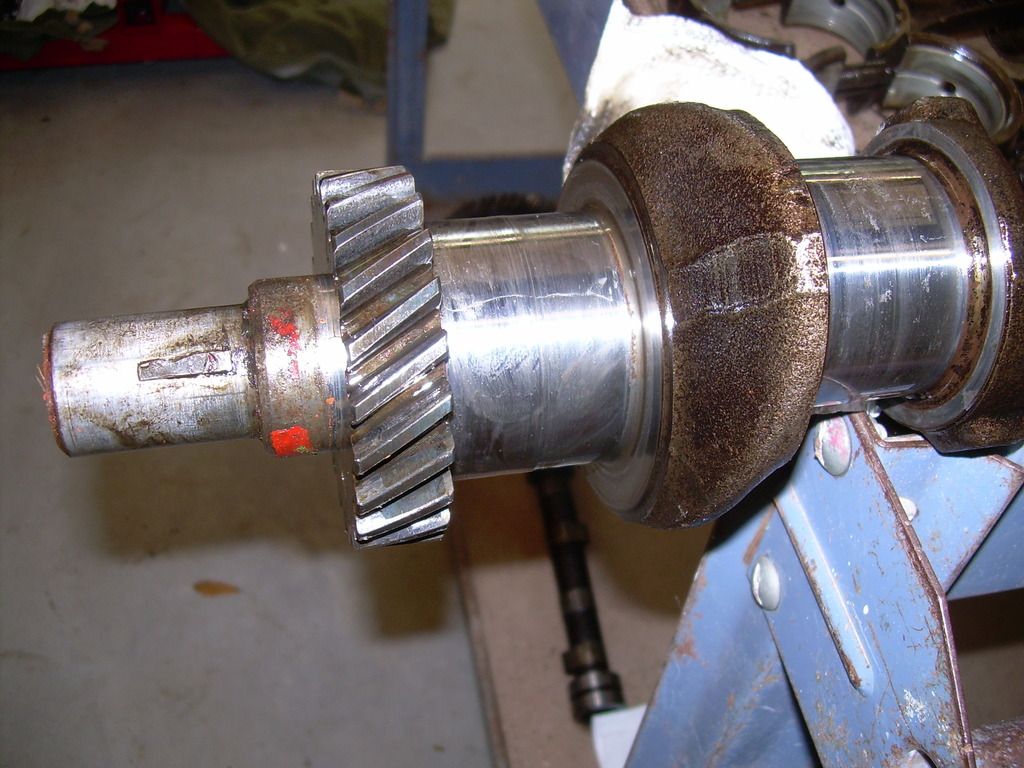 http://s202.photobucket.com/user/cytochromeP450/media/DSCN4606_zpskhltac5d.jpg.html" rel="nofollow"> 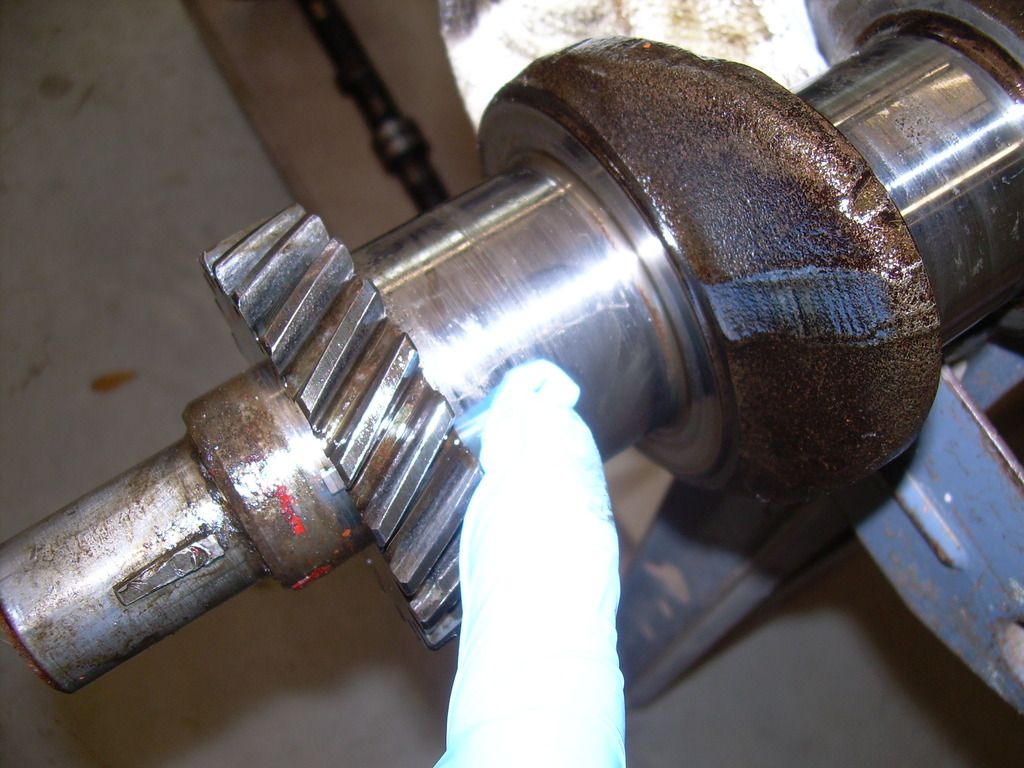 http://s202.photobucket.com/user/cytochromeP450/media/DSCN4605_zpswonj2zdg.jpg.html" rel="nofollow"> 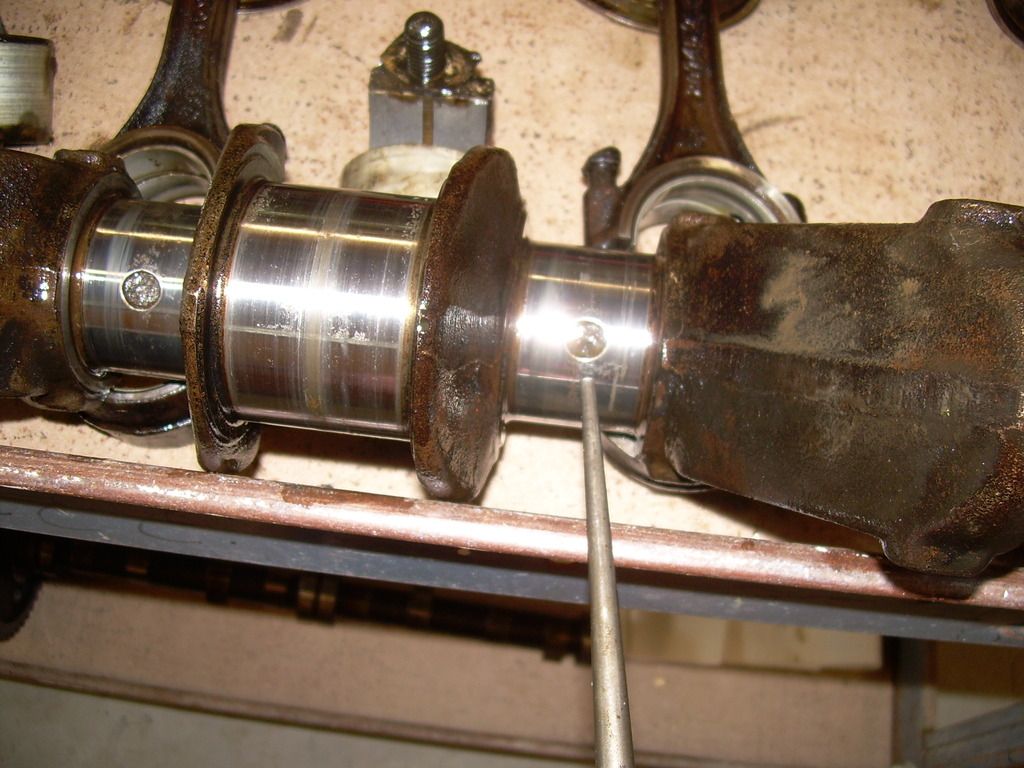 http://s202.photobucket.com/user/cytochromeP450/media/DSCN4611_zpshvmdlwez.jpg.html" rel="nofollow"> 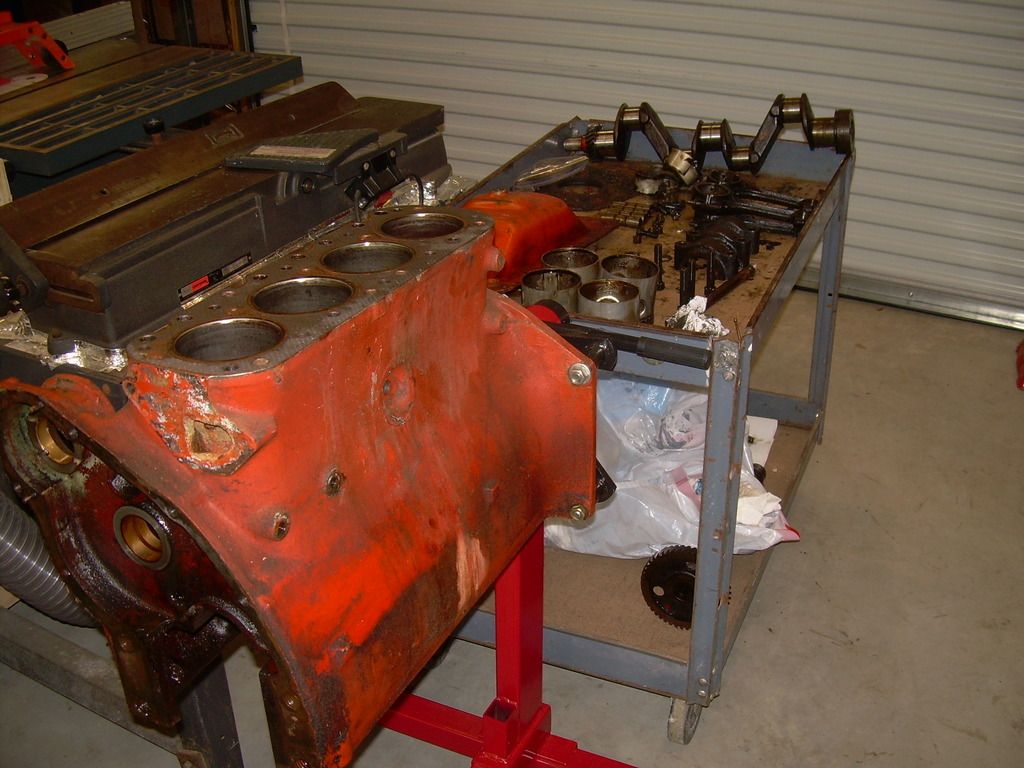 |
Posted By: sandman2234
Date Posted: 22 Mar 2015 at 8:54pm
|
I have 2 engines sitting just outside the fence if you want to look at the cranks in them. That is the only two I can think of that might have useful cranks in them, but no way to know till the pans come off. David from jax ------------- A proud member of the Allis Express movement! Northeast Florida |
Posted By: Dick L
Date Posted: 22 Mar 2015 at 9:36pm
Those are not holes and they are not plugged. They are rough in the bottom so they were not drilled. Those were cast in when the crankshaft was poured. The rods get oiled thru the holes in the rods. |
Posted By: sandman2234
Date Posted: 22 Mar 2015 at 9:48pm
|
I will look to see if I have a hub available next time I get to the house. David from jax ------------- A proud member of the Allis Express movement! Northeast Florida |
Posted By: Ken in Texas
Date Posted: 22 Mar 2015 at 10:05pm
|
I probably have crankshaft worth turning. It has a little light surface rust from sitting around with no grease on it. If I can remember which one it is, it had never been reground before. All I have to do is mic it right? I may also have oil pickup or two on the shelf. What does the cam and tappets look like? Oil pump? I had a head rebuilt 2 years ago that I may not need. Shipping heavy stuff to FL from TX gets costly. If the block checks out OK build it. Anybody making any runs from TX to FL in the next couple weeks? |
Posted By: Hubnut
Date Posted: 23 Mar 2015 at 4:23am
|
David, Kenny, Thanks for the help. I will see what the machine shop says about the crank. It may be serviceable. I think the head actually looks pretty good. However, the machine shop is best to make that determination. Dick, Thanks for setting me straight on the holes. They are filled with dirt!? |
Posted By: structures
Date Posted: 23 Mar 2015 at 7:54am
|
Nice build! I'm interested to see what the shop says about your crankshaft. I think I'd take it in as well and see what they say. ------------- Robert http://www.allischalmers.com/forum/forum_posts.asp?TID=82702&KW=structures&title=structures-1964-allis-d15-series-ii" rel="nofollow - 1964 D15 Series II |
Posted By: Hubnut
Date Posted: 23 Mar 2015 at 8:58am
| Thanks structures. I am going to have the machine shop look at it. Anyone sell new cranks for these engines? Just in case. |
Posted By: Hubnut
Date Posted: 28 Mar 2015 at 6:46pm
|
Made a little progress today. Got one of the final drive assemblies ready to reassemble. Still waiting for a bearing and race. http://s202.photobucket.com/user/cytochromeP450/media/DSCN4616_zps99iymlvj.jpg.html" rel="nofollow"> 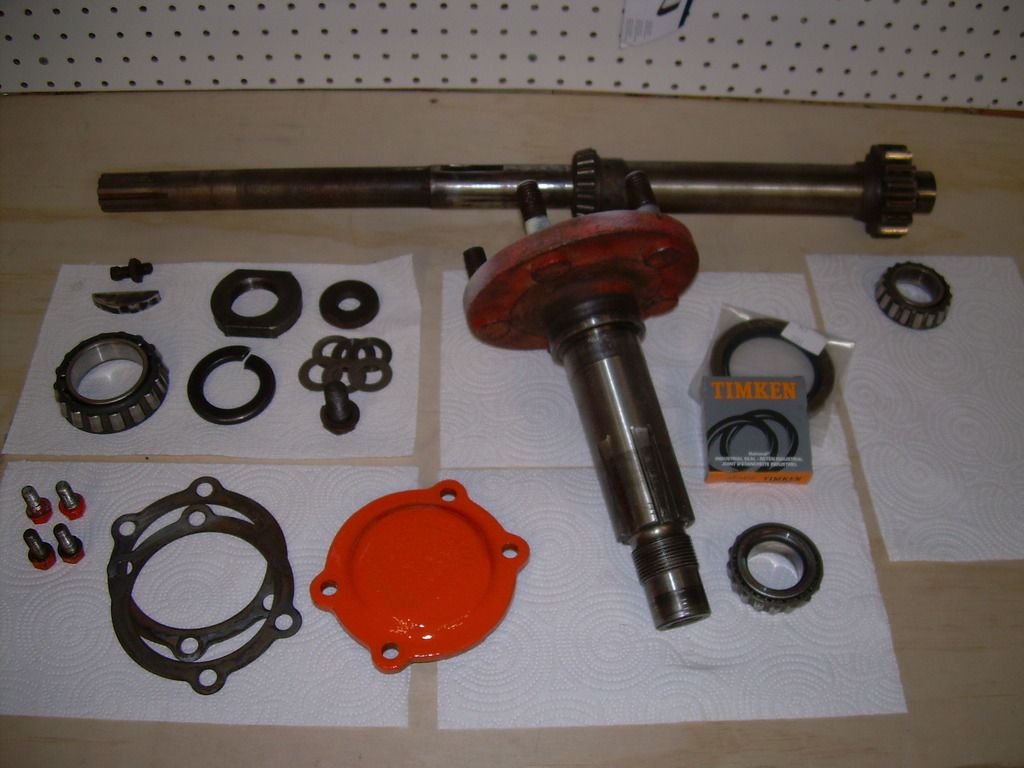 http://s202.photobucket.com/user/cytochromeP450/media/DSCN4617_zpsfdojyest.jpg.html" rel="nofollow"> 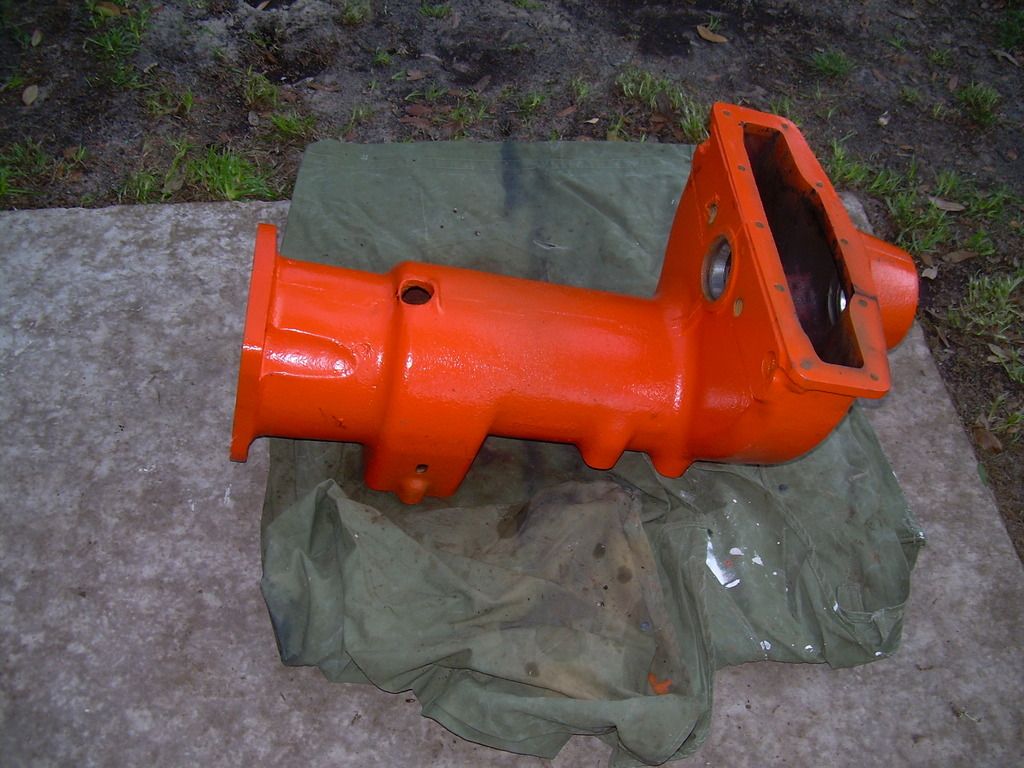 |
Posted By: Sugarmaker
Date Posted: 28 Mar 2015 at 9:22pm
|
Some moves forward and some back. Sounds about right for these projects. I think your going to have a nice tractor when complete! Thanks for posting the pictures. That PO really pops! Regards, Chris ------------- D17 1958 (NFE), WD45 1954 (NFE), WD 1952 (NFE), WD 1950 (WFE), Allis F-40 forklift, Allis CA, Allis D14, Ford Jubilee, Many IH Cub Cadets, 32 Ford Dump, 65 Comet. |
Posted By: Hubnut
Date Posted: 12 Apr 2015 at 4:24pm
|
I've kept at it and gotten some done on my rebuild--mainly cleaning everything! The machine shop has the flywheel, engine, and head. The powdercoater has a ton of parts and wheels. Once they come back I should be able to assemble. A few snags along the way. Four bent pushrods, a pickup tube full of dirt? Poor little engine. I got the driver's final drive back together with all new seals. New seals everywhere! Speaking of which, can someone tell me where the engine seal that I'm pointing to goes? http://s202.photobucket.com/user/cytochromeP450/media/DSCN4629_zps73ltpzog.jpg.html" rel="nofollow"> 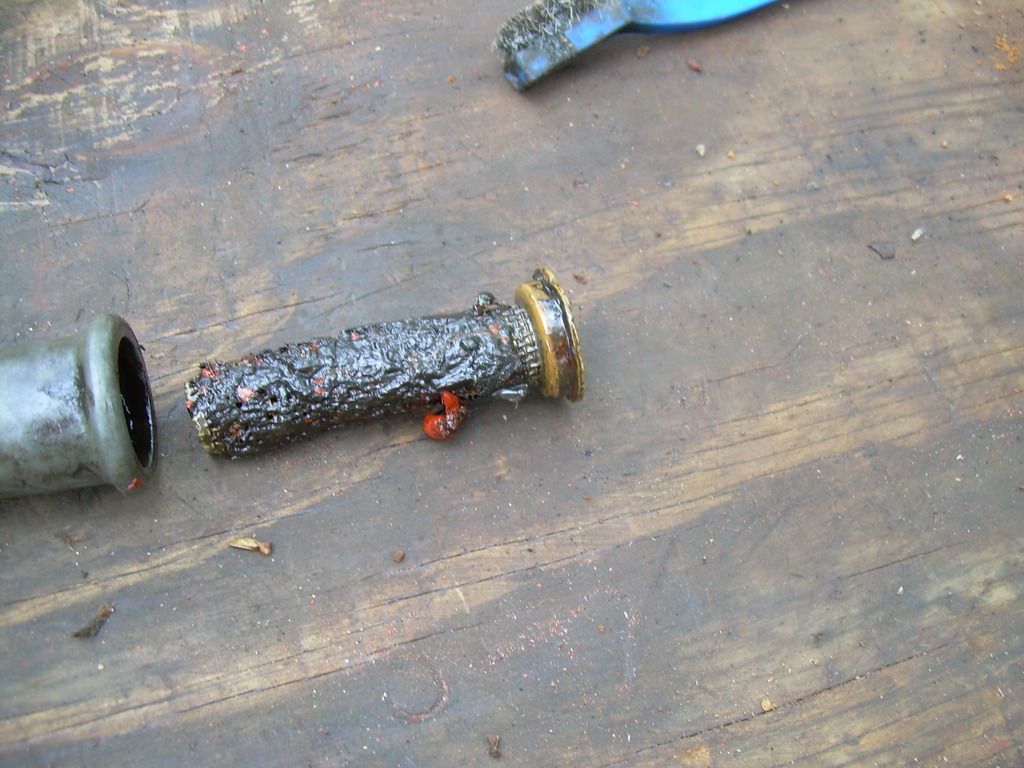 http://s202.photobucket.com/user/cytochromeP450/media/DSCN4628_zps6gn1pvxr.jpg.html" rel="nofollow"> 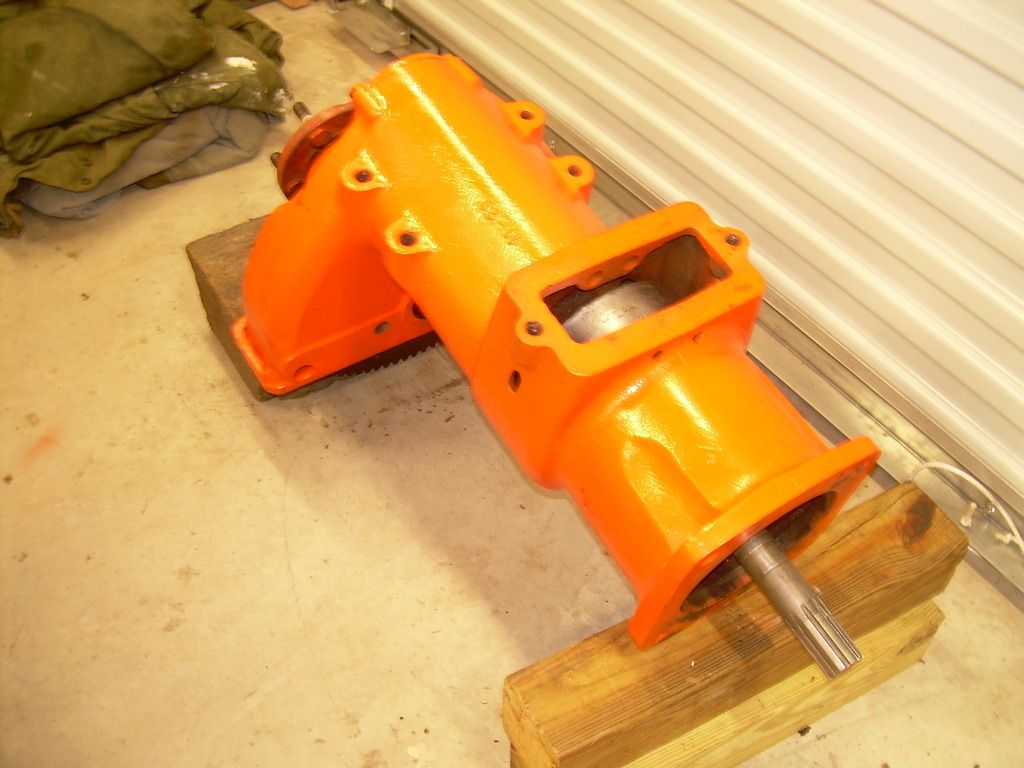 http://s202.photobucket.com/user/cytochromeP450/media/DSCN4620_zps6tibxsen.jpg.html" rel="nofollow"> 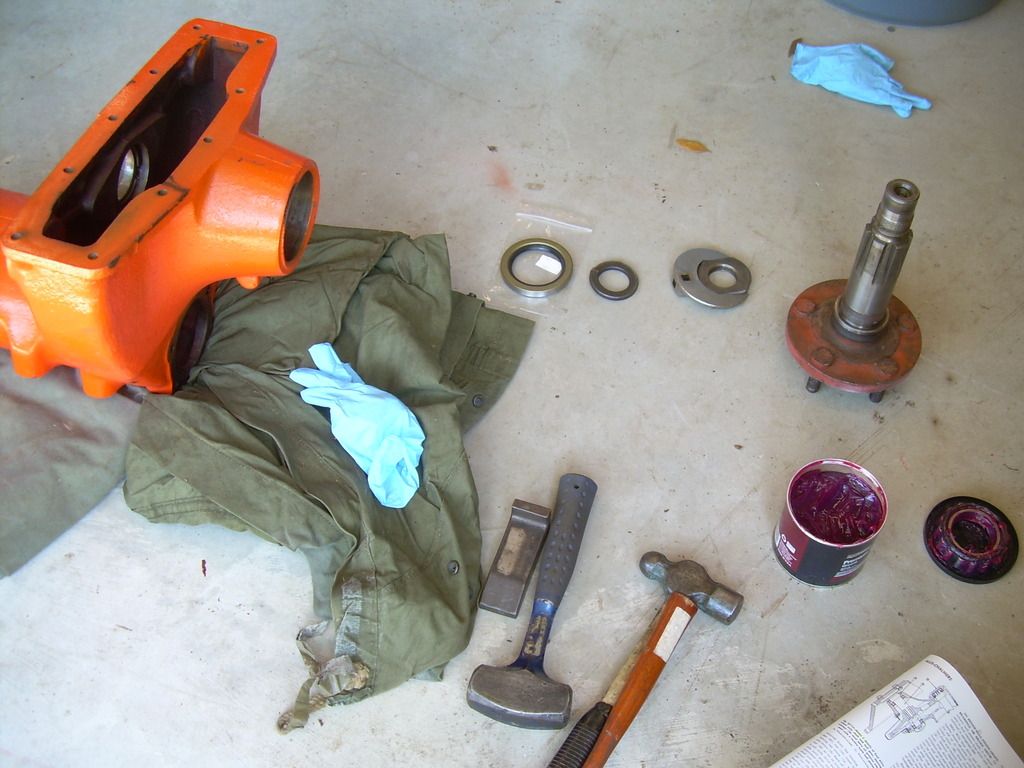 http://s202.photobucket.com/user/cytochromeP450/media/DSCN4635_zpse6xco7vq.jpg.html" rel="nofollow"> 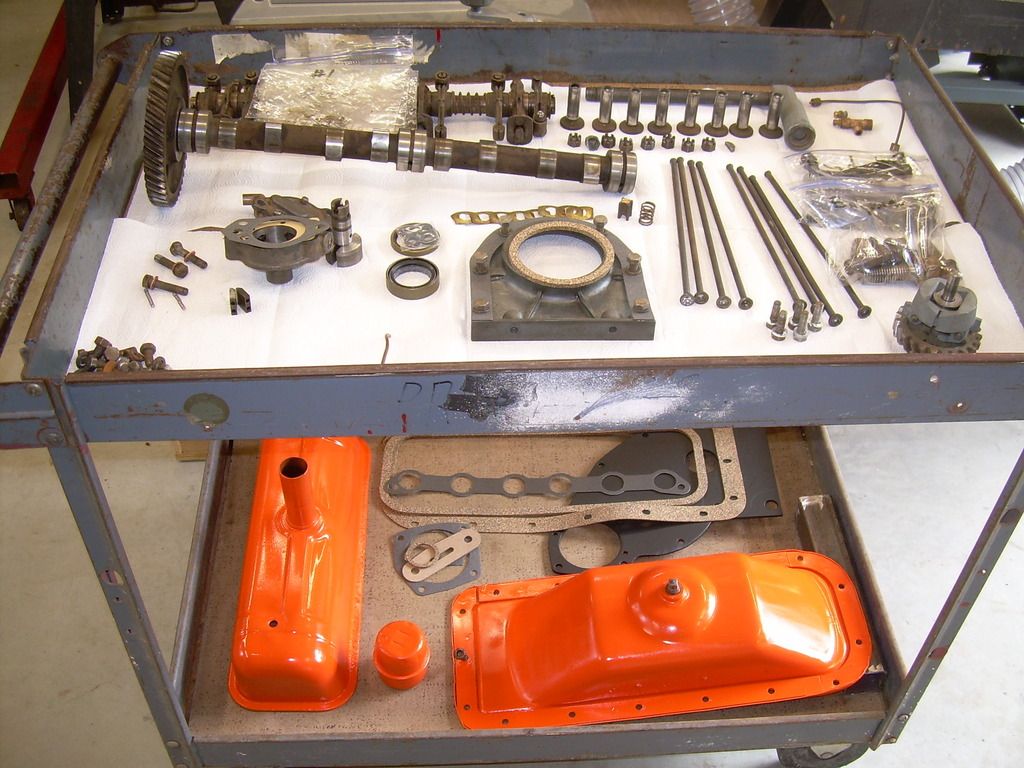 http://s202.photobucket.com/user/cytochromeP450/media/DSCN4637_zpsbiakkxbm.jpg.html" rel="nofollow"> 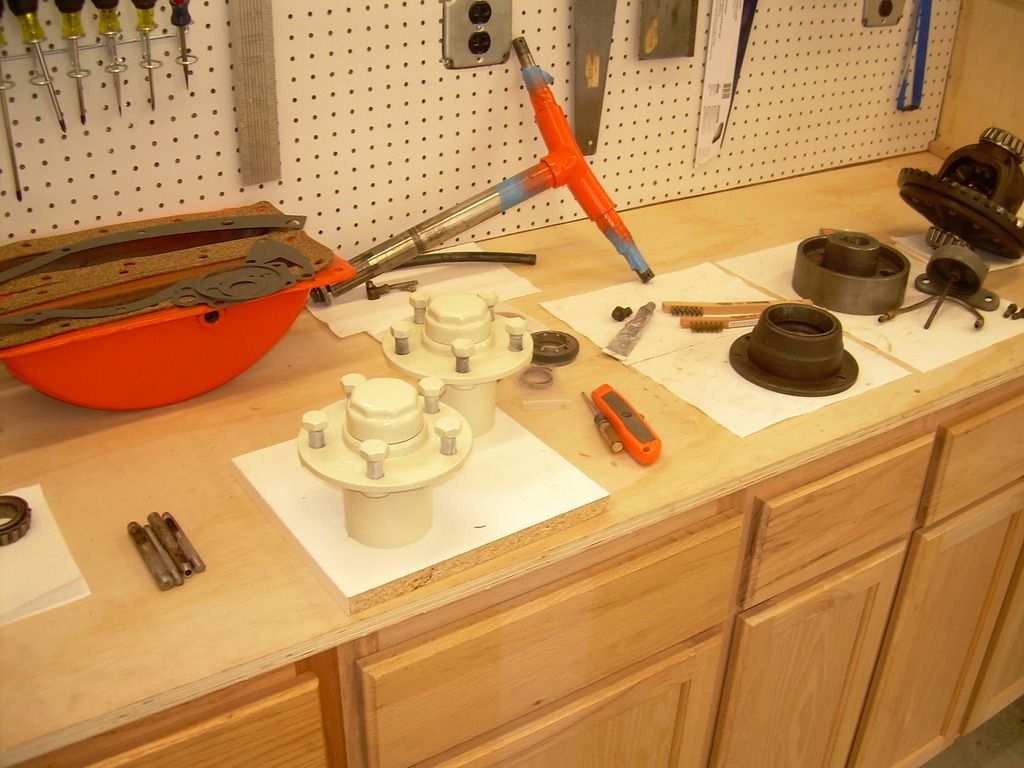 http://s202.photobucket.com/user/cytochromeP450/media/DSCN4638_zpsam6skh3f.jpg.html" rel="nofollow"> 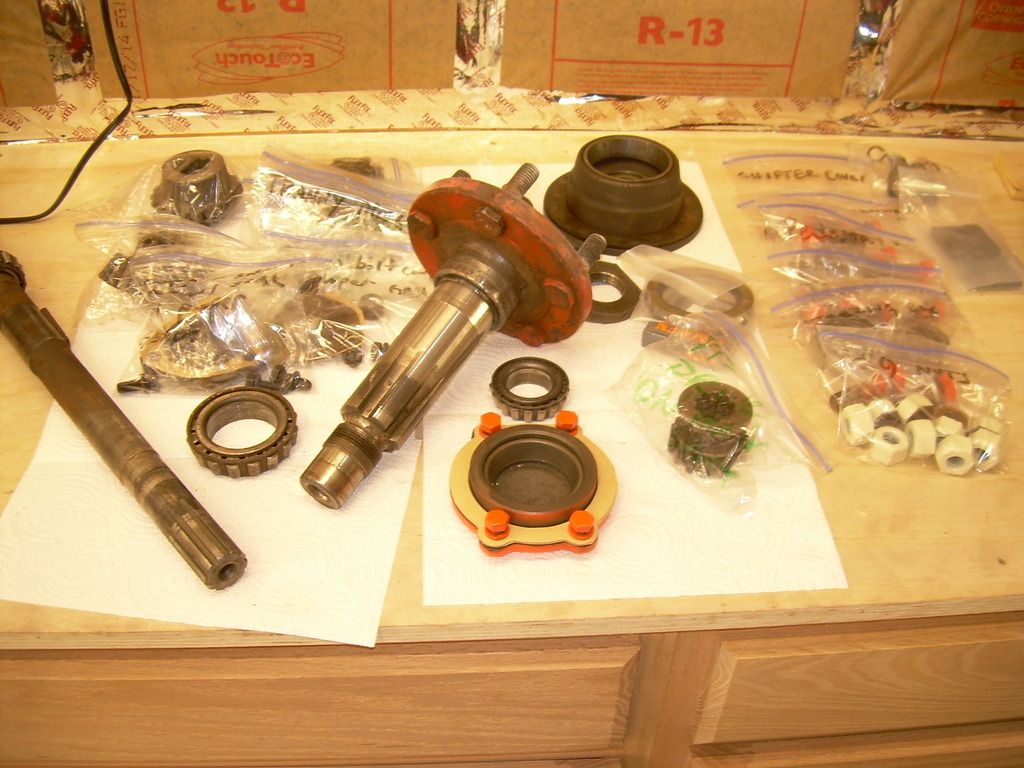 http://s202.photobucket.com/user/cytochromeP450/media/DSCN4636_zps9e8udw82.jpg.html" rel="nofollow"> 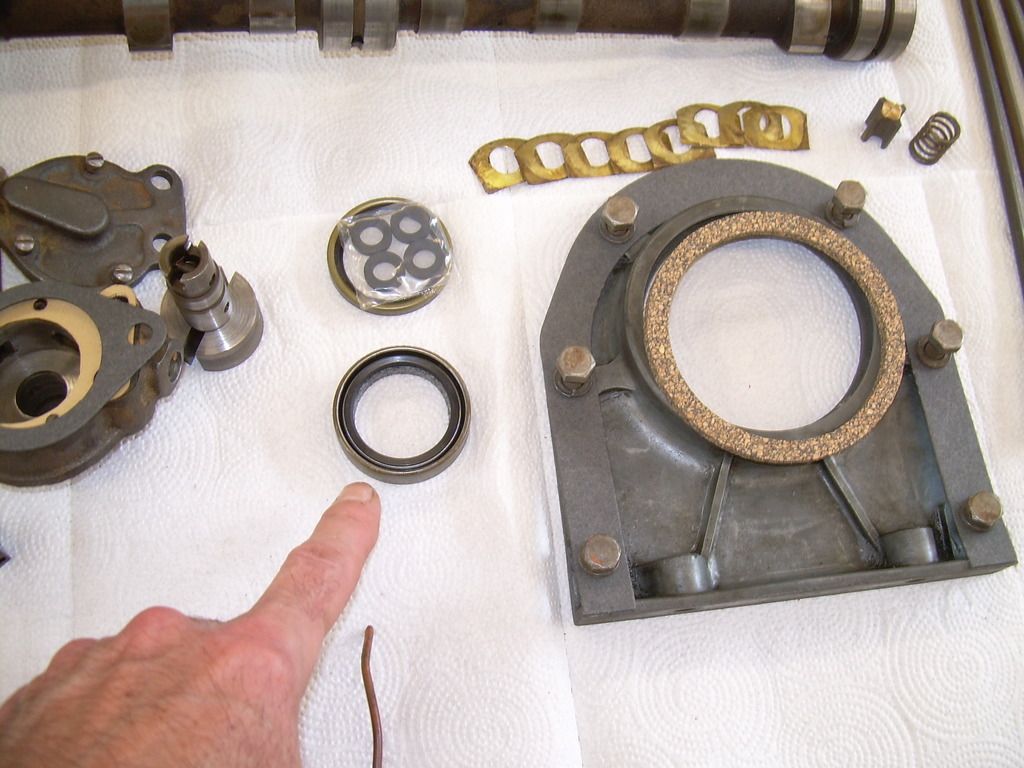 |
Posted By: Dick L
Date Posted: 12 Apr 2015 at 5:40pm
| One goes in the timing gear cover and the other goes in a maybe I can use it some time some where drawer. The newer B's has a larger hole in the cover so they put two in the gasket set. I have opened up the hole on some of the older covers so I could use the larger seal in my maybe some time some where drawer. |
Posted By: Dick L
Date Posted: 12 Apr 2015 at 5:43pm
|
Parts in plastic bags?? That takes all the fun out of putting it back together. I toss every thing in a bucket and play the hunt and sort game.
|
Posted By: Hubnut
Date Posted: 12 Apr 2015 at 6:04pm
|
Dick, Thank you. That makes sense. The gasket set is for both B and C tractors. I'm disappointed in one of the oil pump gaskets. Not even close! |
Posted By: Dick L
Date Posted: 12 Apr 2015 at 7:11pm
The thin one goes under the cover. The thick one the goes between the oil pump and block you can make out of gasket paper. Thickness on the one that goes on the block is not that critical. |
Posted By: Sugarmaker
Date Posted: 12 Apr 2015 at 8:56pm
|
Hub, Your assembly work looks good! Maybe this thread will prod me into moving on my WD project! Thanks for posting such good pictures too. Regards, Chris ------------- D17 1958 (NFE), WD45 1954 (NFE), WD 1952 (NFE), WD 1950 (WFE), Allis F-40 forklift, Allis CA, Allis D14, Ford Jubilee, Many IH Cub Cadets, 32 Ford Dump, 65 Comet. |
Posted By: SC Dan K.
Date Posted: 13 Apr 2015 at 6:16pm
| Back in the good old days I had an obliging parts counter guy who would trade the extra seals that came in kids for the ones I needed more of. I miss that kind of customer service. |
Posted By: SC Dan K.
Date Posted: 13 Apr 2015 at 6:19pm
| Kits not kids stupid voice recognition |
Posted By: Hubnut
Date Posted: 24 Apr 2015 at 8:44pm
|
Got a few more things done. I got all the parts back from the powdercoater, including the wheels. I sent the wheels to a local tire shop and they ordered new firestone 9.5 x 24 tires and installed them. Got them back today. I like the cream color. I think it will look good with the orange tractor. I also had the tin parts powdercoated the same color. Not purist-worthy, but I like it. I got both final drives reassembled with all new seals, gaskets and bearings. I put a new mainshaft into the transmission and reassembled that too. I hope to get some assembly done this weekend. http://s202.photobucket.com/user/cytochromeP450/media/DSCN4641_zpscm8dnbcv.jpg.html" rel="nofollow"> 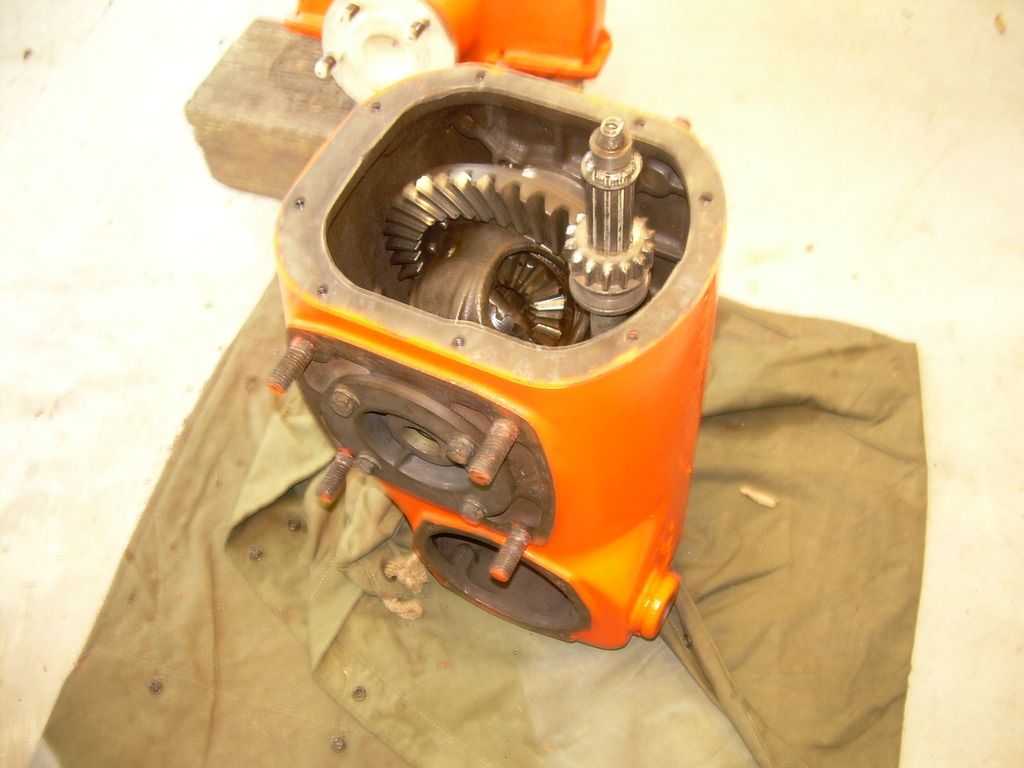 http://s202.photobucket.com/user/cytochromeP450/media/DSCN4639_zpsvn2gvzah.jpg.html" rel="nofollow"> 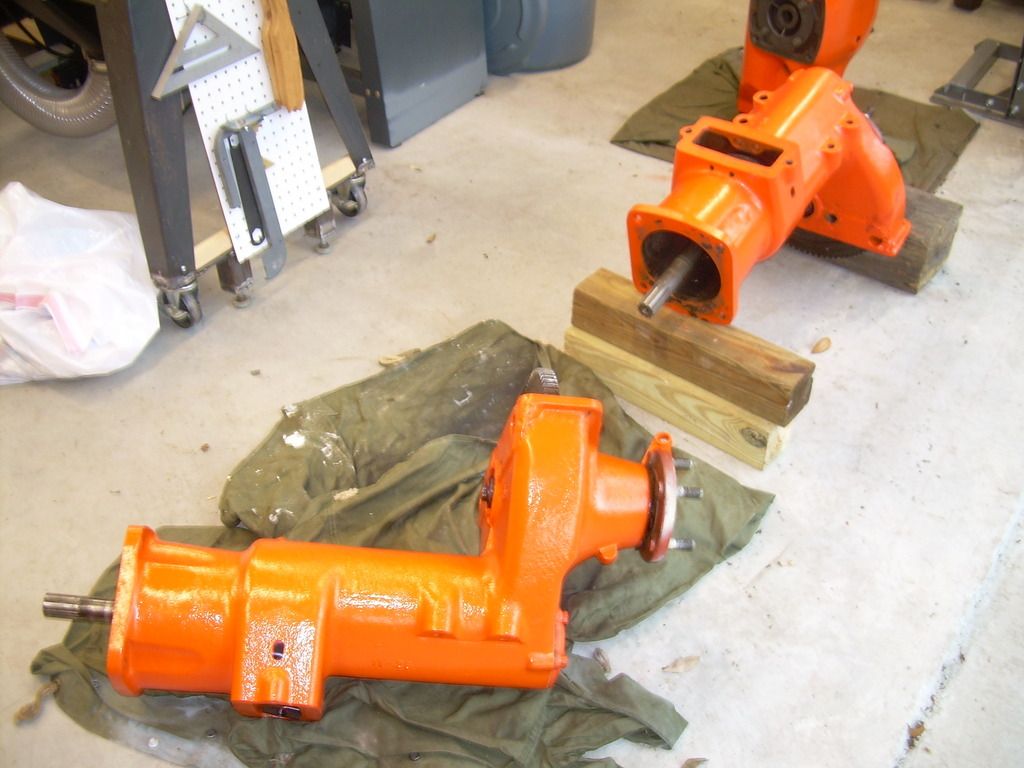 http://s202.photobucket.com/user/cytochromeP450/media/DSCN4724_zpsf24hiicn.jpg.html" rel="nofollow"> 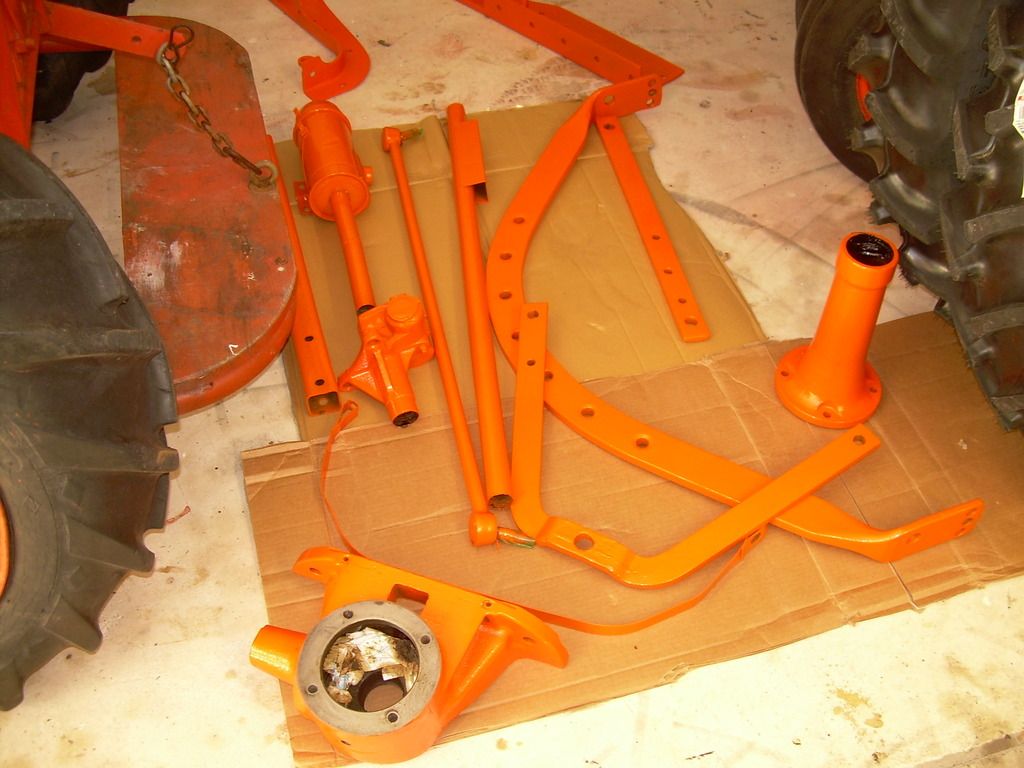 http://s202.photobucket.com/user/cytochromeP450/media/DSCN4723_zps3t75c0um.jpg.html" rel="nofollow"> 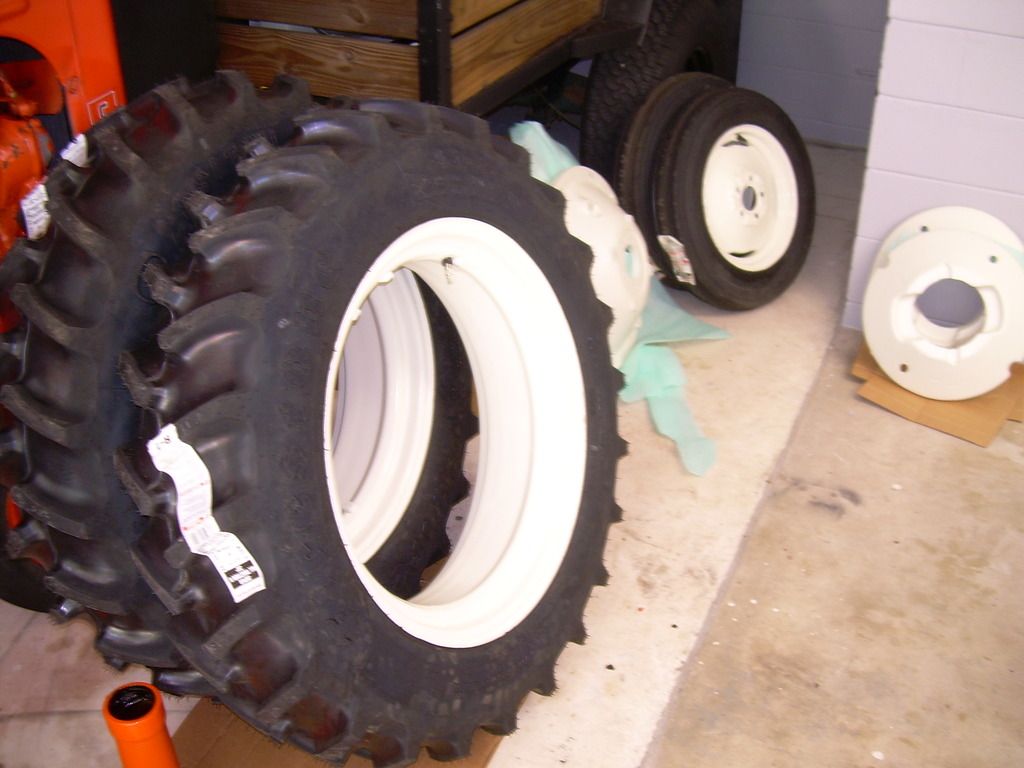 |
Posted By: allischalmerguy
Date Posted: 24 Apr 2015 at 10:19pm
|
Doing good! I like it. ------------- It is great being a disciple of Jesus! 1950 WD, 1957 D17...retired in Iowa, |
Posted By: welsh wheelnut
Date Posted: 25 Apr 2015 at 4:23am
|
Hey Hubnut. That's what I call a quality rebuild. I also use the bag method for the fastners. Then I throw them into a bucket to play hunt the bag months and months later. I once had to play hunt the bucket!!! Clwyd ------------- With great power comes a great big gas bill Allis B's EB6449 Eng. No. CE98937K EB86760 Eng. No. CE104518K EB104152 Eng. No. RL17293K EB104369 Eng. No. CE125009K |
Posted By: Sugarmaker
Date Posted: 25 Apr 2015 at 11:18am
|
Very nice work on the restoration! Your doing it right! Regards, Chris ------------- D17 1958 (NFE), WD45 1954 (NFE), WD 1952 (NFE), WD 1950 (WFE), Allis F-40 forklift, Allis CA, Allis D14, Ford Jubilee, Many IH Cub Cadets, 32 Ford Dump, 65 Comet. |
Posted By: Dick L
Date Posted: 25 Apr 2015 at 11:42am
| Better than new. Fantastic detail from stem to stern. Will be the best of best when assembled. |
Posted By: Hubnut
Date Posted: 25 Apr 2015 at 4:13pm
|
Got the final drives and tranny put together. Tougher than I anticipated. I got a bit discombombulated with the tranny hanging upside down and I installed the tires backwards. I'll fix that later. Too difficult right now. It's getting there. Now I need a clutch. Thanks for the comments. http://s202.photobucket.com/user/cytochromeP450/media/DSCN4726_zps7kzaybwj.jpg.html" rel="nofollow"> 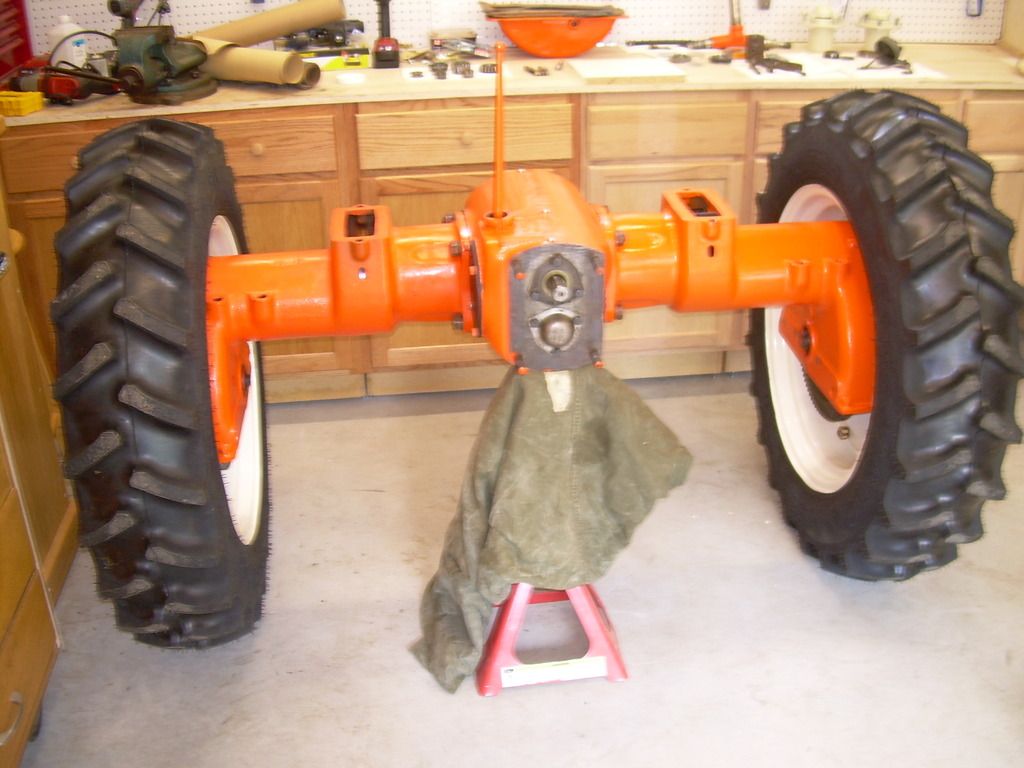 http://s202.photobucket.com/user/cytochromeP450/media/DSCN4727_zpsutpc1cfw.jpg.html" rel="nofollow"> 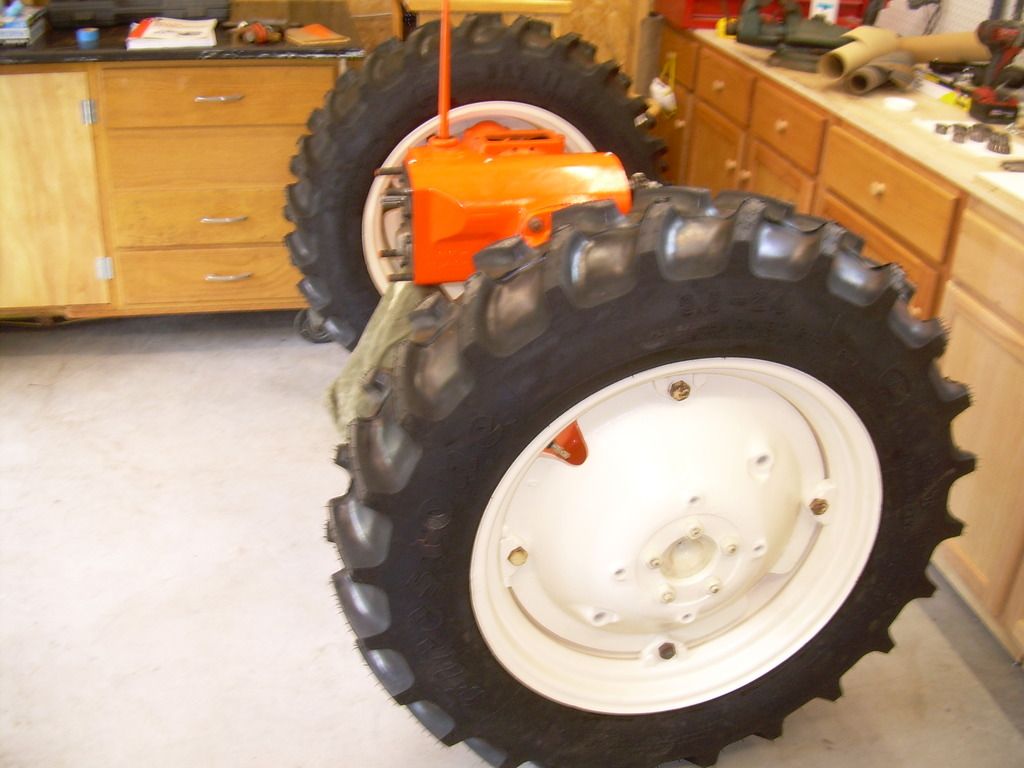 |
Posted By: Wdtractorman
Date Posted: 25 Apr 2015 at 9:48pm
| All I can say is you make me feel terribly inadequate in my atempts at fixing my ol junk. Lol P.s. what size and type of firestones tires are they I really like the looks of them. |
Posted By: acbnz
Date Posted: 26 Apr 2015 at 3:05am
|
Wish I had seen this before now- great article,I've learned a lot from reading this and looking at the photos,hope to see more on this restoration in the future,thank you for sharing your experience,helped me a lot. |
Posted By: Dick L
Date Posted: 26 Apr 2015 at 12:53pm
|
You my friend are putting this old man to shame. I see you either put the final drives on the wrong side or the tires.
|
Posted By: SteveC (NS)
Date Posted: 26 Apr 2015 at 1:11pm
|
Can't you just switch the wheels with the tires the way they are? I wish my boo boos were that easy to fix! Excellent job Hubnut. |
Posted By: Ken in Texas
Date Posted: 26 Apr 2015 at 1:52pm
|
Hub. I thought to my self, Kenny, How long it would it take for a tractor man to spot the wrong way tire tread direction? You could tell them they were put on that way on purpose because you have a big mud hole you plan to drive into and back out when you get stuck in the mud. The pro contract combine drivers mount their front drive tires backwards for backing out of soft playa lake wet spots in flat western wheat fields. Going in deep mud to far without the ability to back out with max traction costs lost time and money. Now the B&W pic I sent 70u8of the 40 B special vegetable addition had the tire direction bass ackwards. Recon the crybaby kids noticed the backwards mounting and that made them cry that their Grandpa should have known better to reverse the tire to alter the tread width one at a time without swapping sides.. Bet grandpa had lots of unnecessary tire slip when plowing. |
Posted By: Hubnut
Date Posted: 26 Apr 2015 at 2:51pm
|
I put the tires on backwards. I know I know. Switched them and all is right with the world. Got the torque tube on. Still awaiting the engine from the machine shop. http://s202.photobucket.com/user/cytochromeP450/media/DSCN4736_zpsrn1a3j94.jpg.html" rel="nofollow"> 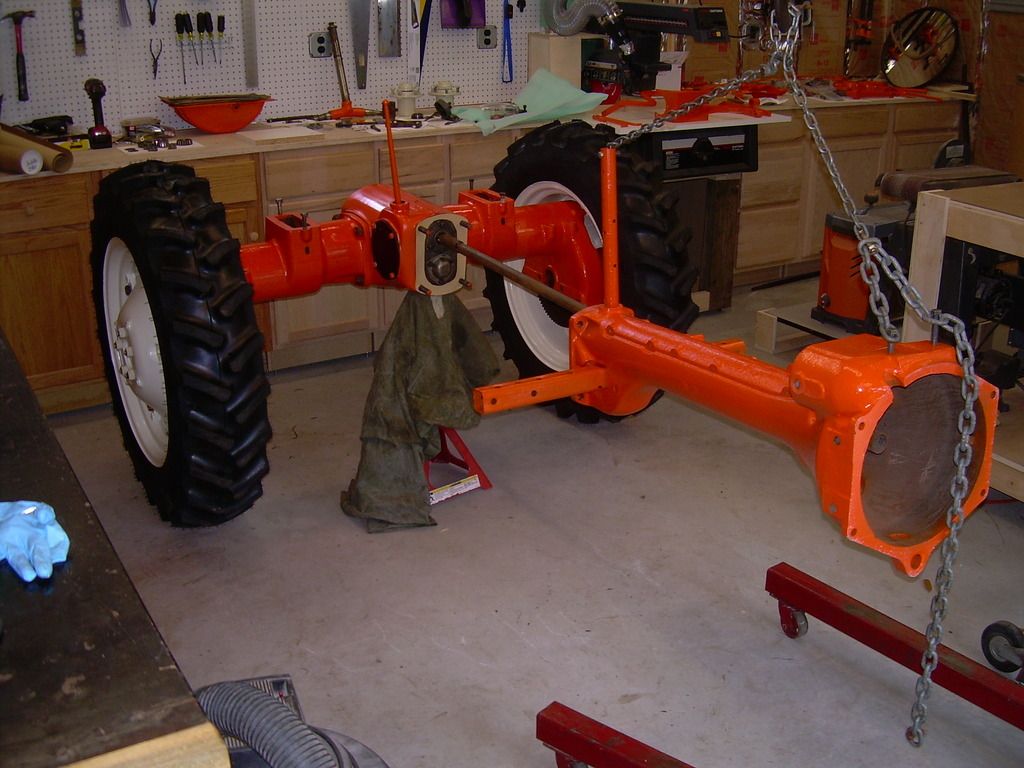 http://s202.photobucket.com/user/cytochromeP450/media/DSCN4737_zpsaztv5xti.jpg.html" rel="nofollow"> 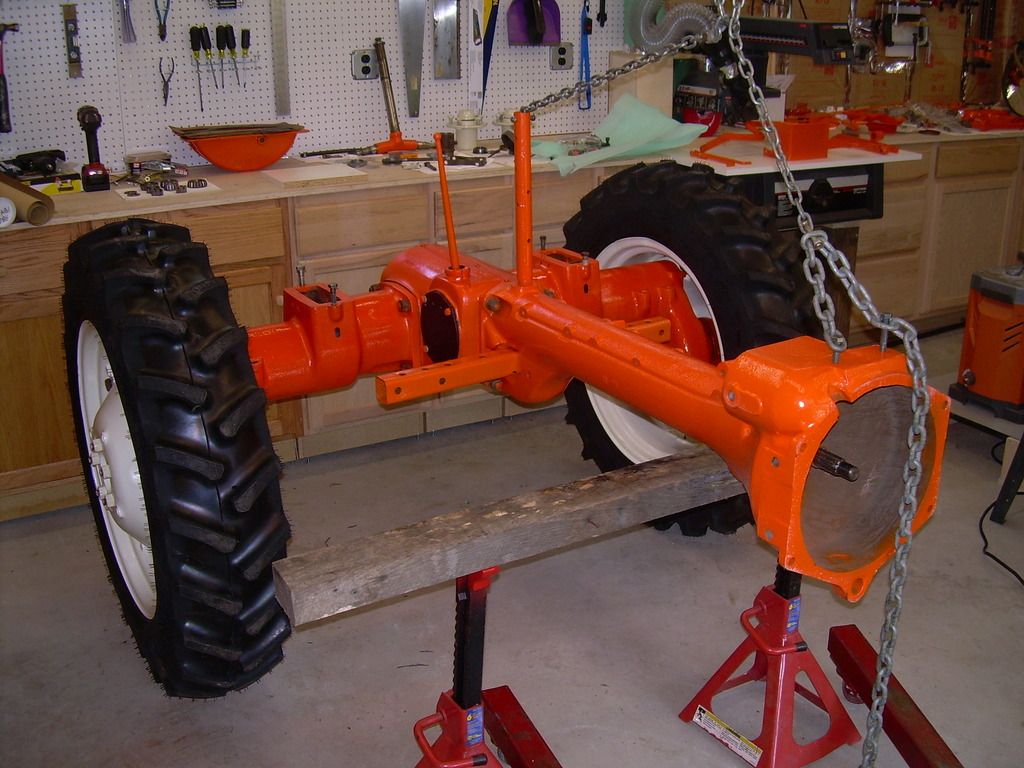 http://s202.photobucket.com/user/cytochromeP450/media/DSCN4739_zpss05xnbwk.jpg.html" rel="nofollow"> 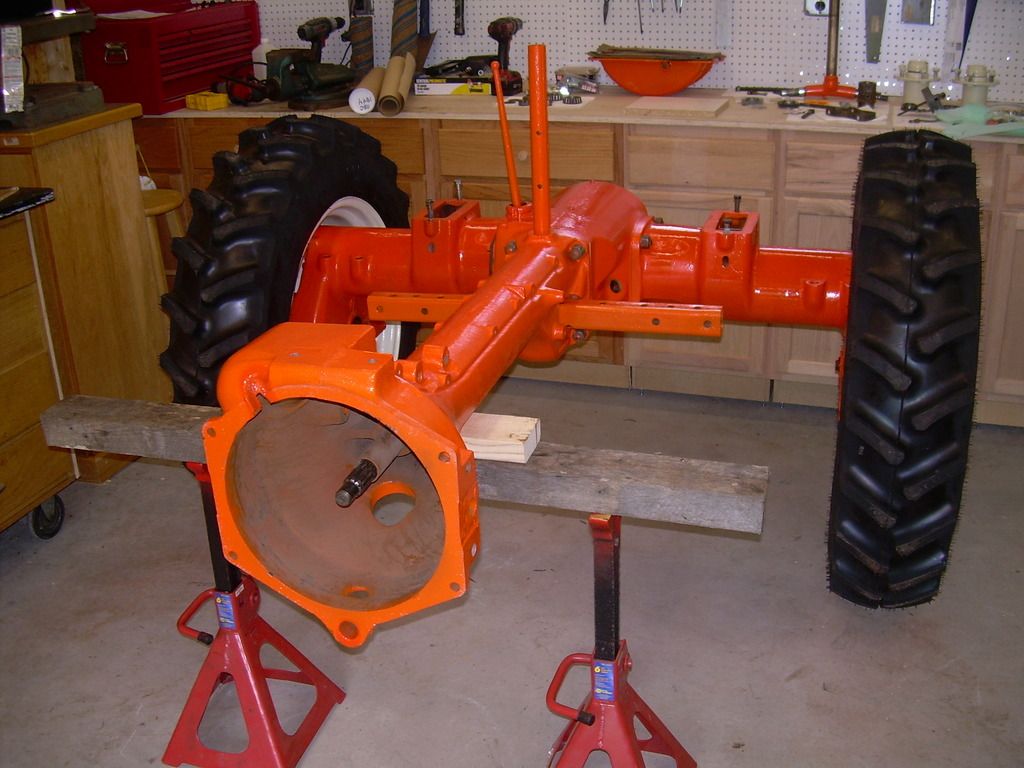 |
Posted By: Hubnut
Date Posted: 26 Apr 2015 at 4:03pm
| WDtractorman, the tires are Firestone super all traction II, 9.5 x 24. |
Posted By: weiner
Date Posted: 26 Apr 2015 at 7:05pm
|
Beautiful job, can`t wait to see the finished product, but I want to know how do you keep your work place and work bench so clean and organized? ------------- Real heros wear dogtags, not capes. |
Posted By: DonBC
Date Posted: 26 Apr 2015 at 7:13pm
|
When I first looked at the the rear axle assembled my first thought was the tires are on backwards. I see that the later photos show the tires(wheels) have been reversed. Exceptional job. ------------- Jack of all trades, master of none |
Posted By: Hubnut
Date Posted: 26 Apr 2015 at 8:48pm
| Thanks for the compliments gents. The shop is a new addition to my backyard, so it hasn't had much time to accumulate and clutter. It's getting that way though! |
Posted By: Steve in NJ
Date Posted: 27 Apr 2015 at 6:28am
|
Outstanding job Hub! Outstanding! Love the detail. Don't feel funny about using parts bags. They're the best especially for guys like me that it takes 5 years to redo a Tractor! If it wasn't for those marked bags, I'd be in deep do-do! LOL! Sweet Tractor man! Steve@B&B ------------- 39'RC, 43'WC, 48'B, 49'G, 50'WF, 65 Big 10, 67'B-110, 75'716H, 2-620's, & a Motorhead wife |
Posted By: Hubnut
Date Posted: 04 May 2015 at 7:14pm
|
Got a few parts on the backside installed. Hopefully the machine shop will get my engine back this week. http://s202.photobucket.com/user/cytochromeP450/media/DSCN4833_zps1qbbbttk.jpg.html" rel="nofollow">  |
Posted By: Dave(inMA)
Date Posted: 04 May 2015 at 9:16pm
|
Hubnut, that is one sweet looking project! Outstanding work - ought to inspire a whole lot of us. Thanks for all the pix and updates. Dave ------------- WC, CA, D14, WD45 |
Posted By: Hubnut
Date Posted: 04 May 2015 at 9:28pm
|
Thanks Dave. I have waaayy too much money in this little tractor. I could have bought 8 complete tractors with that money by now!
|
Posted By: Dave(inMA)
Date Posted: 04 May 2015 at 9:52pm
|
So true, but she's going to be one heck of a nice restoration when you're finished. Hope the machine shop gets that engine back to you soon. ------------- WC, CA, D14, WD45 |
Posted By: Hubnut
Date Posted: 09 May 2015 at 7:09pm
|
Got a few more items added to the back half of the tractor. The machine shop assured me they'd have my engine, head, crank, and flywheel back this week. We'll see. I ordered a Ross steering tool box, but it still wasn't right. I had to do some trimming to get it to fit. Colors are not correct--seems to be a bit taboo right now. Oh well, my tractor. I like it. http://s202.photobucket.com/user/cytochromeP450/media/DSCN4845_zpsbblasi7g.jpg.html" rel="nofollow">  http://s202.photobucket.com/user/cytochromeP450/media/DSCN4847_zpszgm5tust.jpg.html" rel="nofollow">  http://s202.photobucket.com/user/cytochromeP450/media/DSCN4848_zpscu05jep9.jpg.html" rel="nofollow">  |
Posted By: JohnCO
Date Posted: 10 May 2015 at 1:17am
|
Hub, your shop is much too neat. You are making the rest of us look bad, please mess it up a bit. Thanks. BTW, beautiful restoration job! ------------- "If at first you don't succeed, get a bigger hammer" Allis Express participant |
Posted By: Hubnut
Date Posted: 15 May 2015 at 6:32pm
|
Got my engine back today! The head is done, block repaired, line-bored, crank turned 0.01 under (main and rod), and flywheel is flat. Now I just need to reassemble. Like Christmas! http://s202.photobucket.com/user/cytochromeP450/media/DSCN4851_zpskla5zbop.jpg.html" rel="nofollow">  http://s202.photobucket.com/user/cytochromeP450/media/DSCN4855_zpseqihbd5s.jpg.html" rel="nofollow">  http://s202.photobucket.com/user/cytochromeP450/media/DSCN4854_zpsesx1i5kf.jpg.html" rel="nofollow">  |
Posted By: Steve in NJ
Date Posted: 15 May 2015 at 7:38pm
|
Oh Boy!!! Christmas come early!!!! I can see this dude running by next week! Have fun man. You're doin' one heck of a job on that see man!
------------- 39'RC, 43'WC, 48'B, 49'G, 50'WF, 65 Big 10, 67'B-110, 75'716H, 2-620's, & a Motorhead wife |
Posted By: Hubnut
Date Posted: 15 May 2015 at 8:50pm
| Oh, by the way, I got my carburetor back from Steve in NJ and it looks like a work of art! Thanks Steve! |
Posted By: Sugarmaker
Date Posted: 16 May 2015 at 7:44am
|
HN, Wow this is looking good. The colors will work just fine! Your doing a great job! ( I do agree that you should clutter your shop a little more!:) Making me look like a slacker!) That engine will purr like a kitten! Your doing it right and the results will be awesome. Have you gotten a new tractor lined up for the second build? Great pictures! Regards, Chris ------------- D17 1958 (NFE), WD45 1954 (NFE), WD 1952 (NFE), WD 1950 (WFE), Allis F-40 forklift, Allis CA, Allis D14, Ford Jubilee, Many IH Cub Cadets, 32 Ford Dump, 65 Comet. |
Posted By: Hubnut
Date Posted: 16 May 2015 at 8:58am
|
Chris, Thanks. I just rattle-canned the engine. Not bad, but with our 80% humidity, it will take 3 weeks to cure. Gotta run out for some plastigauge. I hope with the line-boring I don't need to shim. At least that's what the machine shop said. Steve |
Posted By: Sugarmaker
Date Posted: 17 May 2015 at 7:08am
|
HN, You will have fun doing the engine. New parts, fresh gaskets, new paint, lots of specs, torquing everything. Nice! Get us some pictures along the way. Regards, Chris ------------- D17 1958 (NFE), WD45 1954 (NFE), WD 1952 (NFE), WD 1950 (WFE), Allis F-40 forklift, Allis CA, Allis D14, Ford Jubilee, Many IH Cub Cadets, 32 Ford Dump, 65 Comet. |
Posted By: Hubnut
Date Posted: 17 May 2015 at 7:14am
|
Started assembly of the engine. After painting, I checked the main bearings for clearance. The block was line-bored, so I assumed shimming wouldn't be necessary. I used red and green plastigage. The red is a wider range and I was getting 0.003 inches in all the bearings. I tried the red plastigage and got a little better numbers (0.002, 0.0022, and 0.0025 for 1, 2, and 3, respectively). All are considered outside specification of 0.001 to 0.002 inches. However, I decided this is good enough for my old engine. The rod bearings were much better. They were: 0.0015, 0.0017, 0.0019, and 0.0015. I am happy with these numbers. I put the sleeves in and got all 4 pistons installed. It went fairly smoothly. I'm waiting on a ring gear, so I won't be able to put the engine on until then. I hope to get rest of the engine reassembled today or next weekend. http://s202.photobucket.com/user/cytochromeP450/media/DSCN4859_zpsidikh3jv.jpg.html" rel="nofollow">  http://s202.photobucket.com/user/cytochromeP450/media/DSCN4862_zpsnexxvsh1.jpg.html" rel="nofollow">  http://s202.photobucket.com/user/cytochromeP450/media/DSCN4878_zpsqxlvbkgp.jpg.html" rel="nofollow">  http://s202.photobucket.com/user/cytochromeP450/media/DSCN4864_zpswz076zys.jpg.html" rel="nofollow">  http://s202.photobucket.com/user/cytochromeP450/media/DSCN4867_zpsmmoru0o1.jpg.html" rel="nofollow">  http://s202.photobucket.com/user/cytochromeP450/media/DSCN4879_zpszia4imv0.jpg.html" rel="nofollow">  |
Posted By: Sugarmaker
Date Posted: 17 May 2015 at 7:28am
|
Steve, Wow great progress on the engine! Nice and clean! Thanks for the pictures of the engine build along the way. I think it will run fine with those clearances on the mains, but I am not the engine man. I think these engines ran for years much looser than that. Your making good steady progress on the "C"! When is the first parade? Regards, Chris ------------- D17 1958 (NFE), WD45 1954 (NFE), WD 1952 (NFE), WD 1950 (WFE), Allis F-40 forklift, Allis CA, Allis D14, Ford Jubilee, Many IH Cub Cadets, 32 Ford Dump, 65 Comet. |