| Author |
|
B26240 
Orange Level

Joined: 21 Nov 2009
Location: mn
Points: 3860
|
 Post Options Post Options
") Thanks(0) Thanks(0)
 Quote Quote  Reply Reply
 Posted: 03 May 2016 at 5:33am Posted: 03 May 2016 at 5:33am |
|
Marv look at the steering shaft u-joint as now would be a great time to change it while the engine is out. Also the worm gear is held on the shaft with a pin and I have seen these loose. On the bottom of bolster shaft the spindles are keyed to bolster shaft and this big key is probably a little worn. These are the easier things to fix. A little wear here and there and it all adds up. Mark
|
 |
|
Sponsored Links
|
|
|
BenGiBoy
Orange Level

Joined: 11 Nov 2015
Location: Ashville, NY
Points: 696
|
Post Options
Thanks(0)
Quote Reply
Posted: 03 May 2016 at 7:38am |
|
The looseness of the steering wheel is just from wear in the steering box, probably. I have been told that they can be adjusted, but then you mess up the wear pattern and it binds, so it is just better to leave it how it is. JMHO..
|
|
'39 Model B
Tractors are cheaper than girls, remember that!
|
|
littlemarv
Orange Level
Joined: 10 Jun 2013
Location: Wisconsin
Points: 1826
|
Post Options
Thanks(0)
Quote Reply
Posted: 13 May 2016 at 9:41am |
When I visited Ken this spring, he mentioned putting oversize pins in the shift tower? The shifter felt pretty good, actually, before I took it off the tractor. I removed it because the reverse interlock linkage was rusted and froze tight. A little soak with some homebrew penetrant and it freed right up. I was just going to put a new boot on and reassemble, but I thought I'd take a peek at those pins. However, I cant get the shift lever out. I removed the snap ring and pulled this spacer out from above the ball, but the lever wont come out. Am I missing something else? 
Edited by littlemarv - 25 Aug 2017 at 10:18pm
|
|
The mechanic always wins.
B91131, WC23065, WD89101, CA29479, B1, Early B10, HB212, 416H
|
|
CAL(KS)
Orange Level
Joined: 18 Sep 2009
Location: Chapman, KS
Points: 3747
|
Post Options
Thanks(0)
Quote Reply
Posted: 13 May 2016 at 10:11am |
|
flip it over, you will need to take the reverse lockout mechanism and spring off before it will come out. fun to do with rails and forks on
Edited by CAL(KS) - 13 May 2016 at 10:13am
|
|
Me -C,U,UC,WC,WD45,190XT,TL-12,145T,HD6G,HD16,HD20
Dad- WD, D17D, D19D, RT100A, 7020, 7080,7580, 2-8550's, 2-S77, HD15
|
|
littlemarv
Orange Level
Joined: 10 Jun 2013
Location: Wisconsin
Points: 1826
|
Post Options
Thanks(0)
Quote Reply
Posted: 13 May 2016 at 10:48am |
|
As I was trying to get it out, it crossed my mind that that mechanism must be involved somehow.
Well, new boot and new gasket and back on she goes. Not going to dig into it at this time. Thanks.
|
|
The mechanic always wins.
B91131, WC23065, WD89101, CA29479, B1, Early B10, HB212, 416H
|
|
B26240
Orange Level
Joined: 21 Nov 2009
Location: mn
Points: 3860
|
Post Options
Thanks(0)
Quote Reply
Posted: 13 May 2016 at 3:48pm |
|
Marv if you ever do take the shift rails out of the shifter top be VERY CAREFULL of the detent balls as they can come flying out at warp speed due to the fact that they are under spring tension.
|
|
B26240
Orange Level
Joined: 21 Nov 2009
Location: mn
Points: 3860
|
Post Options
Thanks(0)
Quote Reply
Posted: 13 May 2016 at 3:51pm |
|
Marv have you checked the wear items I listed in regard to the steering yet? If so what have you found? Mark
|
|
littlemarv
Orange Level
Joined: 10 Jun 2013
Location: Wisconsin
Points: 1826
|
Post Options
Thanks(0)
Quote Reply
Posted: 13 May 2016 at 7:33pm |
|
Well, the u-joint has a little play, and actually the pin that holds the yoke on has a little play too. Haven't looked into the pedestal itself yet.
I hope to pressure wash the entire chassis and bring it in the garage sometime in the next few weeks. Garage has been rather busy. Two weeks ago, block garage sale. One week ago, painted the topper for the truck. This weekend, Courtney's birthday party. Next two weekends, camping. Every weekday, work all day, pick up kids, do homework, make supper, then at least one sporting event if not two. I don't know how we got so busy, but I sneak in a little tractor tinkering here and there.
|
|
The mechanic always wins.
B91131, WC23065, WD89101, CA29479, B1, Early B10, HB212, 416H
|
|
Sugarmaker
Orange Level

Joined: 12 Jul 2013
Location: Albion PA
Points: 8169
|
Post Options
Thanks(0)
Quote Reply
Posted: 13 May 2016 at 8:28pm |
 littlemarv wrote: littlemarv wrote:
Well, the u-joint has a little play, and actually the pin that holds the yoke on has a little play too. Haven't looked into the pedestal itself yet.
I hope to pressure wash the entire chassis and bring it in the garage sometime in the next few weeks. Garage has been rather busy. Two weeks ago, block garage sale. One week ago, painted the topper for the truck. This weekend, Courtney's birthday party. Next two weekends, camping. Every weekday, work all day, pick up kids, do homework, make supper, then at least one sporting event if not two. I don't know how we got so busy, but I sneak in a little tractor tinkering here and there. |
Your 'livin" Marv! Good job! Regards, Chris
|
|
D17 1958 (NFE), WD45 1954 (NFE), WD 1952 (NFE), WD 1950 (WFE), Allis F-40 forklift, Allis CA, Allis D14, Ford Jubilee, Many IH Cub Cadets, 32 Ford Dump, 65 Comet.
|
|
Thad in AR.
Orange Level Access

Joined: 12 Sep 2009
Location: Arkansas
Points: 9301
|
Post Options
Thanks(0)
Quote Reply
Posted: 13 May 2016 at 8:45pm |
|
This is a great post. I hope it inspires me to get back on mine. The steering was very loose on mine. The biggest problem was the keyway in the bottom of the main shaft where the spindle block goes was wore bad. I finally bought another used pedistal and used the best parts from each. I was able to get bearings and races through NAPA. Keep up the good work and thanks for taking the time to share pics with us when time is so valuable.
|
|
littlemarv
Orange Level
Joined: 10 Jun 2013
Location: Wisconsin
Points: 1826
|
Post Options
Thanks(0)
Quote Reply
Posted: 03 Jun 2016 at 12:32am |
Alright, its go time. I told Courtney to get on the tractor and steer, I would pull with the 416, and Carter could take a few pictures. Carter let out a screech and the argument was on! We tried rock paper scissors, pick a number, 7 and 10 year old logic, bargaining, but nothing seemed to yield results suitable to all parties involved. Finally, I told both of them to get on the tractor, Courtney steer, and Carter work the brakes. Finally! Peace returns! So I had to take the damn picture.  Pulled it in the garage, installed some guide studs, and plunked the shift tower into place.    Scraped gunk for awhile, found some pretty nice paint inside the framerails.  I removed this piece. The only thing good on the toolbox is the hole...  Fired up the pressure washer. Before  After   Hold up! Today is the last day of school. This calls for ice cream. Everybody pull up a chair.  Scraped out the bellhousing, and went in after the trans input seal. Removed the clutch return spring, the fork keeper, the throwout bearing, the fork jam bolt, and pivoted the fork down out of the way. Removed the sleeve over the input shaft, only to find out there is no input seal. The shaft is spiral grooved to keep the oil in. I told my dealer I had an unstyled WC and they sent a cork seal about 2" in diameter, but that must be for a styled one? But, at any rate, I got to see how it all comes apart, and inspect and grease everything. Replaced the throwout bearing. 
Edited by littlemarv - 25 Aug 2017 at 10:25pm
|
|
The mechanic always wins.
B91131, WC23065, WD89101, CA29479, B1, Early B10, HB212, 416H
|
|
patrickmull
Orange Level

Joined: 11 Jan 2011
Location: Casey IL
Points: 893
|
Post Options
Thanks(0)
Quote Reply
Posted: 03 Jun 2016 at 5:43am |
look at that wide foot plate in the middle looking good i just got mine done
Edited by patrickmull - 03 Jun 2016 at 5:45am
|
|
JoeM(GA)
Orange Level

Joined: 12 Sep 2009
Location: Cumming,GA
Points: 4533
|
Post Options
Thanks(0)
Quote Reply
Posted: 03 Jun 2016 at 5:49am |
Allis always had the spiral with the cork or felt seals, it helps work the oil back away from the seal. My 41 WC had a felt seal with a steel guard 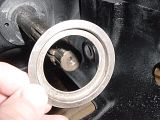
|
|
Allis Express North Georgia
41 WC,48 UC Cane,7-G's,
Ford 345C TLB
|
|
Dan73
Orange Level

Joined: 04 Jun 2015
Location: United States
Points: 6054
|
Post Options
Thanks(0)
Quote Reply
Posted: 03 Jun 2016 at 5:55am |
patrickmull wrote:
look at that wide foot plate in the middle looking good i just got mine done
|
What is the tank and platform on the front used for? I haven't seen anything like that and as far as it hangs out in front it must have a good purpose.
|
|
littlemarv
Orange Level
Joined: 10 Jun 2013
Location: Wisconsin
Points: 1826
|
Post Options
Thanks(0)
Quote Reply
Posted: 03 Jun 2016 at 7:36am |
|
Well, I need to be sure on the tranny seal. The seal that I got is about 1/8" thick, 2" O.D., and 1 1/8" I.D. I didn't see any remnants of an old seal, or anyplace for the seal to actually go. There is a thin steel sleeve that goes over the input shaft, and has a flat flange on it that bolts to the front of the tranny with two 3/8" bolts. The part number on the seal is 70202086.
My tranny does look like the picture in the post above, do I have the right seal?
Any ideas?
Edited by littlemarv - 03 Jun 2016 at 7:40am
|
|
The mechanic always wins.
B91131, WC23065, WD89101, CA29479, B1, Early B10, HB212, 416H
|
|
CAL(KS)
Orange Level
Joined: 18 Sep 2009
Location: Chapman, KS
Points: 3747
|
Post Options
Thanks(0)
Quote Reply
Posted: 03 Jun 2016 at 8:00am |
|
wc should have the felt or cork whatever it was and wd and up have a rubber lip seal. both numbers are listed in the agco parts book. if i remember correctly the seal is clamped between the thin sleeve and bellhousing. when we put a starter bellhousing on my brothers 38 we used a wd bellhousing and seal holder.
|
|
Me -C,U,UC,WC,WD45,190XT,TL-12,145T,HD6G,HD16,HD20
Dad- WD, D17D, D19D, RT100A, 7020, 7080,7580, 2-8550's, 2-S77, HD15
|
|
patrickmull
Orange Level
Joined: 11 Jan 2011
Location: Casey IL
Points: 893
|
Post Options
Thanks(0)
Quote Reply
Posted: 03 Jun 2016 at 11:10am |
|
that's a pulling tractor that's my fuel tank and weight bracket
|
|
Dan73
Orange Level
Joined: 04 Jun 2015
Location: United States
Points: 6054
|
Post Options
Thanks(0)
Quote Reply
Posted: 03 Jun 2016 at 12:10pm |
|
So you don't use the normal gas tank? Just curious. Thought it might be a weight bracket of some kind.
|
|
patrickmull
Orange Level
Joined: 11 Jan 2011
Location: Casey IL
Points: 893
|
Post Options
Thanks(0)
Quote Reply
Posted: 03 Jun 2016 at 2:37pm |
|
No I wanted to get as much weight out front as I could with as much engine as i have I have trouble keeping the front end down
|
|
JoeM(GA)
Orange Level
Joined: 12 Sep 2009
Location: Cumming,GA
Points: 4533
|
Post Options
Thanks(0)
Quote Reply
Posted: 03 Jun 2016 at 3:50pm |
|
When I bought my seal from Sandy Lake it was felt, if you take the AGCO part number it crosses out to a rubber seal, I'd call the folks at Sandy Lake and ask them.
By my parts book and all my pictures, you should have the felt seal in the recess, the seal retainer over it (the piece in my above pic) and the throwout bearing tube bolting down and holding it all in place.
|
|
Allis Express North Georgia
41 WC,48 UC Cane,7-G's,
Ford 345C TLB
|
|
littlemarv
Orange Level
Joined: 10 Jun 2013
Location: Wisconsin
Points: 1826
|
Post Options
Thanks(0)
Quote Reply
Posted: 04 Jun 2016 at 12:46am |
Dove back in to look at that trans input seal. Pulled the sleeve off the input shaft,  Poked around in there a bit, sure enough, there is a steel washer and a rock hard piece of cork in there.  So, cleaned that out and installed a new seal.  There are actually two small holes 90 degrees from the mount holes on the sleeve, must be weep holes.  So, got that up to snuff. Only thing left before the motor goes in is the steering u-joint. If I can tighten it up there a bit, I can eliminate 3" of steering slop. Took the u-joint out. Never saw one like this before. No caps, just has pins through it?  Anyways, I have an extra one from a WD laying around, so I popped that one apart. Will have to try and find one locally tomorrow, as it will be holding up progress...  Cleaned up the input shaft, made sure the disk slides nicely and the pilot bearing fits. 
Edited by littlemarv - 25 Aug 2017 at 10:37pm
|
|
The mechanic always wins.
B91131, WC23065, WD89101, CA29479, B1, Early B10, HB212, 416H
|
|
Dan73
Orange Level
Joined: 04 Jun 2015
Location: United States
Points: 6054
|
Post Options
Thanks(0)
Quote Reply
Posted: 04 Jun 2016 at 2:47am |
|
That is comming along nice. You will be driving it around before you know it. Nicely done.
|
|
littlemarv
Orange Level
Joined: 10 Jun 2013
Location: Wisconsin
Points: 1826
|
Post Options
Thanks(0)
Quote Reply
Posted: 06 Jun 2016 at 10:37pm |
|
|
|
The mechanic always wins.
B91131, WC23065, WD89101, CA29479, B1, Early B10, HB212, 416H
|
|
KenBWisc
Orange Level
Joined: 15 Sep 2009
Location: Fall Creek, WI
Points: 1166
|
Post Options
Thanks(0)
Quote Reply
Posted: 07 Jun 2016 at 8:28am |
|
Roll pins work well. I also ran safety wire through the pins just in case they decided to move.
|
|
'34 WC #629, '49 G, '49 B, '49 WD, '62 D-19, '38 All Crop 60 and still hunting!
|
|
littlemarv
Orange Level
Joined: 10 Jun 2013
Location: Wisconsin
Points: 1826
|
Post Options
Thanks(0)
Quote Reply
Posted: 12 Jun 2016 at 10:21pm |
Cleaning out the gas tank. Install 20 3/8" nuts, 5 5/8" nuts, a gallon of diesel fuel, and a plug in the bottom....  YES, I counted the nuts so we get them all back. Apply tank to tractor wheel, with a wooden buffer....  Yet another reason why you need more than one tractor! And, cruise up and down the road in first gear repeatedly.  I've never done this before, read about it on here a few times. I moved the tank to different positions and changed the fuel twice. Got a lot of crap out of it. I guess, in my mind, I thought it would be shiny new inside when done. Its not, but at least everything loose should have come out now instead of heading to the carb! Still picked up an extra screen for the sediment bowl, just in case.
Edited by littlemarv - 25 Aug 2017 at 10:49pm
|
|
The mechanic always wins.
B91131, WC23065, WD89101, CA29479, B1, Early B10, HB212, 416H
|
|
dawntreader74
Orange Level

Joined: 28 Oct 2013
Location: Manteno
Points: 1761
|
Post Options
Thanks(0)
Quote Reply
Posted: 12 Jun 2016 at 11:00pm |
|
now you can put a small hose on the shop vac an sure get it all out' works good
|
|
alleyyooper
Orange Level
Joined: 12 May 2014
Location: Michigan
Points: 238
|
Post Options
Thanks(0)
Quote Reply
Posted: 13 Jun 2016 at 4:47am |
Ya got the tank off and all, so myself I would just go ahead and coat it and not worry about any thing coming loose later.  Al
|
|
littlemarv
Orange Level
Joined: 10 Jun 2013
Location: Wisconsin
Points: 1826
|
Post Options
Thanks(0)
Quote Reply
Posted: 28 Jul 2016 at 10:26pm |
Sorry fellows, been pretty busy with life in general. Going to Hutch last weekend was just the kick I needed to get back on task here. Slow progress.... The radiator turned into a bit of a struggle. Turns out the bottom tank had a crack in it. I took it to the local radiator shop for repair. He said he could repair it no problem. Over a few weeks, he called me once a week and every week his tone got lower and lower. Finally, he said come and get it, I can't fix it, its crammed full of sealer and all the seams are leaking, its junk. Luckily, in the meantime, I caught wind of a fellow who repairs radiators on the weekends and can fix just about anything, especially ones the first guy said are beyond repair. So, I went and picked it up from the first guy (and paid way too much for nothing) and took it to the second guy. He fixed the radiator, put all the shrouds back on that the first guy chopped off, flow tested it, and painted the core, all for 1/3 what I paid the first guy to do nothing. Lesson learned. Brought the tractor back inside. Made some rubber pads for the radiator mount. Installed the fuel tank, radiator, and hood. I picked up a few pieces at Hutch- cultivator brackets (no reason other than they were only $5) brake covers with the bolt holes not broken off, and a dandy grill screen. Couldn't find just the seat back though. Starting to look like a tractor again!  Just need to rebuild the mag, and polish off the three dozen little things that pop up on these projects, and we should be in tall cotton! Couple of questions: What is the recommended spark plug for this engine? Is there anything between the fuel tank and the supports, or the hood and radiator, or is it steel on steel? The bolts on all the straps are barely long enough the way it is, I cant imagine there's room for a rubber or leather strap under there. More to come.....
Edited by littlemarv - 25 Aug 2017 at 10:53pm
|
|
The mechanic always wins.
B91131, WC23065, WD89101, CA29479, B1, Early B10, HB212, 416H
|
|
CTuckerNWIL
Orange Level

Joined: 11 Sep 2009
Location: NW Illinois
Points: 22816
|
Post Options
Thanks(0)
Quote Reply
Posted: 29 Jul 2016 at 8:35am |
Yes there was webbing between the supports and the tank and between the tank and the straps. I bought mine at a local JoAnns Fabric store the wife frequents but it is available from places like Steiners.
Autolite 295 is a good plug for it
|
|
|
|
BenGiBoy
Orange Level
Joined: 11 Nov 2015
Location: Ashville, NY
Points: 696
|
Post Options
Thanks(0)
Quote Reply
Posted: 29 Jul 2016 at 8:39am |
There is usually a webbing between the hood and fuel tank. Something like this, in one of the colors/widths that it comes in......someone else might know what width/color it was originally. Fuel Tank Webbing - White 1"
|
|
'39 Model B
Tractors are cheaper than girls, remember that!
|
|


 Topic Options


